State Machines and Web Application Development
The year 2018 has arrived, many wonderful ways to create applications have been found, but countless armies of front-end developers are still fighting for the simplicity and flexibility of web projects. Month after month they spend trying to achieve the cherished goal: to find a software architecture that is free from errors and helps them to do their work quickly and efficiently. I am one of these developers. I managed to find something interesting that could give us a chance to win.
Tools like React and Redux allowed web development to take a big step in the right direction. However, they alone are not enough to create large-scale applications. It seems that the situation in the development of client parts of web applications can significantly improve the use of state machines. About them, and will be discussed in this material. By the way, you may have already built several such machines, but for the time being you don’t know about it.
The state machine is a mathematical model of computation. This is an abstract concept, according to which a machine can have different states, but, at some point in time, it can only be in one of them. I guess the most famous state machine is the Turing machine . This is a machine with an unlimited number of states, which means that it can have an infinite number of states. The Turing machine does not very well meet the needs of modern interface design, since in most cases we have a finite number of states. That is why we are better suited to machines with a limited number of states, or, as they are often called, finite automata. This is the Mile machine gun and the Moore machine gun .
The difference between the two is that Moore’s automaton changes its state based only on its previous state. However, we have a lot of external factors, such as user actions and processes occurring in the network, which means that Moore's machine gun will not suit us. What we are looking for is very similar to the Mile machine gun. This state machine has an initial state, after which it transitions to new states based on the input data and its current state.
')
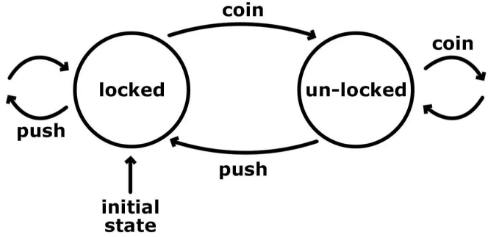
One of the easiest ways to illustrate how a state machine works is to consider it through an analogy with a turnstile. It has a limited set of states: it can be either closed or open. Our turnstile is blocking the entrance to a certain area. Let him have a drum with three bars and a mechanism for receiving money. You can pass through the closed turnstile by dropping a coin into the coin acceptor, which puts the device in the open state, and pushing the bar in order to pass through the turnstile. After having passed through the turnstile, it closes again. Here is a simple diagram that shows us these states, as well as possible input signals and state transitions.
The initial state of the turnstile is “closed” (locked). No matter how many times we push his bar, he will remain closed. However, if we drop a coin into it, the turnstile will go to the “open” state (un-locked). At this point, another coin will not change anything, since the turnstile will still be in the open state. On the other hand, now the push of the turnstile bar makes sense, and we can go through it. This action, in addition, will bring our state machine to its initial state "closed".
If you need to implement a single function that controls the turnstile, we probably should stop at two arguments: this is the current state and the action. If you are using Redux, you may be familiar with this. This is similar to the well-known functions of reducers , where we get the current state, and, based on the payload of the action, decide what the next state will be. A reduer is a transition in the context of a state machine. In fact, any application that has a state that we can somehow change can be called a state machine. The point is simply that all this, again and again, is implemented manually.
At work, we use Redux and it suits us perfectly. However, I began to notice some things that I did not like. Just because I don’t like something, doesn’t mean that it doesn’t work. The point is more that all this adds complexity to the project and forces me to write more code. Once I started a third-party project, where I had room for experimentation, and I decided to rethink our approaches to development on React and Redux. I started taking notes on what was bothering me, and realized that the abstraction of the state machine would most likely solve some of these problems. Let's get down to business and see how to implement the state machine in JavaScript.
We will solve a simple problem. We need to get data from the server API and show it to the user. The very first step is to understand how, when thinking about a task, to think in terms of states, not transitions. Before we get to the state machine, I want to talk about how, at a high level, what we want to create looks like:

Now, analyzing the problem, we think linearly, and, strictly speaking, we are trying to cover all possible paths to the final result. One step leads to another, the next leads to another, and so on. In code, this can be expressed as branch operators. Let's conduct a mental experiment with a program that is built on the basis of user and system actions.
How about a situation in which a user clicks a button twice? What happens if a user clicks a button while we wait for a response from the server? How will the system behave if the request is successful, but the data is damaged?
To handle such situations, we will probably need various flags that signal what is happening. The presence of flags means an increase in the number of

This is due to the fact that we think transitions. We focus on how exactly the changes occur in the program, and on the order in which they occur. If, instead, focus on the various states of the application, everything will be much simpler. How many states do we have? What is their input? We use the same example:
Here we described roughly the same process, but now using the states and input data.
This simplified the logic and made it more predictable. In addition, it solved some of the problems mentioned above. Please note that when the machine is in
This means that we will have to cover less code when testing. In addition, some types of testing, such as integration testing, can be automated. Think about the fact that with such an approach we would have a really clear understanding of what our application does, and we could create a script that traverses the predefined states and transitions and generates assertions. These statements can prove that we have reached each of the possible states or implemented a specific sequence of transitions.
In fact, it is easier to write out all possible states than to write out all possible transitions, since we know which states we need or which states we have. By the way, in most cases, states would describe the logic of the functioning of our application. But if we talk about transitions, their meaning is very often unknown at the beginning of work. Errors in the programs are the results of the fact that actions are performed when the application is in a state that is not designed for these actions. In addition, even if the application is in the appropriate state, the action can be performed at the wrong time. Similar actions lead our application to a state about which we do not know, and this puts the program out of action or leads to the fact that it behaves incorrectly. Of course, we do not need it. State machines are good defenses against such problems. They protect us from reaching unknown states, as we set boundaries for what and when it can happen, without explicitly indicating how it can happen. The concept of a state machine fits perfectly with a unidirectional data stream. Together they reduce the complexity of the code and give clear answers to questions about how the system got into one or another state.
Stop talking - it's time to program. We will use the same example. Based on the above list, let's start with the following code:
States are represented by objects, possible input signals of states are by methods of objects. However, the initial state is not here. Modify the above code, bringing it to the following form:
After we have identified all the states that have meaning, we are ready to send them input signals and change the state of the system. We will do this using the following two auxiliary methods:
The
Following the user's path from our example, the first action we need to dispatch is
First, we change the state of the machine to
As long as everything goes as it should. Next, we need to implement the
Notice how we saved ourselves the need to think about the previous process. We do not care about user clicks on a button, or what happens with an HTTP request. We know that the application is in
The last thing we have to figure out is the
Here you have to copy the code that is already written in the
A full example of a running state machine can be found in my CodePen project.
The state machine template works regardless of whether we use React, Vue, or Angular. As we saw in the previous section, you can implement the state machine on pure JS without much difficulty. However, if you entrust this to a specialized library, this can add more flexibility to the project. Among the examples of good libraries for implementing state machines are Machina.js and XState . In this article, however, we will talk about Stent - my Redux-like library, which implements the concept of finite automata.
Stent is the implementation of the state machine container. This library follows some ideas from the Redux and Redux-Saga projects, but gives, in my opinion, easier-to-use and less constrained capabilities. It is developed using an approach based on the fact that they first write the documentation for the project, and then the code. Following this approach, I spent weeks only on designing API. Since I wrote the library myself, I had a chance to correct the problems I encountered using the Redux and Flux architectures.
In most cases, the application performs many functions. As a result, we cannot do just one car. Therefore, Stent allows you to create as many machines as you need:
Later we can access these machines using the
In my case, rendering is done using React tools, but we can use any other library. It all comes down to calling a callback in which we initiate rendering. One of the first features of the library I created was the
We inform the system about which machines we want to work with, indicating their names. The callback that we pass to the
For convenience, auxiliary functions are exported based on integration with React. This is very similar to the Redux connect (mapStateToProps) construction.
Stent executes a callback and expects to receive an object. Namely, the object that was sent as
Until now, states have been simple strings. Unfortunately, in the real world one has to store in a state something more than the usual line. That is why the Stent state is an object within which there are properties. The only reserved property is
My experience with Stent shows that if the state object becomes too large, then we may need another state machine that could handle these additional properties. Identifying the various states takes some time, but I believe that this is a big step forward in writing applications that are easier to manage. It is something like an attempt to plan ahead for the behavior of the system and prepare the space for future actions.
Practically the same as in the example given at the beginning of the material, we, when working with Stent, need to specify the possible (final) states of the machine and describe the possible input signals:
,
, ,
:
, — . — , , . , , Redux — - . , Stent — . , , . (
, .
-, — -. Redux-Saga , :
, . , JavaScript — . , .
Redux-Saga , , . — command (). , .
— , , , . , . Stent. , , , . , .
:
, :
, , , . , Stent .
Redux ( Flux) , . , , . , . , , , .
Stent . :
, Redux . Redux, , . , , , ? — Redux? , , , - . , , . , - , .
, ? ?
Redux, , . , . Stent , , . For example:
, .
Redux, Flux, . , Redux-, , , , . , , , , , . , , , .
, — , . , , , . . , , , — . , — . — , — . - , .
Dear readers! ?

Tools like React and Redux allowed web development to take a big step in the right direction. However, they alone are not enough to create large-scale applications. It seems that the situation in the development of client parts of web applications can significantly improve the use of state machines. About them, and will be discussed in this material. By the way, you may have already built several such machines, but for the time being you don’t know about it.
Familiarity with state machines
The state machine is a mathematical model of computation. This is an abstract concept, according to which a machine can have different states, but, at some point in time, it can only be in one of them. I guess the most famous state machine is the Turing machine . This is a machine with an unlimited number of states, which means that it can have an infinite number of states. The Turing machine does not very well meet the needs of modern interface design, since in most cases we have a finite number of states. That is why we are better suited to machines with a limited number of states, or, as they are often called, finite automata. This is the Mile machine gun and the Moore machine gun .
The difference between the two is that Moore’s automaton changes its state based only on its previous state. However, we have a lot of external factors, such as user actions and processes occurring in the network, which means that Moore's machine gun will not suit us. What we are looking for is very similar to the Mile machine gun. This state machine has an initial state, after which it transitions to new states based on the input data and its current state.
')
One of the easiest ways to illustrate how a state machine works is to consider it through an analogy with a turnstile. It has a limited set of states: it can be either closed or open. Our turnstile is blocking the entrance to a certain area. Let him have a drum with three bars and a mechanism for receiving money. You can pass through the closed turnstile by dropping a coin into the coin acceptor, which puts the device in the open state, and pushing the bar in order to pass through the turnstile. After having passed through the turnstile, it closes again. Here is a simple diagram that shows us these states, as well as possible input signals and state transitions.
The initial state of the turnstile is “closed” (locked). No matter how many times we push his bar, he will remain closed. However, if we drop a coin into it, the turnstile will go to the “open” state (un-locked). At this point, another coin will not change anything, since the turnstile will still be in the open state. On the other hand, now the push of the turnstile bar makes sense, and we can go through it. This action, in addition, will bring our state machine to its initial state "closed".
If you need to implement a single function that controls the turnstile, we probably should stop at two arguments: this is the current state and the action. If you are using Redux, you may be familiar with this. This is similar to the well-known functions of reducers , where we get the current state, and, based on the payload of the action, decide what the next state will be. A reduer is a transition in the context of a state machine. In fact, any application that has a state that we can somehow change can be called a state machine. The point is simply that all this, again and again, is implemented manually.
What are the strengths of state machines?
At work, we use Redux and it suits us perfectly. However, I began to notice some things that I did not like. Just because I don’t like something, doesn’t mean that it doesn’t work. The point is more that all this adds complexity to the project and forces me to write more code. Once I started a third-party project, where I had room for experimentation, and I decided to rethink our approaches to development on React and Redux. I started taking notes on what was bothering me, and realized that the abstraction of the state machine would most likely solve some of these problems. Let's get down to business and see how to implement the state machine in JavaScript.
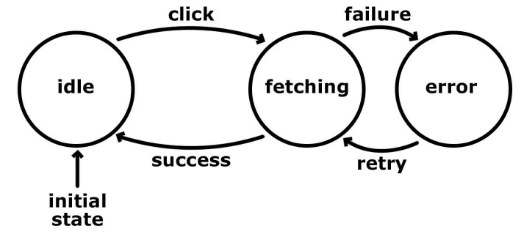
We will solve a simple problem. We need to get data from the server API and show it to the user. The very first step is to understand how, when thinking about a task, to think in terms of states, not transitions. Before we get to the state machine, I want to talk about how, at a high level, what we want to create looks like:
- The
button is displayed on the page. - The user clicks this button.
- The system makes a request to the server.
- The data is loaded and parsed.
- Data is displayed on the page.
- If an error occurs, a corresponding message is displayed and the
button appears on the page again, which allows the user to start the process of receiving data from the server again.
Now, analyzing the problem, we think linearly, and, strictly speaking, we are trying to cover all possible paths to the final result. One step leads to another, the next leads to another, and so on. In code, this can be expressed as branch operators. Let's conduct a mental experiment with a program that is built on the basis of user and system actions.
How about a situation in which a user clicks a button twice? What happens if a user clicks a button while we wait for a response from the server? How will the system behave if the request is successful, but the data is damaged?
To handle such situations, we will probably need various flags that signal what is happening. The presence of flags means an increase in the number of
if , and, in more complex applications, an increase in the number of conflicts.This is due to the fact that we think transitions. We focus on how exactly the changes occur in the program, and on the order in which they occur. If, instead, focus on the various states of the application, everything will be much simpler. How many states do we have? What is their input? We use the same example:
idlestate (idle). In this state, we display thebutton and wait for user actions. Here are the possible actions:fetchingstate (data retrieval). The request has been sent to the server and we are awaiting its completion. Here are the possible actions:- The
errorstate. We display an error message and show thebutton. This state takes one action:
Here we described roughly the same process, but now using the states and input data.
This simplified the logic and made it more predictable. In addition, it solved some of the problems mentioned above. Please note that when the machine is in
fetching state, we do not accept the events associated with clicking the button. Therefore, even if the user clicks a button, nothing will happen, as the machine is not configured to respond to this action when it is in the fetching state. This approach allows you to automatically eliminate unexpected branching logic code.This means that we will have to cover less code when testing. In addition, some types of testing, such as integration testing, can be automated. Think about the fact that with such an approach we would have a really clear understanding of what our application does, and we could create a script that traverses the predefined states and transitions and generates assertions. These statements can prove that we have reached each of the possible states or implemented a specific sequence of transitions.
In fact, it is easier to write out all possible states than to write out all possible transitions, since we know which states we need or which states we have. By the way, in most cases, states would describe the logic of the functioning of our application. But if we talk about transitions, their meaning is very often unknown at the beginning of work. Errors in the programs are the results of the fact that actions are performed when the application is in a state that is not designed for these actions. In addition, even if the application is in the appropriate state, the action can be performed at the wrong time. Similar actions lead our application to a state about which we do not know, and this puts the program out of action or leads to the fact that it behaves incorrectly. Of course, we do not need it. State machines are good defenses against such problems. They protect us from reaching unknown states, as we set boundaries for what and when it can happen, without explicitly indicating how it can happen. The concept of a state machine fits perfectly with a unidirectional data stream. Together they reduce the complexity of the code and give clear answers to questions about how the system got into one or another state.
Creating a state machine using JavaScript
Stop talking - it's time to program. We will use the same example. Based on the above list, let's start with the following code:
const machine = { 'idle': { click: function () { ... } }, 'fetching': { success: function () { ... }, failure: function () { ... } }, 'error': { 'retry': function () { ... } } } States are represented by objects, possible input signals of states are by methods of objects. However, the initial state is not here. Modify the above code, bringing it to the following form:
const machine = { state: 'idle', transitions: { 'idle': { click: function() { ... } }, 'fetching': { success: function() { ... }, failure: function() { ... } }, 'error': { 'retry': function() { ... } } } } After we have identified all the states that have meaning, we are ready to send them input signals and change the state of the system. We will do this using the following two auxiliary methods:
const machine = { dispatch(actionName, ...payload) { const actions = this.transitions[this.state]; const action = this.transitions[this.state][actionName]; if (action) { action.apply(machine, ...payload); } }, changeStateTo(newState) { this.state = newState; }, ... } The
dispatch function checks whether there is an action with the specified name among the transitions of the current state. If so, she triggers this action, passing it the data passed to her when she calls. In addition, the action handler is called with the machine as the context, so we can dispatch another action with this.dispatch(<action>) or change the state with this.changeStateTo(<new state>) .Following the user's path from our example, the first action we need to dispatch is
click . Here is the handler for this action: transitions: { 'idle': { click: function () { this.changeStateTo('fetching'); service.getData().then( data => { try { this.dispatch('success', JSON.parse(data)); } catch (error) { this.dispatch('failure', error) } }, error => this.dispatch('failure', error) ); } }, ... } machine.dispatch('click'); First, we change the state of the machine to
fetching . Then run the request to the server. Suppose we have a service with a getData method that returns a promise. After this promise is resolved and the data is successfully parsed, we dispatch the succes event, otherwise the failure .As long as everything goes as it should. Next, we need to implement the
success and failure actions and describe the fetching status input: transitions: { 'idle': { ... }, 'fetching': { success: function (data) { // this.changeStateTo('idle'); }, failure: function (error) { this.changeStateTo('error'); } }, ... } Notice how we saved ourselves the need to think about the previous process. We do not care about user clicks on a button, or what happens with an HTTP request. We know that the application is in
fetching state, and we expect only these two actions to appear. This is a bit like creating new application mechanisms that work in isolation.The last thing we have to figure out is the
error state. It will be very good if we create a code here to implement a retry, as a result, the application can recover from the occurrence of the error. transitions: { 'error': { retry: function () { this.changeStateTo('idle'); this.dispatch('click'); } } } Here you have to copy the code that is already written in the
click handler. In order to avoid this, we either need to declare the handler as a function accessible to both actions, or first go to the idle state and then dispatch the click action independently.A full example of a running state machine can be found in my CodePen project.
State Machine Management with Library
The state machine template works regardless of whether we use React, Vue, or Angular. As we saw in the previous section, you can implement the state machine on pure JS without much difficulty. However, if you entrust this to a specialized library, this can add more flexibility to the project. Among the examples of good libraries for implementing state machines are Machina.js and XState . In this article, however, we will talk about Stent - my Redux-like library, which implements the concept of finite automata.
Stent is the implementation of the state machine container. This library follows some ideas from the Redux and Redux-Saga projects, but gives, in my opinion, easier-to-use and less constrained capabilities. It is developed using an approach based on the fact that they first write the documentation for the project, and then the code. Following this approach, I spent weeks only on designing API. Since I wrote the library myself, I had a chance to correct the problems I encountered using the Redux and Flux architectures.
Creating state machines in Stent
In most cases, the application performs many functions. As a result, we cannot do just one car. Therefore, Stent allows you to create as many machines as you need:
import { Machine } from 'stent'; const machineA = Machine.create('A', { state: ..., transitions: ... }); const machineB = Machine.create('B', { state: ..., transitions: ... }); Later we can access these machines using the
Machine.get method: const machineA = Machine.get('A'); const machineB = Machine.get('B'); Connecting machines to rendering logic
In my case, rendering is done using React tools, but we can use any other library. It all comes down to calling a callback in which we initiate rendering. One of the first features of the library I created was the
connect function: import { connect } from 'stent/lib/helpers'; Machine.create('MachineA', ...); Machine.create('MachineB', ...); connect() .with('MachineA', 'MachineB') .map((MachineA, MachineB) => { ... }); We inform the system about which machines we want to work with, indicating their names. The callback that we pass to the
map method is immediately called, this is done once. After that, it is called every time the state of one of the machines changes. This is where we call the render function. In this place we have direct access to the connected machines, so we can get the current state of the machines and their methods. In the library, in addition, there is a method mapOnce , used to work with callbacks that need to be called only once, and mapSilent , in order to skip this initial one-time execution of a callback.For convenience, auxiliary functions are exported based on integration with React. This is very similar to the Redux connect (mapStateToProps) construction.
import React from 'react'; import { connect } from 'stent/lib/react'; class TodoList extends React.Component { render() { const { isIdle, todos } = this.props; ... } } // MachineA MachineB - , // Machine.create export default connect(TodoList) .with('MachineA', 'MachineB') .map((MachineA, MachineB) => { isIdle: MachineA.isIdle, todos: MachineB.state.todos }); Stent executes a callback and expects to receive an object. Namely, the object that was sent as
props the React component.What is the state in the context of Stent?
Until now, states have been simple strings. Unfortunately, in the real world one has to store in a state something more than the usual line. That is why the Stent state is an object within which there are properties. The only reserved property is
name . All the rest is application specific data. For example: { name: 'idle' } { name: 'fetching', todos: [] } { name: 'forward', speed: 120, gear: 4 } My experience with Stent shows that if the state object becomes too large, then we may need another state machine that could handle these additional properties. Identifying the various states takes some time, but I believe that this is a big step forward in writing applications that are easier to manage. It is something like an attempt to plan ahead for the behavior of the system and prepare the space for future actions.
Work with state machine
Practically the same as in the example given at the beginning of the material, we, when working with Stent, need to specify the possible (final) states of the machine and describe the possible input signals:
import { Machine } from 'stent'; const machine = Machine.create('sprinter', { state: { name: 'idle' }, // transitions: { 'idle': { 'run please': function () { return { name: 'running' }; } }, 'running': { 'stop now': function () { return { name: 'idle' }; } } } }); ,
idle , run . , running , stop , idle ., ,
dispatch changeStateTo , . Stent , , , . , transitions , Stent :- , . ,
idleisIdle(),running—isRunning(). - :
runPlease()stopNow().
:
machine.isIdle(); // machine.isRunning(); // machine.runPlease(); // machine.stopNow(); // connect , . , . - , connect , . ., — . — , , . , , Redux — - . , Stent — . , , . (
undefined ), . transitions: { 'fetching': { 'success': function (state, payload) { const todos = [ ...state.todos, payload ]; return { name: 'idle', todos }; } } } , .
fetching . , success : machine.success({ label: '...' }); idle todos . , . — , . transitions: { 'idle': { 'run': 'running' } } { name: 'idle' } { name: 'running' } run() . , , . , -, . : transitions: { 'editing': { 'delete all todos': { name: 'idle', todos: [] } } } editing idle deleteAllTodos .-, — -. Redux-Saga , :
import { call } from 'stent/lib/helpers'; Machine.create('app', { 'idle': { 'fetch data': function * (state, payload) { yield { name: 'fetching' } try { const data = yield call(requestToBackend, '/api/todos/', 'POST'); return { name: 'idle', data }; } catch (error) { return { name: 'error', error }; } } } }); , . , JavaScript — . , .
Redux-Saga , , . — command (). , .
— , , , . , . Stent. , , , . , .
:
- ( ) .
call( , , -). , , , : « , , . — ».wait( , ). .
, :
const fireHTTPRequest = function () { return new Promise((resolve, reject) => { // ... }); } ... transitions: { 'idle': { 'fetch data': function * () { yield 'fetching'; // { name: 'fetching' } yield { name: 'fetching' }; // , // // getTheData checkForErrors const [ data, isError ] = yield wait('get the data', 'check for errors'); // , // fireHTTPRequest const result = yield call(fireHTTPRequest, '/api/data/users'); return { name: 'finish', users: result }; } } } , , , . , Stent .
Redux Stent
▍
Redux ( Flux) , . , , . , . , , , .
Stent . :
const machine = Machine.create('todo-app', { state: { name: 'idle', todos: [] }, transitions: { 'idle': { 'add todo': function (state, todo) { ... } } } }); machine.addTodo({ title: 'Fix that bug' }); machine.addTodo , . , : , . React addToDo . , . . .▍
, Redux . Redux, , . , , , ? — Redux? , , , - . , , . , - , .
, ? ?
Redux, , . , . Stent , , . For example:
const machine = Machine.create('app', { state: { name: 'idle' }, transitions: { 'idle': { 'run': 'running', 'jump': 'jumping' }, 'running': { 'stop': 'idle' } } }); // machine.run(); // , // // running stop. machine.jump(); , .
Redux, Flux, . , Redux-, , , , . , , , , , . , , , .
Results
, — , . , , , . . , , , — . , — . — , — . - , .
Dear readers! ?
Source: https://habr.com/ru/post/346908/
All Articles