Writing code in the docker environment
In the company where I work - most services are started and run in docker containers.
In this regard, my fellow novice-to-dockers often have a question - how to write code and run it in this damn container ???
For a person who has written about a hundred docker images and runs them several times a day, this question is no longer necessary, but when I dealt with the docker in ancient times, the thought “How to write code in the docker? This is super-convenient!” has long been relevant.
In the article I will describe my own practices of working with docker images, which allow you to write code "like at home", and even better.
So what is a ready docker image?
This is a cast of the finished service, which is configured by a small number of environment variables and is ready to work immediately after the start. With the docker-image, you do not need to install the dependencies of the application and the developer's library yourself locally in the system, littering it.
Run the finished image
First, let's look at how to run the image. It is assumed that the name of the image we know.
- the name can be the image name on hub.docker.com: kaktuss / clickhouse-udp-proxy;
- The name may contain the name of the private docker registry (repository of the docker images of your company): my-private-registry.com/kaktuss/clickhouse-udp-proxy;
- The title may contain a version of the image: my-private-registry.com/kaktuss/clickhouse-udp-proxy Race.1.
And that is all - the name of the image.
In the simplest case, the image starts like this:
docker run --rm -it kaktuss/clickhouse-udp-proxy Often the image needs to be configured with environment variables. Where do you get them from?
- the necessary values of environment variables are described on the docker hub - if it is a public large supported image with a docker hub;
- in nomad, docker swarm, kubernetes, private documentation scenarios - if it is a private image of your company;
- sometimes, the variables are not described anywhere and the required values need to be guessed by their names and view of the docker image.
Examples of peeked environment variables:
With docker hub

From the nomad script
We start the container with environment variables
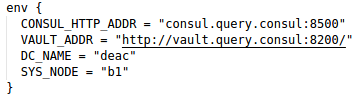
docker run --rm -it -e CLICKHOUSE_ADDR=127.0.0.1:9000 kaktuss/clickhouse-udp-proxy If there are several variables
docker run --rm -it -e CONSUL_HTTP_ADDR="consul.query.consul:8500" -e VAULT_ADDR="http://vault.query.consul:8200/" -e DC_NAME="deac" -e SYS_NODE="b1" ... As a result, we got a working and configured service.
We get inside the container
To simplify programming "inside" the container - we need to get into it. With the launch described above, the service itself starts, but we ourselves do not get "inside."
To get "inside" - you need to override the command to start the image.
This is done by specifying the shell name after the image name.
docker run --rm -it -e CLICKHOUSE_ADDR=127.0.0.1:9000 kaktuss/clickhouse-udp-proxy ash Shell-shell depends on the distribution on which the image is built.
- this may be as in the example above;
- bash;
- or even sh, in the simplest case.
Try one of the options and can not go wrong.
After a similar launch, we find ourselves in the console inside the container.
Service initialization
After we hit the console inside the container, we hit the naked image. Often, the images, after launch, carry out initial initialization (form configuration files, etc.) and then start the service itself.
Initialization is done via the start command, which we replaced above with the shell shell. Therefore, initialization must be run manually. To do this, open the Dockerfile and see the contents of the CMD instruction.
CMD ["/usr/local/bin/entrypoint.sh"] And that is exactly what we are launching.
/ # /usr/local/bin/entrypoint.sh or shorter
/ # entrypoint.sh The service was initialized and started, now we can press Ctrl + C and get into the console again, having a container ready to restart the service.
Writing code inside the container
When the service starts inside the container - it uses those scripts / binary files that are already inside. How do we edit them?
Elementary. You need to edit them from the outside, in your favorite editor, in your home folder, and then just copy to the container and run.
We give the container access to your home folder using the option
-v ~/:/d docker run --rm -it -e CLICKHOUSE_ADDR=127.0.0.1:9000 -v ~/:/d kaktuss/clickhouse-udp-proxy ash After running this command, we will be in the container console, we will be able to edit our code from the outside indefinitely and copy it into the container. The home folder will be available in a container in the / d folder.
/ # cp /d/my-repo/script.pl /usr/local/bin/script.pl After copying the updated script or binary file, we start the service (by the method described in the initialization section) and we get the service with our edits, which works in the original environment.
Depending on your needs - the scripts / files can not be copied to the container, but run directly from / d / my-repo.
Boundary cases and life hacks
ENTRYPOINT
Some images (quite rarely) use the start command in the form of ENTRYPOINT. What is it - you can see in the Dockerfile reference. We just need to remember that rewriting the start command for such images looks different.
docker run --rm -it -e CLICKHOUSE_ADDR=127.0.0.1:9000 -v ~/:/d --entrypoint ash kaktuss/clickhouse-udp-proxy The starting point is overridden by the --entrypoint option.
Cloud environments
If services work in Consul, docker swarm, kubernetes environment, then they can use such environment variables that are available only to the container running in this cloud and will not be available to the container running on the developer's computer.
In this example, the cloud addresses in the variables CONSUL_HTTP_ADDR and VAULT_ADDR are used. In such cases, you need to use the external addresses of these services.
Reruns
Writing a complete docker run command each time is superfluous. It is convenient to save the entire start command with variables with the sh file. Which is then just enough to run.
Reuse of environment variables
If part of the environment variables is required for many services, then these variables can be transferred to a separate file and transferred to the container with a special option.
docker run --env-file=~/my_docker_env Run without sudo
In local development, running containers with sudo is tedious. To fix it, add our user to the docker group. After that, instead
sudo docker run .... you can just write
docker run ')
Source: https://habr.com/ru/post/346890/
All Articles