Flask Mega-Tutorial, Part 7: Error Handling (Edition 2018)
Miguel grinberg
This article is a translation of the seventh part of the new edition of Miguel Greenberg’s textbook, the issue of which the author plans to complete in May 2018. The previous translation has long lost its relevance.
I, for my part, will try to keep up with the translation.
This is the seventh chapter of the Mask-Tutorial series, in which I will tell you how to handle error handling in the Flask application.
For reference, below is a list of articles in this series.
- Chapter 1: Hello world!
- Chapter 2: Templates
- Chapter 3: Web Forms
- Chapter 4: Database
- Chapter 5: User Logins
- Chapter 6: Profile Page and Avatars
- Chapter 7: Error Handling (This article)
- Chapter 8: Subscribers, Contacts, and Friends
- Chapter 9: Pagination
- Chapter 10: Email Support
- Chapter 11: Reconstruction
- Chapter 12: Date and Time
- Chapter 13: I18n and L10n
- Chapter 14: Ajax
- Chapter 15: Improving Application Structure
- Chapter 16: Full Text Search
- Chapter 17: Deploying to Linux
- Chapter 18: Deploying to Heroku
- Chapter 19: Deploying to Docker Containers
- Chapter 20: JavaScript Magic
- Chapter 21: User Notifications
- Chapter 22: Background Tasks
- Chapter 23: Application Programming Interfaces (APIs)
Note 1: If you are looking for old versions of this course, this is here .
Note 2: If suddenly you would like to speak in support of my (Miguel) work on this blog, or simply do not have the patience to wait for a week of the article, I (Miguel Greenberg) offer a full version of this guide a packed e-book or video. For more information, visit learn.miguelgrinberg.com .
In this chapter, I move from coding new features to my microblogging application and instead discuss several strategies for dealing with errors that invariably appear in any software project. To illustrate this topic, I intentionally made a mistake in the code I added in Chapter 6 . Before you continue reading, see if you can find it!
GitHub links for this chapter: Browse , Zip , Diff .
Error handling in Flask
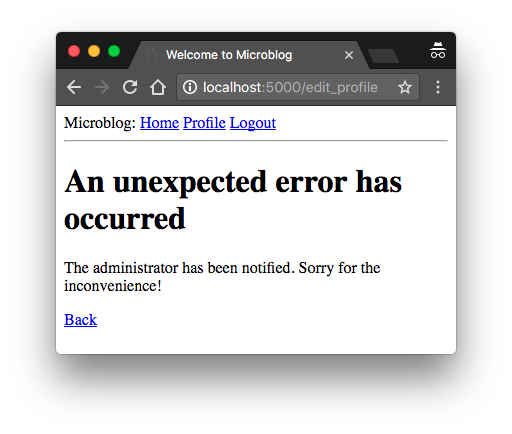
What happens when an error occurs in the Flask application? The best way to find out is to experience it yourself. Run the application and make sure you have at least two registered users. Log in as one of the users, open the profile page and click the "Edit" link. In the profile editor, try changing the username to the existing name of another user who is already registered, and try to apply the fix! This will lead to the terrible "Internal Server Error" page:

In the terminal session on which the application is running, you see the error stack trace. Stack traces are extremely useful for debugging errors, since they show the sequence of calls in this stack, down to the line that caused the error:
(venv) $ flask run * Serving Flask app "microblog" * Running on http://127.0.0.1:5000/ (Press CTRL+C to quit) [2017-09-14 22:40:02,027] ERROR in app: Exception on /edit_profile [POST] Traceback (most recent call last): File "/home/miguel/microblog/venv/lib/python3.6/site-packages/sqlalchemy/engine/base.py", line 1182, in _execute_context context) File "/home/miguel/microblog/venv/lib/python3.6/site-packages/sqlalchemy/engine/default.py", line 470, in do_execute cursor.execute(statement, parameters) sqlite3.IntegrityError: UNIQUE constraint failed: user.username The stack trace indicates what caused the error. The application allows the user to change the username without verifying that the new username does not match another user already in the system. The error arises from SQLAlchemy, which attempts to write a new username to the database, but the database rejects it, because the username column is defined with unique = True.
It is important that the error page presented to the user does not contain much information about the error, and this is correct. I definitely do not want users to know that the crash was caused by a database error or which database I use, as well as the names of the tables and fields in my database. All this information must be internal.
There are several things that are far from ideal. I have a page with an error that is ugly and does not correspond to the layout of the application. I also have important traces of the stack of applications that are dumped on the terminal, and I need to constantly make sure that I do not miss any errors. And, of course, I have a mistake. I'm going to solve all these problems, but first we’ll talk about the Flask debug mode.
Debug mode
The way errors are processed above is great for a system that runs on a production server. If there is an error, the user gets a page with an undefined error (although I'm going to make this error page more enjoyable), and the important error data is in the server output or in the log file.
But when you develop an application, you can turn on debug mode, a mode in which Flask displays a really good debugger directly to your browser. To activate debug mode, stop the application, and then set the following environment variable:
(venv) $ export FLASK_DEBUG=1 If you are running Microsoft Windows, remember to use set instead of exporting.
After you have installed FLASK_DEBUG, restart the server. The lines on your terminal will be slightly different from what you are used to seeing:
(venv) microblog2 $ flask run * Serving Flask app "microblog" * Forcing debug mode on * Running on http://127.0.0.1:5000/ (Press CTRL+C to quit) * Restarting with stat * Debugger is active! * Debugger PIN: 177-562-960 Now let the application crash again to see the interactive debugger in your browser:

The debugger allows you to deploy each level of the stack and see the corresponding source code. You can also open Python for any of the frames and execute any valid Python expressions, for example, to check the values of variables.
It is imperative that you never run the Flask application in debug mode on a production server. The debugger allows you to remotely execute code on the server, so it can be an unexpected gift to an attacker who wants to penetrate your application or your server. As an additional security measure, the debugger running in the browser will close, and when first used, it will request a PIN code, which you can see at the output of the flask run command.
Since I'm talking about debug mode, I should mention the second important feature that is enabled in debug mode - reboot. This is a very useful development feature that automatically restarts the application when the source file changes. If you run flask run in debug mode, you can continue to work in your application and each time you save the file, the application will restart to pick up the new code.
Custom error pages
Flask provides an application mechanism for creating custom error pages, so your users do not need to see simple and boring defaults. As an example, let's define custom error pages for HTTP errors 404 and 500, the two most common. Defining pages for other errors works the same way.
To declare a custom error handler, use the @errorhandler decorator. I'm going to put the error handlers in the new app / errors.py module .
from flask import render_template from app import app, db @app.errorhandler(404) def not_found_error(error): return render_template('404.html'), 404 @app.errorhandler(500) def internal_error(error): db.session.rollback() return render_template('500.html'), 500 Error functions work like browsing functions. For these two errors, I return the contents of their respective templates. Note that both functions return the second value after the pattern, which is the error code number. For all the presentation functions that I have created so far, I did not need to add a second return value, because by default 200 (the status code for successful completion) is what I wanted. Now these are error pages, so I want the response status code to reflect this.
The error handler for the 500th error can be triggered after a database failure has occurred, which was actually caused by an intentional duplicate username. To ensure that failed database sessions do not interfere with database access caused by the template, I issue a session rollback. This resets the session to a clean state.
Here is the template for 404 error:
{% extends "base.html" %} {% block content %} <h1>File Not Found</h1> <p><a href="{{ url_for('index') }}">Back</a></p> {% endblock %} And here is one of the 500 errors:
{% extends "base.html" %} {% block content %} <h1>An unexpected error has occurred</h1> <p>The administrator has been notified. Sorry for the inconvenience!</p> <p><a href="{{ url_for('index') }}">Back</a></p> {% endblock %} Both templates inherit the base.html template, so the error page has the same look and feel as regular application pages.
To get these error handlers registered in Flask, I need to import the new app/errors.py after creating an application instance:
# ... from app import routes, models, errors If you set FLASK_DEBUG = 0 in a terminal session and then again caused a duplicate username error, you will see a more pleasant error page.
Or so! I recommend to come up with something of their own as an exercise.
Emailing bugs
Another problem with the default error handling provided by Flask is that there are no notifications! The error stack trace is printed on the terminal, which means that the output of the server process should be monitored for error detection. When you launch an application during development, this is normal, but once the application is deployed on a production server, no one will look at the result, so you need to create a more reliable solution.
I think it is very important that I actively respond to errors. If an error occurs in the production version of the application, I want to know right away. Thus, my first solution would be to configure Flask to send me an email right after an error occurred with a trace of the error stack in the email.
The first step is to add the email server data to the configuration file:
class Config(object): # ... MAIL_SERVER = os.environ.get('MAIL_SERVER') MAIL_PORT = int(os.environ.get('MAIL_PORT') or 25) MAIL_USE_TLS = os.environ.get('MAIL_USE_TLS') is not None MAIL_USERNAME = os.environ.get('MAIL_USERNAME') MAIL_PASSWORD = os.environ.get('MAIL_PASSWORD') ADMINS = ['your-email@example.com'] The configuration variables for email contain the server and port, a flag to enable encrypted connections, and an optional username and password. Five configuration variables are derived from their mappings to environment variables. If the email server is not installed in the environment, then I will use this as a sign that email errors should be turned off. The e-mail server port can also be specified in the environment variable, but if it is not set, the standard port 25 is used. The default credentials of the mail server are not used, but can be provided if necessary. The ADMINS configuration ADMINS is a list of email addresses that will receive error reports, so your own email address should be on this list.
Flask uses the logging Python package to maintain its logs, and this package already has the ability to send logs by e-mail. All I need to do to send emails that contain errors is to add an instance of SMTPHandler to the Flask log object, which is app.logger :
import logging from logging.handlers import SMTPHandler # ... if not app.debug: if app.config['MAIL_SERVER']: auth = None if app.config['MAIL_USERNAME'] or app.config['MAIL_PASSWORD']: auth = (app.config['MAIL_USERNAME'], app.config['MAIL_PASSWORD']) secure = None if app.config['MAIL_USE_TLS']: secure = () mail_handler = SMTPHandler( mailhost=(app.config['MAIL_SERVER'], app.config['MAIL_PORT']), fromaddr='no-reply@' + app.config['MAIL_SERVER'], toaddrs=app.config['ADMINS'], subject='Microblog Failure', credentials=auth, secure=secure) mail_handler.setLevel(logging.ERROR) app.logger.addHandler(mail_handler) As you can see, I turned on the email recorder only when the application is running without debug mode, which is defined by app in app.debug as True , and also when the email server exists in the configuration.
Setting up a mail logger is somewhat tedious because of the need to handle advanced security settings that are present on many email servers. But in essence, the above code creates an instance of SMTPHandler , sets its level so that it sends only error messages, not warnings, informational or debugging messages, and finally attached them to the app.logger from Flask.
There are two approaches to testing the functionality of this function. The easiest way is to use the debug SMTP server from Python. This is a fake mail server that accepts emails, but instead of sending them, displays them to the console. To start this server, open a second terminal session and run the following command on it:
(venv) $ python -m smtpd -n -c DebuggingServer localhost:8025 Leave the debug SMTP server running and go back to your first terminal and set export MAIL_SERVER = localhost and MAIL_PORT = 8025 (use set instead of export if you are using Microsoft Windows). Make sure that the FLASK_DEBUG variable FLASK_DEBUG set to 0 or not set at all, as the application will not send emails in debug mode.
Run the application and call the SQLAlchemy error again to find out how a terminal session on which a fake mail server is running shows an email with the full contents of the error stack.
The second testing method for this feature is to configure a real mail server. The following is the configuration for using the mail server for a Gmail account :
export MAIL_SERVER=smtp.googlemail.com export MAIL_PORT=587 export MAIL_USE_TLS=1 export MAIL_USERNAME=<your-gmail-username> export MAIL_PASSWORD=<your-gmail-password> If you are using Microsoft Windows, do not forget to use set instead of export in each of the instructions above.
The security features of your Gmail account can prevent an application from sending email through it unless you explicitly allow less secure apps (“less secure applications”) access to your Gmail account. You can read about it here , and if you are concerned about the security of your account, you can create a secondary account that you set up to check email only, or temporarily turn on the permission for less secure applications while this test is running, then return to default.
Write log to file
Getting e-mail errors is useful, but sometimes not enough. There are some failures that are not described by the exception of Python and are not a serious problem, but they can still be interesting enough to be saved for debugging purposes. For this reason, I will also support the log file for the application.
To enable the logging of another handler, this time the RotatingFileHandler type needs to enable the application logger in the same way as the email handler.
# ... from logging.handlers import RotatingFileHandler import os # ... if not app.debug: # ... if not os.path.exists('logs'): os.mkdir('logs') file_handler = RotatingFileHandler('logs/microblog.log', maxBytes=10240, backupCount=10) file_handler.setFormatter(logging.Formatter( '%(asctime)s %(levelname)s: %(message)s [in %(pathname)s:%(lineno)d]')) file_handler.setLevel(logging.INFO) app.logger.addHandler(file_handler) app.logger.setLevel(logging.INFO) app.logger.info('Microblog startup') I am writing a log file called microblog.log in the logs directory, which I create if it does not already exist.
The RotatingFileHandler class is convenient because it rewrites the logs, ensuring that the log files are not too large if the application has been running for a long time. In this case, I limit the size of the log file to 10 KB and store the last ten log files as backup copies.
The logging.Formatter class provides customization of the log message format. Since these messages are sent to a file, I want them to contain as much information as possible. So I use a format that includes a time stamp, a logging level,
the message, the source file, and the line number from which the journal entry originated.
To make the registration more useful, I also lower the logging level to the INFO category, both in the application registrar and in the file handler. If you are not familiar with the categories of logging, this is DEBUG , INFO , WARNING , ERROR and CRITICAL in order of increasing severity.
As the first useful use of a log file, the server writes a string to the log each time it is started. When the application is launched on the production server, these log entries tell you when the server was restarted.
Fix doubled username
I have been using the username duplication error for too long. Now that I have shown you how to prepare an application to handle such errors, I can finally fix it.
If you remember, the RegistrationForm already checks for usernames, but the requirements of the editing form are slightly different. During registration, I need to make sure that the username entered on the form does not exist in the database. In the form of an editing profile, I have to perform the same check, but with one exception. If the user leaves the original username intact, then the check should resolve it, since this username has already been assigned to that user. Below you can see how I verified the username for this form:
class EditProfileForm(FlaskForm): username = StringField('Username', validators=[DataRequired()]) about_me = TextAreaField('About me', validators=[Length(min=0, max=140)]) submit = SubmitField('Submit') def __init__(self, original_username, *args, **kwargs): super(EditProfileForm, self).__init__(*args, **kwargs) self.original_username = original_username def validate_username(self, username): if username.data != self.original_username: user = User.query.filter_by(username=self.username.data).first() if user is not None: raise ValidationError('Please use a different username.') The implementation is performed in a special test method, the super function in the class constructor, which takes the original user name as an argument. This username is stored as an instance variable and verified in the validate_username() method. If the username entered in the form matches the original username, there is no reason to check the database for duplicates.
To use this new validation method, I need to add the original username argument to the function of the form where the form object is created:
@app.route('/edit_profile', methods=['GET', 'POST']) @login_required def edit_profile(): form = EditProfileForm(current_user.username) # ... Now the error has been fixed, and duplicates in the form of an editing profile will be prevented in most cases. This is not an ideal solution, as it may not work when two or more processes simultaneously access the database. In this situation , the race condition may lead to validation, but after a moment when you try to rename, the database has already been changed by another process and cannot rename the user. This is somewhat unlikely, with the exception of very busy applications that have a lot of server processes, so I won’t worry about it yet.
At this point, you can try to reproduce the error again to see how the form validation method prevents it.
PS
Bug work
From translator
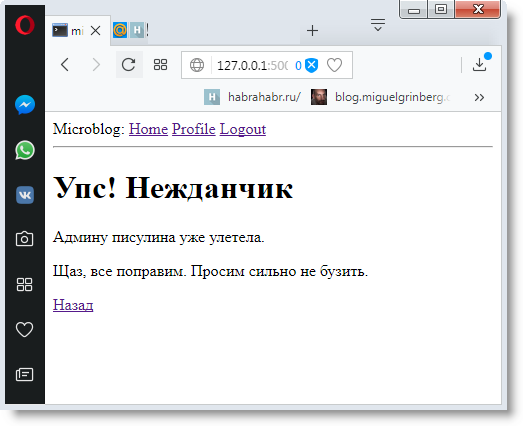
I decided to check the receipt of error messages to the admin by mail. For this, I have corrupted the routes.py module. For this very “corruption”, I commented out the @app.route('/edit_profile', methods=['GET', 'POST']) decorator @app.route('/edit_profile', methods=['GET', 'POST']) before def edit_profile() . As a result, I received an error and it all fell out in the log file, but the letter did not arrive. I am using Python 3.3. Perhaps in newer versions of this and not happen. But in Windows 7 with the Russian layout, this happened.
When I tried to send a message to the admin, the application received an encoding error while generating the message. The console window contained the following lines:
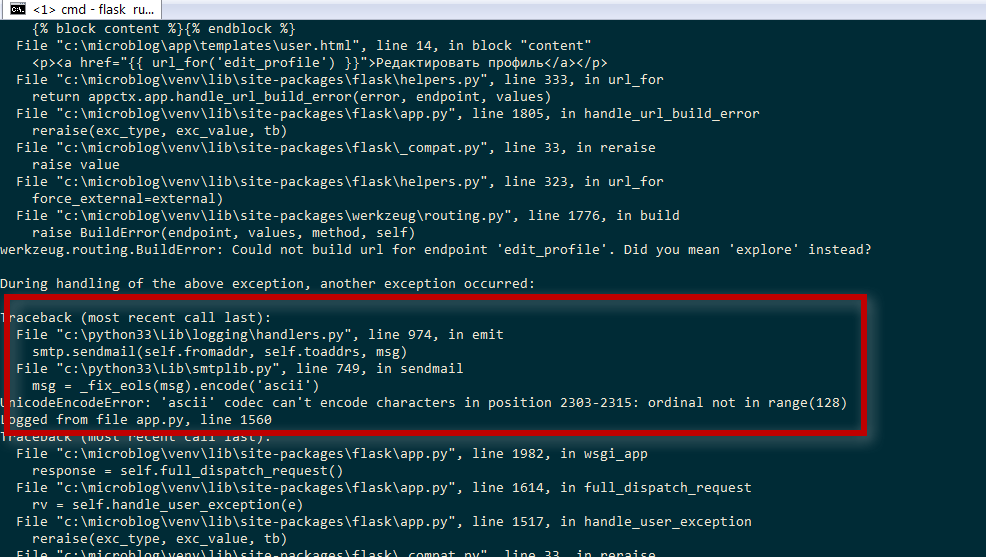
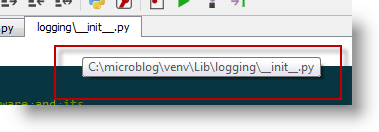
As you can see, the link points to the directory in the standard python, and not in the virtual environment.
logging in version 3 is the standard Python library, so you do not need to install it using pip .
And the logging module, which you can find in PyPI, is outdated, not Python3 compliant.
(According to the README file, its latest version was released on March 2, 2005.)
So just do not try to install logging.
Take the new module in the standard library for granted. If you need to use it in the virtual library.
After the copy in venv \ Lib logging imported from the virtual environment
I get an error again

logging now virtual. But smtplib standard.
I do not think that it is necessary to drag all the libraries from the standard environment to the virtual one.
Error from this will not disappear.
The problem with the encoding in the message is solved by using the standard email package to create a message indicating the preferred encoding.
Here is an example from the Internet for this package:
# -*- coding: utf-8 -*- from email.mime.multipart import MIMEMultipart from email.mime.text import MIMEText import quopri def QuoHead(String): s = quopri.encodestring(String.encode('UTF-8'), 1, 0) return "=?utf-8?Q?" + s.decode('UTF-8') + "?=" FIOin = " " emailout = "some@test.ru" emailin = "some2@test.ru" msg = MIMEMultipart() msg["Subject"] = QuoHead(" " + FIOin).replace('=\n', '') msg["From"] = (QuoHead(" ") + " <" + emailout + ">").replace('=\n', '') msg["To"] = (QuoHead(FIOin) + " <" + emailin + ">").replace('=\n', '') m = """ . . , .""" text = MIMEText(m.encode('utf-8'), 'plain', 'UTF-8') msg.attach(text) print(msg.as_string()) But, how to apply it to send error messages?
Maybe someone will offer in the comments to the article.
In the flask-mail module, this situation is kind of fixed . But logging and smtplib are used here smtplib
In the end, so far . I corrected a line in the smtplib.py module.
Added encode('utf-8')

, , .

')
Source: https://habr.com/ru/post/346880/
All Articles