The book "React and Redux: functional web development"
 Hi, Habrozhiteli! In December, we published a book by Alex Banks and Eva Porsello, the purpose of which is to teach how to write effective user interfaces using React and systematization of new technologies, which allows us to immediately start working with React. Reading the book does not imply any prior knowledge of React. All the basics of the library will be presented from the very beginning. We will now look at the React Status Management section.
Until now, properties have only been used to process data in React components. Properties are immutable. After displaying the properties of the component does not change. To change the user interface, you'll need another mechanism that can re-map the component tree with new properties. The React state is an integral part of it, which is used to manage data that will change inside the component. When the state of the application changes, the user interface is displayed again to reflect these innovations.
Users interact with applications. They move through the data, search for them, filter, select, add, update and delete. When a user works with an application, the state of the program changes, and these changes are displayed for the user in the UI. Screens and menu bars appear and disappear. Visible content changes. Indicators turn on and off. In React, the user interface reflects the state of the application.
The state can be expressed in React components with a single JavaScript object. At the moment of changing its state, the component displays a new user interface showing these changes. What could be more functional? When receiving data, the React component displays it as a UI. Based on their changes, React will update the interface to reflect these changes in the most rational way.
')
Let's see how you can embed state into our React components.
Implementing component state
State represents data that can be changed inside the component if desired. To show this, consider the StarRating component (Figure 6.7).

This component requires two important pieces of data: the total number of stars to display and the rating, or the number of selected stars.
We need a Star component that reacts to mouse clicks and has the selected property. For each star, a functional component can be used that has no state:
const Star = ({ selected=false, onClick=f=>f }) => <div className={(selected) ? "star selected" : "star"} onClick={onClick}> </div> Star.propTypes = { selected: PropTypes.bool, onClick: PropTypes.func } Each Star element will consist of a container div including the class attribute with the value 'star'. If a star is selected, then the class attribute with the value 'selected' will be added to it additionally. This component also has an additional onClick property. When the user clicks a star's div container on a star, this property is called. Moreover, the parent component, StarRating, will be notified of a click on the Star component.
The Star component is functional, stateless. Based on the very name of its category, it is impossible to use the state in such a component. Their purpose is to be included as subsidiaries in more complex components that have a state. The more components have no condition, the better.
Now, having received the Star component, we can use it to create the StarRating component. From its properties, the StarRating component will receive the total number of stars displayed. And the rating, the value of which the user can change, will be saved in the state.
First, we consider the method of introducing state into the component defined by the createClass method:
const StarRating = createClass({ displayName: 'StarRating', propTypes: { totalStars: PropTypes.number }, getDefaultProps() { return { totalStars: 5 } }, getInitialState() { return { starsSelected: 0 } }, change(starsSelected) { this.setState({starsSelected}) }, render() { const {totalStars} = this.props const {starsSelected} = this.state return ( <div className="star-rating"> {[...Array(totalStars)].map((n, i) => <Star key={i} selected={i<starsSelected} onClick={() => this.change(i+1)} /> )} <p>{starsSelected} of {totalStars} stars</p> </div> ) } }) Using the createClass method, the state can be initialized by adding the getInitialState method to the component configuration and returning a JavaScript object that initially sets the starsSelected state variable to 0.
When displaying a component, the total number of stars, totalStars, is taken from the properties of the component and is used to display the specified number of Star elements. In this case, to initialize a new array of a specified length mapped to Star elements, the distribution operator is used with the Array constructor.
When a component is displayed on the screen, the starsSelected state variable is destructured from this.state element. It is used to display the rating as text in a paragraph element, as well as to count the number of selected stars displayed on the screen. Each Star element gets its selected property by comparing its index with the number of selected stars. If three stars are selected, then the first three Star elements will set the selected property to true, and all other stars will have the value false for it.
And finally, when the user clicks on a single star, the index of this particular Star element is incremented and sent to the change function. This value is increased by one, since it is assumed that the first star has a rating of 1, even though its index is zero.
Initializing a state in an ES6 component class is slightly different from a similar process using the createClass method. In these classes, the state can be initialized in the constructor:
class StarRating extends Component { constructor(props) { super(props) this.state = { starsSelected: 0 } this.change = this.change.bind(this) } change(starsSelected) { this.setState({starsSelected}) } render() { const {totalStars} = this.props const {starsSelected} = this.state return ( <div className="star-rating"> {[...Array(totalStars)].map((n, i) => <Star key={i} selected={i<starsSelected} onClick={() => this.change(i+1)} /> )} <p>{starsSelected} of {totalStars} stars</p> </div> ) } } StarRating.propTypes = { totalStars: PropTypes.number } StarRating.defaultProps = { totalStars: 5 } When an ES6 component is installed, its constructor is invoked with the properties implemented as the first argument. In turn, these properties are sent to the parent class by calling the super method. In this case, the parent is the React.Component class. The call to super initializes the component instance, and React.Component gives this instance a functional finish, including state management. After calling super, you can initialize the state variables of our component.
After initialization, the state functions in the same way as in the components created using the createClass method. It can only be changed by calling the this.setState method, which updates the specified parts of the state object. After each call to setState, the render display function is called, updating the user interface according to the new state.
Initializing state from properties
State values can be initialized using incoming properties. The application of this scheme can be caused by just a few circumstances. Most often, it is used when creating a component intended for multiple use among applications in various component trees.
When using the createClass method, a very acceptable way to initialize state variables based on incoming properties would be to add the componentWillMount method. It is called once when the component is installed, and from this method you can call the method this.setState (). It also has access to this.props; therefore, to help the state initialization process, you can use the values from this.props:
const StarRating = createClass({ displayName: 'StarRating', propTypes: { totalStars: PropTypes.number }, getDefaultProps() { return { totalStars: 5 } }, getInitialState() { return { starsSelected: 0 } }, componentWillMount() { const { starsSelected } = this.props if (starsSelected) { this.setState({starsSelected}) } }, change(starsSelected) { this.setState({starsSelected}) }, render() { const {totalStars} = this.props const {starsSelected} = this.state return ( <div className="star-rating"> {[...Array(totalStars)].map((n, i) => <Star key={i} selected={i<starsSelected} onClick={() => this.change(i+1)} /> )} <p>{starsSelected} of {totalStars} stars</p> </div> ) } }) render( <StarRating totalStars={7} starsSelected={3} />, document.getElementById('react-container') ) The componentWillMount method is part of the component life cycle. It can be used to initialize state based on property values in components created using the createClass method or in components of an ES6 class. The component life cycle will be discussed in more detail in the next chapter.
It is possible to initialize the state inside the class of the ES6 component in a simpler way. The constructor gets the properties as an argument, so just use the props argument passed to the constructor:
constructor(props) { super(props) this.state = { starsSelected: props.starsSelected || 0 } this.change = this.change.bind(this) } In most cases, you should avoid setting state variables from properties. Such schemes should be used only in the most extreme cases. This is not difficult to achieve, since when working with React components your task is to limit the number of components that have a state.
State inside the component tree
All your components may have their own state, but should they have it? The reason for the pleasure derived from using React is not the hunt for state variables throughout your application, but it’s based on the possibility of creating simple-to-understand scalable applications. The most important thing you can do to make your program easier to understand is to minimize the number of components that use the state.
In many React applications, it is possible to group all the state data in the root component. State data can be transmitted down the component tree through properties, and up through the tree to the root component through two-way function binding. As a result, the entire state of your application as a whole will be in one place. This is often called the “single source of truth.”
Next, we will look at how presentation levels are created, where all states are stored in one place, in the root component.
New look at the flowers organizer application
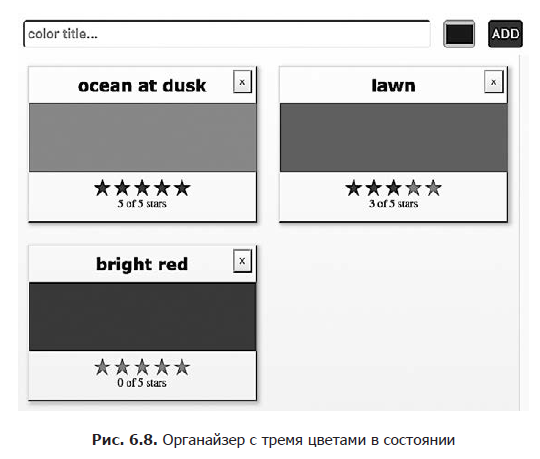
The color swatch organizer allows users to add, name, evaluate, and delete colors in the lists they modify. The whole state of the organizer can be represented using a single array:
{ colors: [ { "id": "0175d1f0-a8c6-41bf-8d02-df5734d829a4", "title": "ocean at dusk", "color": "#00c4e2", "rating": 5 }, { "id": "83c7ba2f-7392-4d7d-9e23-35adbe186046", "title": "lawn", "color": "#26ac56", "rating": 3 }, { "id": "a11e3995-b0bd-4d58-8c48-5e49ae7f7f23", "title": "bright red", "color": "#ff0000", "rating": 0 } ] } From this array it follows that we need to display three colors: the ocean at dusk (ocean at dusk), the green lawn (lawn) and the bright red shade (bright red) (Fig. 6.8). The array provides hexadecimal values corresponding to a particular color and the current rating for each of them displayed on the screen. It also allows unique identification of each color.
This state data will control the application. They will be used to create a user interface each time this object changes. When users add or remove colors, these swatches are added to or removed from the array. When users rate colors, the ratings of the latter change in an array.
Passing properties down the component tree
Earlier in this chapter, the StarRating component was created, keeping the rating in the state. In the color organizer, the rating is saved in each color object. It would be much more rational to treat StarRating as a presentation component and declare it as a functional component with no state. Presentation components are responsible only for the image created by the application on the screen. They only display DOM elements or other presentation components. All data is transferred to these components through properties, and from them are transmitted through callback functions.
To turn the StarRating component into a purely presentational component, you need to remove the state from it. Presentation components use only properties. Since the state is removed from this component at the moment when the user changes the rating, the corresponding data will be transferred from this component via the callback function:
const StarRating = ({starsSelected=0, totalStars=5, onRate=f=>f}) => <div className="star-rating"> {[...Array(totalStars)].map((n, i) => <Star key={i} selected={i<starsSelected} onClick={() => onRate(i+1)}/> )} <p>{starsSelected} of {totalStars} stars</p> </div> First, starsSelected is no longer a state variable; now it is a property. Second, a property in onRate is added to this component, which is a callback function. Instead of calling setState when the user changes the rating, now starsSelected calls onRate and sends the rating as an argument.
The restriction imposed on the state — placing it only in one place, in the root component — means that all data must be passed down to the child components as properties (Fig. 6.9).
In the organizer, the state is made up of an array of color samples declared in the App component. These colors are passed down to the ColorList component as a property:
class App extends Component { constructor(props) { super(props) this.state = { colors: [] } } render() { const { colors } = this.state return ( <div className="app"> <AddColorForm /> <ColorList colors={colors} /> </div> ) } } 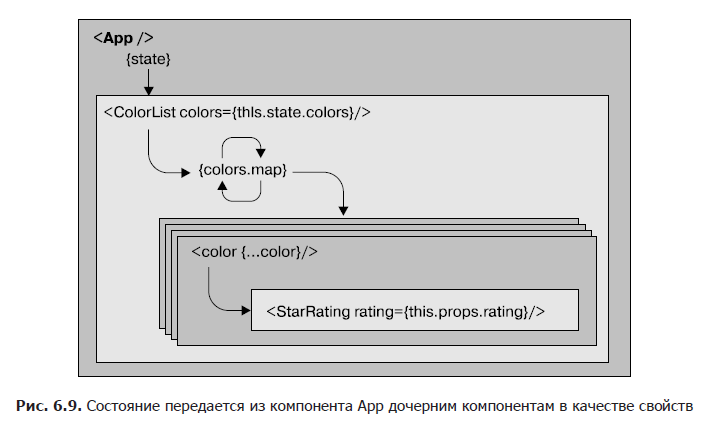
Initially, the color array is empty, so the ColorList component will display a message instead of each color. When there are colors in the array, the data for each individual sample is transferred to the Color component as properties:
const ColorList = ({ colors=[] }) => <div className="color-list"> {(colors.length === 0) ? <p>No Colors Listed. (Add a Color)</p> : colors.map(color => <Color key={color.id} {...color} /> ) } </div> Now the Color component can display the name and hexadecimal color value and pass its rating down to the StarRating component as a property:
const Color = ({ title, color, rating=0 }) => <section className="color"> <h1>{title}</h1> <div className="color" style={{ backgroundColor: color }}> </div> <div> <StarRating starsSelected={rating} /> </div> </section> The number of stars selected, starsSelected, in the star rating comes from the evaluation of each color. All status data for each color is passed down the tree to the child components as properties. When changes in data occur in the root component, React, to reflect the new state, makes changes to the user interface in the most rational way.
Data transfer up the component tree
The state in the color organizer can only be updated by calling the setState method from the App component. If users initiate any changes from the user interface, then to update the status, the data entered by them will need to be passed up the component tree to the App component (Fig. 6.10). This task can be performed using properties in the form of callback functions.

To add new colors, you need a way to uniquely identify each sample. This identifier will be used to determine the location of the color in the state array. To create absolutely unique identifiers, you can use the uuid library:
npm install uuid --save All new colors will be added to the organizer from the AddColorForm component that was created earlier in the "Links" section. This component has an additional property in the form of the onNewColor callback function. When the user adds a new color and submits the form data, the onNewColor callback function is called with the new name and hex value received from the user:
import { Component } from 'react' import { v4 } from 'uuid' import AddColorForm from './AddColorForm' import ColorList from './ColorList' export class App extends Component { constructor(props) { super(props) this.state = { colors: [] } this.addColor = this.addColor.bind(this) } addColor(title, color) { const colors = [ ...this.state.colors, { id: v4(), title, color, rating: 0 } ] this.setState({colors}) } render() { const { addColor } = this const { colors } = this.state return ( <div className="app"> <AddColorForm onNewColor={addColor} /> <ColorList colors={colors} /> </div> ) } } All new colors can be added from the addColor method to the App component. This function is bound to a component in the constructor, therefore, it has access to this.state and this.setState.
New colors are added by combining the current color array with a new color object. The identifier for the latter is set by the v4 function belonging to the uuid library. This creates a unique identifier for each color. The name and colors are passed to the addColor method from the AddColorForm component. Finally, the initial value for estimating each color will be zero.
When a user adds color using the AddColorForm component, the addColor method updates the state using a new color list. As soon as the status is updated, the App component will re-display the component tree using the new list. After each call to the setState state, the render method is called. New data is transmitted down the tree as properties and serves to build the user interface.
If the user wants to evaluate or delete a color, then we need to collect information about this sample. Each color will have a delete button: if the user clicks on it, we will know that he wants to remove the given color. In addition, if the user changes the color score using the StarRating component, we need to change the rating of this color:
const Color = ({title,color,rating=0,onRemove=f=>f,onRate=f=>f}) => <section className="color"> <h1>{title}</h1> <button onClick={onRemove}>X</button> <div className="color" style={{ backgroundColor: color }}> </div> <div> <StarRating starsSelected={rating} onRate={onRate} /> </div> </section> Information that will be changed in this application is saved in the color list. Therefore, you should add properties in the form of onRemove and onRate callback functions to each color so that the data of the corresponding deletion and evaluation events are passed up through the tree. Properties in the form of onRemove and onRate callback functions will also be present in the Color component. When colors are evaluated or removed, the ColorList component must inform its parent App component that this color needs to be evaluated or removed:
const ColorList = ({ colors=[], onRate=f=>f, onRemove=f=>f }) => <div className="color-list"> {(colors.length === 0) ? <p>No Colors Listed. (Add a Color)</p> : colors.map(color => <Color key={color.id} {...color} onRate={(rating) => onRate(color.id, rating)} onRemove={() => onRemove(color.id)} /> ) } </div> The ColorList component will call onRate if any colors are evaluated, or onRemove when deleting any colors. This component manages the collection of colors, displaying them on individual Color components. When individual colors are evaluated or deleted, ColorList identifies the color that has been affected, and passes this information to its parent component through the property as a callback function.
The parent for ColorList is the App component. In it, the rateColor and removeColor methods can be added and bound to a component instance in the constructor. As soon as you need to evaluate or remove the color, these methods will update the state. They are added to the ColorList component as properties in the form of callback functions:
class App extends Component { constructor(props) { super(props) this.state = { colors: [] } this.addColor = this.addColor.bind(this) this.rateColor = this.rateColor.bind(this) this.removeColor = this.removeColor.bind(this) } addColor(title, color) { const colors = [ ...this.state.colors, { id: v4(), title, color, rating: 0 } ] this.setState({colors}) } rateColor(id, rating) { const colors = this.state.colors.map(color => (color.id !== id) ? color : { ...color, rating } ) this.setState({colors}) } removeColor(id) { const colors = this.state.colors.filter( color => color.id !== id ) this.setState({colors}) } render() { const { addColor, rateColor, removeColor } = this const { colors } = this.state return ( <div className="app"> <AddColorForm onNewColor={addColor} /> <ColorList colors={colors} onRate={rateColor} onRemove={removeColor} /> </div> ) } } Both methods, both rateColor and removeColor, expect to receive an identifier of the color that is evaluated or deleted. The ID is written to the ColorList component and passed as an argument to the rateColor or removeColor methods. The rateColor method finds the estimated color and changes its rating in the state. To create a new state array with no color removed, the removeColor method uses the Array.filter method.
After calling the setState method, the user interface is displayed again with new state data. All data changed in this application is managed from a single component, the App. This approach greatly simplifies understanding exactly which data is used by the application to create the state and how it will be changed.
React components are highly reliable. They provide a distinct way to manage and verify properties, exchange data with children, and manage state data from outside the component. These properties make it possible to create superbly scalable levels of presentation.
It has been mentioned more than once that the state is intended for data subject to change. State can also be used in your data caching application. For example, if there is a list of records in which the user can conduct a search, then this list can be saved in the state during the search.
. React. , , , .
, Flux Flux-, Redux.
React — , . React, .
»More information about the book can be found on the publisher's website.
» Table of Contents
» Excerpt
20% — React
Source: https://habr.com/ru/post/346754/
All Articles