Bobaos - access to the KNX TP / UART bus with the Raspberry Pi
If you are not familiar with automation systems and the KNX standard, you can get the necessary information in Google or from official sites. If you work with this standard, then many things will be clear to you, and perhaps you, like me, have long been interested in the question of how you can get access to the physical KNX bus, bypassing IP routers.
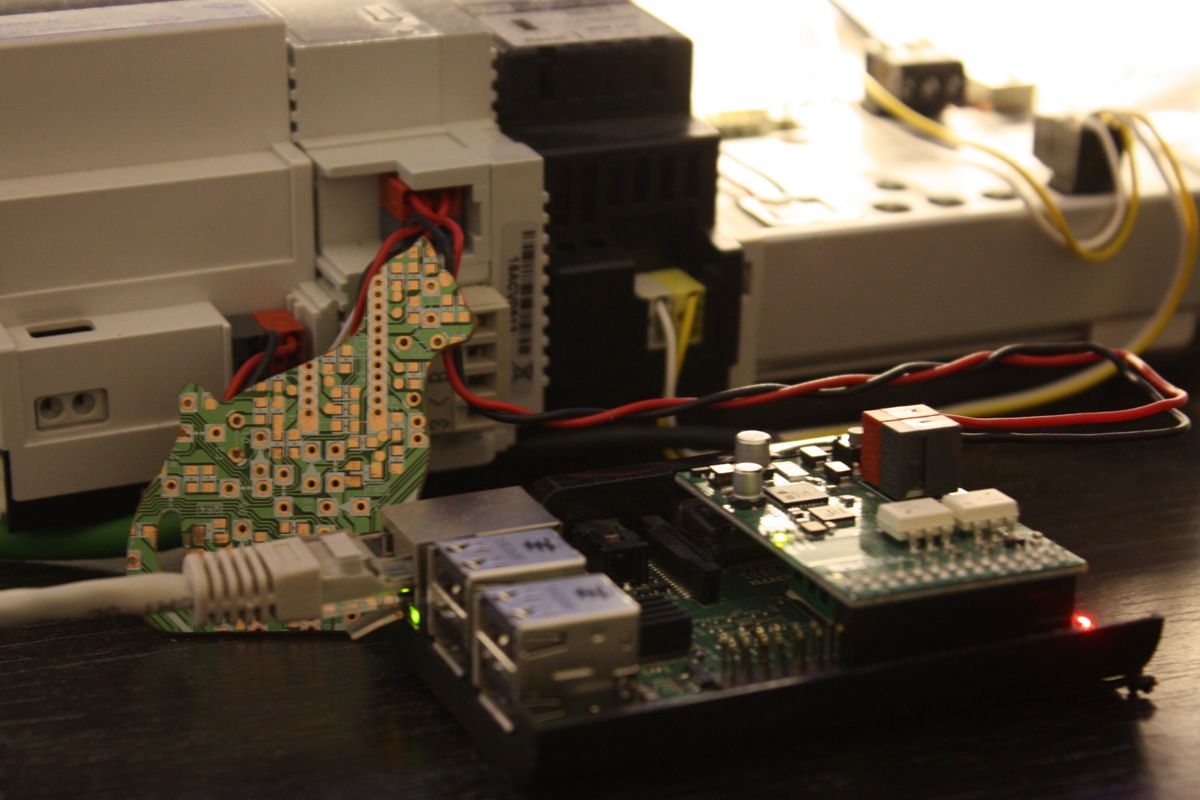
Next, I will show how I solved this problem for myself using the Raspberry Pi and the KNX BAOS 838 kBerry module from Weinzierl.
Motivation
The KNX standard implies a decentralized system operating in the absence of a central PLC controller. Decentralization ensures reliability, but the absence of a PLC in the system deprives us of the flexibility we need. You can use different IP gateways, and communicate via UPD from the server, but this solution was not considered, because access directly to the bus looks more reliable.
Existing solutions
On the market, you can find solutions for this problem, with the following of them I worked closely:
Loxone miniserver
- Price: ~ 600 Euro
- Plus: its own tire, a large range of devices.
- Plus: a simple configurator, programming logic in blocks, good documentation.
- Minus: there is no possibility to program in high level languages. There is a built-in PicoC interpreter, but it is problematic to implement, for example, access to the cloud.
iRidium Server for UMC
- Price: recommended retail 119000r, or ~ 1700 euros.
- Plus: support for a large number of automation systems, in addition to KNX.
- Plus: JavaScript support.
- Minus: project file - zip archive, which complicates its editing. Those. In order to edit a script, you should either use iRidium Studio with a built-in script editor, which does not have the charms of your usual IDE / editor, or think of a way to unpack / assemble a project.
- Minus: JavaScript engine. For example, there is no usual setTimeout / setInterval, instead of them IR.SetTimeout / IR.SetInterval. There is no compatibility with nodejs.
- Minus: stability of work, frequent reboots.
EVIKA LogicMachine
- Price: ~ 3000 euros.
- Plus: in addition to KNX TP / UART, there are RS-485, RS-232 and other interfaces on the board, depending on the configuration.
- Plus: language lua, cron schedules, and more.
Some solutions are good, but the price pushes away, plus I would like to use more flexibility in programming.
Decision
The task was solved using the Raspberry Pi and the Weinzierl KNX BAOS Module 838 kBerry module.
The cost of the module is ~ 70 euros, in the amount of the Raspberry Pi + power supply, the DIN rail housing is about 150 euros.
As the runtime, nodejs is used, from the dependencies the "serialport" module for communication with the UART.
Our application is connected via a serial port to the BAOS 838 module and communicates via the ObjectServer protocol, a description of which can be found at the link at the end of the article.
The frame with the data is in protocol FT1.2 as follows:
|0x68|L|L|0x68|CR|data|C|0x16| L - data +1 CR - , 0x73 , 0x53 , C - = ( + ) mod 256 There are also fixed-length frames, such as reset request, reset indication, acknowledge frame.
Reset request is sent when the connection is opened, reset indication is sent from the baos 838 module to the Raspberry Pi when the module is reset, acknowledge sends each side when receiving data.
Data data consists of the following fields:
| | | | MainService | 1 | . 0xF0 | SubService | 1 | . : , , . | StartItem | 2 | ID | NumberOfItems | 2 | ... . . Communication scheme:
- Our application (client) sends a reset request.
- BAOS 838 (server) sends acknowledge.
- The client sends the first request (for example GetDatapointDescription.Req). Odd frame.
- The server receives the request, sends acknowledge.
- The server sends a response to the request.
- The client sends an acknowledge acknowledgment.
....
Connection
The module connects to the GPIO contacts of the Raspberry Pi board; for more details, see the links at the end of the article.
ETS
Like any KNX device, the BAOS 838 module is configured via ETS. The application in this case uses "KNX BAOS 830", it can be downloaded from the official website of the manufacturer. The device supports up to 1000 multicast addresses.
Configure Raspberry Pi
First of all, install raspbian-stretch-lite, set up access via ssh.
Next, configure the UART interface. For Raspberry Pi 3:
sudo sh -c "echo dtoverlay=pi3-miniuart-bt >>/boot/config.txt" From /boot/cmdline.txt we remove the record console = serial0,115200
Add a user to the dialout group:
sudo usermod -a -G dialout YOURUSERNAME Reboot
reboot Install nodejs, git:
curl -sL https://deb.nodesource.com/setup_8.x | sudo -E bash - sudo apt-get install -y nodejs git Preparation is completed, go to our project.
bobaos-cli
For testing, you can use a simple command line interface. Install:
sudo npm install -g bobaos-cli Run:
% bobaos-cli bobaos> help Commands: help [command...] Provides help for a given command. exit Exits application. open [options] Open serial port getDatapointDescription [options] GetDatapointDescription.Req service setDatapointValue [options] SetDatapointValue.Req service with command "set and send to bus" readDatapointFromBus [options] SetDatapointValue.Req service with command "read via bus" getDatapointValue [options] GetDatapointValue.Req service getParameterByte [options] GetParameterByte.Req service Next we open the port with the open command. By default, the connection to the device / dev / ttyAMA0 is opened; if the system has a different interface, use the -p, --port option.
Further, we can get information about configured datapoints:
bobaos> getDatapointDescription -s 1 -n 10 { service: 'GetDatapointDescription.Res', direction: 'response', error: false, start: 1, number: 10, payload: [ { id: 1, valueType: 8, configFlags: 95, dpt: 'dpt9' }, { id: 2, valueType: 7, configFlags: 87, dpt: 'dpt5' }, { id: 3, valueType: 7, configFlags: 87, dpt: 'dpt5' }, { id: 4, valueType: 7, configFlags: 87, dpt: 'dpt5' }, { id: 5, valueType: 7, configFlags: 87, dpt: 'dpt5' }, { id: 6, valueType: 0, configFlags: 95, dpt: 'dpt1' }, { id: 7, valueType: 0, configFlags: 95, dpt: 'dpt1' }, { id: 8, valueType: 0, configFlags: 87, dpt: 'dpt1' }, { id: 9, valueType: 0, configFlags: 87, dpt: 'dpt1' }, { id: 10, valueType: 14, configFlags: 87, dpt: 'dpt16' } ] } bobaos> In my case, the first one is a temperature sensor, followed by several single-byte values, several single-byte values, and the string value dpt16.
We get the values:
bobaos> getDatapointValue -s 1 -n 10 { service: 'GetDatapointValue.Res', direction: 'response', error: false, start: 1, number: 10, payload: [ { id: 1, state: 16, length: 2, value: <Buffer 0c bf> }, { id: 2, state: 0, length: 1, value: <Buffer 00> }, { id: 3, state: 0, length: 1, value: <Buffer 00> }, { id: 4, state: 0, length: 1, value: <Buffer 00> }, { id: 5, state: 0, length: 1, value: <Buffer 00> }, { id: 6, state: 0, length: 1, value: <Buffer 00> }, { id: 7, state: 0, length: 1, value: <Buffer 00> }, { id: 8, state: 0, length: 1, value: <Buffer 00> }, { id: 9, state: 0, length: 1, value: <Buffer 00> }, { id: 10, state: 0, length: 14, value: <Buffer 00 00 00 00 00 00 00 00 00 00 00 00 00 00> } ] } bobaos> Values are returned in an unconverted form, for conversion, you can use the knx-dpts-baos library, which supports types from dpt1 to dpt18.
Set the value:
bobaos> setDatapointValue -s 2 -v 128 -t dpt5 { service: 'SetDatapointValue.Res', direction: 'response', error: false, start: 2, number: 0, payload: null } bobaos> getDatapointValue -s 2 { service: 'GetDatapointValue.Res', direction: 'response', error: false, start: 2, number: 1, payload: [ { id: 2, state: 16, length: 1, value: <Buffer 80> } ] } bobaos> bobaos-cli can be used for quick testing, installation, reading data from the bus.
Application Use
Install the npm package:
npm install --save bobaos Add to our script:
const Baos = require('bobaos'); const app = new Baos({serialPort: {device: '/dev/ttyAMA0'}, debug: false}); // send requests after successful initial reset app.on('open', () => { app .getDatapointDescription(1, 10) .getParameterByte(1, 10) .readDatapointFromBus(1, 2) // good .readDatapointFromBus(1, 10) // error! .getDatapointValue(1, 10) .setDatapointValue(2, Buffer.alloc(1, 0xc0)) .getDatapointValue(2); }); // listen to incoming events and responses app.on('service', console.log); The output should look something like this:
{ service: 'GetParameterByte.Res', error: false, start: 1, number: 10, payload: <Buffer 01 03 05 07 09 0b 0a 00 00 00> } { service: 'SetDatapointValue.Res', error: false, start: 1, number: 0, payload: null } { service: 'GetDatapointValue.Res', error: false, start: 1, number: 1, payload: [ { id: 1, state: 4, length: 2, value: <Buffer 0c fb> } ] } .... .... Now we have the right to experiment as we please, create any scripts, use the capabilities of nodejs, npm packages. There is still a lot of work ahead, but a good start has been made, which pleases and motivates to continue further.
Links
- Github repository
- KNX BAOS Module 838 kBerry . Under the link you can see the information, download the application for ETS.
- Protocol Description
- Official installation documentation for the Raspberry Pi
')
Source: https://habr.com/ru/post/346680/
All Articles