Lab: Introduction to Docker from scratch. Your first microservice
Hi, username! Today I will try to present you another article about the docker. Why am I doing this if there are already many such articles? There are several answers here. First of all, not all of them describe what I myself would have been very useful at the very beginning of my study of the docker. Secondly, I would like to give people a little practice to theory directly on this theory. One of the important reasons is to put all the experience accumulated over this short period of study by the docker (I have been working with him for a little more than six months) in some kind of format, having laid out everything for myself. Well, in the end, to pour out my soul, describing some rakes to which I have already stepped (to give advice about them) and forks, the solution of which in the docker is simply not provided out of the box and whose problems it would be worth thinking about at the stage when you are bursting with keen desire to transfer the whole world around itself into containers before realizing that this technology is not suitable for all things.
What will we consider in this article?
In Part 0 (theoretical) I will tell you about the containers, what it is and what they eat
In Parts 1-5 there will be a theory and practical task, where we will write microservice in python, working with the rabbitmq queue.
In Part 6 - the afterword
What is a docker? This is such a new way to isolate your applications from each other using linux namespaces. It is extremely easy to manage, expand, migrate, and is suitable for a huge range of tasks ranging from application development and package building to five-minute tests (run-check 1-2 commands-close and forget, and also clean up the trash) . Read more on the off site . It is only necessary to imagine at the first stage that the container consists of layers, i.e. from the file system state casts. I will tell about it a bit later.
')
The laboratory infrastructure of this article can be replicated on the same operating system with Linux on board, or on the \ vps \ whatever virtual machine series. I did everything on one dedicated server with Debian OS. Hereinafter, I assume that you are working in the same Debian 9 OS. Commands and approaches from the OS to the OS may differ, it’s impossible to describe everything in one article, so the server OS I’ve chosen is the most familiar to me. I hope it will not be difficult for you to install yourself a virtual machine and give it access to the Internet.
We will need to install docker-ce ( official man )
I do not set my task to chew on what is already written, so here I will give a link to the documentation, and in the listing I will give commands to install on pure Debian9 x64. Commands that need to be executed on behalf of the superuser begin with the # character, and regular user commands start with $.
It is important to remember that Docker is a means of isolating a process (task), and this means that you cannot treat a docker as a virtual machine. It wraps around containerization tools (cgroups + namespaces) specifically the linux kernel. But it has many similar features, like virtualization:
Nevertheless, it differs from the usual virtualization:
Now that we’ve figured out what a docker is, we’ll see through the binoculars what’s inside. We need to remember the following postulates:
There are public and private storage of official and unofficial images. They are called docker registry. The most popular of them is Docker hub . When you dock any service, go first to the hub and see if someone has already done it for you?
It will also be a great help for you at the time of study. since the finished Dockerfile is visible on the hub, you can see the cool uncles and how they do this or that thing. A lot of them are stored on github and other similar resources.
In addition to the public registry, there are also private ones - paid and free. Paid you will need it when you, after having been tortured by the maintenance, exclaim “let these guys follow all this puffed docker orgy in these your registry”. And the truth is, when you actively use the docker with DevOps, when people or automation build hundreds of containers, then sooner or later you will start to burn from how to clean and maintain it.
Not all of course so bad, of course. For a dozen people and a couple of builds per day, your registry will do. For personal use all the more.
Why registry can be useful? it is a single place for storing and exchanging containers between you, other people, or automatics. And this is a really cool thing. You can put and pick up the finished container with just one team, and provided that it weighs a penny (compared to VM), then the advantages are just on the face. The truth is that the docker is a tool, the docker registry does not store the data of your working containers. In this way, you can have a very convenient workflow: developers write a product, build a new container, push it into the repository. Testers take it, test it, give it a go-ahead. Devopsy then using, for example, ansible roll containers on the prod. And it doesn’t matter to you whether you have a server or 100, using ansible and registry, rolling containers into food is a pleasure. Here and all the stuffing with CI - new versions can be automatically downloaded by the build server. Therefore, I highly recommend, even for personal use, to get a VPS \ DS with the registry, it is very convenient to exchange containers.
Download the image from the repository:
Upload image to repository:
In private repositories, you also need to login, for this you need the command
where you need to enter a username and password.
You can run your registry with just one command:
More on the off site. SSL, authorization - all this is possible.
The docker image (image) is a certain set of layers. Each layer is the result of the command in the Dockerfile. Roughly speaking, an image is a template on the basis of which you will run containers. Everything that runs on the basis of this image is a container, or an instance. those. From one image you can run multiple identical copies of this image - containers. And then, after some manipulations, from this container you can create a template - a new image. All this mess is stored in / var / lib / docker.
documentation
The list of images on your system can be viewed with the command:
Container list:
the -a switch will show the stopped ones, and the -s switch will show its size. those. how much actually, now, in runtime, this container takes up disk space.
The image has 3 fields related to naming:
1) Repository
2) Tag
3) Image ID
The repository is real or unreal, is this the place from where or where your image will be downloaded / uploaded, or is it just a made-up name if you are not going to download it anywhere.
A tag is usually a product version. In theory, this is any set of characters. (from the allowed list [a-z0-9.-] etc.) If there is no tag, then the word latest is automatically used. a tag is placed through the symbol: on behalf of the repository and is automatically substituted if not specified during push \ pull.
ImageID is a locally generated unique ID of your image by which you can operate on this image.
Thus, you or the author of the container influence the repository and / or tag, and the system locally affects the ID. But, by the way, no one bothers you to reuse any other repository name, another question is what you can not push (load) into it
For example:
1/2/3-blah.blah.blah - the name of your local image, you have invented it
projects / my_first_docker is also the name of your local image
projects / my_first_docker: latest is the same name but tagged. equivalent to the previous one.
projects / my_first_docker: 1.13.33 - and this is a specific version of the image in this repository.
projects / my_first_docker: 1.13.34
projects / my_first_docker: 1.13.35
... etc - all this is the same project, but the versions of your images will be different.
One of the big docker chips is the reuse of layers. This means that if the layer has not changed, then the new version of your image will be able to use layers of other containers. For example, the root layer with debian will be used by all containers based on debian. If your second layer, for example, the nginx installation, and the third - to put a config, then at change of a config and assembly of a new image, it will consist of 2 old layers and one new. But do not rush to rejoice. Although this reuse can save space, the docker can still podstraat these layers, which he creates for every sneeze. due to reuse, these layers will have hellish dependencies on each other and in the end, on large installations where a lot of containers are assembled, this will be the same flaky orgy about which I have already spoken above. But you should not take what has been said as something that will happen to you, I'm talking about a loaded system with dozens of new builds on a day when the entire office, along with automation, collects something all day. There is no such bacchanalia on ordinary servers - there you will only have a couple of containers. And on the other hand, this is also pretty simple to clean - just rm -rf. The most important thing for you is the containers, and they are in the repository and will simply be automatically downloaded again. Well, the result of the work and so you do not store in the container.
More examples:
wallarm / node - and this is an image already downloaded from a public docker hub with the best WAF from Wallarm.
debian: stretch - the debian image, the version of the image is stretch (not a number, but a word)
centos: 7 is similar to debian.
mongo: 3.2 - mongodb version 3.2 image downloaded from public repository
nginx - latest stable nginx - the same.
And most often on the hub, you can see the various versions of the software you need. For example, mongo will give you download 3.2, 3.4 and 3.6, and even dev versions. and various intermediate. and a bunch of others.
Imagine how convenient - you have Monga 3.2 spinning, you want to try another version next to it. just download the container with the new version and launch it. and no need to raise any virtual locks, tweak them, clean them up. After all, all that is needed to remove the docker image is to enter the docker rmi command. And it weighs incomparably less. 200 meters for example. And if you want even cooler - you can use a ready-made solution based on alpine linux. bind9-alpine. one demon. 3 config. 15 megabytes !!! and this is a complete, ready-to-use installation.
It should be remembered: the same image can have as many repository names and tags, but will have the same imageid. At the same time, the image will not be deleted until all tags of this image are deleted. those. After downloading the debian image, giving it a new tag you will receive 2 images in the list with different names, but the same imageid. and removing debian: stretch, you simply remove one of the tags, and the image itself will live.
To set a different name for an existing image, use the command:
To delete an image:
But containers have 2 names:
1) CONTAINER ID
2) Name
With id - the same thing here - this is the unique name of a specific unique launched instance of an image. to put it simply - the unique name of the running image. The image can be run as many times as desired and each copy will receive a unique name.
Name - and this is the name that is more convenient for humans and scripting. The fact is that when launching various images you will never know with what name you launched it, until you climb up, look at the running containers, or take this exhaust when you start the container. considering that you can log to stdout, your container name will be lost. So you can pre-set the name for the running container using the --name key, then you can operate on it with a immediately known name.
Container list:
To remove a container:
There is a docker build mechanism for creating your containers. It uses a set of instructions in the Dockerfile to build your own image. When building the container, the sh shell is used inside and your commands are executed in it.
You should know the following:
Docker pretty litter layers in the build. In addition, you can leave a bunch of stopped containers. Remove all with one command.
The docker on the idea virtualizes exactly one process (with any number of descendants). Nobody bothers you, of course, stuffing in one container and 10 processes, but then blame yourself.
This can be done using, for example, supervisor.
But, you say, what about the services that, well, all their lives will be together and should not be separated? use content that a friend will generate for a friend?
In order to do this beautifully and correctly, docker-compose is a yaml file that describes N your containers and their relationships. what container with which to cross, what ports for each other to open, what data to share.
In the case of compose, you actually manage your project easier. for example, the nginx + uwsgi + mongo bundle is 3 containers, although it is known that no one except nginx will go to uwsgi, and besides uwsgi - no one in mongo. Yes, and they will always live together. (THIS IS A PRIVATE CASE). This is where we get the following situation - your application (api) will be updated often - you write and push it every day. and, for example, releases of nginx or mongodb come out much less often - maybe a month, maybe longer. So why bother to build this heavyweight every time, when changes happen in one place? When it comes time to update nginx, you simply change the name of the tag and the entire project rebuild, just download the new container from nginx.
At this stage, you can try to touch the containers and teach the necessary commands. I am a supporter of driving teams from tutorials manually. Therefore - only screenshots.
1. Let's try download debian image

2. Look what happened. In my case, I used the word debian for the filter, since otherwise a bunch of other images would have fallen out in the output. you do not need to use it. Well, as a result - you will have 2 identical imageid with different tags (I have the first two).
ZY hello to the future! for those who will live to debian10 and will read this article, you will not have the same result as me. I hope you understand why.

3. Run the bash process inside the debian: stretch image. Look at his pid - it is equal to one. Those. This is the main process around which we are dancing. Please note - we could not execute ps aux so easily - there is no package in the container. we can put it as usual with apt.

4. Exit the container (exit | Ctrl + D) and try to launch the bash again — this is in the upper console (you can open another one, I did this for simplicity of screenshots). In the lower window - see the list of running containers.
Wow! and where did the procps go? yes nowhere he is not here and was not. when we launched the image again, we took the same impression without the installed program. and where did the result of our work go? And there he lies - in a state of exited. As well as a bunch of other containers that I started earlier and stopped afterwards.
All this is rubbish. But it can still be revived:
1. exit container in terminal 1
2. in the second terminal we copy the ID of the container, suitable for the timeshtamp as the one we then stopped
3. in 1 terminal we start this container with the start command. he goes to the background
4. in the second terminal we look at the list of running containers - according to the timestamp the one that is running 7 seconds is clearly ours.
5. Feint ears. Attach to the already running container with the exec command and start the second instance of bash.
6. perform ps aux - note that the first bash lives with pid 1. and we in the container now manage it via bash with pid = 7. and now, if we leave, the container will live.
So:
run - take image X and create container Z with process Y
exec - take the container Z and run the process N in it, while the process Y will work as before.
Findings:
1) The container can live both in the background and in the foreground, so long as the process that we virtualize is alive.
2) a container is an instance deployed from an image.
3) containers can be stopped and started without data loss (but not worth it, this is not docker-wei)
Learning to use dockerfile.
Here are two approaches to development:
1) take ready and sharpen for themselves
2) do it yourself from scratch
Option one is when you are sure that you have already done all the work perfectly. For example, why install nginx when you can get a ready-made official container with nginx. This is especially true of those systems that are not put into one command or which, for example, in debian have outdated versions, and on the docker hub they are built with more recent stable ones. Moreover, there is already an auto-assembly done - the latest versions arrive there pretty quickly.
Option two - you are paranoid or you do not like the approach of the author of the image (for example, the official was not found, but there is only on the hub of Vasya Pupkin). No one bothers to see how Basil did it, and then go and do it yourself.Well, or in case you just write your logic, which is definitely nowhere to be found, such as a docker image for the build of your deb-packages in jenkins. But it is very convenient!
Dockerfile is a file with a set of instructions that will be performed in a clean container of the image you specified, and you will receive your image at the output.
The most important thing you need to specify is the FROM and CMD directives (not necessary in principle). I will give an example of such a file:
FROM - which image to base.
MAINTAINER - the author of this development (someone to kick for the work of this, a new image)
RUN - a command executed inside the container, on the basis of which a new image will be obtained. Pay attention - the usual bash transfers and && makes the code readable and beautiful.
You can also write at least 10 RUN - commands (but each from a new line) in which to describe your logic.
EXPOSE - which ports, according to which protocol will be available outside the container when using docker-compose. Here it is important to remember that this does not mean that they will be accessible from the outside immediately. those. , : , . :
1) 0.0.0.0:80 ( 0.0.0.0!!!, — ). mysql. , , .
2) docker run -p 80:80 image
And this is the only way - it turns out that when accessing a host on port 80, you will be mapped into a container on port 80. when the container was started, this port was opened, and inside the container, the application listens to port 80. and so, you will get from port 80 of the host to port 80 of the application. Naturally ports can be made any. So, you can run a lot of containers, inside which nginx listen to port 80, and make the mapping outside like this: 8000: 80, 8001: 80, 8002: 80 ... well, etc., the idea is clear. Thus, you can make 1 image with one config, and run it parallel and independently many times.
CMD - and this is the most crucial place. This is the command that will be executed when the container is started and it works all the time. Remember yes? while the process works, the container lives. Here, the approach is the same as in systemd - the process should not go to the background - this is no need, the process is just one inside this container. From here by the way and different approaches logging. for example, you can leave the output in STDOUT, and you can in the logs. The main thing is that the process (main process) after the launch remains live. and forks-threads can be as much as you like.
In addition to CMD, there is another type of shamanism - ENTRYPOINT. this is usually a shell script to which the CMD value is passed as an argument.
You need to remember the following things:
1) the final command to start the process in the container = sum ENTRYPOINT + CMD.
2) entrypoint cmd — , .
For example:
ENTRYPOINT ["/entrypoint.sh"]
CMD [«haproxy», "-c", "/etc/haproxy/haproxy.conf"]
:
sh -c "/entrypoint.sh haproxy -c /etc/haproxy/haproxy.conf".
— .
? entrypoint . , CMD ENTRYPOINT .
1:
:
docker run haproxy
ENTRYPOINT + CMD:
sh -c "/entrypoint.sh haproxy -c /etc/haproxy/haproxy.conf"
. entrypoint.sh : = haproxy, haproxy = haproxy -db -W $@. . :
2:
:
docker run haproxy bash
bash — CMD dockerfile. ENTRYPOINT + CMD :
sh -c "/entrypoint.sh bash"
, != haproxy, . .
3:
haproxy .
docker run haproxy haproxy -c /opt/haproxy.conf
haproxy — , — , . CMD, :
sh -c "/entrypoint.sh haproxy -c /opt/haproxy.conf"
:
, . ENTRYPOINT+CMD. , , dockerfile.
, , ADD, COPY — , ADD , . .
Dockerfile ! ( )
Dockerfile , .
Example:
100500 . , — .. .
. : , , . , . — . - — \ . — \ \ . , . , — -. — , , . .
-v:
, - .
, . , Dockerfile (ENV key=value), , , .
, , , ? — systemd!
, :
:
:
ExecStartPre — \ - my-project. (, ) — , .
--rm — .
--name my-project —
-a STDIN -a STDOUT -a STDERR — attach to std* — \\ . systemd
-p — 0.0.0.0:80 -> 80
-v —
, . — tcp udp. - — tcp.
-:
— systemd , journalctl — stdout .
:
send.py -> rabbitmq -> read.py
Those. 3 , , . systemd.
sender.py 5 1 7, (receiver.py) — - .
, — , — . , , . , . /etc /var/log, , . . , , . , . ssh docker, ? (, , , puppet, -. — . , — . , , . , )
1. RabbitMQ
RabbitMQ — . . . . rabbitmq 3 — Dockerfile 2 . — . , , — json definitions.
2.
3. Receiver — -worker.
, . . , . . — . — .
. . , , , , — , . , , ! - Dockerfile — , , . - ansible\puppet\chef, . , . — ! — . , virtualenv, , , — .
, , docker hub. , . , , , /etc/init.d/uwsgi start — . why? uwsgi docker.
uwsgi docker — init .
1) /etc/init.d/uwsgi start . , , . . :
, init-. , /proc/{id}/exe. 0, , && 2 (return 2), ( ). 14 : github.com/moby/moby/issues/6800 .
Workaround:
, , .
a) /usr/share/uwsgi/init/specific_daemon --exec --startas. ( , , , ) startas /proc/{id}/exe pid. (https://chris-lamb.co.uk/posts/start-stop-daemon-exec-vs-startas)
b) --cap-add=SYS_PTRACE. .
) init-.
2) /etc/init.d/uwsgi start . ( ?). , . , , .
:
1) ( ):
2) Dockerfile:
.1 .2, pid\socket.
community-edition . ! . — , , .
- . - — kubernetes\docker swarm. kubernetes helm. , ;)…
. . , . .
! . .
What will we consider in this article?
In Part 0 (theoretical) I will tell you about the containers, what it is and what they eat
In Parts 1-5 there will be a theory and practical task, where we will write microservice in python, working with the rabbitmq queue.
In Part 6 - the afterword
Part 0.0: we warm up the tires
What is a docker? This is such a new way to isolate your applications from each other using linux namespaces. It is extremely easy to manage, expand, migrate, and is suitable for a huge range of tasks ranging from application development and package building to five-minute tests (run-check 1-2 commands-close and forget, and also clean up the trash) . Read more on the off site . It is only necessary to imagine at the first stage that the container consists of layers, i.e. from the file system state casts. I will tell about it a bit later.
')
The laboratory infrastructure of this article can be replicated on the same operating system with Linux on board, or on the \ vps \ whatever virtual machine series. I did everything on one dedicated server with Debian OS. Hereinafter, I assume that you are working in the same Debian 9 OS. Commands and approaches from the OS to the OS may differ, it’s impossible to describe everything in one article, so the server OS I’ve chosen is the most familiar to me. I hope it will not be difficult for you to install yourself a virtual machine and give it access to the Internet.
We will need to install docker-ce ( official man )
I do not set my task to chew on what is already written, so here I will give a link to the documentation, and in the listing I will give commands to install on pure Debian9 x64. Commands that need to be executed on behalf of the superuser begin with the # character, and regular user commands start with $.
# apt install apt-transport-https ca-certificates curl gnupg2 software-properties-common # curl -fsSL https://download.docker.com/linux/$(. /etc/os-release; echo "$ID")/gpg | apt-key add - # add-apt-repository "deb [arch=amd64] https://download.docker.com/linux/$(. /etc/os-release; echo "$ID") $(lsb_release -cs) stable" # apt update && apt install docker-ce Part 0.1 Comparison with VM
It is important to remember that Docker is a means of isolating a process (task), and this means that you cannot treat a docker as a virtual machine. It wraps around containerization tools (cgroups + namespaces) specifically the linux kernel. But it has many similar features, like virtualization:
- independence - the container can be moved to any OS with a docker service on board and the container will work. (Officially, yes, in fact, I’m not sure that compatibility is as bright as pony, rainbow and butterflies. If you have any other experience, please share)
- self-sufficiency - the container will perform its functions in any place wherever it is launched.
Nevertheless, it differs from the usual virtualization:
- Inside the container is the minimum required set of software necessary for the operation of your process. This is no longer a full-fledged OS that needs to be monitored, monitor the rest of the space, etc., etc.
- A different approach to virtualization is used. read about it . I mean the principle itself - there is no familiar host OS.
- It should be particularly relevant to the container and the data generated by it. A container is a data processing tool, but not a storage tool. As an example, a container is a nailing machine, data submitted to the input is a board and a nail, and the result of the work is to hammer a nail into the board. At the same time, the board with the nail does not remain part of the same nailing machine, the result is separate, the tool is separate. Output data should not be saved inside the container (it is possible, but this is not a docker-way). Therefore, the container is either a worker (worked, reported to the queue), or, if it is, for example, a web server, then you need to use external volumes. (all this is very simple, you should not be sad at this moment).
Part 0.2 Container processes
Now that we’ve figured out what a docker is, we’ll see through the binoculars what’s inside. We need to remember the following postulates:
- The container lives while the process lives around which the container is born.
- Inside the container this process has pid = 1
- Next to the process with pid = 1, you can spawn as many other processes as you like (within the capabilities of the OS, of course), but by killing (restarting) the process with pid = 1, the container exits. (see item 1)
- Inside the container you will see the usual directory arrangement according to FHS standards. The location is identical to the original distribution (from which the container was taken).
- The data created inside the container remains in the container and is not stored anywhere else (well, you can still access this layer from the host OS). deleting the container will lose all your changes. Therefore, the data in the containers are not stored, and carried out to the host OS.
Part 0.3 Where do you get these containers from? how to store?
There are public and private storage of official and unofficial images. They are called docker registry. The most popular of them is Docker hub . When you dock any service, go first to the hub and see if someone has already done it for you?
It will also be a great help for you at the time of study. since the finished Dockerfile is visible on the hub, you can see the cool uncles and how they do this or that thing. A lot of them are stored on github and other similar resources.
In addition to the public registry, there are also private ones - paid and free. Paid you will need it when you, after having been tortured by the maintenance, exclaim “let these guys follow all this puffed docker orgy in these your registry”. And the truth is, when you actively use the docker with DevOps, when people or automation build hundreds of containers, then sooner or later you will start to burn from how to clean and maintain it.
Not all of course so bad, of course. For a dozen people and a couple of builds per day, your registry will do. For personal use all the more.
Why registry can be useful? it is a single place for storing and exchanging containers between you, other people, or automatics. And this is a really cool thing. You can put and pick up the finished container with just one team, and provided that it weighs a penny (compared to VM), then the advantages are just on the face. The truth is that the docker is a tool, the docker registry does not store the data of your working containers. In this way, you can have a very convenient workflow: developers write a product, build a new container, push it into the repository. Testers take it, test it, give it a go-ahead. Devopsy then using, for example, ansible roll containers on the prod. And it doesn’t matter to you whether you have a server or 100, using ansible and registry, rolling containers into food is a pleasure. Here and all the stuffing with CI - new versions can be automatically downloaded by the build server. Therefore, I highly recommend, even for personal use, to get a VPS \ DS with the registry, it is very convenient to exchange containers.
Download the image from the repository:
docker pull wallarm/node Upload image to repository:
docker push example.com:5000/my_image In private repositories, you also need to login, for this you need the command
docker login where you need to enter a username and password.
You can run your registry with just one command:
docker run -d -p 5000:5000 --restart=always --name registry registry:2 More on the off site. SSL, authorization - all this is possible.
Part 0.4. Containers and images (images)
The docker image (image) is a certain set of layers. Each layer is the result of the command in the Dockerfile. Roughly speaking, an image is a template on the basis of which you will run containers. Everything that runs on the basis of this image is a container, or an instance. those. From one image you can run multiple identical copies of this image - containers. And then, after some manipulations, from this container you can create a template - a new image. All this mess is stored in / var / lib / docker.
documentation
The list of images on your system can be viewed with the command:
# docker images Container list:
docker ps the -a switch will show the stopped ones, and the -s switch will show its size. those. how much actually, now, in runtime, this container takes up disk space.
Part 0.5 How to name containers and images (images)?
The image has 3 fields related to naming:
1) Repository
2) Tag
3) Image ID
The repository is real or unreal, is this the place from where or where your image will be downloaded / uploaded, or is it just a made-up name if you are not going to download it anywhere.
A tag is usually a product version. In theory, this is any set of characters. (from the allowed list [a-z0-9.-] etc.) If there is no tag, then the word latest is automatically used. a tag is placed through the symbol: on behalf of the repository and is automatically substituted if not specified during push \ pull.
ImageID is a locally generated unique ID of your image by which you can operate on this image.
Thus, you or the author of the container influence the repository and / or tag, and the system locally affects the ID. But, by the way, no one bothers you to reuse any other repository name, another question is what you can not push (load) into it
For example:
1/2/3-blah.blah.blah - the name of your local image, you have invented it
projects / my_first_docker is also the name of your local image
projects / my_first_docker: latest is the same name but tagged. equivalent to the previous one.
projects / my_first_docker: 1.13.33 - and this is a specific version of the image in this repository.
projects / my_first_docker: 1.13.34
projects / my_first_docker: 1.13.35
... etc - all this is the same project, but the versions of your images will be different.
One of the big docker chips is the reuse of layers. This means that if the layer has not changed, then the new version of your image will be able to use layers of other containers. For example, the root layer with debian will be used by all containers based on debian. If your second layer, for example, the nginx installation, and the third - to put a config, then at change of a config and assembly of a new image, it will consist of 2 old layers and one new. But do not rush to rejoice. Although this reuse can save space, the docker can still podstraat these layers, which he creates for every sneeze. due to reuse, these layers will have hellish dependencies on each other and in the end, on large installations where a lot of containers are assembled, this will be the same flaky orgy about which I have already spoken above. But you should not take what has been said as something that will happen to you, I'm talking about a loaded system with dozens of new builds on a day when the entire office, along with automation, collects something all day. There is no such bacchanalia on ordinary servers - there you will only have a couple of containers. And on the other hand, this is also pretty simple to clean - just rm -rf. The most important thing for you is the containers, and they are in the repository and will simply be automatically downloaded again. Well, the result of the work and so you do not store in the container.
More examples:
wallarm / node - and this is an image already downloaded from a public docker hub with the best WAF from Wallarm.
debian: stretch - the debian image, the version of the image is stretch (not a number, but a word)
centos: 7 is similar to debian.
mongo: 3.2 - mongodb version 3.2 image downloaded from public repository
nginx - latest stable nginx - the same.
And most often on the hub, you can see the various versions of the software you need. For example, mongo will give you download 3.2, 3.4 and 3.6, and even dev versions. and various intermediate. and a bunch of others.
Imagine how convenient - you have Monga 3.2 spinning, you want to try another version next to it. just download the container with the new version and launch it. and no need to raise any virtual locks, tweak them, clean them up. After all, all that is needed to remove the docker image is to enter the docker rmi command. And it weighs incomparably less. 200 meters for example. And if you want even cooler - you can use a ready-made solution based on alpine linux. bind9-alpine. one demon. 3 config. 15 megabytes !!! and this is a complete, ready-to-use installation.
It should be remembered: the same image can have as many repository names and tags, but will have the same imageid. At the same time, the image will not be deleted until all tags of this image are deleted. those. After downloading the debian image, giving it a new tag you will receive 2 images in the list with different names, but the same imageid. and removing debian: stretch, you simply remove one of the tags, and the image itself will live.
To set a different name for an existing image, use the command:
docker tag <existing image name> <new image name> To delete an image:
docker rmi <image> But containers have 2 names:
1) CONTAINER ID
2) Name
With id - the same thing here - this is the unique name of a specific unique launched instance of an image. to put it simply - the unique name of the running image. The image can be run as many times as desired and each copy will receive a unique name.
Name - and this is the name that is more convenient for humans and scripting. The fact is that when launching various images you will never know with what name you launched it, until you climb up, look at the running containers, or take this exhaust when you start the container. considering that you can log to stdout, your container name will be lost. So you can pre-set the name for the running container using the --name key, then you can operate on it with a immediately known name.
Container list:
docker ps To remove a container:
docker rm <container> Part 0.6 Okay, all these are other people's containers, and how can I make my own, from scratch?
There is a docker build mechanism for creating your containers. It uses a set of instructions in the Dockerfile to build your own image. When building the container, the sh shell is used inside and your commands are executed in it.
You should know the following:
- Each completed command creates a file system layer with the results of changes generated by this command. those. for example, running the apt install htop command will create a layer that will contain the result of executing this command - binaries, libraries, etc. in the end, each such layer will be superimposed on each other, and then on the original (the image of the operating system) and you will get the final result. From here come several limitations:
- Layers are independent of each other. This means that any service running during the build process inside the container exists only within its layer. A vivid example is an attempt to fill the database in mysql. How does this usually happen? you need to start a mysql server and use the following command to fill in the database. It won't work that way here. A layer will be created that will save the results of running mysql (logs, etc.) and then mysql will simply end. in the next layer (when executing the base fill command), the muskul will no longer be running and there will be an error. The solution to this problem is simply to unite the teams through &&.
- 3) But the permanent data will be superimposed from the first team to the last one on top of each other and stored permanently from layer to layer. Therefore, creating a file with the first command, you can access it in the last command.
Part 0.7 Finally, and "This is not docker-wei"
Docker pretty litter layers in the build. In addition, you can leave a bunch of stopped containers. Remove all with one command.
docker system prune This is not docker-wei
The docker on the idea virtualizes exactly one process (with any number of descendants). Nobody bothers you, of course, stuffing in one container and 10 processes, but then blame yourself.
This can be done using, for example, supervisor.
But, you say, what about the services that, well, all their lives will be together and should not be separated? use content that a friend will generate for a friend?
In order to do this beautifully and correctly, docker-compose is a yaml file that describes N your containers and their relationships. what container with which to cross, what ports for each other to open, what data to share.
In the case of compose, you actually manage your project easier. for example, the nginx + uwsgi + mongo bundle is 3 containers, although it is known that no one except nginx will go to uwsgi, and besides uwsgi - no one in mongo. Yes, and they will always live together. (THIS IS A PRIVATE CASE). This is where we get the following situation - your application (api) will be updated often - you write and push it every day. and, for example, releases of nginx or mongodb come out much less often - maybe a month, maybe longer. So why bother to build this heavyweight every time, when changes happen in one place? When it comes time to update nginx, you simply change the name of the tag and the entire project rebuild, just download the new container from nginx.
Part 1: when is practice?
At this stage, you can try to touch the containers and teach the necessary commands. I am a supporter of driving teams from tutorials manually. Therefore - only screenshots.
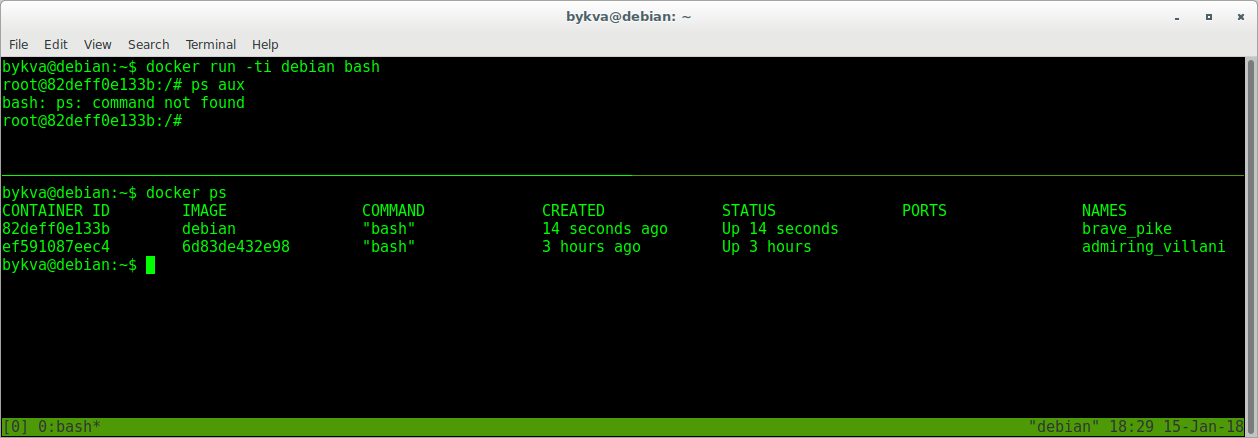
1. Let's try download debian image
2. Look what happened. In my case, I used the word debian for the filter, since otherwise a bunch of other images would have fallen out in the output. you do not need to use it. Well, as a result - you will have 2 identical imageid with different tags (I have the first two).
ZY hello to the future! for those who will live to debian10 and will read this article, you will not have the same result as me. I hope you understand why.
3. Run the bash process inside the debian: stretch image. Look at his pid - it is equal to one. Those. This is the main process around which we are dancing. Please note - we could not execute ps aux so easily - there is no package in the container. we can put it as usual with apt.
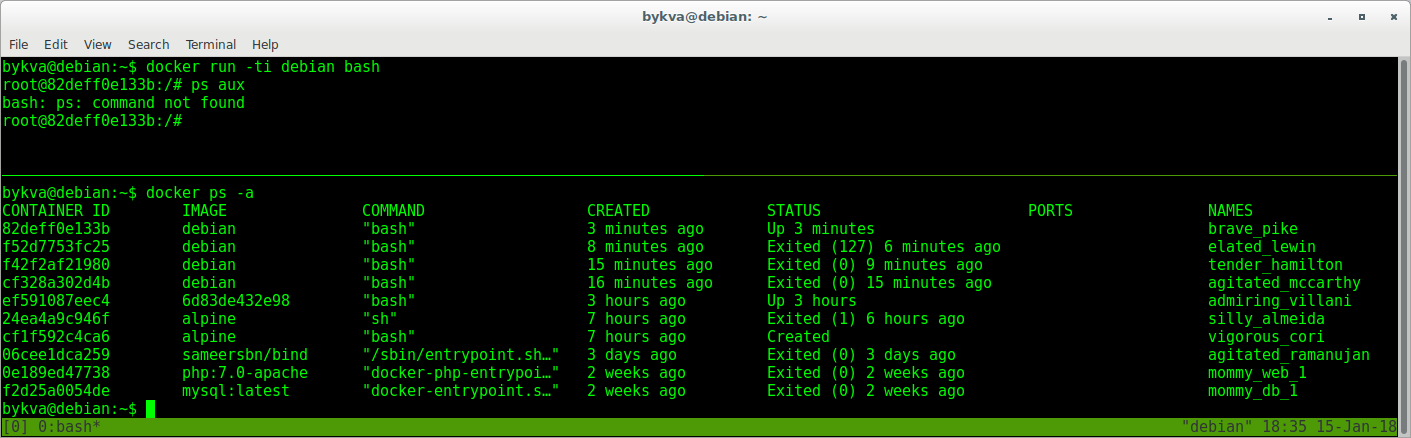
4. Exit the container (exit | Ctrl + D) and try to launch the bash again — this is in the upper console (you can open another one, I did this for simplicity of screenshots). In the lower window - see the list of running containers.
Wow! and where did the procps go? yes nowhere he is not here and was not. when we launched the image again, we took the same impression without the installed program. and where did the result of our work go? And there he lies - in a state of exited. As well as a bunch of other containers that I started earlier and stopped afterwards.
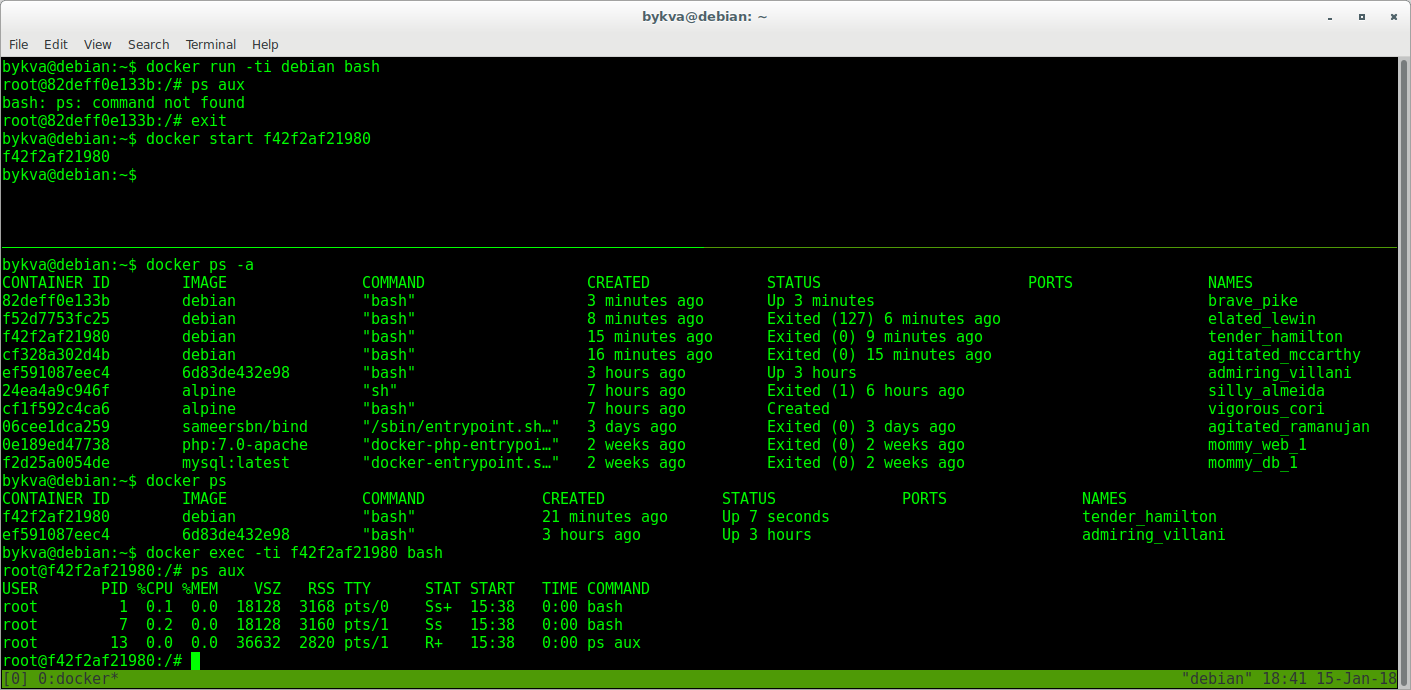
All this is rubbish. But it can still be revived:
1. exit container in terminal 1
2. in the second terminal we copy the ID of the container, suitable for the timeshtamp as the one we then stopped
3. in 1 terminal we start this container with the start command. he goes to the background
4. in the second terminal we look at the list of running containers - according to the timestamp the one that is running 7 seconds is clearly ours.
5. Feint ears. Attach to the already running container with the exec command and start the second instance of bash.
6. perform ps aux - note that the first bash lives with pid 1. and we in the container now manage it via bash with pid = 7. and now, if we leave, the container will live.
So:
run - take image X and create container Z with process Y
exec - take the container Z and run the process N in it, while the process Y will work as before.
Findings:
1) The container can live both in the background and in the foreground, so long as the process that we virtualize is alive.
2) a container is an instance deployed from an image.
3) containers can be stopped and started without data loss (but not worth it, this is not docker-wei)
Part 2: Making Your Own Docker Image
Learning to use dockerfile.
Here are two approaches to development:
1) take ready and sharpen for themselves
2) do it yourself from scratch
Option one is when you are sure that you have already done all the work perfectly. For example, why install nginx when you can get a ready-made official container with nginx. This is especially true of those systems that are not put into one command or which, for example, in debian have outdated versions, and on the docker hub they are built with more recent stable ones. Moreover, there is already an auto-assembly done - the latest versions arrive there pretty quickly.
Option two - you are paranoid or you do not like the approach of the author of the image (for example, the official was not found, but there is only on the hub of Vasya Pupkin). No one bothers to see how Basil did it, and then go and do it yourself.Well, or in case you just write your logic, which is definitely nowhere to be found, such as a docker image for the build of your deb-packages in jenkins. But it is very convenient!
Dockerfile is a file with a set of instructions that will be performed in a clean container of the image you specified, and you will receive your image at the output.
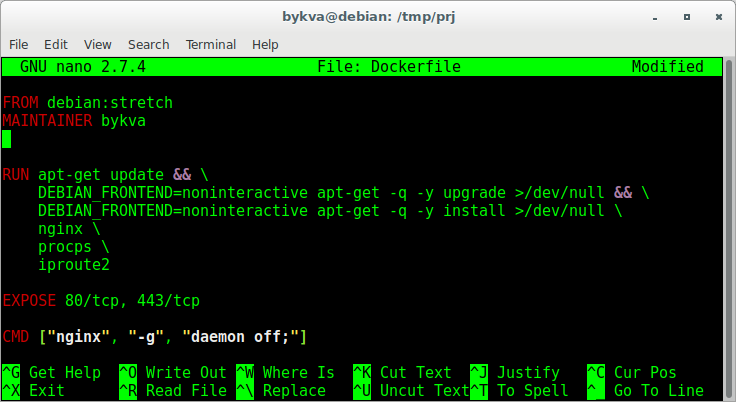
The most important thing you need to specify is the FROM and CMD directives (not necessary in principle). I will give an example of such a file:
FROM - which image to base.
MAINTAINER - the author of this development (someone to kick for the work of this, a new image)
RUN - a command executed inside the container, on the basis of which a new image will be obtained. Pay attention - the usual bash transfers and && makes the code readable and beautiful.
You can also write at least 10 RUN - commands (but each from a new line) in which to describe your logic.
EXPOSE - which ports, according to which protocol will be available outside the container when using docker-compose. Here it is important to remember that this does not mean that they will be accessible from the outside immediately. those. , : , . :
1) 0.0.0.0:80 ( 0.0.0.0!!!, — ). mysql. , , .
2) docker run -p 80:80 image
And this is the only way - it turns out that when accessing a host on port 80, you will be mapped into a container on port 80. when the container was started, this port was opened, and inside the container, the application listens to port 80. and so, you will get from port 80 of the host to port 80 of the application. Naturally ports can be made any. So, you can run a lot of containers, inside which nginx listen to port 80, and make the mapping outside like this: 8000: 80, 8001: 80, 8002: 80 ... well, etc., the idea is clear. Thus, you can make 1 image with one config, and run it parallel and independently many times.
CMD - and this is the most crucial place. This is the command that will be executed when the container is started and it works all the time. Remember yes? while the process works, the container lives. Here, the approach is the same as in systemd - the process should not go to the background - this is no need, the process is just one inside this container. From here by the way and different approaches logging. for example, you can leave the output in STDOUT, and you can in the logs. The main thing is that the process (main process) after the launch remains live. and forks-threads can be as much as you like.
In addition to CMD, there is another type of shamanism - ENTRYPOINT. this is usually a shell script to which the CMD value is passed as an argument.
You need to remember the following things:
1) the final command to start the process in the container = sum ENTRYPOINT + CMD.
2) entrypoint cmd — , .
For example:
ENTRYPOINT ["/entrypoint.sh"]
CMD [«haproxy», "-c", "/etc/haproxy/haproxy.conf"]
:
sh -c "/entrypoint.sh haproxy -c /etc/haproxy/haproxy.conf".
— .
? entrypoint . , CMD ENTRYPOINT .
1:
:
docker run haproxy
ENTRYPOINT + CMD:
sh -c "/entrypoint.sh haproxy -c /etc/haproxy/haproxy.conf"
. entrypoint.sh : = haproxy, haproxy = haproxy -db -W $@. . :
haproxy -db -W -c /etc/haproxy/haproxy.conf" 2:
:
docker run haproxy bash
bash — CMD dockerfile. ENTRYPOINT + CMD :
sh -c "/entrypoint.sh bash"
, != haproxy, . .
3:
haproxy .
docker run haproxy haproxy -c /opt/haproxy.conf
haproxy — , — , . CMD, :
sh -c "/entrypoint.sh haproxy -c /opt/haproxy.conf"
:
haproxy -db -W -c /opt/haproxy.conf" , . ENTRYPOINT+CMD. , , dockerfile.
, , ADD, COPY — , ADD , . .
Dockerfile ! ( )
Dockerfile , .
Example:
COPY config config RUN apt install 100500-programms-pack 100500 . , — .. .
3:
. : , , . , . — . - — \ . — \ \ . , . , — -. — , , . .
-v:
-v /source/folder:/destination/folder -v /path/to/file:/path/to/config , - .
, . , Dockerfile (ENV key=value), , , .
4:
, , , ? — systemd!
, :
# >/etc/systemd/system/my-project.service # systemctl daemon-reload # systemctl edit --full my-project.service :
[Unit] Description=my first docker service Requires=docker.service After=docker.service [Service] Restart=always RestartSec=3 ExecStartPre=/bin/sh -c "/usr/bin/docker rm -f my-project 2> /dev/null || /bin/true" ExecStart=/usr/bin/docker run --rm -a STDIN -a STDOUT -a STDERR -p 80:80 -v /etc/my-project/:/etc/my-project --name my-project:2.2 ExecStop=/usr/bin/docker stop my-project [Install] WantedBy=multi-user.target :
ExecStartPre — \ - my-project. (, ) — , .
--rm — .
--name my-project —
-a STDIN -a STDOUT -a STDERR — attach to std* — \\ . systemd
-p — 0.0.0.0:80 -> 80
-v —
, . — tcp udp. - — tcp.
-:
systemctl restart my-project.service && journalctl -u my-project.service --no-pager -f — systemd , journalctl — stdout .
5: .
:
send.py -> rabbitmq -> read.py
Those. 3 , , . systemd.
sender.py 5 1 7, (receiver.py) — - .
, — , — . , , . , . /etc /var/log, , . . , , . , . ssh docker, ? (, , , puppet, -. — . , — . , , . , )
1. RabbitMQ
RabbitMQ — . . . . rabbitmq 3 — Dockerfile 2 . — . , , — json definitions.
mkdir -p ~/Documents/my_project/{sender,receiver,rabbitmq} cd ~/Documents/my_project/rabbitmq ## , ( ) docker build -t rabbitmq:1.0 . >/etc/systemd/system/my_project-rabbitmq.service ## systemd systemctl edit --full my_project-rabbitmq.service ## systemctl start my_project-rabbitmq ## docker ps systemctl status my_project-rabbitmq /etc/systemd/system/my_project-rabbitmq.service
[Unit] Description=my first docker service Requires=docker.service After=docker.service [Service] Restart=always RestartSec=3 ExecStartPre=/bin/sh -c "/usr/bin/docker rm -f rabbitmq 2> /dev/null || /bin/true" ExecStart=/usr/bin/docker run --rm -a STDIN -a STDOUT -a STDERR -p 5672:5672 --name rabbitmq rabbitmq:1.0 ExecStop=/usr/bin/docker stop rabbitmq [Install] WantedBy=multi-user.target ~/Documents/my_project/rabbitmq/rabbitmq.conf
management.load_definitions = /etc/rabbitmq/definitions.json
~/Documents/my_project/rabbitmq/definitions.json
{"rabbit_version":"3.7.2","users":[{"name":"username","password_hash":"P2bFyWm2oSwuzoRDw37nRYgagL0ciZSGus3kYnkG1aNaUWeD","hashing_algorithm":"rabbit_password_hashing_sha256","tags":""},{"name":"guest","password_hash":"SjeLNFEWLHwuC5QRAaZIF/SX/uMasQFyt5+dELgKK03TgsC8","hashing_algorithm":"rabbit_password_hashing_sha256","tags":"administrator"}],"vhosts":[{"name":"virtualhost"},{"name":"/"}],"permissions":[{"user":"guest","vhost":"/","configure":".*","write":".*","read":".*"},{"user":"username","vhost":"virtualhost","configure":".*","write":".*","read":".*"}],"topic_permissions":[],"parameters":[],"global_parameters":[],"policies":[],"queues":[],"exchanges":[],"bindings":[]} ~/Documents/my_project/rabbitmq/Dockerfile
FROM rabbitmq:management ADD rabbitmq.conf /etc/rabbitmq/rabbitmq.conf ADD definitions.json /etc/rabbitmq/ RUN chown rabbitmq:rabbitmq /etc/rabbitmq/rabbitmq.conf /etc/rabbitmq/definitions.json CMD ["rabbitmq-server"] 2.
cd ~/Documents/my_project/sender ## sender.py Dockerfile, docker build -t sender:1.0 . >/etc/systemd/system/my_project-sender.service ## systemd systemctl edit --full my_project-sender.service ## systemctl start my_project-sender ## docker ps systemctl status my_project-sender /etc/systemd/system/my_project-sender.service
[Unit] Description=my first docker service Requires=docker.service After=docker.service [Service] Restart=always RestartSec=3 ExecStartPre=/bin/sh -c "/usr/bin/docker rm -f sender 2> /dev/null || /bin/true" ExecStart=/usr/bin/docker run --rm -a STDIN -a STDOUT -a STDERR -v /etc/my_project/sender:/etc/my_project/sender --name sender sender:1.0 ExecStop=/usr/bin/docker stop sender [Install] WantedBy=multi-user.target sender.py
# -*- coding: utf-8 -*- import pika, yaml, base64, time, random config_file = open("/etc/my_project/sender/sender.yaml","r") config = yaml.load(config_file) pika_username = config["rabbitmq"]["username"] pika_password = base64.b64decode(config["rabbitmq"]["password"]) pika_addr = config["rabbitmq"]["host"] pika_port = config["rabbitmq"]["port"] pika_virtualhost = config["rabbitmq"]["virtualhost"] pika_queue = config["rabbitmq"]["queue"] def send_message_rabbitmq(message="Hello World!"): credentials = pika.PlainCredentials(pika_username, pika_password) parameters = pika.ConnectionParameters(pika_addr, pika_port, pika_virtualhost, credentials) connection = pika.BlockingConnection(parameters) channel = connection.channel() channel.queue_declare(queue=pika_queue, durable=True) channel.basic_publish(exchange='', routing_key=pika_queue, body=message, properties=pika.BasicProperties( delivery_mode=2, )) connection.close() while True: send_message_rabbitmq(str(random.randint(1,7))) time.sleep(5) ~/Documents/my_project/sender/Dockerfile
FROM debian:stretch RUN apt-get update > /dev/null && apt-get -y -q install \ python3-pip > /dev/null RUN pip3 install pika pyyaml COPY sender.py /opt/ CMD ["/usr/bin/python3", "/opt/sender.py"] /etc/my_project/sender/sender.yaml
-- rabbitmq: username: username password: MTIzNDU2Nzg5MA== host: 192.168.136.181 port: 5672 virtualhost: virtualhost queue: queue 3. Receiver — -worker.
cd ~/Documents/my_project/receiver ## receiver.py Dockerfile, docker build -t sender:1.0 . >/etc/systemd/system/my_project-sender.service ## systemd systemctl edit --full my_project-sender.service ## systemctl start my_project-sender ## docker ps systemctl status my_project-sender /etc/systemd/system/my_project-receiver.service
[Unit] Description=my first docker service Requires=docker.service After=docker.service [Service] Restart=always RestartSec=3 ExecStartPre=/bin/sh -c "/usr/bin/docker rm -f receiver 2> /dev/null || /bin/true" ExecStart=/usr/bin/docker run --rm -a STDIN -a STDOUT -a STDERR -v /etc/my_project/receiver:/etc/my_project/receiver --name receiver receiver:1.0 ExecStop=/usr/bin/docker stop receiver [Install] WantedBy=multi-user.target /etc/my_project/receiver/receiver.yaml
--- rabbitmq: username: username password: MTIzNDU2Nzg5MA== host: 192.168.136.181 port: 5672 virtualhost: virtualhost queue: queue ~/Documents/my_project/receiver/receiver.py
# -*- coding: utf-8 -*- import pika, yaml, base64, time log_file = open("/var/log/my_project/receiver/receiver.log","a") config_file = open("/etc/my_project/receiver/receiver.yaml","r") config = yaml.load(config_file) pika_username = config["rabbitmq"]["username"] pika_password = base64.b64decode(config["rabbitmq"]["password"]) pika_addr = config["rabbitmq"]["host"] pika_port = config["rabbitmq"]["port"] pika_virtualhost = config["rabbitmq"]["virtualhost"] pika_queue = config["rabbitmq"]["queue"] credentials = pika.PlainCredentials(pika_username, pika_password) parameters = pika.ConnectionParameters(pika_addr, pika_port, pika_virtualhost, credentials) connection = pika.BlockingConnection(parameters) channel = connection.channel() channel.queue_declare(queue=pika_queue, durable=True) print(' [*] Waiting for messages. To exit press CTRL+C') def callback(ch, method, properties, body): print(" [x] Received %r" % (body,)) #this goes to stdout print("[x] Received %r" % (body,), file=log_file) #this goes to log file time.sleep(int(body.decode('ascii'))) channel.basic_ack(delivery_tag = method.delivery_tag) channel.basic_qos(prefetch_count=1) channel.basic_consume(callback, queue=pika_queue) channel.start_consuming() ~/Documents/my_project/receiver/Dockerfile
FROM debian:stretch RUN apt-get update > /dev/null && apt-get -y -q install \ python3-pip > /dev/null RUN pip3 install pika pyyaml RUN mkdir /var/log/receiver COPY receiver.py /opt/ CMD ["/usr/bin/python3", "/opt/receiver.py"] , . . , . . — . — .
6:
. . , , , , — , . , , ! - Dockerfile — , , . - ansible\puppet\chef, . , . — ! — . , virtualenv, , , — .
, , docker hub. , . , , , /etc/init.d/uwsgi start — . why? uwsgi docker.
uwsgi docker — init .
1) /etc/init.d/uwsgi start . , , . . :
start-stop-daemon --start --quiet \ --pidfile "$PIDFILE" \ --exec "$DAEMON" \ --test > /dev/null \ && return 2 , init-. , /proc/{id}/exe. 0, , && 2 (return 2), ( ). 14 : github.com/moby/moby/issues/6800 .
Workaround:
, , .
a) /usr/share/uwsgi/init/specific_daemon --exec --startas. ( , , , ) startas /proc/{id}/exe pid. (https://chris-lamb.co.uk/posts/start-stop-daemon-exec-vs-startas)
b) --cap-add=SYS_PTRACE. .
) init-.
2) /etc/init.d/uwsgi start . ( ?). , . , , .
:
1) ( ):
... stats = 0.0.0.0:9090 socket = 0.0.0.0:3031 pidfile = /run/uwsgi/pid socket = /run/uwsgi/socket ... 2) Dockerfile:
... COPY app.ini /etc/uwsgi/apps-enabled/app.ini RUN mkdir /run/uwsgi && chown www-data /run/uwsgi CMD ["/usr/bin/uwsgi", "--ini", "/etc/uwsgi/apps-enabled/app.ini"] .1 .2, pid\socket.
community-edition . ! . — , , .
- . - — kubernetes\docker swarm. kubernetes helm. , ;)…
. . , . .
! . .
Source: https://habr.com/ru/post/346634/
All Articles