We connect devices of the Internet of things and Azure by means of NodeJS

To work with the Internet of things, various more serious devices are often used that can support NodeJS. An example of such a device could be one of the most popular maker cards Raspberry PI. Therefore, I could not ignore this topic and decided to deal with how supporting NodeJS devices can work with Azure IoT hub.
In addition, under the cat is considered the possibility of protecting the connection with an SSL certificate and the process of creating a self-signed certificate.
Download and install NodeJS. English manual how to do it is available here:
Installing Node.js via package manager
Create a new directory. Open CMD or Bash, and go to the created directory
We execute the command
')
npm init As a result of answering questions, a package.json file will be created.
Install a couple of packages with the command:
npm install azure-iot-device azure-iot-device-mqtt –save In this example, we use the MQTT protocol, which does not contain unnecessary information, has not so many possibilities, but is specifically designed for IoT devices.
Create some js file. Suppose a file named index.js. Now, let's add the following code to the file and look at it:
'use strict'; // require('package-name') var clientFromConnectionString = require('azure-iot-device-mqtt').clientFromConnectionString; var Message = require('azure-iot-device').Message; var connectionString = 'HostName=ArduinoDemoHub.azure-devices.net;DeviceId=ArduinoAzureTwin;SharedAccessKey=Fqve19DXyMOx3vQI63eHxW0bK6VmT+R6iqPK23vhdiQ='; var client = clientFromConnectionString(connectionString); function printResultFor(op) { return function printResult(err, res) { if (err) console.log(op + ' error: ' + err.toString()); if (res) console.log(op + ' status: ' + res.constructor.name); }; } var connectCallback = function (err) { if (err) { console.log('Could not connect: ' + err); } else { console.log('Client connected'); // «» writeLine client.onDeviceMethod('writeLine', onWriteLine); // IoT Hub setInterval(function(){ var iotdata = Math.round((Math.random() * 25)); var data = JSON.stringify({ deviceId: 'ArduinoAzureTwin', iotdata: iotdata }); var message = new Message(data); console.log("Sending message: " + message.getData()); client.sendEvent(message, printResultFor('send')); }, 1000); } }; function onWriteLine(request, response) { response.send(200, 'Input was written to log.', function(err) { if(err) { console.error('An error ocurred when sending a method response:\n' + err.toString()); } else { console.log('Response to method \'' + request.methodName + '\' sent successfully.' ); } }); } client.open(connectCallback); Of course, you should have created an IoT hub and you should replace the connection string from the code with your own. In my example, the data is sent with the names deviceId and iotdata. You can send some of your data.
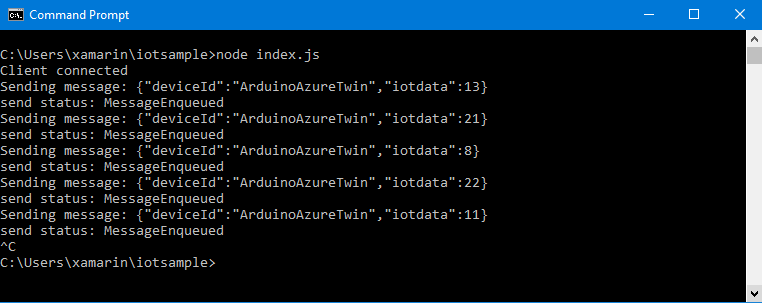
You can run the code with the command
node index.js If done correctly, the result should be something like this:
Links to official manuals:
Connecting a virtual device to the IoT Center using Node
Using direct methods on the Internet of Things device (Node.js)
It all works, but not very well done in terms of security.
In order to secure the connection, you can use TLS X.509 certificates. In production, of course, it is better to use certificates issued by any certifying center. But you can use self-signed certificates for testing. Let's create one and protect the connection.
To create a certificate, I initially thought of using the makecert application, but it turned out that it was already considered obsolete. So I decided to use PowerShell scripts.
Open Powershell with admin rights. We execute the following command, specifying after CN = the name you want to name the certificate:
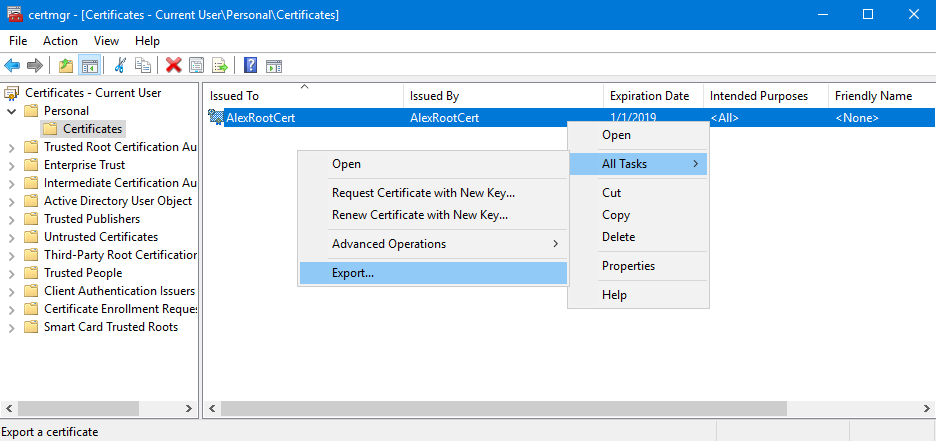
$cert = New-SelfSignedCertificate -Type Custom -KeySpec Signature ` -Subject "CN=AlexRootCert" -KeyExportPolicy Exportable ` -HashAlgorithm sha256 -KeyLength 2048 ` -CertStoreLocation "Cert:\CurrentUser\My" -KeyUsageProperty Sign -KeyUsage CertSign Now you can open the certmgr.msc utility and find your certificate in the Certificates - Current User / Certificates folder.
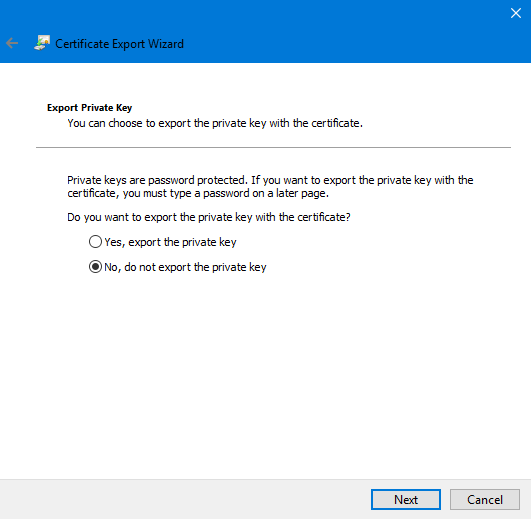
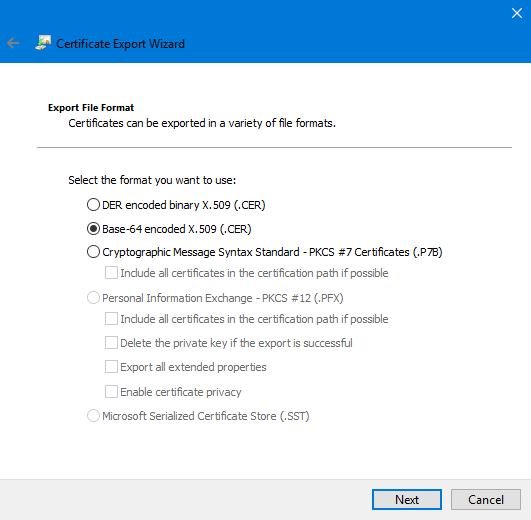
The certificate must be exported as follows (without a private key):
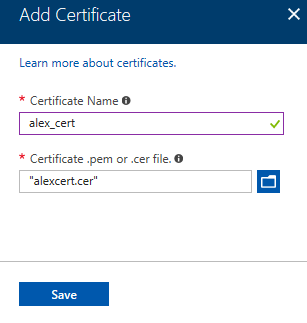
We will later upload this certificate to IoT Hub.
After generating the root certificate, it is advisable not to close the Powershell window. If you have not closed it, then generating the client certificate will be quite easy for you. After all, you can use the $ cert variable.
If closed, then read the official documentation (look for Example 2 there). Or open the spoiler and read my description of how to declare the variable cert.
how can I declare a variable cert
We execute the command
We get something like this:
PSParentPath: Microsoft.PowerShell.Security \ Certificate :: CurrentUser \ My
Thumbprint Subject
- - FDF386B2AE761CBDD5A111CEF047CC5419F9425A CN = AlexRootCert
From this answer, copy the Thumbprint certificate and paste it into the command:
Get-ChildItem -Path "Cert:\CurrentUser\My" We get something like this:
PSParentPath: Microsoft.PowerShell.Security \ Certificate :: CurrentUser \ My
Thumbprint Subject
- - FDF386B2AE761CBDD5A111CEF047CC5419F9425A CN = AlexRootCert
From this answer, copy the Thumbprint certificate and paste it into the command:
$cert = Get-ChildItem -Path "Cert:\CurrentUser\My\FDF386B2AE761CBDD5A111CEF047CC5419F9425A" Create a client certificate. There is no need to change anything other than the name of the certificate being created in the command.
New-SelfSignedCertificate -Type Custom -KeySpec Signature ` -Subject "CN=AlexClientCert" -KeyExportPolicy Exportable ` -HashAlgorithm sha256 -KeyLength 2048 ` -CertStoreLocation "Cert:\CurrentUser\My" ` -Signer $cert -TextExtension @("2.5.29.37={text}1.3.6.1.5.5.7.3.2") Now let's load the first generated certificate into the IoT hub. To download the root certificate, go to the IoT hub in the certificates section.

Since it is self-signed with us, it will be displayed as “Unverified”. Certificate confirmation is called Proof of possession. Open the certificate properties window and scroll down to the last two fields.

Click the button “Generate Verification Code” and copy the generated code. Again, open PowerShell and run the following code:
function New-CASelfsignedCertificate([string]$subjectName, [object]$signingCert, [bool]$isASigner=$true) { # Build up argument list $selfSignedArgs =@{"-DnsName"=$subjectName; "-CertStoreLocation"="cert:\LocalMachine\My"; "-NotAfter"=(get-date).AddDays(30); } if ($isASigner -eq $true) { $selfSignedArgs += @{"-KeyUsage"="CertSign"; } $selfSignedArgs += @{"-TextExtension"= @(("2.5.29.19={text}ca=TRUE&pathlength=12")); } } else { $selfSignedArgs += @{"-TextExtension"= @("2.5.29.37={text}1.3.6.1.5.5.7.3.2,1.3.6.1.5.5.7.3.1", "2.5.29.19={text}ca=FALSE&pathlength=0") } } if ($signingCert -ne $null) { $selfSignedArgs += @{"-Signer"=$signingCert } } if ($useEcc -eq $true) { $selfSignedArgs += @{"-KeyAlgorithm"="ECDSA_nistP256"; "-CurveExport"="CurveName" } } # Now use splatting to process this Write-Host ("Generating certificate {0} which is for prototyping, NOT PRODUCTION. It will expire in 30 days." -f $subjectName) write (New-SelfSignedCertificate @selfSignedArgs) } function New-CAVerificationCert([string]$requestedSubjectName) { $cnRequestedSubjectName = ("CN={0}" -f $requestedSubjectName) $verifyRequestedFileName = "D:\verifyCert4.cer" $ert = Get-ChildItem -Path "Cert:\CurrentUser\My\FDF386B2AE761CBDD5A111CEF047CC5419F9425A" Write-Host "Using Signing Cert:::" Write-Host $ert $verifyCert = New-CASelfsignedCertificate $cnRequestedSubjectName $ert $false Export-Certificate -cert $verifyCert -filePath $verifyRequestedFileName -Type Cert if (-not (Test-Path $verifyRequestedFileName)) { throw ("Error: CERT file {0} doesn't exist" -f $verifyRequestedFileName) } Write-Host ("Certificate with subject {0} has been output to {1}" -f $cnRequestedSubjectName, (Join-Path (get-location).path $verifyRequestedFileName)) } New-CAVerificationCert "8957B1DCD5D19DDFD06BFCC90A9B740C9EF7B4DBEC84C5AB" In this code, we insert the verification code from Azure into the last line. And in the line:
$ert = Get-ChildItem -Path "Cert:\CurrentUser\My\FDF386B2AE761CBDD5A111CEF047CC5419F9425A" Insert the thumbprint, which we received earlier from the Root certificate. Or, if you didn’t close Powershell right from the start, you can delete this line.
If you wish, you can change the directory and the name of the certificate to be created. After the file is created, upload it to the IoT Hub.
Now you need to create a device twin. In IoT Hub, open the menu item “IoT Devices”. We choose the type of authentication X.509 Self-Signed and understand that we are asked to imprint a certificate. And even 2 prints.

We go to the certificate manager certmgr.msc and click on the client certificate twice. A property window will open where you can find what you need:

The Thumbprint value is copied and pasted into the device's twin creation window. The second imprint is requested for special scenarios in which the certificate can be replaced on the fly with a spare one.
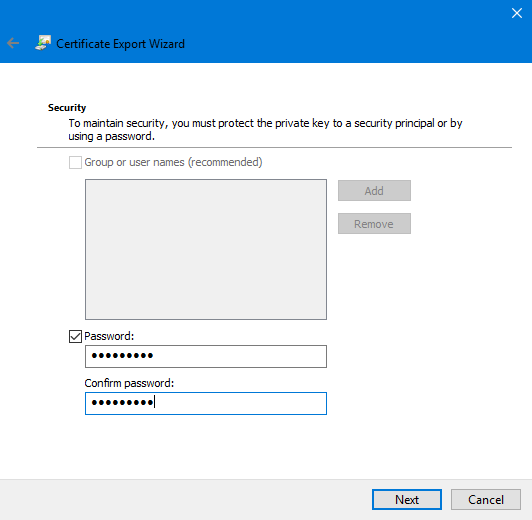
That's not all. We need to export a client certificate without a private key (as a cer) and with a private key (in pxf format). From the exported client certificate in the pxf format, you must create a key file in the pem format.
A client certificate without a private key is exported in the same way as we have already exported the root certificate. But in pfx format the certificate is exported in the same way as the root certificate is exported in order to install it on another computer:


If you do not enable the Enable certificate privacy option, then the contents of the certificate will remain unencrypted. Protection will be applied only to the private key. The contents of the certificate can be viewed with certutil.
Export extended extended properties applies only to the Microsoft platform and exports some additional information.
To create a pem file we need OpenSSL. You can use WSL to install OpenSSL on Windows. Install Ubuntu from Microsoft Store and then install OpenSSL
sudo apt-get update sudo apt-get install openssl Now you need to use the cd command to go to the directory with the certificate and execute the following command:
openssl pkcs12 -in alex-client-cert.pfx -out key.pem -nodes The command specifies the name of the existing certificate and the name of the pem file to be created.
Alternatively, you can use the following utility: Win64 OpenSSL v1.0.2n
Go to the directory of the installed utility (I have C: \ OpenSSL-Win64 \ bin) and run the following command:
.\openssl pkcs12 -in D:\iotapp\alex-client-cert.pfx -out D:\iotapp\key.pem -nodes It remains to change our code to code protected by a certificate. As an example, I used the following: simple_sample_device_x509.js
'use strict'; var clientFromConnectionString = require('azure-iot-device-mqtt').clientFromConnectionString; var Message = require('azure-iot-device').Message; var connectionString = 'HostName=ArduinoDemoHub.azure-devices.net;DeviceId=NodeTwin;x509=true'; var fs = require('fs'); var certFile = 'alex-client-cert.cer'; var keyFile = 'key.pem'; var passphrase = 'KJu86Hfjw3jG'; var client = clientFromConnectionString(connectionString); function printResultFor(op) { return function printResult(err, res) { if (err) console.log(op + ' error: ' + err.toString()); if (res) console.log(op + ' status: ' + res.constructor.name); }; } var connectCallback = function (err) { if (err) { console.log('Could not connect: ' + err); } else { console.log('Client connected'); client.onDeviceMethod('writeLine', onWriteLine); // Create a message and send it to the IoT Hub every second setInterval(function(){ var iotdata = Math.round((Math.random() * 25)); var data = JSON.stringify({ deviceId: 'ArduinoAzureTwin', iotdata: iotdata }); var message = new Message(data); console.log("Sending message: " + message.getData()); client.sendEvent(message, printResultFor('send')); }, 1000); } }; function onWriteLine(request, response) { console.log('sdfdsf'); response.send(200, 'Input was written to log.', function(err) { if(err) { console.error('An error ocurred when sending a method response:\n' + err.toString()); } else { console.log('Response to method \'' + request.methodName + '\' sent successfully.' ); } }); } var options = { cert : fs.readFileSync(certFile, 'utf-8').toString(), key : fs.readFileSync(keyFile, 'utf-8').toString(), passphrase: passphrase }; client.setOptions(options); client.open(connectCallback); Link to the official manual:
Configuring an X.509 Security Certificate in Azure Internet of Things
Source: https://habr.com/ru/post/346598/
All Articles