How I reinvent the media center

With the acquisition of a new TV, the question arose of which prefix for it to take. Chromecast capabilities are not enough, and I wanted a full-fledged media center at Kodi. TV with SmartTV is not an option to buy - Kodi can only be installed on Android (from SmartTV platforms), and I treat it without much love, besides, it is already inside the TV, and not in a separate box that can be safely reflashed. Well, why do I need a full-sized Android, with all its services and programs in a virtual machine, without a full-fledged GNU / Linux environment and, most likely, without updates? For the same reason, numerous ready-made media centers on Android were also flagged, although the same prefix from Xiaomi is pretty good. One would think about SmartTV on TizenOS, but for him there is no Kodi.
With such requirements, and despite the fact that this is my first single-board computer, the choice is obvious - Raspberry Pi, and specifically I took the RPi 3 model B.
Raspbian Installation and Pre-Setup
As a Debian user, I immediately installed Raspbian and started playing with the new system. You can record the downloaded system image using the Etcher program, or from the console:
First, clear the contents of the card, filling in everything with zeros ...
sudo dd if=/dev/zero of=/dev/mmcblk0 bs=512 count=2047 then write the image ...
sudo dd if=/path/to/raspbian.img of=/dev/mmcblk0 Running raspberry with raspbian is very easy to install Kodi - with a command
sudo apt update && sudo apt install kodi For the media center to start when the raspberry is turned on, you need to add a line to the /home/pi/.config/lxsession/LXDE-pi/autostart file
@kodi -fs Despite all the charm of the Raspberry Pi, it has one important drawback: with a sudden power outage, it is likely that only part of the data will be overwritten to the SD card, and therefore memory cards do not last long and, on average, fail after a year. There are solutions on the market that solve this problem with the help of an additional energy source (for example, a capacitor). Also, SD cards have a limited number of rewrite cycles and it is important to reduce the number of these same rewrites in order for the memory card to last longer.
Remove unwanted programs
I removed the dphys-swapfile to remove the swap file with the ends, which consumes the resource of the memory card, and also deleted different toys and completely unnecessary programs, at least for me.
sudo apt purge dphys-swapfile wolfram-engine logrotate nodejs nodered minecraft-pi oracle-java8-jdk openjdk-7-jre oracle-java7-jdk openjdk-8-jre sudo apt autoremove --purge Replacing the log manager
I also changed the service for recording logs:
sudo apt install busybox-syslogd sudo dpkg --purge rsyslog Now logs are written to the ring buffer located in RAM, you can watch them with the command logread
Increased reliability when power is off
The most logical step is to make the partition with the system read-only, and then, by definition, there will be no problems with writing, because there will be no recording. But Raspbian is a complete system that cannot work on a partition on which writing is completely prohibited. At a minimum , you need to remove / var / log , / var / tmp and / tmp in tmpfs , i.e., store the contents of these folders in RAM. But for practical use, you need to make much more changes .
I decided to do it differently: create a multi-layered file system, where the basis stored on the memory card is kept as read-only, and all changes that are made in the system are stored in RAM. Accordingly, all changes are reset when the power is turned off and do not harm anyone. The approach is not new, it is often used in routers, for example, and using overlayfs is very easy to implement.
A link to a similar solution using UnionFS has already been posted to Hyktimes, but since its publication, support for the OverlayFS file system developed by SUSE as a more progressive replacement for UnionFS and AUFS has been added to the Linux kernel, so the whole thing is configured a little differently.
I found a script that does exactly what I planned: the system partition on the memory card mounts in read-only mode, and all changes are saved in the upper layer, located in RAM. By the way, this script also supports AUFS .
Installation is quite simple:
Create a root-ro file in the / etc / initramfs-tools / scripts / init-bottom / folder, in which we put the contents of the script
cd /etc/initramfs-tools/scripts/init-bottom && sudo wget https://gist.github.com/sbonfert/7044eced553ea5c5c2346bcde6bb12e7/raw/7ef62bd5553faae1cb2d2eb79d84dde5197e8c56/root-roChange script access rights:
sudo chmod 0755 /etc/initramfs-tools/scripts/init-bottom/root-roAdd overlay to the list of modules that will be loaded into the initramfs
sudo echo "overlay" >> /etc/initramfs-tools/modulesRe-create the initramfs image:
mkinitramfs -o /boot/initrdIt remains to add the
root-ro-driver=overlayparameter to the bootloader, to the /boot/cmdline.txt file- And 3 more lines in the bootloader configuration at /boot/config.txt :
initramfs initrd followkernel ramfsfile=initrd ramfsaddr=-1
You can disable-root-ro=true read-only mode, by the way, either by adding disable-root-ro=true in / boot / cmdline.txt , or by creating a disable-root file in the root of the file system.
In Debian (respectively, and in Raspbian), there is the bilibop-lockfs package , which does roughly the same thing as this script. However, despite the fact that bilibop is available for installation, it is designed to work in conjunction with GRUB , and not used in the Raspbian loader. In the x86 version of Raspbian, it works correctly. Perhaps readers will be able to patch it for Raspberry Pi.
File system overflow protection
For tmpfs , half the amount of RAM is allocated by default, and since memory is limited, once the changes to the root file system have reached the limit. You can clear it by simply rebooting the system; to do this, add the line to / etc / crontab :
# (100%) . * * * * * root /bin/df -h | /bin/grep /$ | /usr/bin/awk '{if ($5=="100%") system ("/sbin/shutdown -r now")}' and restart cron
sudo service cron restart This will allow you to respond to the problem within one minute.
Roots separately, hamsters separately
I used such a configuration for a while, but I was tired of losing settings and plugins in Kodi, and did not set everything up in advance, and I decided to leave the root system in read-only mode, and keep the home folder as it is, all the same, it doesn’t make much changes .
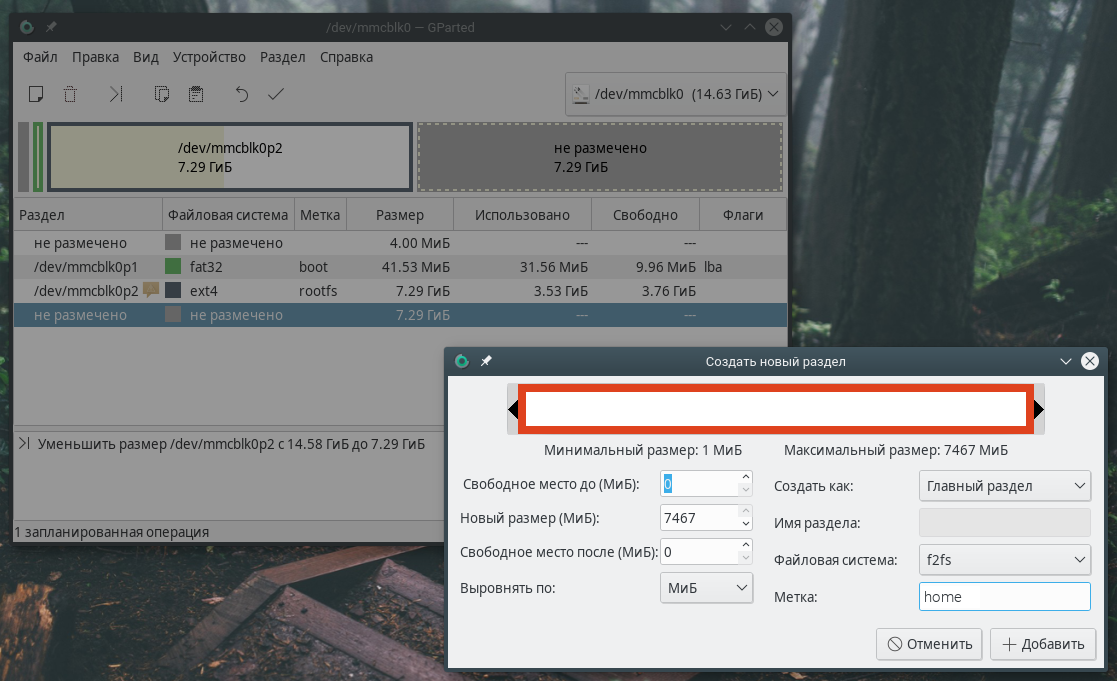
Naturally, then the partition should be under F2FS - optimized for SSD and other flash drives to the file system. As already mentioned, the memory card has two troubles: the probability of losing some of the data during recording and a relatively small number of supported cell overwrites. F2FS refers to file systems that use the concept of copy-on-write (Copy-On-Write), that is, new data is not overwritten in the same cells, but written to a new place, and only if the operation is completed successfully, the link to the old area of the media is deleted .
To work with F2FS, you need to install the f2fs-tools package both in our raspberry pi and in the system with which the new partition is created. For Debian-like (including Raspbian), you need to run the command
sudo apt install f2fs-tools I cut off half with GParted, created the F2FS partition and at the same time gave the home tag to more conveniently access the partition.
After that made changes to / etc / fstab , adding the line
LABEL=home /home f2fs rw,noatime,defaults 0 1 Everything is good, but how to install updates now?
I also thought of this, recalling the project Ubuntu Core Snappy. It provides for the existence of 2 sections, available for reading to all others. The system update is atomically written to the inactive partition and the system is rebooted, already using the updated partition. These two sections of System-a / b also allow you to roll back to a working version in case of problems with the update.

Similarly, I did, breaking the system partition into 2 equal sections. Previously, of course, copying data from a memory card to a computer. For this, it is convenient to use the rsync file copy utility. For example:
sudo rsync -aAXv --exclude={"/dev/*","/proc/*","/sys/*","/tmp/*","/run/*","/mnt/*","/media/*","/var/backups/*","/var/cache/apt/*","/var/lock/*","/var/tmp/*","/lost+found", "/home"} /media/user/folder /home/user/backup_raspbian We split the above command and see what each argument does.
- -aAXv — Files are transferred in “archive” mode, which ensures that symbolic links, device, permission, ownership, modification time, access control lists, and extended attributes are preserved.
- --exclude - Exclude these directories from the backup.
- / media / user / folder - Source directory.
- / home / user / backup_raspbian - This is the backup destination folder.
In total, I received 4 sections, where the first one contains the bootloader, the next two are identical in size and contain a copy of the file system (for convenience, I called them root1fs and root2fs, respectively), and in the last section, user data.

It remains to back up the backup from the computer to both sections of the memory card and register the changes in the fstab and the bootloader.
In the root1fs section of the / etc / fstab file in the line where the root is mounted, we change the line to
LABEL=root1fs / ext4 defaults,noatime 0 1 and in the root2fs section , respectively, on root2fs
It remains to make changes to /boot/cmdline.txt
It is necessary to find the root=PARTUUID=… parameter there and replace it with root=LABEL=root1fs or root=LABEL=root2fs , it will depend on this from which partition it is being booted.
Preparations are over, now you can make the first update of the system.
On the computer where we saved the backup, you need to install the proot and qemu-system packages. For Debian-like:
sudo apt install proot qemu-system Now we can do chrut in the saved backup ...
sudo proot -q qemu-arm -S /home/user/backup_raspbian and make the necessary changes. For example, the very update that I suggested above.
apt update && apt upgrade after downloading and installing updates, exit the command with the exit and can synchronize with the memory card:
sudo rsync -aAXv --exclude={"/dev/*","/proc/*","/sys/*","/tmp/*","/run/*","/mnt/*","/media/*","/var/backups/*","/var/cache/apt/*","/var/lock/*","/var/tmp/*","/lost+found", "/home", "/etc/fstab"} /home/user/backup_raspbian /media/user/root2fs Notice, I added the / etc / fstab synchronization exception to the already mentioned rsync command, since this file is already configured on each partition separately.
In this case, the changes are synchronized with the second partition (root2fs). By choosing the active partition in /boot/cmdline.txt , you can boot from both the original version of the system and the updated one.
And it was interesting to play with this synchronization, as well as network synchronization with the working raspberry, but the need to control from a separate device is inconvenient. If I had a rack of minicomputers, or if I offered to use my distribution kit, of course, such non-atomic updates would be very convenient, but on the scale of one device there is no point. And I started thinking about automatically updating the script, or that some script even directly from Raspbian should read the second section and update it, and then change the boot partition, but before that I decided to study the existing distros intended for deploying a media center on Kodi. And suddenly…
XBian Happiness

I don’t know how I used to pass XBian , but this is exactly what I need. Unlike other distributions with Kodi, which are variations in the number of software originally installed, it is in XBian that many optimizations are used specifically to work as a media center. In XBian released what I wanted, only better thought out.
XBian is based on Debian, and, like Debian, uses rolling releases, because packages are always up to date. Moreover, you can upgrade to the test branch and go back to the stable one.
The system is located on the partition with the Btrfs file system, which, like F2FS , uses the copy-on-write mechanism, but also supports creating snapshots, and the XBian menu has convenient utilities for managing snapshots and settings for automatically creating snapshots. If any file is damaged, Btrfs will instantly transfer the system to read-only mode to prevent further damage to the system, and provide the means to restore and roll back to the working version. I think Btrfs is the perfect choice for the system partition in this case, and F2FS decided to use it on a flash drive with files connected to the Raspberry Pi. I don’t need snapshots on a flash drive, but the data in F2FS is written strictly sequentially, unlike Btrfs , without worrying about fragmentation, which provides a more uniform load on the cells.
In XBian, the services are set to the minimum number of records made on microSD, so the lack of the Read-Only section can be ignored. In the end, the store gave me a 10-year warranty on the memory card, if anything, I’ll change it.
The only downside for me is that XBian uses upstart as the initialization system. It is customary to scold systemd , and I myself am scolding as a joke myself, but it's much more convenient for me to go with it. But you can not worry about this: upstart since 2014 does not develop, one day developers will have to change the initialization system.
Then I found a great plugin for Kodi called Quasar , which I want to tell about separately. It allows you to choose from various tops, either to find the desired movie or series and start watching it using torrent technology, and after viewing the plugin will offer to save this movie or series to the library. And you can save as a downloaded file, and a link to it - then when you click on the product will start downloading torrents.
Quasar Burst is an add-on for Quasar, which contains settings for which torrent trackers to use to search for content. It already has popular Russian torrent trackers, for example, rutor and rutracker, so Quasar is absolutely suitable for Russian-speaking users.
UP: In the comments recommended Elementum - fork of the quasar that had stopped developing. I recommend to try it.
Bypass blocking
However, everything is not as good as we would like. As you know, Roskomnadzor requires providers to block heap of sites, like recipe for crafting dynamite in minecraft or torrent trackers, and if installing a browser add-on is enough to bypass the lock on the desktop, then it’s not so easy for the media center.
If all traffic is sent via Tor, VPN or a proxy, then this will affect the download speed. Especially in the case of Tor. Therefore, it is necessary to bypass blocking only blocked addresses, and connect to other torrent users directly.
You can find various options for circumvention, varying degrees of reliability and complexity, I chose to use a VPN, and not for all traffic, but for a specifically specified list of addresses.
You can use your VPN server, purchase it somewhere, or use the antizapret.prostovpn.org service. It seems like when installing this VPN traffic to the sites should go directly if this site is not on the blocked list, but for some reason all of my traffic on the Raspberry Pi bypasses the VPN, so I forcibly indicated which addresses to use for it, o what a little later.
The command to install OpenVPN:
sudo apt install openvpn Then you need to add the tun kernel module to autoload at system startup in order to ensure the operation of OpenVPN
sudo echo "tun" >> /etc/modules and for the first time manually download it
sudo modprobe tun In the case of using a VPN from antizapret, I downloaded the antizapret.ovpn file stored there, saved it as /etc/openvpn/client.conf and added the addresses I needed to be transmitted via VPN
route 195.82.146.214 255.255.255.255 vpn_gateway # rutracker route 185.112.157.181 255.255.255.255 vpn_gateway # nnm-club route 104.27.140.149 255.255.255.255 vpn_gateway # rutor route 104.24.106.53 255.255.255.255 vpn_gateway # kinozal It is important that the configuration does not have a line starting with redirect-gateway , otherwise all traffic will go through the VPN.
The file / etc / default / openvpn is used to configure which configurations will be run by default when OpenVPN is started. It is enough to uncomment AUTOSTART="all" , or instead of all specify the client , that is, the configuration we created.
OpenVPN launch:
sudo service openvpn start and adding to autostart:
sudo update-rc.d openvpn enable Also, to bypass the blocking of service trackers, .t-ru.org executed a command in the console and added in /etc/rc.local* before `exit to auto-execute the command at boot:
iptables -t nat -A PREROUTING -p tcp -m tcp --dport 80 -d 195.82.146.120/30 -j DNAT --to-destination 163.172.167.207:3128 It would seem that all? But no. My provider turned out to be tricky, because my DNS requests addressed to Google at 8.8.4.4 are intercepted and changed if I request the IP address of a blocked resource. Here that to me nslookup issues:
nslookup rutracker.org Server: 8.8.4.4 Address: 8.8.4.4#53 Non-authoritative answer: Name: rutracker.org Address: <ip > Well, long ago it was time to switch to DNSCrypt. This utility connects to the DNS server over an encrypted channel, so the provider or another MitM will not be able to listen, spoof, or filter packets. I installed DNSCrypt on the router, launched it and now everything is gorgeous.
As a result, I got a wonderful media center, with a huge amount of available content, which is based on the best (at least in my estimation) technology, and using Raspberry Pi opens up huge opportunities for customization. You can install an infrared receiver to control the media center using the remote, even when connected to a TV that does not support HDMI-CEC, or play old games by connecting a joystick, or you can completely convert from a media center to another device.
')
Source: https://habr.com/ru/post/346594/
All Articles