Tutorial on the Unreal Engine. Part 9: Artificial Intelligence
In the video game industry, artificial intelligence (Artificial Intelligence, AI) is usually called the decision-making process by non-player-controlled characters. It can be simple: the enemy sees the player and attacks. Or more difficult, for example, a controlled AI opponent in real-time strategy.
In the Unreal Engine, AI can be created using behavior trees . The behavior tree is a system for determining the behavior used by AI. For example, he may have a fight or run behavior. You can create a behavior tree in which the AI will fight a player if his health is higher. If it is below 50%, then it will run away.
In this tutorial you will learn the following:
')
- Create an AI entity that can control the Pawn element.
- Create and use behavior trees and blackboard
- Use AI Perception to give pawn vision
- Create behaviors so Pawn can walk and attack enemies.
Note: This article is one of the nine parts of the Unreal Engine tutorial series:
- Part 1: Introduction to the engine
- Part 2: Blueprints
- Part 3: Materials
- Part 4: UI
- Part 5: How to create a simple game
- Part 6: Animation
- Part 7: Sound
- Part 8: Particle Systems
- Part 9: Artificial Intelligence
- Part 10: How to create a simple FPS
Getting Started
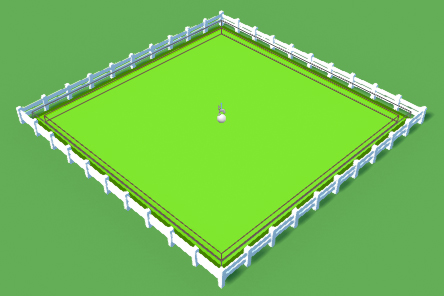
Download the project blank and unpack it. Navigate to the project folder and open MuffinWar.uproject .
Click on Play to start the game. Press the left mouse button inside the enclosed area to create a muffin.
Gif
In this part of the tutorial, we will create an AI that will roam around the screen. When an enemy muffin comes into the view of the AI, he approaches the enemy and attacks him.
To create an AI character, we need three things:
- Body: the physical shape of the character. In our case, the body is a muffin.
- Soul: the essence that controls the character. This can be a player or an AI.
- Brain: how AI makes decisions. The brain can be created in various ways, for example, using C ++ code, Blueprints, or behavior trees.
We already have a body, so we need more soul and brain. First we will create a controller that will be the “soul”.
What is a “controller”?
A controller is a non-physical actor that can move into Pawn. Universe allows the controller (as you might guess) to control the pawn. But what does “manage” mean in this context?
For the player, this means that when you press the key, Pawn will do something. The controller receives the player's input and sends the entered data to the pawn. Also, the controller can process the input itself and tell Pawn to perform the action.
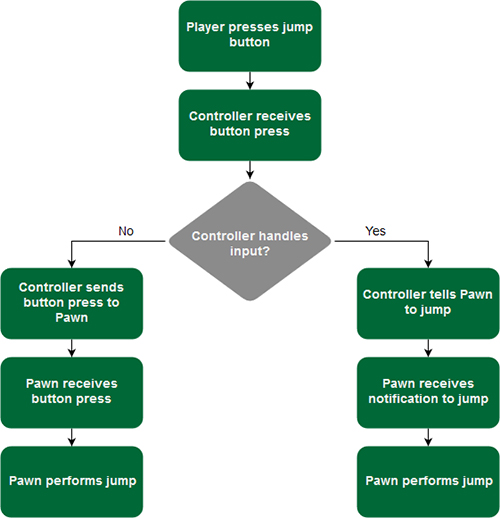
In the case of an AI, Pawn may receive information from a controller or brain (depending on how you implement it).
To control the muffins using AI, you need to create a special type of controller, called an AI controller .
Create AI Controller
Go to Characters \ Muffin \ AI and create a new Blueprint Class . Select AIController as the parent class and name it AIC_Muffin .

Then you need to tell the muffin to use the new AI controller. Go to Characters \ Muffin \ Blueprints and open BP_Muffin .
By default, the Details panel should display the default Blueprint parameters. If not, then click on the Class Defaults in the Toolbar.

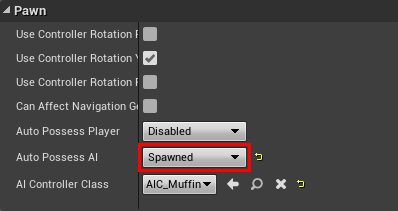
Go to the Details panel and find the Pawn section. Set the AI Controller Class to AIC_Muffin . This will create an instance of the controller when creating a muffin.
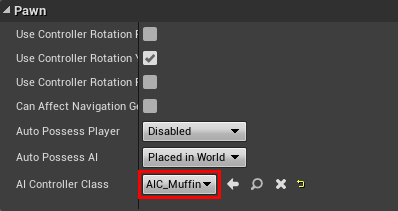
As we create the muffins dynamically, we also choose Spawned for Auto Possess AI . So AIC_Muffin will automatically populate the BP_Muffin when it is created.
Click on Compile and close BP_Muffin .
Now we will create a logic that will control the behavior of the muffin. You can use behavior trees for this .
Create a Behavior Tree
Go to Characters \ Muffin \ AI and select Add New \ Artificial Intelligence \ Behavior Tree . Call it BT_Muffin and open it.
Behavior Tree Editor
There are two new panels in the behavior tree editor:
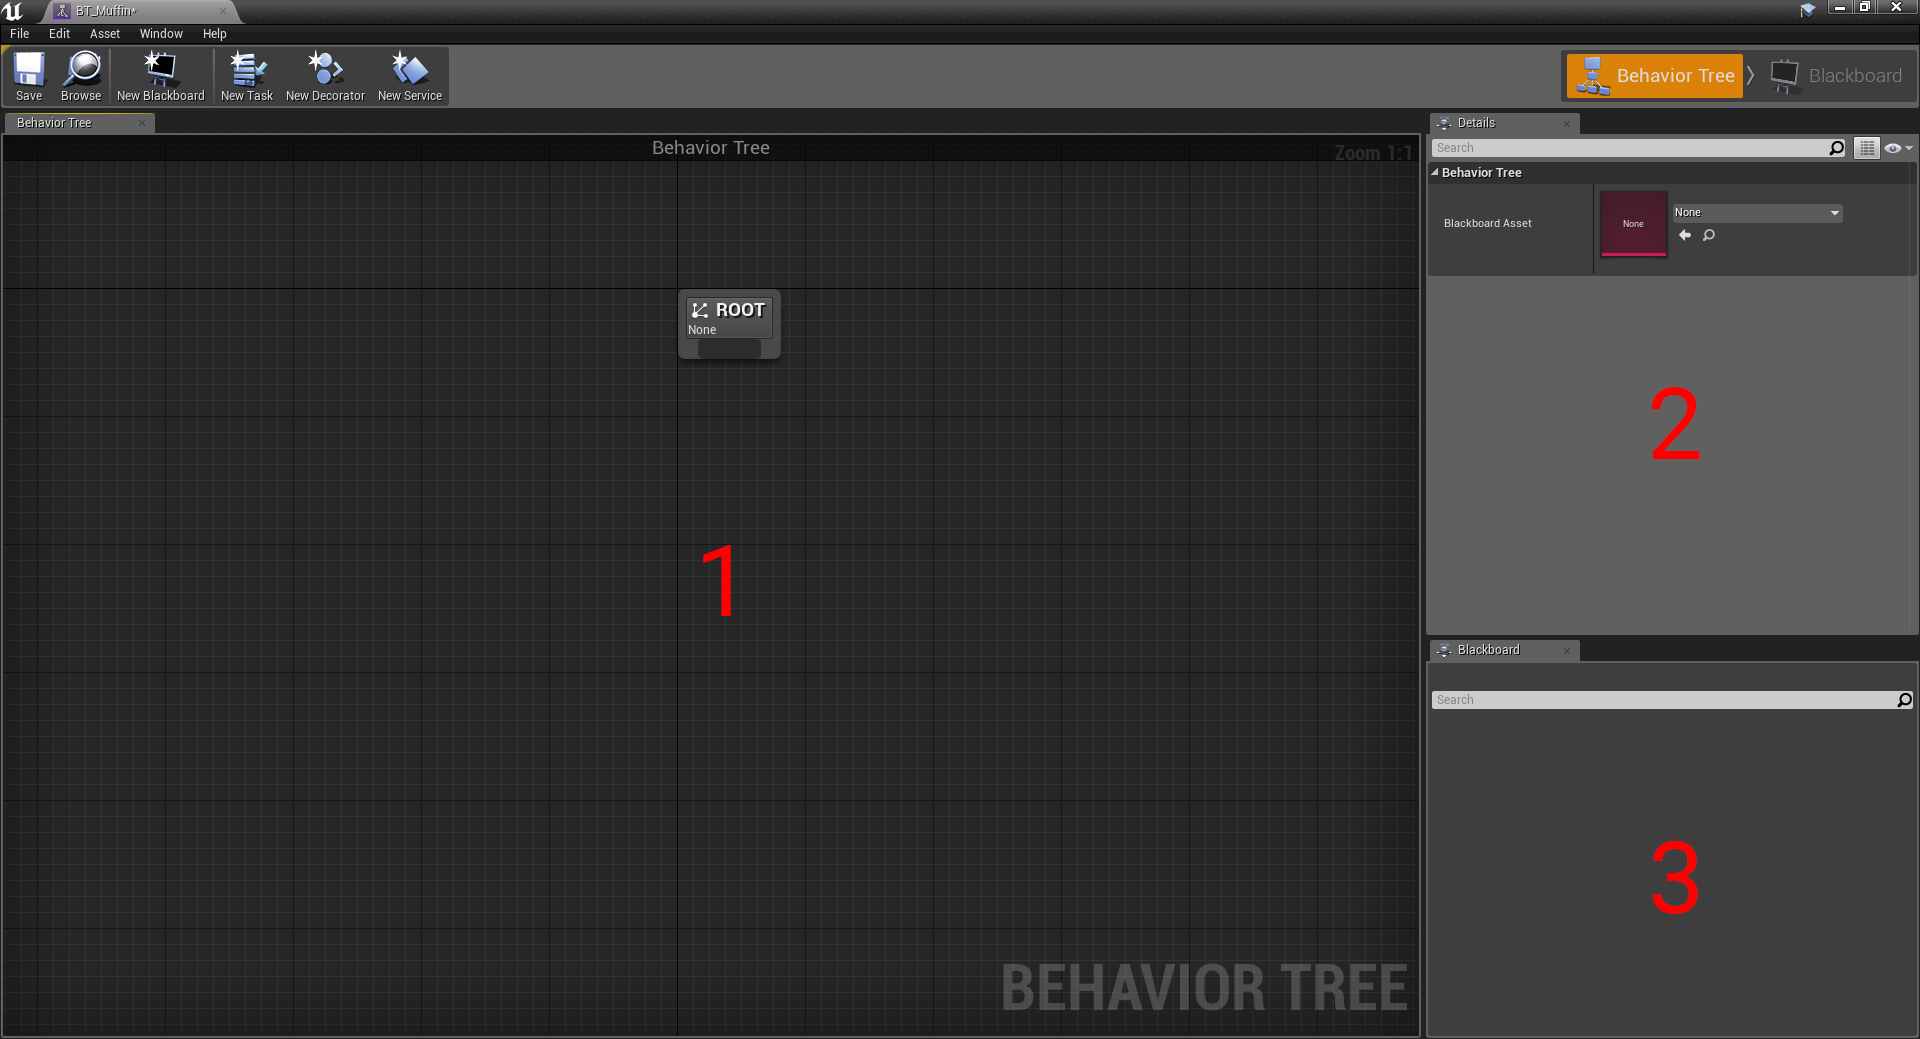
- Behavior Tree: this is a graph in which we will create nodes for the behavior tree
- Details: the properties of the selected nodes are displayed here.
- Blackboard: Blackboard keys (more about them later) and their meanings are displayed in this panel. Displayed only when the game is running.
Like Blueprint, a behavior tree consists of nodes. There are four types of nodes in behavior trees. The first two are task and composite .
What is Task and Composite?
As the name implies, a task is a node that "does" something. It can be something complicated, for example, a chain of combos, or something simple, for example, waiting.

To perform tasks you need to use composites (composite). A behavior tree consists of many branches (behaviors). At the root of each branch is a composite. Different types of composites have different ways of performing their child nodes.
Suppose we have the following sequence of actions:

To perform each action sequentially, we need to use the Sequence composite, because the Sequence runs its children from left to right. Here is what it will look like:
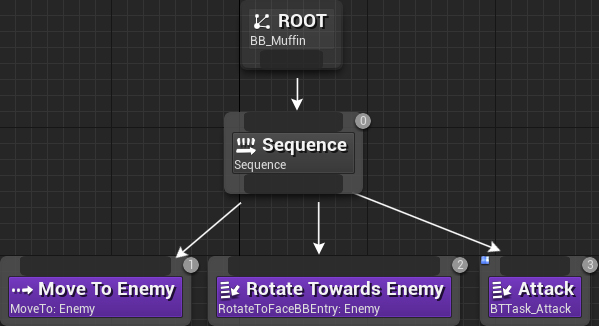
Note: anything that begins with a composite can be called a subtree . This is usually a behavior. In our example, the Sequence , Move To Enemy , Rotate Towards Enemy, and Attack can be considered the “attack the enemy” behavior.
If any of the child nodes of the Sequence fails to execute , then the Sequence stops executing.
For example, if Pawn cannot move to the enemy, then Move To Enemy will fail. This means that Rotate Towards Enemy and Attack will not be executed. However, they will be executed if Pawn manages to move towards the enemy.
We will also learn about the composite selector later. For now, we'll use Sequence to move Pawn to a random point and then wait.
Movement to a random point
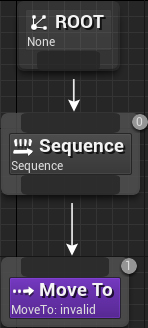
Create a Sequence and connect it to Root .
Gif
Now we need to move the pawn. Create a MoveTo and connect it to the Sequence . This node will move Pawn to the specified point or actor.
Then create Wait and connect it to Sequence . It is necessary to place this node to the right of MoveTo . The order here is important because the child nodes run from left to right.

Note: you can check the order of execution by looking at the numbers in the upper right corner of each node. The smaller the value, the higher the priority of the nodes.
Congratulations, you have just created your first behavior! It will move the pawn to the selected point, and then wait five seconds.
To move Pawn you need to specify a point. However, MoveTo can only get values received from blackboard , so let's create it.
Blackboard creation
Blackboard is a resource whose sole purpose is to store variables (called keys ). It can be considered its AI memory.
Although it is not necessary to use them, blackboard provides a convenient way to read and save data. It is convenient because many nodes in behavior trees can only receive blackboard keys.
To create a blackboard, go back to the Content Browser and select Add New \ Artificial Intelligence \ Blackboard . Call it BB_Muffin and open it.
Blackboard editor
The blackboard editor consists of two panels:

- Blackboard: a list of keys is displayed in this panel.
- Blackboard Details: the properties of the selected key are displayed in this panel.
Now we need to create a key that will contain the target point.
Creating the key of the target point
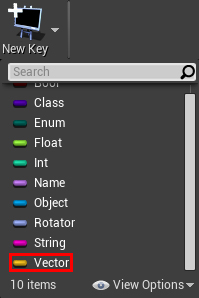
Since we store points in 3D space, we need to store them as vectors. Click on New Key and select Vector . Call it TargetLocation .
Now we need a way to generate a random point and save it in blackboard. To do this, we will use the third type of node of the behavior tree: service .
What is a service?
Services are similar to the tasks with which we do something. However, rather than forcing Pawn to perform actions, we use services to perform checks or update blackboard.
Services are not separate nodes, they are attached to tasks or composites. Due to this, a more ordered tree is created, because we have to work with fewer nodes. This is how the use of the task looks like:

And this is what the use of the service looks like:

Now we can create a service that generates a random point.
Service creation
Go back to BT_Muffin and click on New Service .

This will create and automatically open a new service. Call it BTService_SetRandomLocation . To rename it, you will need to return to the Content Browser.
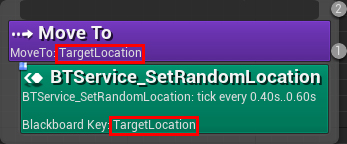
The service should only be performed when Pawn needs to move. To do this, attach it to MoveTo .
Open BT_Muffin and right-click on MoveTo . Choose Add Service \ BTService Set Random Location .
Now BTService_SetRandomLocation will be activated when MoveTo is activated.
Next we need to generate a random target point.
Random Point Generation
Open Open BTService_SetRandomLocation .
To find out when the service is activated, create an Event Receive Activation AI node. It will be executed when the parent is activated (the node to which it is attached).

Note: There is also an Event Receive Activation event that does the same. The difference between the two events is that the Event Receive Activation AI also provides a Controlled Pawn .
To generate a random point, add the selected node. The parameter Radius is assigned the value 500 .
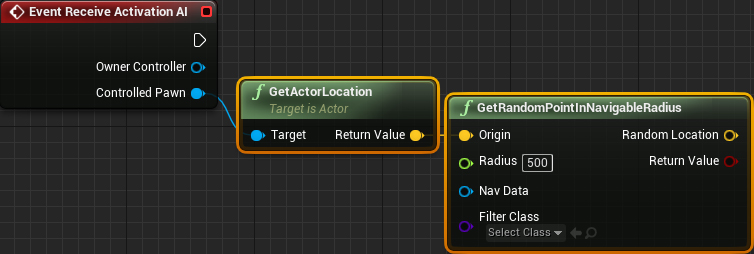
This will give us a random point within 500 units of Pawn, which you can reach.
Note: to determine if you can get to the point, GetRandomPointInNavigableRadius uses navigation data (called NavMesh ). In this tutorial, I pre-created NavMesh. You can visualize it by going to Viewport and selecting Show \ Navigation .
If you want to create your own NavMesh, then create a Nav Mesh Bounds Volume . Change its scale so that it restricts the area that should be available for movement.
Now we need to save the point in the blackboard. There are two ways to select the key to use:
- You can specify a key using its name in the Make Literal Name node
- You can make the variable visible in the behavior tree. This will allow you to select a key from the drop-down list.
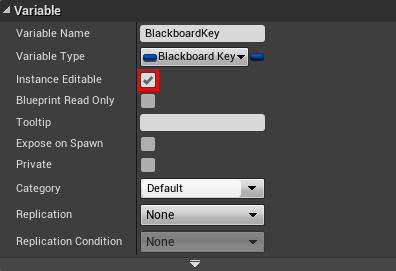
We will use the second method. Create a variable of type Blackboard Key Selector . Name it BlackboardKey and turn on Instance Editable . This will make the variable visible when selecting a service in the behavior tree.
Next, create the following selected nodes:

Summarize:
- Event Receive Activation AI runs when its parent is activated (in this case, MoveTo )
- GetRandomPointInNavigableRadius returns a random navigation point within a radius of 500 units from a controlled muffin.
- Set Blackboard Value as Vector sets the blackboard key (transmitted via BlackboardKey ) to a random point value.
Click on Compile and close BTService_SetRandomLocation .
Now we want to tell the behavior tree to use our blackboard.
Blackboard selection
Open BT_Muffin and make sure nothing is selected. Go to the Details panel. In Behavior Tree, set Blackboard Asset to BB_Muffin .
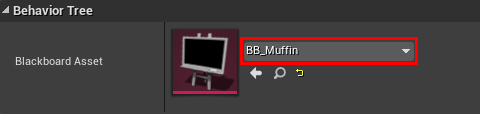
After this, MoveTo and BTService_SetRandomLocation will automatically use the first blackboard key. In our case, this is TargetLocation .
Finally, we need to order the AI controller to start the behavior tree.
Execution of the behavior tree
Open AIC_Muffin and connect the Run Behavior Tree to the Event BeginPlay . Select BT_Muffin for BTAsset .
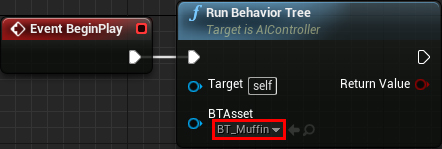
So BT_Muffin will be launched when creating AIC_Controller .
Click on Compile and return to the main editor. Click on Play , create some muffins and see how they wander around the screen.
Gif
We had to work hard, but we did it! Now we need to configure the AI controller so that it recognizes enemies in its area of visibility. To do this, you can use AI Perception .
Configure AI Perception
AI Perception is a component that can be added to actors. With it, you can give AI feelings (such as sight and hearing).
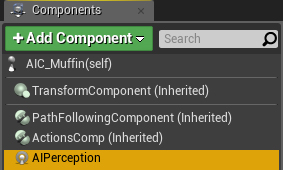
Open AIC_Muffin and add an AIPerception component.
Now we need to add a feeling. We want the muffin to recognize another muffin falling into the field of view, so we need to add vision .
Select AIPerception and go to the Details panel. In the AI Perception section, add a new element to the Senses Config .
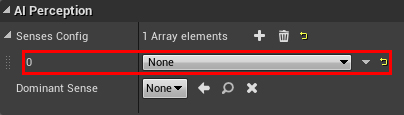
Set element 0 for AI Sight config and expand it.
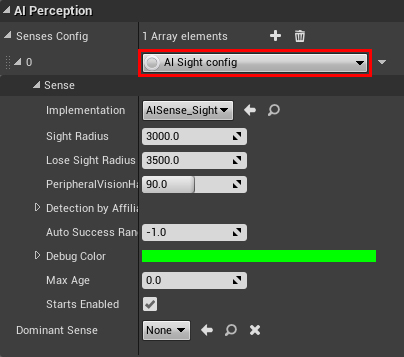
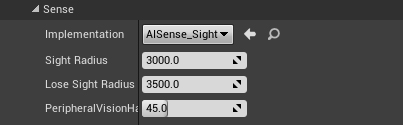
Vision has three main parameters:
- Sight Radius: the maximum distance that a muffin can see. Leave here the value of 3000 .
- Lose Sight Radius: if the muffin saw the enemy, this is the value by which the enemy must move away for the muffin to lose sight of him. Leave here the value of 3500 .
- Peripheral Vision Half Angle Degrees: the angle of view of the muffin. Set the value to 45 . This will give the muffin a viewing angle of 90 degrees.
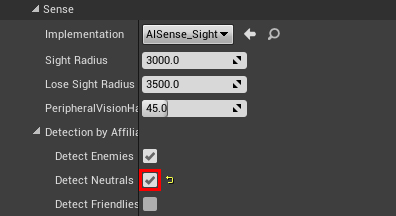
By default, AI Perception recognizes only enemies (actors assigned to another team ). However, by default, actors have no command. If the actor has no command, then AI Perception considers it neutral .
At the time of writing, there was no way to assign commands using Blueprints. Instead, you can simply order AI Perpcetion to recognize neutral actors. To do this, expand Detection by Affiliation and turn on Detect Neutrals .
Click on Compile and return to the main editor. Click on Play and create some muffins. Press the ' key to display the AI debug screen. Press key 4 on the number pad to visualize AI Perception. When the muffin comes into view, a green sphere appears.
Gif
Now we need to move the muffin towards the enemy. For this, the behavior tree must know about the enemy. This can be done by saving the link to the enemy in the blackboard.
Creating an enemy key
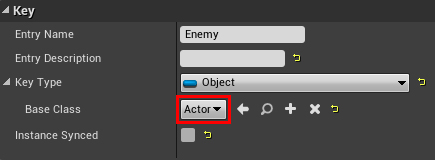
Open BB_Muffin and add an Object key. Rename it to Enemy .
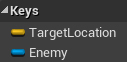
While we can not use Enemy in MoveTo , because the key is of type Object , but MoveTo can only receive keys of type Vector or Actor .
To fix this, select Enemy and expand Key Type . Select Base Class for Actor . This will allow the behavior tree to recognize Enemy as Actor .
Close BB_Muffin . Now we need to create a behavior to move towards the enemy.
Movement towards the enemy
Open BT_Muffin and separate the Sequence from the Root . This can be done by holding down Alt and left-clicking on the wire connecting them. For now, let's leave the subtree of random motion alone.
Now create the selected nodes and set the Blackboard Key value to Enemy :
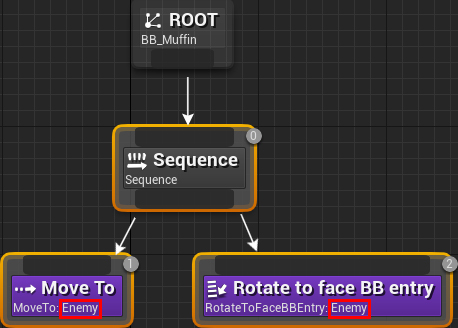
In this case, Pawn will move to Enemy . In some cases, Pawn does not completely turn to the target, so you need to use also Rotate to face BB entry .
Now you need to set Enemy when AI Perception recognizes another muffin.
Set the key Enemy
Open AIC_Muffin and select the AIPerception component. Add an On Perception Updated event.
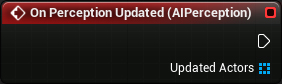
This event is executed when the feeling is updated. In our case, it is executed when the AI sees or loses someone. This event also transmits a list of actors that are currently detected by the senses.
Add highlighted nodes. Make sure the Make Literal Name is set to Enemy .
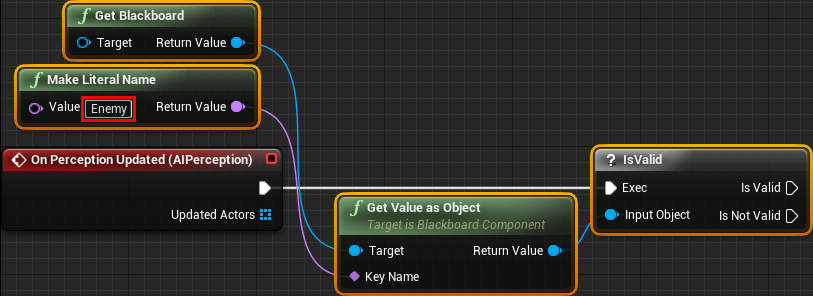
This will allow you to check if the AI is already an enemy. If not, we must give him an enemy. To do this, add the selected nodes:

Summarize:
- IsValid checks if the Enemy key is set
- If it is not specified, then all currently detected actors cycle
- Cast To BP_Muffin checks if the actor is a muffin
- If he is a muffin, then we check to see if he is dead.
- If IsDead returns false , then set the muffin as the new Enemy and stop the cycle
Click on Compile and close AIC_Muffin . Click on Play and create two muffins so that one is in front of the other. The muffin, located behind, will automatically begin to move to another.
Gif
Now we will create our own task for the muffin to carry out the attack.
Creating an attack task
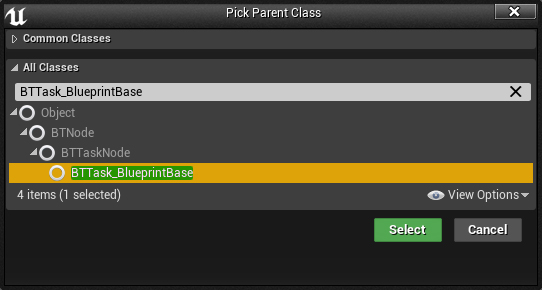
We can create a task in the Content Browser instead of the behavior tree editor. Create a new Blueprint Class and select BTTask_BlueprintBase as the parent class.
Call it BTTask_Attack and open it. Add an Event Receive Execute AI node. This node will be executed when the behavior tree executes BTTask_Attack .

First we need to make the muffin attack. BP_Muffin contains the IsAttacking variable. If it is set, the muffin will execute the attack. To do this, add the selected nodes:

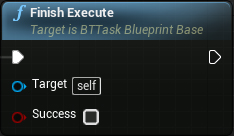
If you use the task in its current state, the execution will stop at it, because the behavior tree does not know whether the task has completed. To fix this, add a Finish Execute to the end of the chain.
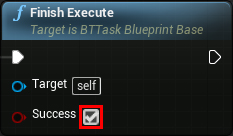
Then turn on Success . We use Sequence , so this will allow the nodes to execute after BTTask_Attack .
Here is how the graph should look like:

Summarize:
- Event Receive Execute AI is executed when the behavior tree starts BTTask_Attack
- Cast To BP_Muffin checks if Controlled Pawn is of type BP_Muffin.
- If yes, then its variable IsAttacking is set
- Finish Execute makes the behavior tree understand that the task was completed successfully .
Click on Compile and close BTTask_Attack .
Now we need to add BTTask_Attack to the behavior tree .
Adding an attack to the behavior tree
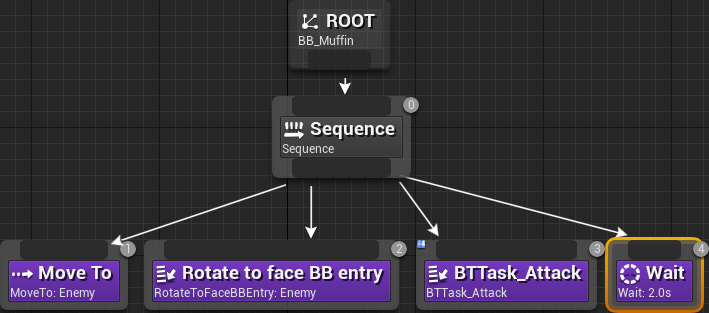
Open BT_Muffin . Then add the BTTask_Attack node to the end of the Sequence .
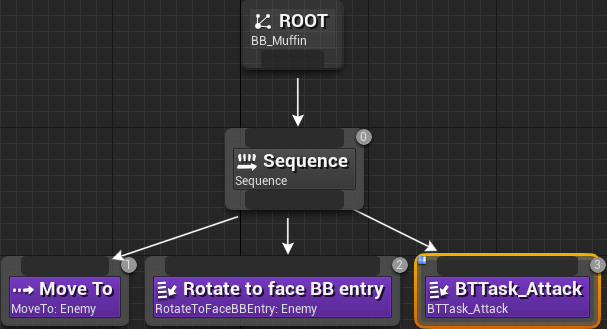
Next, add a Wait node to the end of the Sequence . Change the value of its Wait Time variable to 2 . Because of this, the muffin will not attack constantly.
Return to the main editor and click on Play . Like last time, create two muffins. The muffin will begin to move and turn towards the enemy. Then he attacks and waits two seconds. If he sees another enemy, he will repeat the same sequence again.

In the last part, we will combine the subtrees of attack and random movement.
Subtree association
To combine subtrees, you can use the Selector composite. Like the Sequence, it also runs from left to right. However, the Selector stops when the child node succeeds , and does not fail. With this behavior, we can make the behavior tree execute only one subtree.
Open BT_Muffin and create a Selector after the Root node. Then connect the subtrees as follows:
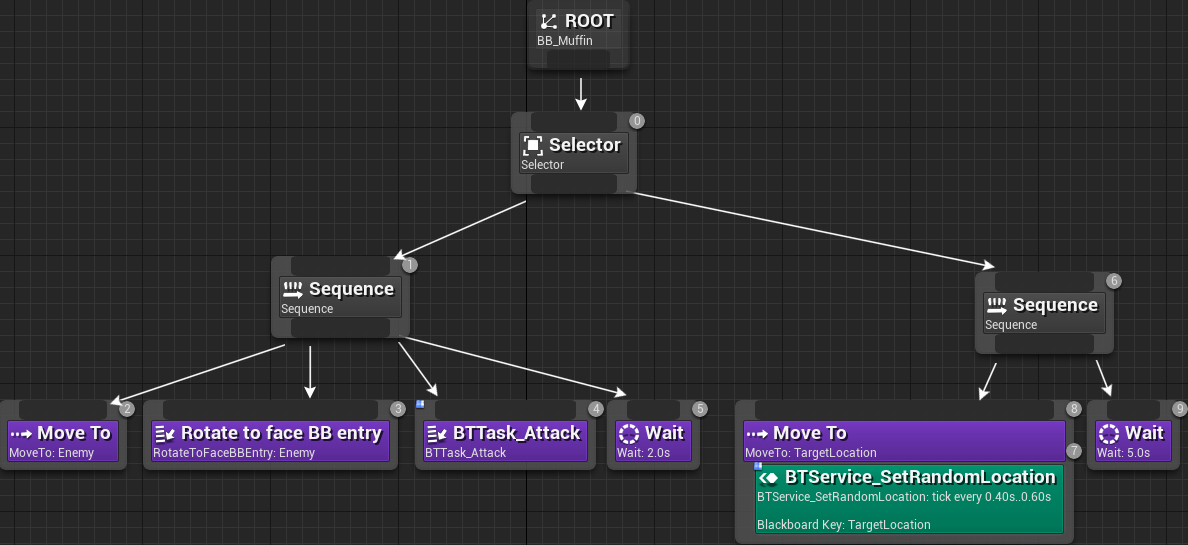
In this scheme, only one subtree will be executed at a time. Here is how each subtree runs:
- Attack: The selector will launch the first subtree of the attack. If all tasks are completed successfully, the Sequence will also complete successfully. The selector will detect this and stop execution. Due to this, the subtree of random movement will not be executed.
- Roam: The selector will first attempt to execute an attack subtree. If Enemy is not set, then MoveTo will fail. Therefore, the Sequence will also fail. Since the subtree of the attack failed, the Selector will execute the next child, that is, the subtree of the random move.
Return to the main editor and click on Play . Create some muffins to test the job.

Wait, but why doesn't the muffin immediately attack another muffin?
In traditional behavior trees, execution begins with each update from the root. This means that with each update, the tree first tries to execute the subtree of attack, and then the subtree of random motion. This means that the behavior tree can instantly change subtrees when the Enemy value changes.
However, the Unreal behavior trees work differently. In Unreal, execution continues from the last node executed. Since AI Perception does not immediately sense other actors, the subtree of random motion begins to run. Now the behavior tree must wait for the random movement tree to complete, and only then check the ability to execute the subtree of the attack.
To fix this, we can use the last node type: decorators .
Creating a decorator
Like services, decorators are attached to tasks or composites. Typically, decorators are used to perform checks. If the result is true, then the decorator also returns true, and vice versa. Thanks to decorators, we can manage the execution of their parent elements.
In addition, decorators have the ability to terminate a subtree. This means that you can complete the execution of the random tree subtree if Enemy is specified. Thus, the muffin will be able to attack the enemy immediately after its detection.
To use termination execution, we can use the Blackboard decorator. It simply checks if the blackboard key is set. Open BT_Muffin and right-click on the Sequence of the attack subtree. Select Add Decorator \ Blackboard . At the same time, the Blackboard decorator is added to the Sequence.
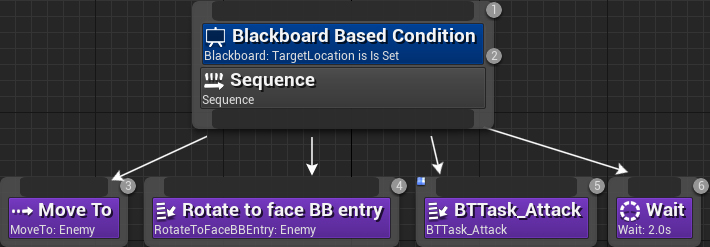
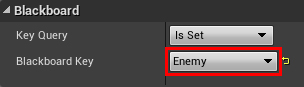
Now select the Blackboard decorator and go to the Details panel. Set the Blackboard Key to Enemy .
So we will check if Enemy is set . If it is not specified, the decorator will fail and result in a failed Sequence . This will allow random subtree to run.
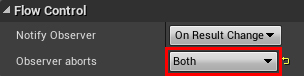
To stop executing a random motion subtree, we will need to use the Observer Aborts parameter.
Using Observer Aborts
Observer aborts stops running the subtree when the selected blackboard key is changed. There are two types of termination:
- Self: This parameter allows the attack subtree to stop its own execution when Enemy becomes invalid. This can happen when Enemy dies before completing the attack subtree.
- Lower Priority: This parameter allows you to stop the execution of trees with a lower priority when setting Enemy . Since the subtree of random motion is located after the attack, it has a lower priority.
Choose Observer Aborts for Both to enable both types of termination.
Now the subtree of attack will immediately proceed to random movement in the absence of the enemy. And the subtree of random movement will immediately switch to attack mode when an enemy is detected.
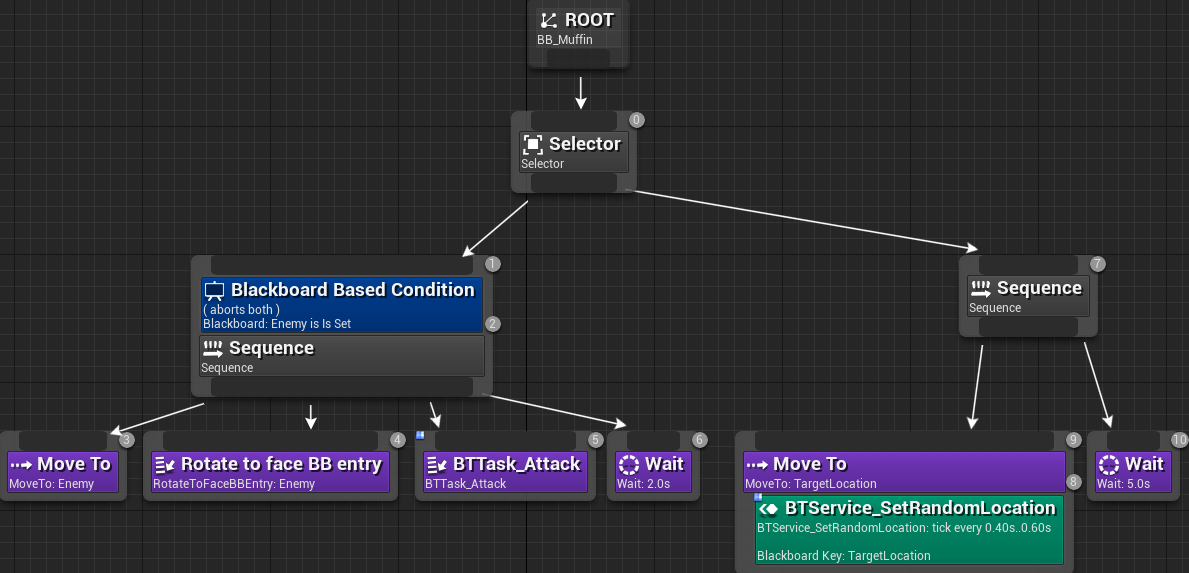
Here is what the finished behavior tree looks like:
To summarize the attack subtree:
- Selector starts an attack subtree if set to Enemy
- If it is set, then Pawn will move and turn towards the enemy.
- Then he will execute the attack
- Finally, Pawn will wait two minutes.
Sum up the random motion subtree:
- The selector starts a random subtree if the attack subtree fails. In our case, it fails if Enemy is not specified .
- BTService_SetRandomLocation generates a random point
- Pawn moves to the generated point.
- Then he waits five seconds
Close BT_Muffin and click on Play . Create some muffins and get ready for the greatest "Royal Battle"!
Gif
Where to go next?
The finished project can be downloaded from here .
As you can see, a simple AI character is very easy to create. If you want to create more sophisticated AI, then study the Environment Query System . This system allows the AI to collect and respond to environmental data.
Source: https://habr.com/ru/post/346498/
All Articles