How to create an in-game menu in Unity
How to create an in-game menu in Unity
Unity allows you not to make the settings menu, as there is a built-in dialog for setting the quality and resolution before starting the game. However, if you want to make your game unique and show what you can do as a designer, then this article is for you. After going through this tutorial, you will be able to create your own menu with such functionality - volume, resolution, image quality, full-screen and window mode settings. Interesting? Then launch Unity and go!
Creation and design of the main menu and settings menu
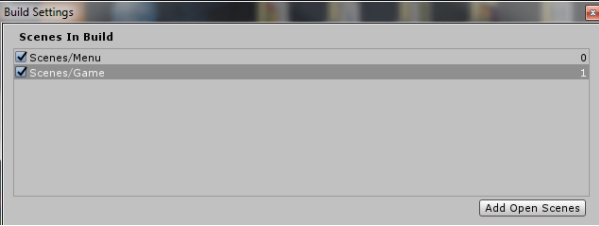
1. Create two scenes: Menu and Game
2. Open File-> BuildSettings and drag the created scenes to Scenes in build.
Now we can start creating the user interface. Open the Menu scene and add a Panel. A Canvas is immediately added and a Panel is added to the child object.

Pay attention to the inspector for Canvas. Namely, on the Canvas component.
')
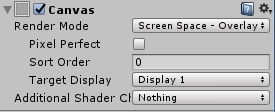
Render Mode is automatically set to Screen Space - Overlay.
A little information:
Screen Space - Overlay:
A rendering method in which the Canvas is directly attached to the screen. If you change the screen resolution or size, the Canvas with this setting will also change its scale to the appropriate one. The UI will then be drawn on top of other objects.
The order of placing objects in the hierarchy is important. Canvas Screen Space - Overlay must be at the very top of the hierarchy, otherwise it may disappear from view.
Screen Space - Camera:
In such a case, the canvas is attached in the chamber. For this setting, you must specify the camera which corresponds to Canvas. As in the previous paragraph, the canvas will change its scale depending on the resolution and screen size, as well as on the scope of the camera.
Also for Holst with such settings it is important to place relative to other objects. In the foreground will be objects that are closer to the camera, regardless of whether it is a UI or other GameObjects.
World Space:
The canvas is placed like any other object without reference to the camera or screen, it can be oriented as you like, the size of the Canvas is set using the RectTransform, but how it will be seen during the game will depend on the camera position.
In this task we will use Screen Space - Overlay.
Let's adjust the color of the panel. You can also add a picture to the background. To do this, pay attention to the Image component in the Inspector panel.
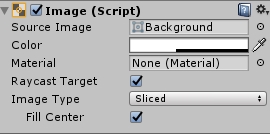
As you can see, the picture is added to the Source Image field. You can simply drag the image from the project files, or click on the circle to the right of the field.
Color is selected in the Color field, either using the pipette tool.
It is important to know that the eyedropper allows you to choose a color outside of Unity.
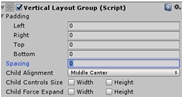
After choosing a color or a picture, we need to place the buttons that will control everything, as well as the text. To simplify our task, for Panel we will add another component called the Vertical Layout Group. And immediately set it up.
We need to place all the buttons and text in the center of the screen. To do this, we find the Child Alignment item in the Vertical Layout Group component and select Middle Center. Now all our elements, be it buttons or text, will be centered, regardless of the screen resolution.
Also remove the checkboxes with ChildForceExpand. It should turn out like this:
This component can be configured depending on what type you want to get.
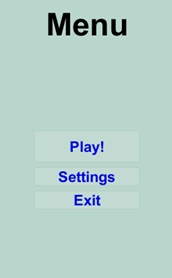
In our menu should be the following buttons:
1. Start Game
2. Settings
3. Exit
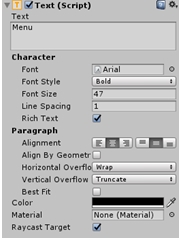
Now, we add Text as a child of our Panel. You may notice how it is attached in the center. Sometimes this requires a created element in the Scene window to simply move to the Panel and then it will align. Adjust the text as you would like using the Text (Script) component in the inspector.
After we add the Button. The button will be added under the text.
Let's sort the Button component of our button. We are interested in Transition - how the button will react to mouse actions. Unity implements several methods. For now, let's look at a fairly simple Color Tint. This means that the button will change its color under certain conditions. The interface for setting up is quite convenient. Customize as you like.
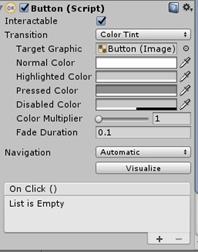
Also, the Button object has a child Text object - this is the text that will be displayed on the button. In the text write Play.
It seems the Text and Buttons are too close together.
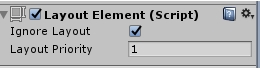
To fix this for our Text Menu, we add another component called Layout Element. And put a tick in front of Ignore Layout.
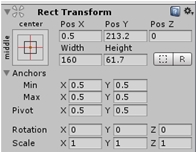
After that, we set Anchor to Middle-Center.
Then we add three more buttons and call them Settings, Credits, Exit.
You can change the size of the buttons. At this point, the menu looks like this:
Transitions between main menu and settings
To go to the options menu, it is not necessary to make a new scene.
To begin, create an empty GameObject (Create Empty) as a child of our canvas. Let's call it the Main menu. Then we will make our panel, with all the tools, the child elements of this object. It should turn out like this:

Select our MainMenu object and duplicate it. With the selected item, press the key combination Ctrl + D. We will have a new object.
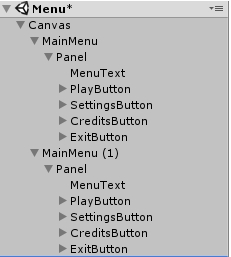
Rename the new object to Settings. For ease of management, inactivate MainMenu.
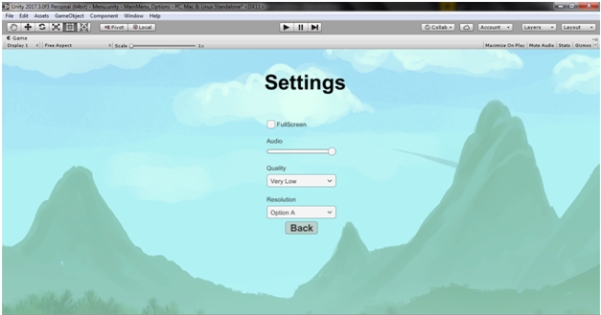
Next, in the Settings panel, we rewrite the text to Settings, as well as delete all the buttons.
In the settings we will do the following - Fullscreeen, volume settings, image quality, screen resolution.
For the control of Fullscreen will be responsible element Toggle.
For the volume - Slider.
For image quality and resolution - Dropdown.
Between each element should be placed text that will indicate the name of each setting. You should also add a button that will take us back to the main menu.
You can configure Spacing in the Vertical layout group to have a bit of space between the elements. Add a picture to the panel and get the following result:
Button programming
Let's move on to writing a menu script.
We need to click on the Play button, we run another scene with our game, and on pressing the Exit button, the game is closed.
This is what we write in our script.
For MainMenu, add a new component MenuControls.cs and tear it off.
The first thing to do is to delete the existing Start () and Update () methods — we do not need them here.
Next we need to connect the following:
using UnityEngine.SceneManagement; After that we will write our method for pressing the Play button. The method must be public - we need to be able to see it outside of our script.
SceneManager is responsible for loading the scene and it has a LoadScene method. There are several method overloads. You can transfer the name of the scene you want to load. In our case, this is the “Game” scene.
As a result, the function will be as follows.
public void PlayPressed() { SceneManager.LoadScene("Game"); } We also create a method to exit the game:
public void ExitPressed() { Application.Quit(); } However, in Unity we will not see the result of this method, since this works only in the build. In order to check that everything works correctly, we add a line to the method
Debug.Log("Exit pressed!"); Now you need to attach button events to these methods. Select the Play button and find the following in the inspector:
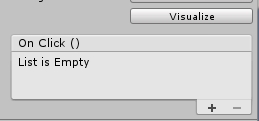
This is a button event that, when clicked, will call the methods subscribed to the event. Add a method by clicking on +.
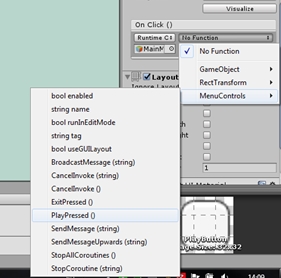
In the window that appears, you need to drag the object, which contains the desired script. In our case, this is the Main Menu.
After that, you need to select the MenuControls script and find the PlayPressed () method.
We do the same for the Exit button. Only now we select the ExitPressed () method.
For the Settings button, we do not need to write any code, since some functionality is already built in.
The bottom line is that we will activate the GameObject. At this point, MainMenu should be active, and Settings should not be visible. We also see that when we activate Settings, it completely overlaps the Menu. The bottom line is that the role played by the order of the children of the Holst plays a role — in what order they are arranged in the hierarchy in that order and they will be drawn. Since the Settings are located above the Main Menu, they overlap the menu.
This is what we will use.
Select the Settings button and in OnClick () drag and drop our Settings object. In the functions, select GameObject -> SetActive (); and put a tick. Like this:

Well, for the Back button, which is in the options menu, you can connect the SetActive event for the Settings object in the same way, but this time we need to inactivate our object, so we just do not put a tick.
That's it, we’ve finished creating the menu, and in the next part we’ll continue and make the game react to changes in settings.
Settings
Full screen settings
The first thing we will prescribe is switching the full-screen and window modes.
It is necessary to remove the tick from the item Is On of our Toggle element.
Create a script for the Settings object. Let's call it Settings.cs.
First we need to store a variable of type bool that will display the current state - full screen mode or not. And then, by changing the toggle, this variable will switch to the opposite value.
The screen has a bool type Screen.fullScreen property. You can simply assign our isFullScreen value to this property.
The code looks like this:
public void FullScreenToggle() { isFullScreen = !isFullScreen; Screen.fullScreen = isFullScreen; } You can see the result only in the build. Let's do it now. Note that in order for the build to be correct you need to leave only the MainMenu object active, and Settings to disable. If this is done, then run the build via File-> BuildSettings and click the Build button.
After that, you can check the program. If everything is correct, then by pressing the check mark the mode will immediately change.
Changes in sound volume in the game
To work with sound settings, we first need AudioMixer, as well as some track on which we will check the work of our settings.
Add these two elements. First add AudioMixer. Right-click in the Project -> Create-> AudioMixer window.
We call it GameSettings. After that open the AudioMixer window: Window-> Audio Mixer (Ctrl + 8).
To control the parameters of the mixer through the script, they must be made visible for this script. This procedure is called ExposeParameters. To do this, click on the Mixer and in the inspector we find the volume and click the right mouse button. Choose Expose to script:
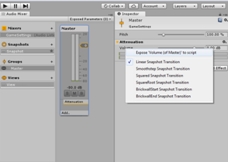
Now in the Audio Mixer window, notice the Exposed Parameters item in the upper left.

Now there is a parameter. Click on it and call our parameter masterVolume. You should remember the name that we assign to it - you will need to specify it in the code.
Go to Settings.cs and create the AudioMixer field to get a link to it in the code.
public AudioMixer am; then create a method
public void AudioVolume(float sliderValue) { am.SetFloat("masterVolume", sliderValue); } The SetFloat method will take the values of our slider and assign this value to the “masterVolume” parameter.
It remains to attach our method to the slider events. Find the On Value Changed field in the slider inspector and attach the object in the same way. But now we need not just to choose a method from the list, but to use the Dynamic float field. As you can see, our method is already there, and it will receive the variable from the slider itself. You also need to remember to drag the AudioMixer into the corresponding field in the Settings.cs component.

Please note that we directly bind the slider value to the values of the audio mixer. In an audio mixer, the volume changes from -80 to 20. It is enough for us to change from -80 (no sound) to 0 (normal sound). In the slider settings, set the minimum value to -80, the maximum to 0.

Now we add sounds to our game to test the script.
Add an Audio Source component to the canvas.
Configure it as follows:
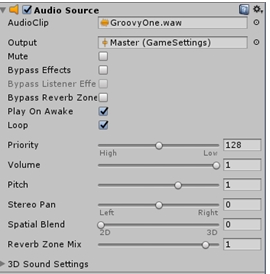
Audio Clip - soundtrack
Output - Master of our mixer (child object)
Loop - put a check mark - loop the composition so that it plays constantly.
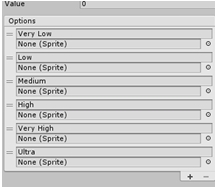
Image quality
Unity already has built-in image quality settings. Edit-> Project Settings-> Quality. In the inspector we see Quality settings. They can be added and customized.
A feature of working with quality settings is the following:
Each setting corresponds to an index that we can get from Dropdown. All you need to do is rewrite the corresponding items into the necessary indices in our UI element. Open it and in the inspector we find Dropdown (Script) and the Options item in it. Next, enter the settings in the correct order. I did this:
Next you need to register the code. We continue to add methods to our Settings.cs script.
Create a method that will accept an int - index of the selected item.
public void Quality(int q) { QualitySettings.SetQualityLevel(q); } Save the script and connect the method to the event on our menu. This time this event is Dropdown - On Value Changed.
Since our method will receive the value from the UI element itself, we select the name of the method from the Dymanic int group. by analogy with the previous paragraph.
Screen resolution
The screens are different for everyone and it is impossible to guess what permissions for them will be supported in advance. Therefore, for the screen resolution settings, you must first obtain all possible permissions, and then fill in the list of permissions with these values.
The first thing we need is an array of type Resolution [] where we will store the screen resolution values.
However, for items in the drop-down list, type is string. Therefore, we create a List <> in which we will save the values of possible permissions. To work with lists you need to connect:
using System.Collections.Generic; We also need a link to the corresponding Dropdown. To work with UI elements you should also register:
using UnityEngine.UI; In the script we get the following fields:
Resolution[] rsl; List<string> resolutions; public Dropdown dropdown; Initialization and filling is carried out in the Awake method. This method is called when the object is launched, respectively, it is executed earlier than all other methods.
We get the values and add each of them to the List in the format width * height. After that, clear the Dropdown list and fill it with new options.
public void Awake() { resolutions = new List<string>(); rsl = Screen.resolutions; foreach (var i in rsl) { resolutions.Add(i.width +"x" + i.height); } dropdown.ClearOptions(); dropdown.AddOptions(resolutions); } Now you need to create a method that will change the screen resolution. As in the previous paragraphs, we will take the value from the UI element. We create function which accepts int
public void Resolution(int r) { Screen.SetResolution(rsl[r].width, rsl[r].height, isFullScreen); } In SetResolution, you must pass the parameters - width, height, and a boolean variable that is responsible for the full screen. We already have one - this isFullScreen. Pass it to the function.
Next, we do not forget to connect our Resolution method from the Dynamic Int group to the corresponding event, as well as add a link to the desired Dropdown.

Is done. Now you can use this menu instead of the boring default launcher. However, to make sense, you need to disable its launch.
Edit->ProjectSettings-> Display Resolution Dialog-Disabled
Now you have the opportunity to create your own menus and use in them any design decisions that will make the game unique and memorable.
Source: https://habr.com/ru/post/346370/
All Articles