Understanding the network Kubernetes: services
In the first post of this series, I looked at how Kubernetes uses a combination of virtual network devices and routing rules. If the sender knows the pod IP address, the combination permits the exchange of information between the footers running on different clusters. If you do not know how to share information, you should read about it before continuing to read the article.
The network of pods in the cluster is neat material, but by itself it is insufficient to create long-term systems, since the pods in Kubernetes are ephemeral. As the end point, you can use the IP address of the hearth, but there is no guarantee that the next time you recreate the hearth, the address will remain the same. It can change for any reason.
You probably know that this is an old problem, and it has a standard solution: to send traffic through a reverse proxy server / load balancer. Clients connect to the proxy, and the proxy is responsible for maintaining a list of healthy servers for sending requests.
There are several requirements for a proxy server:
- durability and resistance to failure;
- availability of a list of servers that the proxy server can direct;
- the ability to determine whether the server is healthy and whether it can respond to requests.
The engineers at Kubernetes solved this problem in an elegant way. It is based on the capabilities of the delivery platform for the three requirements listed and begins with the type of resource called service.
Services
In the first post, I showed a hypothetical cluster with two server server paths and described how they can communicate through the nodes. I want to give an example to describe how the Kubernetes service allows you to balance the load on a variety of server-side pods, allowing client modules to work independently and for a long time. To create server backdrops, you can use this deployment :
kind: Deployment apiVersion: extensions/v1beta1 metadata: name: service-test spec: replicas: 2 selector: matchLabels: app: service_test_pod template: metadata: labels: app: service_test_pod spec: containers: - name: simple-http image: python:2.7 imagePullPolicy: IfNotPresent command: ["/bin/bash"] args: ["-c", "echo \"<p>Hello from $(hostname)</p>\" > index.html; python -m SimpleHTTPServer 8080"] ports: - name: http containerPort: 8080 This deployment creates two very simple HTTP servers that respond to port 8080 with the name of the host they are working with. After creating a deployment using the kubectl application kubectl we can see that the platforms are running in a cluster and find out their network addresses:
$ kubectl apply -f test-deployment.yaml deployment "service-test" created $ kubectl get pods service-test-6ffd9ddbbf-kf4j2 1/1 Running 0 15s service-test-6ffd9ddbbf-qs2j6 1/1 Running 0 15s $ kubectl get pods --selector=app=service_test_pod -o jsonpath='{.items[*].status.podIP}' 10.0.1.2 10.0.2.2 We can demonstrate that the hearth network works by creating a simple client application to fulfill the request, and then viewing the output.
apiVersion: v1 kind: Pod metadata: name: service-test-client1 spec: restartPolicy: Never containers: - name: test-client1 image: alpine command: ["/bin/sh"] args: ["-c", "echo 'GET / HTTP/1.1\r\n\r\n' | nc 10.0.2.2 8080"] After the sub will be created, the command will be launched before completion, under the “completed” state, and the result can be obtained using kubectl logs :
$ kubectl logs service-test-client1 HTTP/1.0 200 OK <!-- blah --> <p>Hello from service-test-6ffd9ddbbf-kf4j2</p> In this example, it is not visible on which node the client was created. But regardless of the placement in the cluster, he will be able to reach the server hearth and get a response through the network hearth. However, if the server under had to die and restart, or it was moved to another node, its IP address would almost certainly change, and the client would break. We avoid this by creating a service.
kind: Service apiVersion: v1 metadata: name: service-test spec: selector: app: service_test_pod ports: - port: 80 targetPort: http Service - the type of resource Kubernetes, which causes the proxy to be configured to send requests for a set of containers. The set of containers that will receive traffic is determined by the selector corresponding to the labels assigned when creating containers. After creating the service, we see that it was assigned an IP address, and it will accept requests for port 80.
$ kubectl get service service-test NAME CLUSTER-IP EXTERNAL-IP PORT(S) AGE service-test 10.3.241.152 <none> 80/TCP 11s Requests can be sent directly to the IP address of the service, but it would be better to use the host name that resolves the IP address. Fortunately, Kubernetes provides an internal DNS cluster that resolves the name of the service. We can use it with a slight change to the client under:
apiVersion: v1 kind: Pod metadata: name: service-test-client2 spec: restartPolicy: Never containers: - name: test-client2 image: alpine command: ["/bin/sh"] args: ["-c", "echo 'GET / HTTP/1.1\r\n\r\n' | nc service-test 80"] After this one is complete, the output will show that the service has redirected the request to one of the server pods.
$ kubectl logs service-test-client1 HTTP/1.0 200 OK <!-- blah --> <p>Hello from service-test-6ffd9ddbbf-kf4j2</p> You can continue to launch the client submission and see the responses from both server-side bogs, each of which will receive approximately 50% of requests. If your goal is to understand how the service works, a good place to start is the IP address that was assigned to our service.
Service network
The IP address that was assigned by the testing service represents the network address. Note: the network does not match the one on which the containers are installed.
thing IP network ----- -- ------- pod1 10.0.1.2 10.0.0.0/14 pod2 10.0.2.2 10.0.0.0/14 service 10.3.241.152 10.3.240.0/20 This is not the same as a private network with nodes. In the first post, I noted that the range of network addresses under kubectl not provided, so you need to use the supplier command to get this cluster property. The same applies to the range of network addresses of the service. If you are working with the Google Container Engine, you can do this:
$ gcloud container clusters describe test | grep servicesIpv4Cidr servicesIpv4Cidr: 10.3.240.0/20 The network specified by the address space is called service. Each service that is of type ClusterIP ”on this network will be assigned an IP address. There are other types of services, which I will discuss in the next post about ingress. ClusterIP is used by default, and this means that “the service will be assigned an IP address accessible from any sub-cluster in the cluster”. Type of service can be found by running kubectl describe services with the name of the service.
$ kubectl describe services service-test Name: service-test Namespace: default Labels: <none> Selector: app=service_test_pod Type: ClusterIP IP: 10.3.241.152 Port: http 80/TCP Endpoints: 10.0.1.2:8080,10.0.2.2:8080 Session Affinity: None Events: <none> The network of services, like the hearth network, is virtual, but it differs from the hearth network. Consider the range of network addresses podov 10.0.0.0/14 . If you look at the hosts that make up the nodes in the cluster, listing the bridges and interfaces, you can see the actual devices configured with addresses on this network. These are virtual ethernet interfaces for each pod and bridges that connect them to each other and the outside world.
Consider the service network 10.3.240.0/20 . You can run ifconfig and you will not find devices configured with addresses on this network. You can check the routing rules on the gateway that connects all the nodes, and you will not find routes for this network. Service network does not exist. However, above, when we sent a request for an IP address on this network, somehow the request issued an IP address in the server server running on the network server. How did this happen? Let's get a look.
Imagine that the commands you ran above created the following subsets in the test cluster:
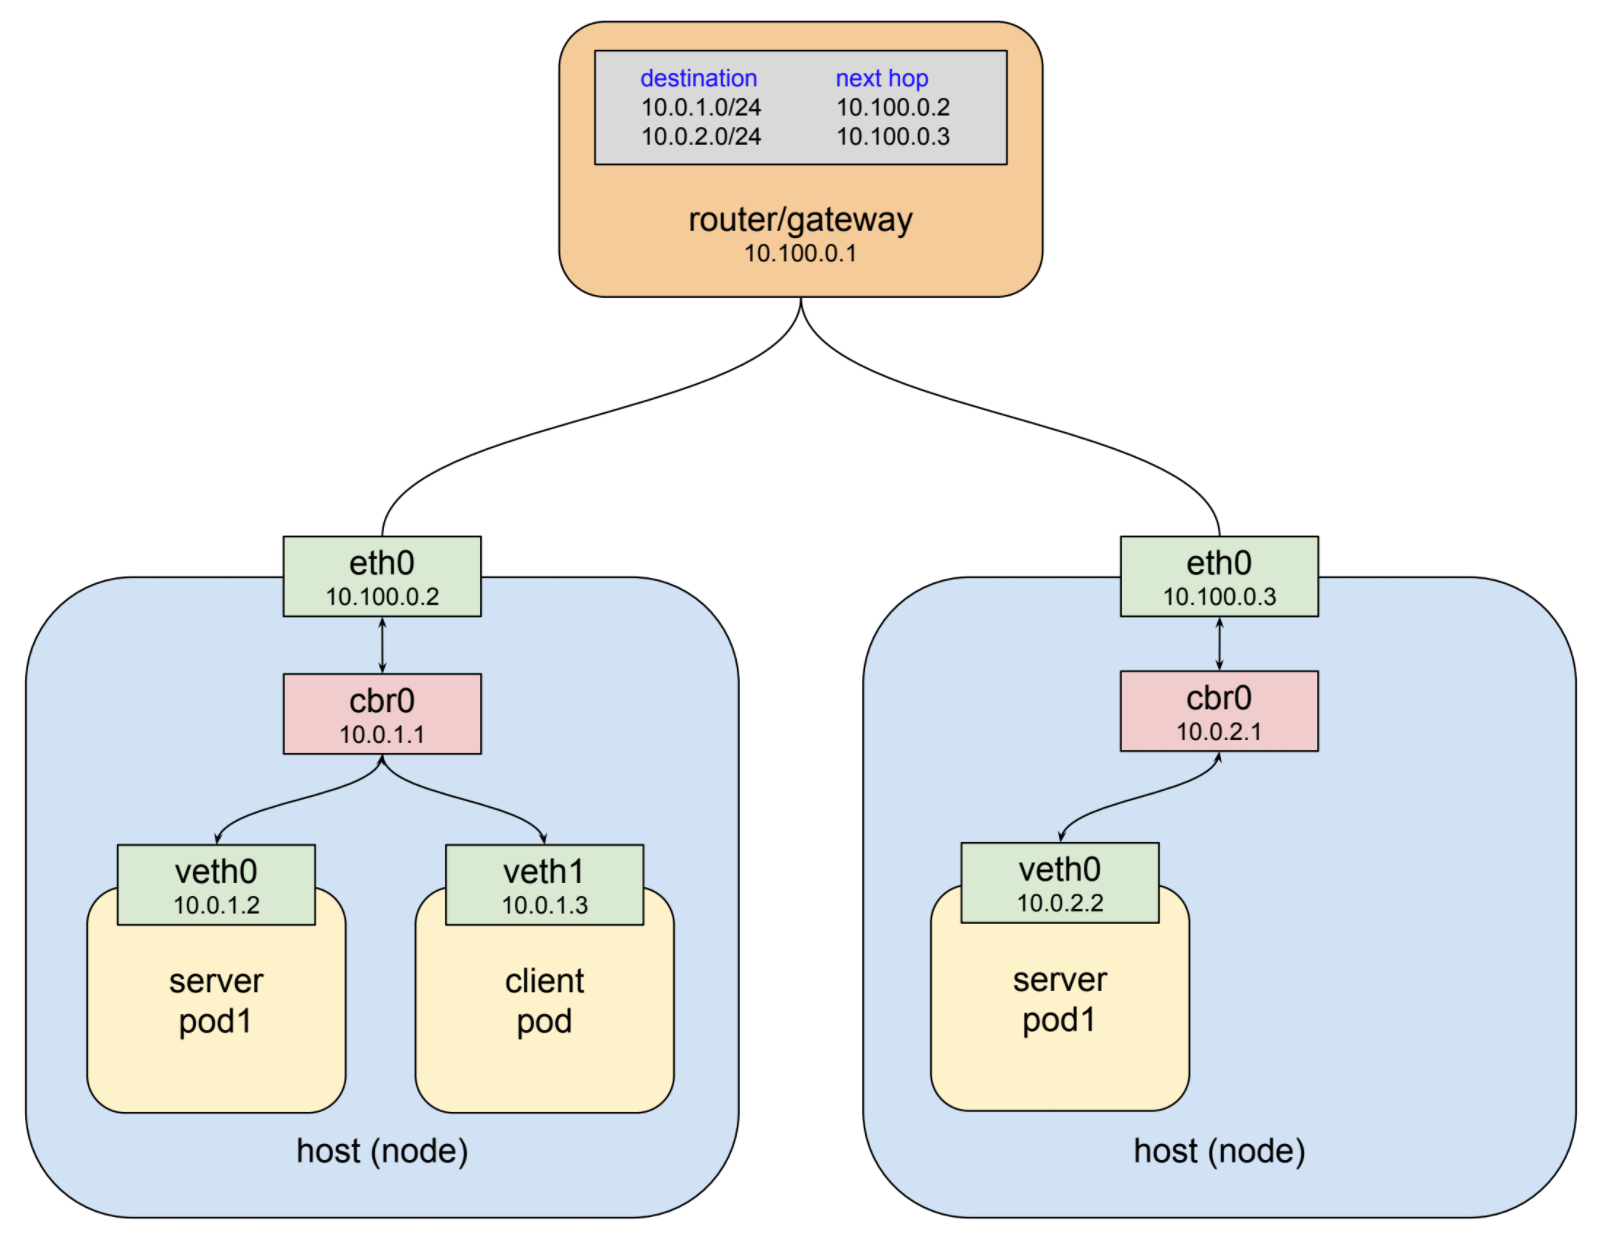
Here we have two nodes: a connecting gateway (which also has routing rules for the hearth network) and three hearths: a client subnet on node 1, a server sub link — also on node 1, and another server sub node on node 2. The client makes an http request to the service using the DNS name service-test . The DNS cluster system resolves this name in the IP services cluster 10.3.241.152 , and the client sub finishes creating an http request, as a result of which some packets are sent with this IP address in the destination field.
The main feature of an IP network is this: when an interface cannot deliver a packet to its destination, because no device with this address exists locally, it forwards the packet to the upstream gateway. Thus, the first interface that sees the packets in this example is the virtual ethernet interface inside the client's network. This interface is on the network under 10.0.0.0/14 and does not know any devices with the address 10.3.241.152 , so it redirects the packet to its gateway, which is the cbr0 bridge. Bridges simply send traffic back and forth, so the bridge sends the packet to the ethernet host / interface.

The host / ethernet interface in this example is on the network 10.100.0.0/24 , and it does not know any devices with the address 10.3.241.152 , so the packet must be redirected to the gateway interface. The top-level router is shown in the drawing. Instead, the packet is stuck in flight and redirected to one of the live server routines.

Three years ago, when I started working with Kubernetes, what was depicted in the diagram seemed like magic. Somehow, my clients were able to connect to an address without an interface associated with it, and these packages jumped out at the right place in the cluster. Later I found out the answer - this is a piece of software called kube-proxy.
kube-proxy
In Kubernetes, a service is simply a resource, an entry in a central database that shows how to set up software. The service influences the configuration and behavior of several components in a cluster, but it is important here that what performs magical actions - kube-proxy. Many of you will have a general idea of what this component does based on a name. But there are some features of kube-proxy that make it different from a regular reverse proxy server, such as haproxy or linkerd .
The general behavior of the proxy server is to transfer traffic between clients and servers through two open connections. Since all proxy servers of this type work in user space, this means that packets are routed to user space and back to kernel space during each pass through the proxy. Initially, kube-proxy was implemented as a user-space proxy server. The proxy server needs an interface both for listening to client connections and for connecting to backend servers. The only interfaces available on the host are the host's ethernet interface or virtual ethernet interfaces on the network.
Why not use the address in one of these networks? I do not have deep knowledge, but at the beginning of the project, it became clear that this would complicate the routing rules for networks designed to meet the needs of hearths and nodes, which are ephemeral objects in the cluster. Services clearly need their own, stable, non-conflicting network address space, and the use of a system of virtual IP addresses is most logical here. However, as we have already noted, there are no real devices on this network. You can use the network in routing rules, firewall filters, etc., but you will not be able to listen on the port or open a connection through an interface that does not exist.
Kubernetes went around this using the linux kernel feature, called netfilter, and the user space interface for it, called iptables. There is not enough space in this post to understand how this works. If you want to learn more, the netfilter page is a good place to start.
tl; dr ;: netfilter is a rule-based packet processing engine. It works in kernel space and scans every package at different points in its life cycle. It matches packets with rules, and when it finds a rule that matches it, it applies the specified action. Among the many actions he can take is forwarding a packet to another destination. netfilter is a kernel proxy. The role of netfilter is illustrated below when kube-proxy works as a proxy server for a user.

In this mode, kube-proxy opens a port (10400 in the example above) on the local host interface to listen for requests to the test service, inserts netfilter rules for forwarding packets destined for the IP address of the service to its own port and forwards their requests to the port 8080. Thus, the request 10.3.241.152:80 magically becomes a request to 10.0.2.2:8080 . Considering the capabilities of netfilter, all that is required to work with any service is to open the kube-proxy port and insert the correct netfilter rules for this service, which kube-proxy does in response to notifications from the main api server about changes to the cluster.
The article has another twist. Above, I mentioned that user-space level proxying is expensive. This is due to packet marshaling. In kubernetes 1.2 kube-proxy got the opportunity to work in iptables mode. In this mode, kube-proxy in most cases ceases to be a proxy server for intercluster connections and instead delegates netfilter the job of detecting packets bound to the IP addresses of the service and redirecting them to scams. Now all actions take place in the space of the kernel. In this mode, the kube-proxy task is to keep the netfilter rules up to date.

In conclusion, we compare all of the above with the requirements for a reliable proxy, set out at the beginning of the post. Is the proxy service system durable? By default, kube-proxy works as unitd, so it will reboot if it doesn't work. In the Google Container Engine, it operates as a control unit, controlled by a daemonset . This will be the default, possibly with version 1.9. As the proxy server of the user, kube-proxy is still the only point of connection failure. When launched in itables mode, the system is very durable in terms of local pods trying to connect.
Are proxy services aware of useful server hooks that can handle requests? As mentioned above, kube-proxy listens to the api master server for changes in the cluster, which includes changes in services and endpoints. When it receives updates, it uses iptables to save the netfilter rules. When a new service is created and its endpoints are filled, kube-proxy receives a notification and creates the necessary rules. Similarly, it deletes rules when deleting services. Endpoint health checks are performed using a kubelet. This is another component that runs on each node. When unhealthy endpoints are found, the kubelet notifies the kube-proxy through the api server, and the netfilter rules are edited to remove this endpoint until it is healthy again.
All of this is added to a highly available cluster tool for proxying requests between containers, allowing the containers themselves to come and go as the needs of the cluster change. However, the system is not without its drawbacks. The main thing is that kube-proxy works only as described for requests within the cluster, i.e. requests from one flow to another. Another drawback is the result of how the netfilter rules work: for requests coming from outside the cluster, the rules knock down the source IP address. This has become a source of discussion, and decisions are under active consideration. We will consider both of these issues more closely when we discuss ingress in the final post of the series.
Part 3 published (in English): Understanding the network Kubernetes: ingress .
Original: Understanding kubernetes networking: services .
')
Source: https://habr.com/ru/post/346314/
All Articles