An illustrative guide to networking in Kubernetes. Parts 1 and 2
Note trans. : The author of the article, Amanpreet Singh, calls himself "still beginner in the world of networking," but that’s what prompted him to understand their basic Kubernetes device (which he uses in production), and then share with the community a very accessible material with visual illustrations. In the original, it is divided into two parts , but in this translation we have combined them into one article.
Here you have launched many services in the Kubernetes cluster and are reaping the benefits ... or at least you are going to do it. However, despite the existence of a number of utilities for configuring and managing the cluster, you are still interested in how everything works “under the hood”. Where to look if something breaks? By myself I know that this is important.
')
With Kubernetes, simply starting work is enough. But if you look inside, there will be a complex system. It has a lot of "moving" components, the functioning and interaction of which is necessary to understand if you want to prepare for possible failures. One of the most complex and possibly most critical components of Kubernetes is the network.
Therefore, I decided to figure out exactly how it works: I read the documentation, listened to the reports, and even looked at the code base - and this is what I found out ...
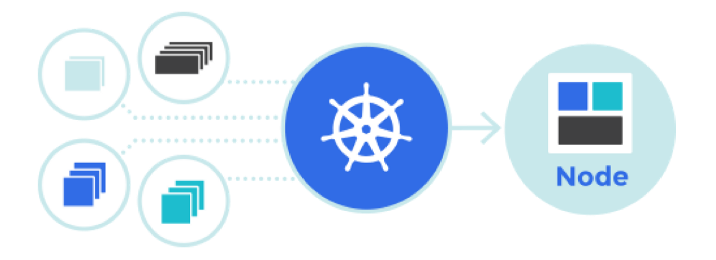
At the heart of the Kubernetes network device is an important architectural principle: “ Each has its own unique IP ”.
IP pod is divided between all its containers and is available (routable) for all other pods. Have you ever noticed working pause containers on your nodes? They are also called “ sandbox containers ” (sandbox containers) , because their work consists in reserving and retaining the network namespace (netns) used by all the pod containers. Due to this, IP flow does not change even in those cases when the container dies and a new one is created instead. The great advantage of this model - IP for each pod (IP-per-pod) - is the absence of IP / port collisions on the underlying host. And we do not need to worry about which ports use applications.
Therefore, the only requirement for Kubernetes is that all these IP addresses of the hearths should be accessible / routable from the rest of the hearths, regardless of which node they are located on.
The first step is to make sure that the pods of one node are able to communicate with each other. Then this idea is expanded to interaction between nodes, with the Internet, etc.
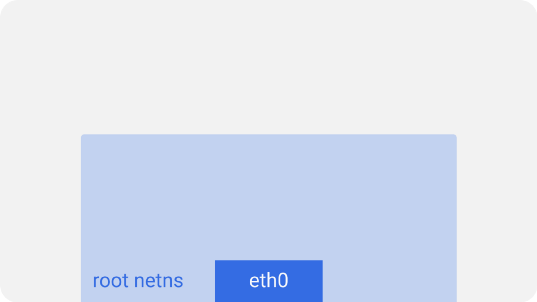
On each Kubernetes node, which in this case is a Linux machine, there is a root network namespace - root netns . The main network interface,
Similarly, each pod has its own netns with a virtual Ethernet interface, connecting them to root netns. In fact, this is a virtual link with one end at root netns and the other at netns in the hearth.
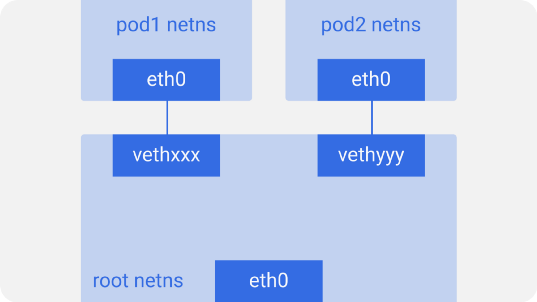
The end on the pod side is called
Such is the arrangement of all the pods on a node. To let the pods communicate with each other, use a Linux Ethernet bridge -
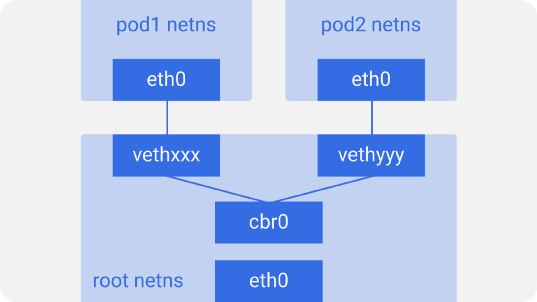
The list of bridges can be
Suppose a packet is sent from
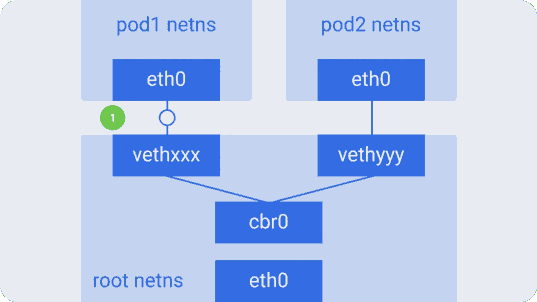
So the containers of one node communicate with each other. Obviously, there are other ways to interact, but this is probably the easiest one; Docker uses it too.
As mentioned above, the hoists should also be accessible from all nodes. And for Kubernetes it doesn’t matter how it is implemented. Therefore, you can use L2 (ARP between nodes), L3 (IP routing between nodes - similar to the routing tables of cloud providers), overlay networks, and even pigeons. Each node is assigned a unique CIDR block (range of IP addresses) for the IP addresses issued by the sub, so each sub has a unique IP that does not conflict with the sub masses of other nodes.
In most cases, especially in cloud environments, the cloud provider uses routing tables to ensure that packets reach the correct recipients. The same can be configured using the routes on each node. There are also many other network plug-ins that solve their problems.
Consider an example with two nodes, similar to the one above. Each node has different network namespaces, network interfaces, and a bridge.
Suppose a packet follows from
Overlay nets are not required by default, but they are useful in some situations. For example, when we do not have enough IP address space or the network cannot manage additional routes. Or when we want to get additional management capabilities provided by overlays. A frequent case is the presence of a limit on the number of routes supported in the routing tables of the cloud provider. For example, for the routing table, AWS claims support for up to 50 routes without affecting network performance. If we need more than 50 Kubernetes nodes, the AWS routing table will not be enough. In such cases, the overlay network will help.
The overlay network encapsulates packets passing through the network between nodes. You may not want to use it because the encapsulation-decapsulation of all packets adds a little delay and complexity. Often it is not necessary that it is worth considering when making a decision about their use.
To understand how traffic flows in the overlay network, consider an example with a flannel , an open source project from CoreOS:
Here we see a configuration similar to the previous one, however, a new virtual Ethernet device called
Passing a packet from
Different implementations may have minor differences, but in general, this is how overlay networks in Kubernetes work. There is a common misconception that their use in Kubernetes is necessary, but the truth is that everything depends on specific cases. So first make sure you apply them only if you really need them.
Read also in our blog:
Here you have launched many services in the Kubernetes cluster and are reaping the benefits ... or at least you are going to do it. However, despite the existence of a number of utilities for configuring and managing the cluster, you are still interested in how everything works “under the hood”. Where to look if something breaks? By myself I know that this is important.
')
With Kubernetes, simply starting work is enough. But if you look inside, there will be a complex system. It has a lot of "moving" components, the functioning and interaction of which is necessary to understand if you want to prepare for possible failures. One of the most complex and possibly most critical components of Kubernetes is the network.
Therefore, I decided to figure out exactly how it works: I read the documentation, listened to the reports, and even looked at the code base - and this is what I found out ...
Kubernetes Network Model
At the heart of the Kubernetes network device is an important architectural principle: “ Each has its own unique IP ”.
IP pod is divided between all its containers and is available (routable) for all other pods. Have you ever noticed working pause containers on your nodes? They are also called “ sandbox containers ” (sandbox containers) , because their work consists in reserving and retaining the network namespace (netns) used by all the pod containers. Due to this, IP flow does not change even in those cases when the container dies and a new one is created instead. The great advantage of this model - IP for each pod (IP-per-pod) - is the absence of IP / port collisions on the underlying host. And we do not need to worry about which ports use applications.
Therefore, the only requirement for Kubernetes is that all these IP addresses of the hearths should be accessible / routable from the rest of the hearths, regardless of which node they are located on.
Intra-node interaction
The first step is to make sure that the pods of one node are able to communicate with each other. Then this idea is expanded to interaction between nodes, with the Internet, etc.
On each Kubernetes node, which in this case is a Linux machine, there is a root network namespace - root netns . The main network interface,
eth0 , is in this root netns:Similarly, each pod has its own netns with a virtual Ethernet interface, connecting them to root netns. In fact, this is a virtual link with one end at root netns and the other at netns in the hearth.
The end on the pod side is called
eth0 , because it doesn’t know about the underlying host and thinks that it has its own root network configuration. The other end is called something like vethxxx . You can see all these interfaces on your Kubernetes node using the command ifconfig or ip a .Such is the arrangement of all the pods on a node. To let the pods communicate with each other, use a Linux Ethernet bridge -
cbr0 . Docker uses a similar bridge called docker0 .The list of bridges can be
brctl show using the brctl show command.Suppose a packet is sent from
pod1 to pod2 :- It leaves ethns via
eth0belonging topod1and gets into root netns viavethxxx. - It
cbr0intocbr0, which gives it a destination with an ARP request asking: “Who has such an IP address?”. vethyyyreplies that he has the necessary IP - so the bridge will know where to send the packet.- The packet reaches
vethyyyand, passing a virtual link, falls into netns owned bypod2.
So the containers of one node communicate with each other. Obviously, there are other ways to interact, but this is probably the easiest one; Docker uses it too.
Inter-node communication
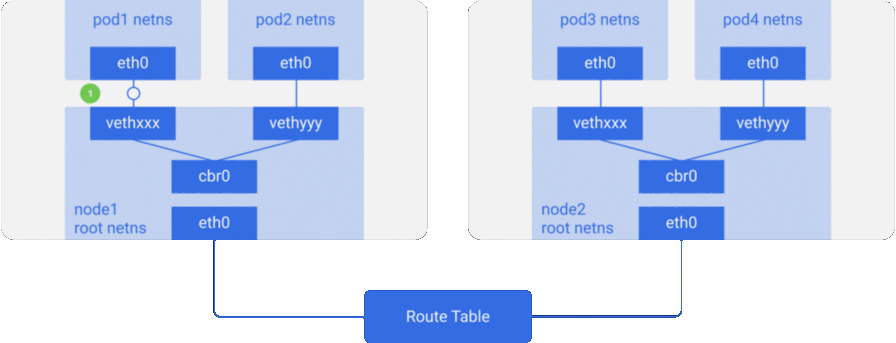
As mentioned above, the hoists should also be accessible from all nodes. And for Kubernetes it doesn’t matter how it is implemented. Therefore, you can use L2 (ARP between nodes), L3 (IP routing between nodes - similar to the routing tables of cloud providers), overlay networks, and even pigeons. Each node is assigned a unique CIDR block (range of IP addresses) for the IP addresses issued by the sub, so each sub has a unique IP that does not conflict with the sub masses of other nodes.
In most cases, especially in cloud environments, the cloud provider uses routing tables to ensure that packets reach the correct recipients. The same can be configured using the routes on each node. There are also many other network plug-ins that solve their problems.
Consider an example with two nodes, similar to the one above. Each node has different network namespaces, network interfaces, and a bridge.
Suppose a packet follows from
pod1 to pod4 (on another node):- It leaves ethns via
eth0belonging topod1and gets into root netns viavethxxx. - It falls into
cbr0, which makes an ARP request looking for a destination. - From
cbr0it goes to theeth0main network interface, since no one on this node has an IP address corresponding topod4. - Leaves the
node1machine, remaining in the network wire with the valuessrc=pod1anddst=pod4. - In the routing table, routing is configured for the CIDR blocks of each node - according to it, the packet is sent to the node whose CIDR block contains the IP address
pod4. - The packet arrives at
node2main network interface node,eth0. Now, althoughpod4not theeth0IP address, the packet is redirected tocbr0because IP forwarding is enabled on the nodes. The node's routing table is scanned for the presence of routes corresponding to the IP address ofpod4. It showscbr0as the destination for the CIDR block of this node. You can view the node's routing table using theroute -ncommand — it will show the route forcbr0like this:
- The bridge picks up the packet, makes an ARP request, and finds out that the IP belongs to
vethyyy. - The package passes through a virtual link and gets into
pod4.
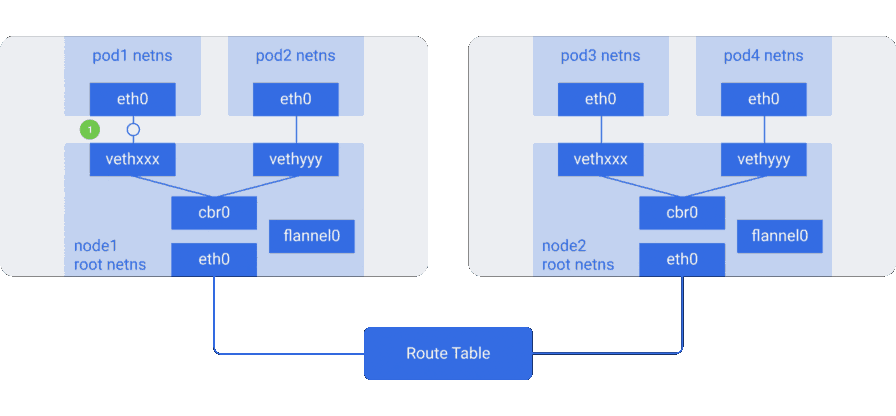
Overlay nets
Overlay nets are not required by default, but they are useful in some situations. For example, when we do not have enough IP address space or the network cannot manage additional routes. Or when we want to get additional management capabilities provided by overlays. A frequent case is the presence of a limit on the number of routes supported in the routing tables of the cloud provider. For example, for the routing table, AWS claims support for up to 50 routes without affecting network performance. If we need more than 50 Kubernetes nodes, the AWS routing table will not be enough. In such cases, the overlay network will help.
The overlay network encapsulates packets passing through the network between nodes. You may not want to use it because the encapsulation-decapsulation of all packets adds a little delay and complexity. Often it is not necessary that it is worth considering when making a decision about their use.
To understand how traffic flows in the overlay network, consider an example with a flannel , an open source project from CoreOS:
Here we see a configuration similar to the previous one, however, a new virtual Ethernet device called
flannel0 appeared in it - it is located in the root name space (root netns). This is an implementation of Virtual Extensible LAN (VXLAN), which for Linux is just another network interface.Passing a packet from
pod1 to pod4 (it is located on another node) looks like this:- The packet through
eth0leaves netns owned bypod1, and it turns out to root netns onvethxxx. - Passes to
cbr0, which makes an ARP request to discover the destination. - Since no one on this node has an IP address corresponding to
pod4, the bridge sends the packet toflannel0— the node's routing table is configured to useflannel0as a target for the network hearth range. - The flanneld daemon communicates with the Kubernetes apiserver or the underlying etcd, from which it receives all the IP addresses of the subfields and the information on which nodes they are located on. Thus, the flannel creates matching mappings (in user space) for the sub-IPs and node IPs.
flannel0takes the packet and wraps it into a UDP packet with additional headers that change the source and destination IP addresses to the appropriate nodes, and sends it to a special vxlan port (usually 8472):
Although the mappings are in user space, the actual encapsulation and data flow takes place in kernel space, so this is quite fast. - The encapsulated packet is sent through
eth0, since it is responsible for routing the node traffic.
- Since no one on this node has an IP address corresponding to
- The packet leaves the node with the IP addresses of the nodes as the source and destination.
- The routing table of the cloud provider already knows how to route traffic between nodes, so the packet is sent to the receiving node,
node2. - The packet arrives at
node2eth0node. Since a special vxlan is used as a port, the kernel sends a package toflannel0. flannel0decapsulates the packet and transfers it back to root netns. The packet leaves the node with the IP addresses of the nodes as the source and destination. The further path coincides with what was in the case of a conventional (non-turn) network.- Since IP forwarding is enabled, the kernel sends the packet to
cbr0according to the routing table.
- The packet arrives at
- The bridge takes the packet, makes an ARP request and finds out that the IP address you need belongs to
vethyyy. - The package passes through a virtual link and gets into
pod4.
Different implementations may have minor differences, but in general, this is how overlay networks in Kubernetes work. There is a common misconception that their use in Kubernetes is necessary, but the truth is that everything depends on specific cases. So first make sure you apply them only if you really need them.
PS from translator
Read also in our blog:
- “ An illustrative guide to networking in Kubernetes. Part 3 ";
- " Behind the scenes of the network in Kubernetes ";
- " Comparison of the performance of network solutions for Kubernetes ";
- “ Container Networking Interface (CNI) - network interface and standard for Linux containers ”;
- “What happens in Kubernetes when starting the kubectl run?”: Part 1 and part 2 ;
- “ How does the Kubernetes scheduler actually work? ";
- " Infrastructure with Kubernetes as an affordable service ."
Source: https://habr.com/ru/post/346304/
All Articles