Web installer on pure WINAPI with Hi DPI support and vector logo
In our time, this is probably one of the main applications for applications written in pure WINAPI. Writing something more serious than a few simple windows on pure WINAPI is no longer so fun, but a small installer is the best thing.
Since it's 2018 in the yard, writing a simple application is somehow not very good. Let's correspond to the trends of time - the installer will be with support for Hi DPI modes. Even in laptops already 4K screens are not uncommon, what can we say about desktops. Well, since the installer is something that should quickly boot, we will save on what is really not difficult to do yourself. Well, let's try to cheat to use vector graphics without additional libraries - we need a beautiful logo!

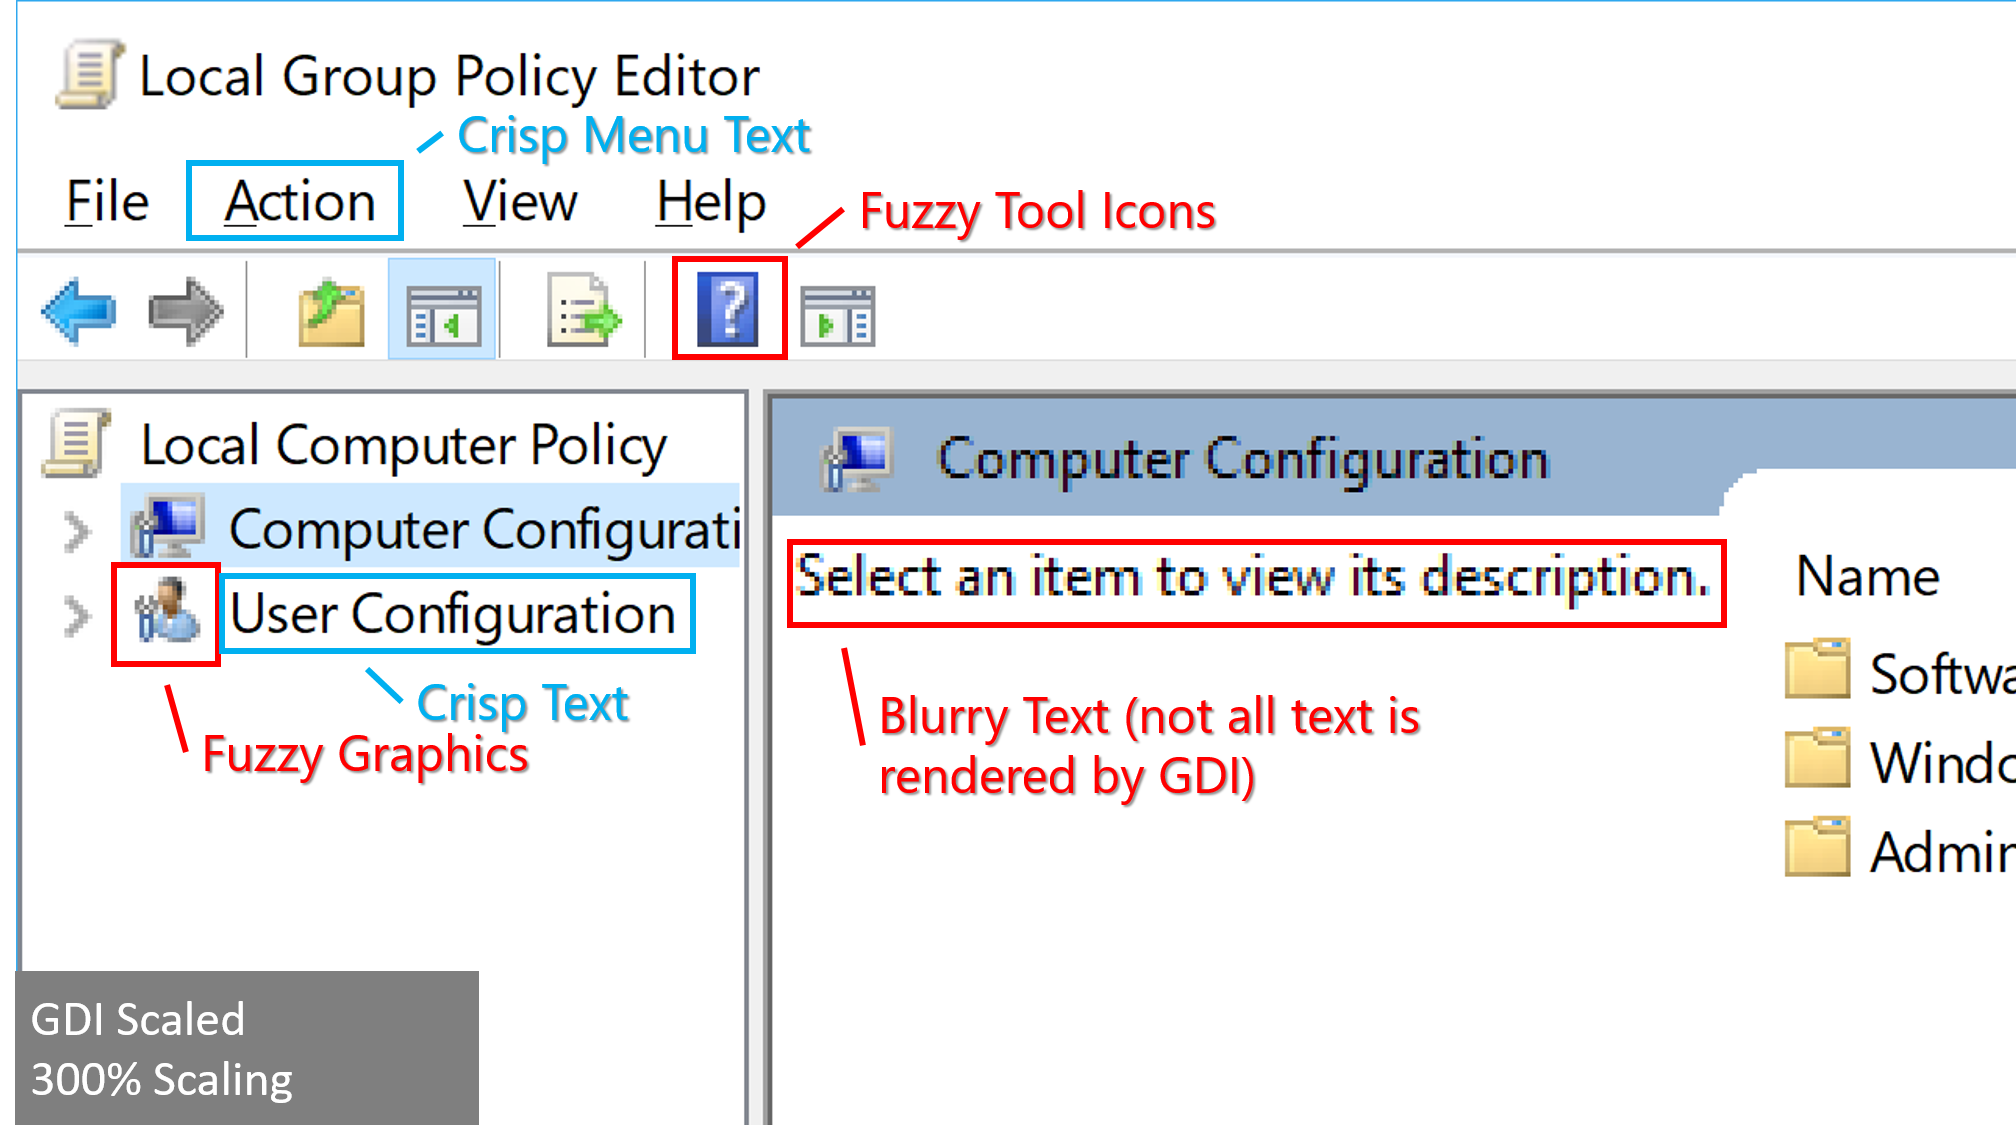
To begin with, the latest (for today) manual from Microsoft is about how to write High DPI Desktop applications. From it you can see what a difficult fate in the mode of support for different DPI in Windows applications. And how many different functions have already been added ... Before Windows 10, the system could only draw the font in accordance with the DPI, but at the same time the indents and other sizes terribly “floated”, and everything else was just stretched. This mode is called XP style DPI scaling. Starting with Vista, the system drew the application to the buffer and stretched the final image, but the result was also so-so - everything was blurry. Starting with Windows 8.1, the system began to send a message about the DPI change on the fly, but only to the main window of the application. Only now it is not necessary to close the user session to see the DPI changes. And only in Windows 10, the system learned to redraw everything that is done through GDI (text and common controls) and then not immediately, but after Creators Update, but even Windows 10 cannot do everything:
')
So if you want to write DPI aware application, then according to the document you have to do UWP - only this framework supports DPI and will do everything for you. All the rest will require manual control in one form or another.
In fact, we don’t really need it - we draw everything, anyway. At the start, we get the current DPI and listen to the message from the system - in order to change the DPI on the fly (if the system supports it). Then just draw the windows / components as we need, taking into account the DPI, well, and update if the user decides to change the DPI while the program is running or drag the window to another monitor, where the DPI is different. It’s impossible to use ommon ontrols, they don’t know how to react to the DPI change until Windows 10 1703 - so that’s all by yourself.
I don’t like to write the window procedures in the “C” style, because wrappers were written on all the components - windows and controls. There is not a lot of work here even from scratch (this is if you know everything in advance), and every WINAPI programmer already has such things in storerooms for a long time. What we need:
To tell the whole theory of the operation of windows and controls (this is also windows, by the way) in WINAPI is out of place. In short, something like this: when a GUI element is created, the system returns its HANDLE (HWND) and it points to the data of the created element. Elements and windows have a main procedure - which parses calls to an element and does (or does not) what they want from it. The appeal to the element goes through messages (the message itself and two parameters to it: wparam and lparam). In order to alter something, we redefine the main procedure on our own, process the messages we need and give control to the main procedure signaling - we need to sort things out further, or we have already done everything. In other systems, the GUI is about the same - nothing complicated.
Well, now you are a WINAPI programmer. Nearly.
What we ultimately do is the main window, where you can click a couple of buttons and select several options. By clicking the Install button, we show a trendy progress indicator with a blurred background and we’ll have it working, starting with Windows XP. We take the dialog box as the basis - the easiest way.

Now let's take it in order - what we have with Hi DPI. Windows itself defines DPI support (dpi aware) from the application side using the application manifest - it has been almost mandatory for some time. In addition to DPI in Windows c 8.1, for example, the GetVersion function was changed - if the manifest does not say which systems you support - GetVersion will return 6.2 (as if your application is running on Windows 8 on all systems older than Windows 8) or as close as possible from the list systems that you add. So the manifesto is needed for many reasons. An example of a manifest can be found here , and all possible manifest options are listed here .
Our application can have 4 options for working with DPI:
In the last three modes, the system “takes away hands” from our application (almost), does not touch anything and gives us all coordinates and dimensions in pixels without virtualizing them. Of course, except for the above points. Per-Monitor mode is best suited for us, and the capabilities of Per-Monitor V2 will only interfere.
But there is not without problems, of course. Since I like to make dialog boxes in the designer of Visual Studio - there is a serious problem. Microsoft itself proposes to create interactive applications manually and add all elements to the window manually too - for that I am sorry, I did not subscribe. The problem is that the size of the dialog box in the resources (dialog template) is stored in the DLU (DIALOG UNITS). And the current DLU value varies with the DPI of the system. It turns out that both DPI and DIALOG UNITS overlap each other. Moreover, on the fly they (DIALOG UNITS) do not change in contrast to the DPI and, after changing the DPI, they only work in a new session. Moreover, if you use the GetDialogBaseUnits () function and try to calculate the changes, the size will float. It turns out the calculation of the actual size of the window also depends on some parameters, which is indirectly confirmed by this message . That is, we will not be able to specify the initial and correct size at the start of the application. I don’t want to give up the dialog designer, and so the code appeared that brings the initial size of the window and elements in the window as if it is always 96 DPI, and then we will change it depending on the DPI. I had to write for this bypassing the resources of the dialogue and its elements. Further, the sizes of windows / elements are multiplied by the DLU by default, and our initialization window is brought to this form.
But now everything is simple - after adjusting the size of the window and the elements at the start, we take the DPI by default (96) and do the initial initialization of the window size under the current DPI of our window, and we do the same with all the children in the window. You can do this in one stage, but I left it in two. But it is not at all clear what is happening there.
But we must not forget that when the WM_DPICHANGED message arrives to the window, the first parameter is the new DPI, and the second is the recommended size and position of the window that the system sends us. If you do not take this into account and consider it yourself - the window will shy away to the floor of the screen (well, depending on how you implement it) when you drag it between monitors with different DPI.
That is, to do the size of the window itself - it is not necessary, the system will send us the desired size. But the child windows need to be processed (we have the same per-monitor mode version 1).
The application is implemented as a single window plus InstallManager with a variety of common properties and options (implemented through singleton). So in my project is much more convenient, but here, too, does not seem to interfere.
Now a detailed description of the project files. Everything for windows in the folder: webinstaller \ windows \
Abstract, general class of windows
Base class - it is convenient to fumble the main functionality if there are several windows.
Pay attention to OnEraseBackground, there is implemented the possibility of a gradient background for the window. To do this, use the WINAPI function GradientFill.
If anything, then the background can be changed to the usual one in webinstaller \ install \ installer_constants.h, it is enough to remove the GRADIENT_BG declaration.
Specific window - in our case the main
Any utilities of varying degrees of utility
For example, RectHolder, which is inherited from the RECT structure and contains several additional methods of the type - Width and Height. Otherwise it is very annoying to write blablabla.bottom - blablabla.top, etc.
And the replacement MulDiv (MultiplyThenDivide), which does not round the result, otherwise I can get out unpleasant size jumps for small values (important for fonts).
Yes, by the way, all this is partially torn out from the live project, which is noticeably more complicated than this, so do not judge it - all sorts of oddities are available. In some places it was necessary on the fly to add what was needed instead of what was cleaned and it looks illogical. In the end, this is an example. Well, loading, unpacking, installing are done with a stub - this is all very easily done through the WinInet functions and is not very relevant to the main topic of the article.
And what do we have with the controls ... In terms of DPI support - everything is simple, it makes the window. And the rest of the implementation is also not particularly difficult.
Everything is in the folder: webinstaller \ ui \
Base class for ui elements
Our static element, well, just text
What is interesting, since it may be necessary to redraw an element without redrawing the window, and we can have a background with a gradient - when you first draw, you have to save the background under the element and draw it every time. And there is still a small flaw, sometimes this buffer is read when the window has not cleared it and when redrawing over it, the text becomes slightly fatter. Suddenly find how to get around :)
Text that link
Sly element that allows you to add text and several links (bottom line in the window)
Made to be convenient to write about the user agreement and privacy policy. If to do separate elements, then there will be a trouble with indents and alignment.
Progress indicator
A regular base element that draws a bar in two colors depending on the data. Plus the marquee mode (it's hard to find some correct description in Russian in one word). This is when we do not know exactly how long the operation will take and just draw a short strip that crawls around the indicator in a circle. To do this, call the function of the element by timer from the window with parameters 0, 0.
Square button
The button is conditionally square, if you set the color specifically for the button, then the background will be and the edges of the background will be rounded and smeared - for beauty, of course.
The text in the button can be drawn with a shadow.
Our cunning element for a vector logo (etc.)
Let's start from afar. Since the size of ours is not one and not two (100%, 125%, 150%, 175%, 200% ...), stocking up with pictures for all resolutions looks wasteful, at the same time the logo is usually a vector. But Windows doesn’t support anything other than EMF, and this is essentially the GDI / GDI + call log for EMF / EMF +. The option is not bad, there are some restrictions, but if you need to do something quite complicated and you can wrap the image you need into EMF +, that’s what it is. Tweak the rendering for a decent blur of edges and may even be nice. It is only necessary to use GDI + 1.1 and at a minimum it is Windows Vista (the essence is in the Metafile.ConvertToEmfPlus function). Normal EMF will not blur the edges (antialiasing).
If you do not use GDI +, then only one vector component of Windows remains - this is font rendering. And since it is carried out in one color, you will have to disassemble the logo into colors.
That's what layered_static_control is for. Several symbols are taken and drawn one after another with the desired colors. In fact, the typefaces of characters and so complex in the font - so there is nothing particularly new. Unless we will not be able to use this mechanism, since it is inside the component and the color cannot be changed.
For example, I took the SVG mouse from Twitter 'a, disassembled it into 4 parts by the number of colors, took the OpenSans font and put them there instead of the characters of the brackets, correcting quite a bit. All this is done in half an hour in a convenient open source editor - FontForge . At the same time we will have a nice font in the window.
I uploaded SVG to Illustrator, unloaded into SVG already in parts. I uploaded to FontForge and in FontForge itself corrected that the contours were closed. To do this, call the element error check in FontForge: Element -> Error Check -> Outlines -> Open Outlines. After checking, he will highlight the desired point and you just need to grab, move and put in the same place - he closes this circuit.
Then there are two important steps: do not forget to set characters to the same size / metrics (themes that we use for layers) and change the name of the font (its properties in FontForge); otherwise, when we try to download it into the application, it may turn out that it is already installed system (original) will be used in the system.
By the way, since we save space, you can delete all unused characters from the font, it will then become very small (Russian + English letters + numbers and signs - 29kb). The main thing is careful, many characters in the font are compound. The top dash in the letter, for example, is located at the very end of the OpenSans font and is visible as a separate element.
We add layers and their color to the element itself - everything is simple.
Parts of the logo / symbols can be drawn with gradients - for this you need to use GDI +, there are gradient brushes. It is necessary to make only new implementation of StaticControl and LayeredStaticControl under GDI +.
By the way, the button for closing the window is still not quite similar to the letter X, therefore it is also made separately in the font (instead of \).
Element to select options and settings (checkbox)
Here, too, it was not without a vector, somehow it’s necessary to draw a daw and everything else. As I wrote earlier, only Windows 10.1703 can redraw common controls. Everything is similar to the example with the mouse in the logo, you need a frame, a clean background and the checkbox itself.
In terms of functionality, if you really want to install something with your program (and suddenly) or mention something especially important, you will need some kind of reference to the agreement separately. It is here provided as a separate element.
An element for choosing which itself changes the status of the selected option in InstallManager - otherwise it inherits the CompositeCheckboxControl
Application manifest
Pay attention to the line:
This is what we say to the system that we support the DPI per Monitor mode. All other DPI options are listed here .
Singleton manager
Various system functions (wrappers)
From the resources we have only the font and icon
Well, in general, that's all. 160kb for everything about everything (of course, without downloading from the network, but this is a few kb from strength).
What we have as a result of DPI in WINAPI applications:
If you do not draw all the elements of the window yourself - then you can shift almost all the problems with drawing on Windows, but only starting with Windows 10.1703. Solving problems in this case is necessary only with raster graphics. It is enough to add a special option - gdiscaling to the application manifest and set it to true. It describes in detail how it works. Of course, if you use GDI for drawing or your framework uses GDI.
If you do not add raster image sets to the application, you can take a larger size and simply reduce it via GDI + for the desired resolution - there is a fairly decent interpolation algorithm. Microsoft itself advises him .
In general, it turns out or do it yourself, or leave it at the mercy of the system. Moreover, Microsoft is preparing a new option in Spring Creators Update - to allow Windows to correct application blur. How it works is not yet clear, but most likely forcibly includes GDI scaling.
And, of course, the repository with the application on github .
Since it's 2018 in the yard, writing a simple application is somehow not very good. Let's correspond to the trends of time - the installer will be with support for Hi DPI modes. Even in laptops already 4K screens are not uncommon, what can we say about desktops. Well, since the installer is something that should quickly boot, we will save on what is really not difficult to do yourself. Well, let's try to cheat to use vector graphics without additional libraries - we need a beautiful logo!
To begin with, the latest (for today) manual from Microsoft is about how to write High DPI Desktop applications. From it you can see what a difficult fate in the mode of support for different DPI in Windows applications. And how many different functions have already been added ... Before Windows 10, the system could only draw the font in accordance with the DPI, but at the same time the indents and other sizes terribly “floated”, and everything else was just stretched. This mode is called XP style DPI scaling. Starting with Vista, the system drew the application to the buffer and stretched the final image, but the result was also so-so - everything was blurry. Starting with Windows 8.1, the system began to send a message about the DPI change on the fly, but only to the main window of the application. Only now it is not necessary to close the user session to see the DPI changes. And only in Windows 10, the system learned to redraw everything that is done through GDI (text and common controls) and then not immediately, but after Creators Update, but even Windows 10 cannot do everything:
')
So if you want to write DPI aware application, then according to the document you have to do UWP - only this framework supports DPI and will do everything for you. All the rest will require manual control in one form or another.
In fact, we don’t really need it - we draw everything, anyway. At the start, we get the current DPI and listen to the message from the system - in order to change the DPI on the fly (if the system supports it). Then just draw the windows / components as we need, taking into account the DPI, well, and update if the user decides to change the DPI while the program is running or drag the window to another monitor, where the DPI is different. It’s impossible to use ommon ontrols, they don’t know how to react to the DPI change until Windows 10 1703 - so that’s all by yourself.
I don’t like to write the window procedures in the “C” style, because wrappers were written on all the components - windows and controls. There is not a lot of work here even from scratch (this is if you know everything in advance), and every WINAPI programmer already has such things in storerooms for a long time. What we need:
- Something abstract for windows (windows)
- Something abstract for controls
- Text element (textbox)
- Button text and effects (button)
- Progress indicator
- Link
- Checkboxes with text to select any settings (checkbox)
- Tricky element for vector logo
- Well, plus their different combinations
To tell the whole theory of the operation of windows and controls (this is also windows, by the way) in WINAPI is out of place. In short, something like this: when a GUI element is created, the system returns its HANDLE (HWND) and it points to the data of the created element. Elements and windows have a main procedure - which parses calls to an element and does (or does not) what they want from it. The appeal to the element goes through messages (the message itself and two parameters to it: wparam and lparam). In order to alter something, we redefine the main procedure on our own, process the messages we need and give control to the main procedure signaling - we need to sort things out further, or we have already done everything. In other systems, the GUI is about the same - nothing complicated.
Well, now you are a WINAPI programmer. Nearly.
What we ultimately do is the main window, where you can click a couple of buttons and select several options. By clicking the Install button, we show a trendy progress indicator with a blurred background and we’ll have it working, starting with Windows XP. We take the dialog box as the basis - the easiest way.
Now let's take it in order - what we have with Hi DPI. Windows itself defines DPI support (dpi aware) from the application side using the application manifest - it has been almost mandatory for some time. In addition to DPI in Windows c 8.1, for example, the GetVersion function was changed - if the manifest does not say which systems you support - GetVersion will return 6.2 (as if your application is running on Windows 8 on all systems older than Windows 8) or as close as possible from the list systems that you add. So the manifesto is needed for many reasons. An example of a manifest can be found here , and all possible manifest options are listed here .
Our application can have 4 options for working with DPI:
- DPI Unaware - knows nothing about DPI (the system will do everything, but how it will turn out)
- System DPI Awareness - we take the system DPI and at the start we initialize our application for it (Widows Vista)
- Per-Monitor - we take not the system DPI, but the monitor DPI on which the application is displayed. We process messages when the user drags the application between different monitors with different DPI, but they only come to the top level window (Widows 8.1)
- Per-Monitor (V2) is the same as Per-Monitor, but the system sends messages to all of our windows. Plus, the system itself adjusts the dimensions of the non-client part of the window, the common controls and the initial dimensions of the dialog boxes created via CreateDialog (Windows 10 starting with Creators Update build 1703).
In the last three modes, the system “takes away hands” from our application (almost), does not touch anything and gives us all coordinates and dimensions in pixels without virtualizing them. Of course, except for the above points. Per-Monitor mode is best suited for us, and the capabilities of Per-Monitor V2 will only interfere.
But there is not without problems, of course. Since I like to make dialog boxes in the designer of Visual Studio - there is a serious problem. Microsoft itself proposes to create interactive applications manually and add all elements to the window manually too - for that I am sorry, I did not subscribe. The problem is that the size of the dialog box in the resources (dialog template) is stored in the DLU (DIALOG UNITS). And the current DLU value varies with the DPI of the system. It turns out that both DPI and DIALOG UNITS overlap each other. Moreover, on the fly they (DIALOG UNITS) do not change in contrast to the DPI and, after changing the DPI, they only work in a new session. Moreover, if you use the GetDialogBaseUnits () function and try to calculate the changes, the size will float. It turns out the calculation of the actual size of the window also depends on some parameters, which is indirectly confirmed by this message . That is, we will not be able to specify the initial and correct size at the start of the application. I don’t want to give up the dialog designer, and so the code appeared that brings the initial size of the window and elements in the window as if it is always 96 DPI, and then we will change it depending on the DPI. I had to write for this bypassing the resources of the dialogue and its elements. Further, the sizes of windows / elements are multiplied by the DLU by default, and our initialization window is brought to this form.
But now everything is simple - after adjusting the size of the window and the elements at the start, we take the DPI by default (96) and do the initial initialization of the window size under the current DPI of our window, and we do the same with all the children in the window. You can do this in one stage, but I left it in two. But it is not at all clear what is happening there.
But we must not forget that when the WM_DPICHANGED message arrives to the window, the first parameter is the new DPI, and the second is the recommended size and position of the window that the system sends us. If you do not take this into account and consider it yourself - the window will shy away to the floor of the screen (well, depending on how you implement it) when you drag it between monitors with different DPI.
That is, to do the size of the window itself - it is not necessary, the system will send us the desired size. But the child windows need to be processed (we have the same per-monitor mode version 1).
The application is implemented as a single window plus InstallManager with a variety of common properties and options (implemented through singleton). So in my project is much more convenient, but here, too, does not seem to interfere.
Now a detailed description of the project files. Everything for windows in the folder: webinstaller \ windows \
Abstract, general class of windows
class AbstractDialog Base class - it is convenient to fumble the main functionality if there are several windows.
class BaseDialog : public AbstractDialog Pay attention to OnEraseBackground, there is implemented the possibility of a gradient background for the window. To do this, use the WINAPI function GradientFill.
If anything, then the background can be changed to the usual one in webinstaller \ install \ installer_constants.h, it is enough to remove the GRADIENT_BG declaration.
Specific window - in our case the main
class MainDialog : public BaseDialog Any utilities of varying degrees of utility
namespace WindowsUtils For example, RectHolder, which is inherited from the RECT structure and contains several additional methods of the type - Width and Height. Otherwise it is very annoying to write blablabla.bottom - blablabla.top, etc.
And the replacement MulDiv (MultiplyThenDivide), which does not round the result, otherwise I can get out unpleasant size jumps for small values (important for fonts).
Yes, by the way, all this is partially torn out from the live project, which is noticeably more complicated than this, so do not judge it - all sorts of oddities are available. In some places it was necessary on the fly to add what was needed instead of what was cleaned and it looks illogical. In the end, this is an example. Well, loading, unpacking, installing are done with a stub - this is all very easily done through the WinInet functions and is not very relevant to the main topic of the article.
And what do we have with the controls ... In terms of DPI support - everything is simple, it makes the window. And the rest of the implementation is also not particularly difficult.
Everything is in the folder: webinstaller \ ui \
Base class for ui elements
class BaseControl Our static element, well, just text
class StaticControl : public BaseControl What is interesting, since it may be necessary to redraw an element without redrawing the window, and we can have a background with a gradient - when you first draw, you have to save the background under the element and draw it every time. And there is still a small flaw, sometimes this buffer is read when the window has not cleared it and when redrawing over it, the text becomes slightly fatter. Suddenly find how to get around :)
Text that link
class LinkControl : public StaticControl Sly element that allows you to add text and several links (bottom line in the window)
class CompositeLinkControl : public LinkControl Made to be convenient to write about the user agreement and privacy policy. If to do separate elements, then there will be a trouble with indents and alignment.
Progress indicator
class ProgressControl : public BaseControl A regular base element that draws a bar in two colors depending on the data. Plus the marquee mode (it's hard to find some correct description in Russian in one word). This is when we do not know exactly how long the operation will take and just draw a short strip that crawls around the indicator in a circle. To do this, call the function of the element by timer from the window with parameters 0, 0.
Square button
class RectButtonControl : public LinkControl The button is conditionally square, if you set the color specifically for the button, then the background will be and the edges of the background will be rounded and smeared - for beauty, of course.
The text in the button can be drawn with a shadow.
Our cunning element for a vector logo (etc.)
class LayeredStaticControl : public StaticControl Let's start from afar. Since the size of ours is not one and not two (100%, 125%, 150%, 175%, 200% ...), stocking up with pictures for all resolutions looks wasteful, at the same time the logo is usually a vector. But Windows doesn’t support anything other than EMF, and this is essentially the GDI / GDI + call log for EMF / EMF +. The option is not bad, there are some restrictions, but if you need to do something quite complicated and you can wrap the image you need into EMF +, that’s what it is. Tweak the rendering for a decent blur of edges and may even be nice. It is only necessary to use GDI + 1.1 and at a minimum it is Windows Vista (the essence is in the Metafile.ConvertToEmfPlus function). Normal EMF will not blur the edges (antialiasing).
If you do not use GDI +, then only one vector component of Windows remains - this is font rendering. And since it is carried out in one color, you will have to disassemble the logo into colors.
That's what layered_static_control is for. Several symbols are taken and drawn one after another with the desired colors. In fact, the typefaces of characters and so complex in the font - so there is nothing particularly new. Unless we will not be able to use this mechanism, since it is inside the component and the color cannot be changed.
For example, I took the SVG mouse from Twitter 'a, disassembled it into 4 parts by the number of colors, took the OpenSans font and put them there instead of the characters of the brackets, correcting quite a bit. All this is done in half an hour in a convenient open source editor - FontForge . At the same time we will have a nice font in the window.
I uploaded SVG to Illustrator, unloaded into SVG already in parts. I uploaded to FontForge and in FontForge itself corrected that the contours were closed. To do this, call the element error check in FontForge: Element -> Error Check -> Outlines -> Open Outlines. After checking, he will highlight the desired point and you just need to grab, move and put in the same place - he closes this circuit.
Then there are two important steps: do not forget to set characters to the same size / metrics (themes that we use for layers) and change the name of the font (its properties in FontForge); otherwise, when we try to download it into the application, it may turn out that it is already installed system (original) will be used in the system.
By the way, since we save space, you can delete all unused characters from the font, it will then become very small (Russian + English letters + numbers and signs - 29kb). The main thing is careful, many characters in the font are compound. The top dash in the letter, for example, is located at the very end of the OpenSans font and is visible as a separate element.
We add layers and their color to the element itself - everything is simple.
Parts of the logo / symbols can be drawn with gradients - for this you need to use GDI +, there are gradient brushes. It is necessary to make only new implementation of StaticControl and LayeredStaticControl under GDI +.
By the way, the button for closing the window is still not quite similar to the letter X, therefore it is also made separately in the font (instead of \).
Element to select options and settings (checkbox)
class CompositeCheckboxControl : public CompositeLinkControl Here, too, it was not without a vector, somehow it’s necessary to draw a daw and everything else. As I wrote earlier, only Windows 10.1703 can redraw common controls. Everything is similar to the example with the mouse in the logo, you need a frame, a clean background and the checkbox itself.
In terms of functionality, if you really want to install something with your program (and suddenly) or mention something especially important, you will need some kind of reference to the agreement separately. It is here provided as a separate element.
An element for choosing which itself changes the status of the selected option in InstallManager - otherwise it inherits the CompositeCheckboxControl
class OptionCheckboxControl : public CompositeCheckboxControl Application manifest
webinstaller\installer\install.manifest Pay attention to the line:
<dpiAware xmlns="http://schemas.microsoft.com/SMI/2005/WindowsSettings">True/PM</dpiAware> This is what we say to the system that we support the DPI per Monitor mode. All other DPI options are listed here .
Singleton manager
class InstallerManager Various system functions (wrappers)
namespace SystemUtils From the resources we have only the font and icon
webinstaller\installer\resources\webinstaller.ttf webinstaller\installer\resources\webinstaller.ico Well, in general, that's all. 160kb for everything about everything (of course, without downloading from the network, but this is a few kb from strength).
What we have as a result of DPI in WINAPI applications:
If you do not draw all the elements of the window yourself - then you can shift almost all the problems with drawing on Windows, but only starting with Windows 10.1703. Solving problems in this case is necessary only with raster graphics. It is enough to add a special option - gdiscaling to the application manifest and set it to true. It describes in detail how it works. Of course, if you use GDI for drawing or your framework uses GDI.
If you do not add raster image sets to the application, you can take a larger size and simply reduce it via GDI + for the desired resolution - there is a fairly decent interpolation algorithm. Microsoft itself advises him .
In general, it turns out or do it yourself, or leave it at the mercy of the system. Moreover, Microsoft is preparing a new option in Spring Creators Update - to allow Windows to correct application blur. How it works is not yet clear, but most likely forcibly includes GDI scaling.
And, of course, the repository with the application on github .
Source: https://habr.com/ru/post/346274/
All Articles