Beginners on Arduino: We pack the state machine in a separate class and library
In the last article about writing finite automata, I promised to pack our ingenious code in the form of a class in C ++ for repeated convenient use. I will do the same on the example of my old development SmartButton . So, we get into the incomprehensible world of arduin libraries and PLO .
Why is all this necessary?
Arduino IDE allows you to use C ++ 11 syntax, it turns out. That is, there is a very developed object-oriented language. We want to focus on our ingenious code and the excess logic spread over the program often prevents us from concentrating. Take, for example, all kinds of displays, buttons, sensors, and relays - each has its own logic, why mix it with the general logic of the program. The same, for example, the display. It has many fields, static and changeable. Oh, the field is the same class. A field can enter a menu (menu class) or not, be part of a virtual display (class), which in the physical environment can be as much (displays: working, settings, diagnostics, etc.). The menu, in turn, is controlled by buttons (classes of buttons can be different) or a joystick (class). All this together - the class "display", which can be declared in your program as:
#include "Display.h" Display disp( ); If you are doing a project not entirely on your knee, not something like you are going to change something or reuse some of your own developments - it is better to arrange it in the form of Arduino libraries. Ideally, of course, put in Github for other people, if you don’t feel sorry and you don’t mind if someone corrects or supplements your code.
Since in the last article we made a button, let's design it as a class and a library?
So, our task is to make it so that we can write in our sketches:
#include "myButton.h" myButton b1(4),b2(5),b3(12); // 4, 5 12. loop() { b1.run(); b2.run(); b3.run(); // ... if (b1.clicked()) doSomething(); // , . // ... } How to make an Arduino library?
It's simple!
First you need to decide how your library will be called. Let for example, it will be MyLib .
Find where your sketches are on the computer. They each lie in their daddy, and next to them is the libraries folder. For example, on the Mac / Users / User / Documents / Arduino / libraries and on Windows: c: \ Users \ User \ Documents \ Arduino \ libraries. I myself am sitting on a Mac and I don’t know the path in Windows. Find it.
Here in this libraries folder create a new folder MyLib, that is, with the name of your library. Go there.
In this new folder you need to create at least one file MyLib.h, the one that you will include in your project. Its minimum content looks like this:
#ifndef MYLIB_H #define MYLIB_H #if ARDUINO >= 100 #include <Arduino.h> #else #include <WProgram.h> #endif // #endif I'll tell you what here is why. The construction below allows you to include your library in the code several times without errors. It is better to use the name of your library in capital letters. This is not harshly straightforward, but everyone does it and you don’t stand out. The task is to come up with a unique word, in our case MYLIB_H, an identifier for this header file.
#ifndef MYLIB_H #define MYLIB_H // #endif That is, in your sketch there can be several such lines:
#include "MyLib.h" You say "bye, yes, I, yes I follow, yes I ..." and you will be wrong. It is better to write such a construction in one file once, than to correct your finished sketches, if you suddenly want to put one into another, or your library will be included in another, and so on. This code checks whether the word MYLIB_H is defined; if not, it identifies it and includes further code. If the word is already defined, then the second time you do not need to compile the code.
The following important piece of code:
#if ARDUINO >= 100 #include <Arduino.h> #else #include <WProgram.h> #endif Includes definitions from the Arduino UDE runtime. Without this, your library simply won't compile.
Everything. Close the Arduino IDE. Reopen. Create a new sketch, write #include "MyLib.h" there and hooray, your library is there and connected!
I looked, in the library it seems like how many files should be?
Yes of course. We took minimal steps to create a library. Now it’s time to plan.
So that I can put pieces of my code here with copy-paste, I will call the SmartButton library, okay? The pig MyLib can be nailed as unnecessary.
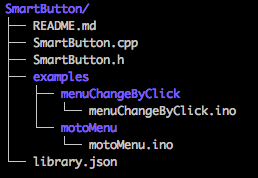
By analogy with the previous item, create a folder SmartButton, in it:
- SmartButton.h - What we will include in our programs. There will only be definitions, without a code.
- SmartButton.cpp - Class program code. This is not a sketch! Please note that the file extension is cpp (C ++).
- README.md - Library file "for people", that is, documentation. "md" means MarkDown, that is, with markup. Just name the README.
- library.json - a library description for the Arduino IDE in a clever JSON format.
- examples - a folder with examples, which will then be visible in the Arduino IDE. It should contain the folder with the names of the examples, and in them with the same name files with the ino extension - sketches.
SmartButton.h
#ifndef SMART_BUTTON_H #define SMART_BUTTON_H #if ARDUINO >= 100 #include <Arduino.h> #else #include <WProgram.h> #endif // include #ifndef SmartButton_debounce #define SmartButton_debounce 10 #endif #ifndef SmartButton_hold #define SmartButton_hold 1000 #endif #ifndef SmartButton_long #define SmartButton_long 5000 #endif #ifndef SmartButton_idle #define SmartButton_idle 10000 #endif class SmartButton { // . // // . // . private: byte btPin; // , [ ](https://habrahabr.ru/post/345960/) enum state {Idle, PreClick, Click, Hold, LongHold, ForcedIdle}; enum input {Press, Release, WaitDebounce, WaitHold, WaitLongHold, WaitIdle}; enum state btState = Idle; enum input btInput = Release; unsigned long pressTimeStamp; // , . private: void DoAction(enum input in); // , . public: // . // , . SmartButton(); SmartButton(int pin); SmartButton(int pin, int mode) {btPin=pin; pinMode(pin,mode);} ~SmartButton(); // Arduino IDE begin void begin(int p, int m) {btPin=p; pinMode(p,m);} // loop(). void run(); // . public: inline virtual void onClick() {}; // On click. inline virtual void onHold() {}; // On hold. inline virtual void onLongHold() {}; // On long hold. inline virtual void onIdle() {}; // On timeout with too long key pressing. inline virtual void offClick() {}; // On depress after click. inline virtual void offHold() {}; // On depress after hold. inline virtual void offLongHold() {}; // On depress after long hold. inline virtual void offIdle() {}; // On depress after too long key pressing. }; #endif Let's explain the essence of the venture. We do not know what we will need from the button. Our ICA is able to be in the states of Click, Press, Hold, and TooLong-Hold, as well as exit from these states to the Off state. Since we are making the library universal, it is necessary to provide an opportunity for another programmer to insert their code into state handlers. OOP has a great tool for this — inheritance.
We are making a class that has several methods (functions) and they are empty. That is, they are, they will be called at the right time, but there is no code in them. Why is this? Then, in the sketch, it will be possible to create your own class on the basis of ours, to determine there only the necessary ones from the methods and fill them with your own code.
For example, we want to make a toggle button, that is, one press is on, the other is off. We will light and dim the LED and provide the isOn () function for use in the classic form in the loop () function.
#include "SmartButton.h" #define LED_PIN (13) // SmartButton class Toggle : public SmartButton { private: byte sw = 0; // byte led; // public: Toggle(byte bt_pin, byte led_pin) : SmartButton(bt_pin) { // . led=led_pin; }; // // . byte isOn() { return sw; } // . virtual void onClick() { if (sw) { // . . digitalWrite(led,LOW); // . } else { // . . digitalWrite(led,HIGH); // . } sw=!sw; // . } }; // bt . . Toggle bt(4,LED_PIN); // 4, . Toggle drill(12,8) // 12, 8. void loop() { bt.run(); drill.run(); if (bt.isOn()) { // - } else { // - } if (drill.isOn()) { // - } else { // - } } As you can see, we are absolutely not interested in the ICA buttons from the previous article, there is no code for this button, it is hidden. We added our functionality to the base class and made the switch on click. Our new Toggle class can also be formatted as a library, by the way, or put it in a separate Toggle.h file next to your sketch, you just need to connect it with the #include directive. We also set foot with LED to highlight the button. Please note that we just created two objects (bt and drill) of the new Toggle class, and the ICA handle the buttons for us is hidden and does not care.
Based on the SmartButton class, you can make your classes that they understand double click, for example, they move the cursor on the menu or turn the machine gun turret slowly-faster, depending on how long the button is held. To do this, it is enough to define your methods described in SmartButton.h as virtual. It is not necessary to determine everything, only you need.
At the request of the target audience, here is an example of a PressButton class that provides methods:
- pressed () - the button was pressed, you can call many times.
- ok () - I understand, listen to the button further, that is, reset.
#include "SmartButton.h" #define LED_PIN (13) // SmartButton class PressButton : public SmartButton { private: byte sw = 0; // public: PressButton(byte bt_pin) : SmartButton(bt_pin) {}; // . // // . byte pressed() { return sw; }; // , . void ok() { sw=0; }; // . virtual void onClick() { sw=1; }; }; // bt . . PressButton bt(4); // 4. PressButton drill(12) // 12. void loop() { bt.run(); drill.run(); if (bt.pressed()) { // - bt.ok(); } else { // - } if (drill.pressed()) { // - if (__) drill.ok(); } else { // - } } Thus, we get two independently working "sticky" buttons, which after pressing are in the pressed state until they are reset using the ok () method.
If you have a menu, you can define onClick () methods for the up and down buttons that will cause the menu cursor to move on the display in the appropriate direction. The definition of onHold () in them can cause the cursor to move to the beginning and end of the menu, for example. In the "Enter" button, you can define onClick () as a menu selection, onHold () as an exit with saving, and onLongHold () as an exit without saving.
If you need a double click, well, define onClick so that you have a click counter there and a time since the previous click. Then you can distinguish between single and double clicks.
SmartButton is just an ICA, it is a tool for implementing the behavior of your buttons.
Where is all the magic hidden? The magic lies in the file SmartButton.cpp
#include "SmartButton.h" // . SmartButton::SmartButton() {} SmartButton::~SmartButton() {} // . // . SmartButton::SmartButton(int pin) { btPin = pin; pinMode(pin, INPUT_PULLUP); } // : // - , // [ ](https://habrahabr.ru/post/345960/). // on* off*. void SmartButton::DoAction(enum input in) { enum state st=btState; switch (in) { case Release: btState=Idle; switch (st) { case Click: offClick(); break; case Hold: offHold(); break; case LongHold: offLongHold(); break; case ForcedIdle: onIdle(); break; } break; case WaitDebounce: switch (st) { case PreClick: btState=Click; onClick(); break; } break; case WaitHold: switch (st) { case Click: btState=Hold; onHold(); break; } break; case WaitLongHold: switch (st) { case Hold: btState=LongHold; onLongHold(); break; } break; case WaitIdle: switch (st) { case LongHold: btState=ForcedIdle; break; } break; case Press: switch (st) { case Idle: pressTimeStamp=millis(); btState=PreClick; break; } break; } } // . // loop() void SmartButton::run() { unsigned long mls = millis(); if (!digitalRead(btPin)) DoAction(Press); else DoAction(Release); if (mls - pressTimeStamp > SmartButton_debounce) DoAction(WaitDebounce); if (mls - pressTimeStamp > SmartButton_hold) DoAction(WaitHold); if (mls - pressTimeStamp > SmartButton_long) DoAction(WaitLongHold); if (mls - pressTimeStamp > SmartButton_idle) DoAction(WaitIdle); } The logic is controversial in places, I know :) But it works.
Now it remains to fill out the README file with the description of your library and fill in the file library.json file, where the fields are quite obvious:
{ "name": "SmartButton", "keywords": "button, abstract class, oop", "description": "The SmartButton abstract class for using custom buttons in Arduino sketches.", "repository": { "type": "git", "url": "https://github.com/nw-wind/SmartButton" }, "version": "1.0.0", "authors": { "name": "Sergei Keler", "url": "https://github.com/nw-wind" }, "frameworks": "arduino", "platforms": "*" } If you do not have a repository, you can omit this section.
Hooray! The library is ready. You can pack a folder in a ZIP and distribute it to your friends or copy to your other computers.
By analogy, you can make a class for any ICA. The principle is general: you make a class, define virtual methods that you will then need to override to insert your own code or ready-made methods, if universality is not required.
What kind of Github and why me?
Github is a huge community of programmers. Yes, your code will be publicly lit for the entire Internet, but ... anyone can suggest their own changes to your code. For example, two people helped me a lot with SmartDelay, one of whom made his own similar library and we looked at each other's code a little bit. Better two good libraries than two glitches, right?
To put your library on Github, you need to create an account there, generate a key and create a repository with the same name as your library (folder). Files can be downloaded via the web interface.
To install the library from Github to the Arduino IDE, just copy the URL and use the git utility:
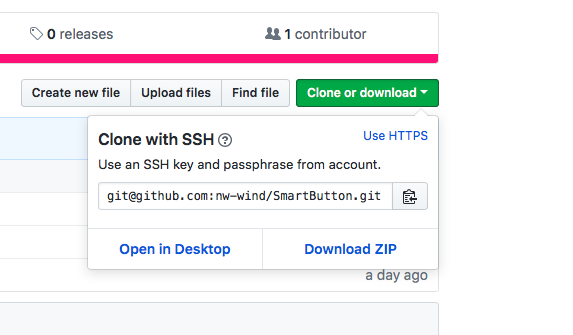
Or download the ZIP - it will be just the Arduino library, like all other libraries.
How to use git in general and Github in particular, there are many articles for sure. Try searching. If you do not find it, I will write how I use it.
')
Source: https://habr.com/ru/post/346006/
All Articles