ScadaPy - creating mnemonic schemes
In the continuation of the series of articles on the possibility of creating a simple scada system using the python programming language, I want to offer a description of the editor of the mnemonic schemes, which integrates all the programs about which it was written earlier.
Currently, many scada systems use a web browser as a display interface or display subsystem, which processes data, usually using a java script.
In this case, the direct display of graphic objects is performed using SVG graphics. Indeed, this approach makes it possible to focus on creating code for a web page operating in different operating systems, rather than creating a separate application for each individual project.
')
Obviously, this approach saves a lot of time on the project, even if it is a simple project for home automation.
The basis of this editor mnemonic was taken freely available svg graphics editor svg-edit. The editor works on the basis of html and is quite efficient for local use.
In order to integrate svg-editor into an application on PyQt5, you need to connect the
For the convenience of editing the project's html file, the file is divided into 3 parts:
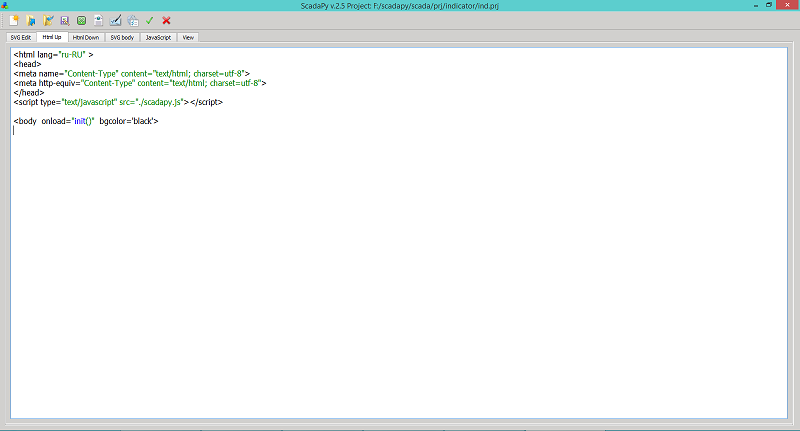
Heading - the code from the html tag to the body tag is inserted.
SVG part - SVG graphics code is inserted.
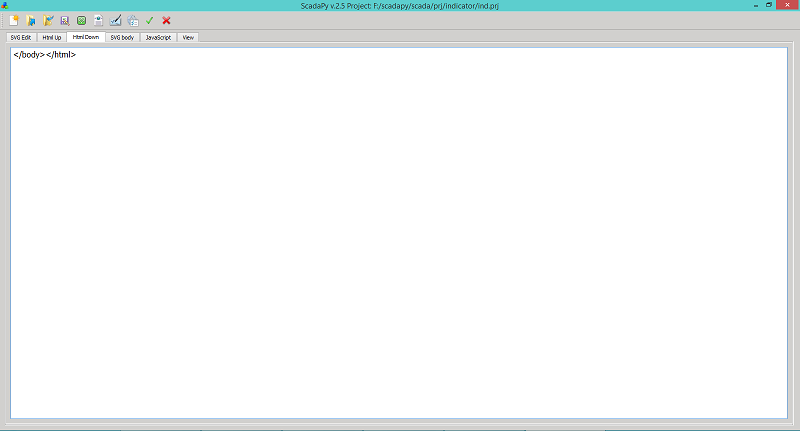
Bottom part - the code from the / body tag to the / html tag is inserted
After launching the application, a window with standard control buttons and several tabs will appear on the screen.
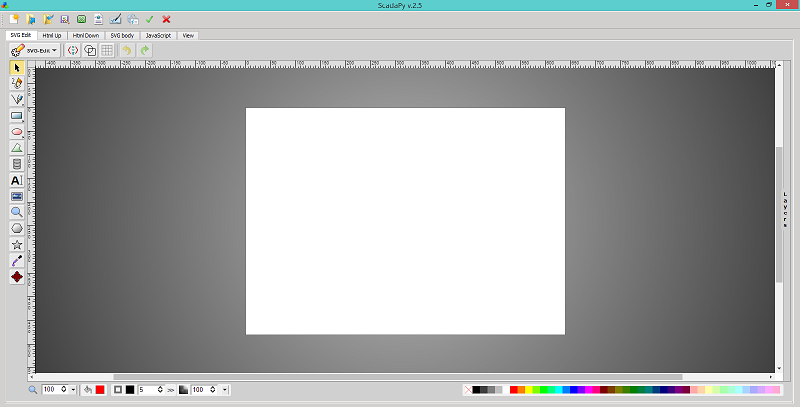
In the first tab "SVG-edit" is located SVG editor, with all the tools necessary for editing a graphic object.
In the second tab "Html Up" is a text editor to edit the header of the html file.
In the tab "Html Down" is a text editor to edit the bottom of the html file.
The “SVG body” tab contains a text editor for editing the code of a graphic object.

In the JavaScript tab , there is a text editor for editing the code for the scadapy.js file.

In the "View" tab displays the collected html project file.

To create a project, you can click on the upper left button of the window, but you can open an existing demo project indicator , located in the prj folder.

After that, all the tabs will load the corresponding project files and when you go to the View tab, you can immediately see the html page in action.
Project files are tightly bound to each tab and are automatically generated:
ind.prj - project description
up.pr - header of the file
down.pr - the bottom of the file
img.svg - svg image
scadapy.js - javascript script file
tmp.html - temporary html page file
project.html - saved html page file
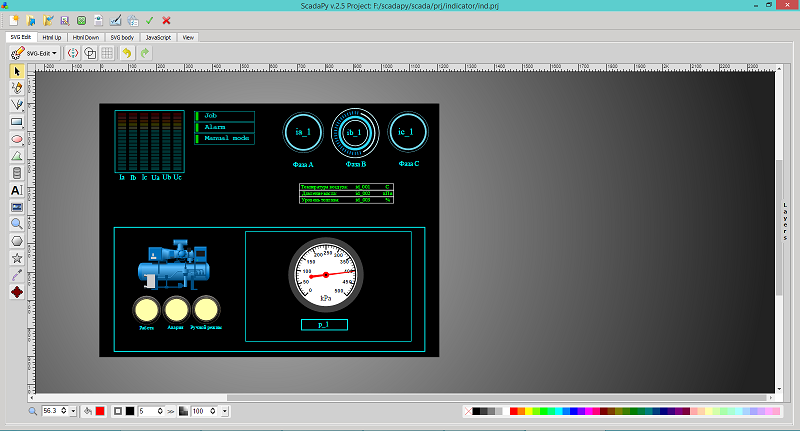
To edit an svg object, you must upload the img.svg file to the svg editor. To do this, in the editor menu, select the item “Load image”, and a picture will appear on the screen.

After that, the graphic object can be edited and modified values.
It must be remembered that each dynamic object must be assigned an ID number, otherwise the editor will assign it automatically and then it will be difficult to find the necessary object in the script to change its value.
For example, we assigned a text object id = id_001, now in the script we assign it a new value:
To change the color repainting, something like this is done:
After editing svg objects, they need to be transferred in some way to the html file. To do this, click on the \ <SVG \> button of the editor and copy the code Ctrl-A Ctrl-C in the window that appears.
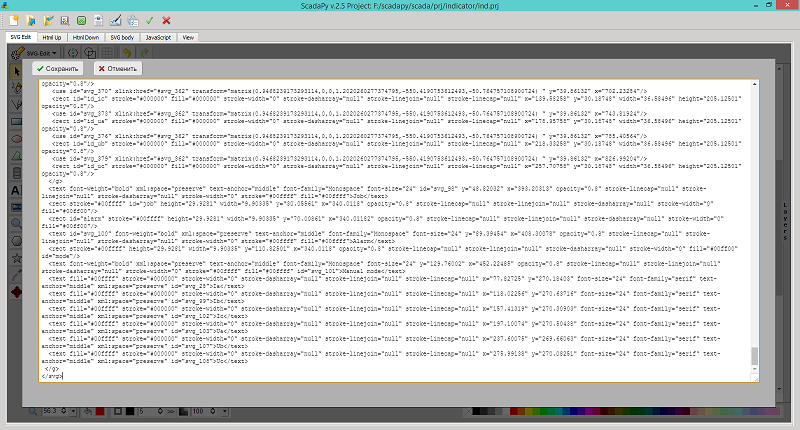
After that, go to the tab "SVG-body" and do Ctrl-A Ctrl-V, that is, transferred the copied object code.
If you now go to the “View” tab, you can see all the changes on the page immediately.
I absolutely agree that this way of transferring code is not very convenient, but the fact is that this application is used exclusively for creating the main page template, but further editing and licking is better done in the editors in which you are used to working.
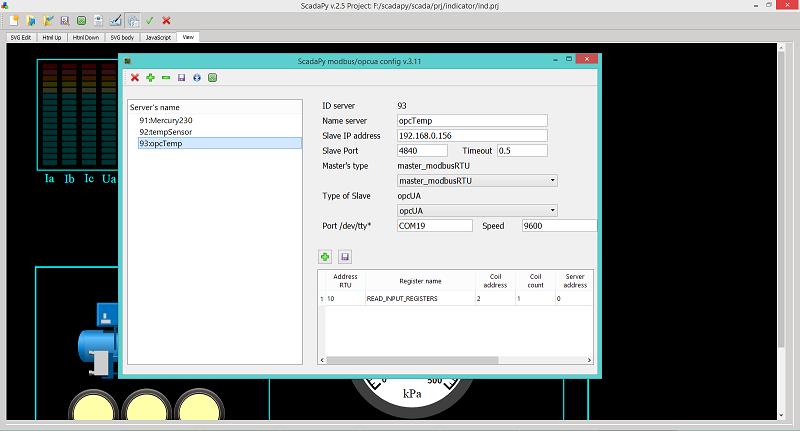
In addition to the mnemonic editor, you can run json.py and srvconf.py in the application.

Since QtWebEngineWidgets is based on WebKit, we decided that when you click on the Run project button, tmp.html will run in the Google Chrome browser.
If this browser is not installed, it is advisable to install it.
Of course, you can register a different browser in the processing of a button click.
Download here.
Currently, many scada systems use a web browser as a display interface or display subsystem, which processes data, usually using a java script.
In this case, the direct display of graphic objects is performed using SVG graphics. Indeed, this approach makes it possible to focus on creating code for a web page operating in different operating systems, rather than creating a separate application for each individual project.
')
Obviously, this approach saves a lot of time on the project, even if it is a simple project for home automation.
SVG Editor
The basis of this editor mnemonic was taken freely available svg graphics editor svg-edit. The editor works on the basis of html and is quite efficient for local use.
In order to integrate svg-editor into an application on PyQt5, you need to connect the
QtWebEngineWidgets library, and there are no problems in Linux, but this was not possible on Windows for the first time and had to update PyQt5 to the latest version. At the moment I have installed version 5.9.3.Editor mnemonic.
For the convenience of editing the project's html file, the file is divided into 3 parts:
Heading - the code from the html tag to the body tag is inserted.
<html lang="ru-RU" > <head> <meta name="Content-Type" content="text/html; charset=utf-8"> <meta http-equiv="Content-Type" content="text/html; charset=utf-8"> </head> <script type="text/javascript" src="./scadapy.js"></script> <body onload="init()" bgcolor='black'> SVG part - SVG graphics code is inserted.
<svg width="1200" height="899.9999999999999" xmlns="http://www.w3.org/2000/svg" xmlns:svg="http://www.w3.org/2000/svg" xmlns:xlink="http://www.w3.org/1999/xlink"> </svg> Bottom part - the code from the / body tag to the / html tag is inserted
</body></html> After launching the application, a window with standard control buttons and several tabs will appear on the screen.
In the first tab "SVG-edit" is located SVG editor, with all the tools necessary for editing a graphic object.
In the second tab "Html Up" is a text editor to edit the header of the html file.
In the tab "Html Down" is a text editor to edit the bottom of the html file.
The “SVG body” tab contains a text editor for editing the code of a graphic object.
In the JavaScript tab , there is a text editor for editing the code for the scadapy.js file.
In the "View" tab displays the collected html project file.
Creating a project.
To create a project, you can click on the upper left button of the window, but you can open an existing demo project indicator , located in the prj folder.
After that, all the tabs will load the corresponding project files and when you go to the View tab, you can immediately see the html page in action.
Project files are tightly bound to each tab and are automatically generated:
ind.prj - project description
up.pr - header of the file
down.pr - the bottom of the file
img.svg - svg image
scadapy.js - javascript script file
tmp.html - temporary html page file
project.html - saved html page file
To edit an svg object, you must upload the img.svg file to the svg editor. To do this, in the editor menu, select the item “Load image”, and a picture will appear on the screen.
After that, the graphic object can be edited and modified values.
It must be remembered that each dynamic object must be assigned an ID number, otherwise the editor will assign it automatically and then it will be difficult to find the necessary object in the script to change its value.
For example, we assigned a text object id = id_001, now in the script we assign it a new value:
document.getElementById("id_001").innerHTML = "100.00 A" To change the color repainting, something like this is done:
document.getElementById("job").setAttribute("fill", "#00ff00"); After editing svg objects, they need to be transferred in some way to the html file. To do this, click on the \ <SVG \> button of the editor and copy the code Ctrl-A Ctrl-C in the window that appears.
After that, go to the tab "SVG-body" and do Ctrl-A Ctrl-V, that is, transferred the copied object code.
If you now go to the “View” tab, you can see all the changes on the page immediately.
I absolutely agree that this way of transferring code is not very convenient, but the fact is that this application is used exclusively for creating the main page template, but further editing and licking is better done in the editors in which you are used to working.
In addition to the mnemonic editor, you can run json.py and srvconf.py in the application.
Since QtWebEngineWidgets is based on WebKit, we decided that when you click on the Run project button, tmp.html will run in the Google Chrome browser.
If this browser is not installed, it is advisable to install it.
Of course, you can register a different browser in the processing of a button click.
Download here.
Source: https://habr.com/ru/post/345938/
All Articles