Install and update the Let's encrypt certificate for Zimbra mail server
In the last articles we were asked to talk about installing and updating Let's Encrypt certificates.
Let's Encrypt is a certificate authority that provides free X.509 cryptographic certificates for TLS encryption (HTTPS). The process of issuing certificates is fully automated.

It is advisable to perform the request for Let's Encrypt on the server with Zimbra in order to obtain an SSL certificate, CA Intermediate and Private Key. To do this, you must stop the mail server service (ports 80 and 443):
')
1. Stop the service.
2. Download the Let's Encrypt package and go to the letencrypt directory:
Note. In RedHat and CentOS 6, before installing you will need to enable the EPEL repository.

3. Run the automatic Let's Encrypt script, use the certonly parameter.
The script will set up a temporary WEB-server for checking and issuing a certificate, if necessary agreeing with the license and informing the email:

If you need to have multiple hostnames on the same SSL, you should instead use the Multi-SAN protocol, SSL, where -d are your domains:
4. If everything is good with verification, then the certificate (certificate + public key + chain) will be issued in the format "/ etc / letencrypt / live / address /" :

5. At this point, you can restart the service and begin installing the signed certificate. To implement a certificate in Zimbra, you need to supplement the “root CA” chain. Create a file with “root CA” and lines in the file “fullchain1.pem”)
6. After the file has been created, check the files with the following command:
7. Check, back up your current certificates (highly recommended) and copy the private key to the “/ opt / zimbra / ssl / zimbra / commercial” directory with the name “commercial.key”:
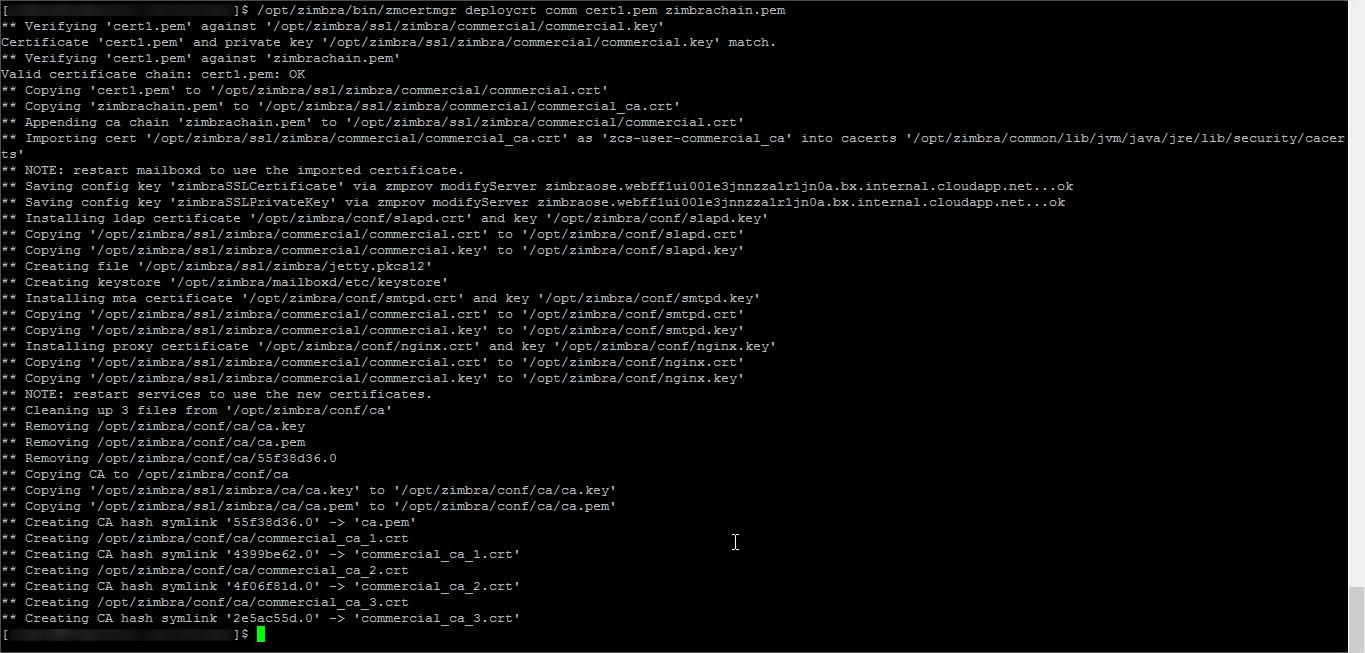
8. Perform certificate installation and restart services to verify deployment.
9. Correct installation of the certificate:
10. Restart the service.
1. Stop the Zimbra.
2. We receive new certificates and start the mail server.
3. Certificates obtained will need to be uploaded to Zimbra. Copy certificates:
4. At the end of the chain.pem file, add the intermediate Let's encrypt certificate:
If you do not add an intermediate certificate, you will receive an error during the verification phase:
5. Check the installed keys and certificates:
6. If the check was successful, then install the updated certificates:
7. To apply the installed certificate, restart all Zimbra services:
Done!
Let's Encrypt is a certificate authority that provides free X.509 cryptographic certificates for TLS encryption (HTTPS). The process of issuing certificates is fully automated.
Issue Let's Encrypt
It is advisable to perform the request for Let's Encrypt on the server with Zimbra in order to obtain an SSL certificate, CA Intermediate and Private Key. To do this, you must stop the mail server service (ports 80 and 443):
')
1. Stop the service.
zmproxyctl stop
zmmailboxdctl stop
2. Download the Let's Encrypt package and go to the letencrypt directory:
Note. In RedHat and CentOS 6, before installing you will need to enable the EPEL repository.
git clone https://github.com/letsencrypt/letsencrypt
cd letsencrypt
3. Run the automatic Let's Encrypt script, use the certonly parameter.
root@zimbra86:~/tmp/letsencrypt# ./letsencrypt-auto certonly --standaloneThe script will set up a temporary WEB-server for checking and issuing a certificate, if necessary agreeing with the license and informing the email:
If you need to have multiple hostnames on the same SSL, you should instead use the Multi-SAN protocol, SSL, where -d are your domains:
root@zimbra86:~/tmp/letsencrypt# ./letsencrypt-auto certonly --standalone -d xmpp.example.com -d conference.example.com4. If everything is good with verification, then the certificate (certificate + public key + chain) will be issued in the format "/ etc / letencrypt / live / address /" :
5. At this point, you can restart the service and begin installing the signed certificate. To implement a certificate in Zimbra, you need to supplement the “root CA” chain. Create a file with “root CA” and lines in the file “fullchain1.pem”)
root CA: (https://www.identrust.com/certificates/trustid/root-download-x3.html)6. After the file has been created, check the files with the following command:
/opt/zimbra/bin/zmcertmgr verifycrt comm privkey.pem cert.pem CHAIN_COMPLETA.pem7. Check, back up your current certificates (highly recommended) and copy the private key to the “/ opt / zimbra / ssl / zimbra / commercial” directory with the name “commercial.key”:
cp -a /opt/zimbra/ssl/zimbra /opt/zimbra/ssl/zimbra.$(date "+%Y%m%d")
cp privkey.pem /opt/zimbra/ssl/zimbra/commercial/commercial.key
8. Perform certificate installation and restart services to verify deployment.
/opt/zimbra/bin/zmcertmgr deploycrt comm cert.pem chain.pem9. Correct installation of the certificate:
10. Restart the service.
zmcontrol restartCertificate renewal
1. Stop the Zimbra.
/etc/init.d/zimbra stop2. We receive new certificates and start the mail server.
certbot certonly --standalone -d mail.example.com
/etc/init.d/zimbra start
3. Certificates obtained will need to be uploaded to Zimbra. Copy certificates:
cp /etc/letsencrypt/live/zimbra86.zimbra.io/* /opt/zimbra/ssl/letsencrypt/
chown zimbra:zimbra /opt/zimbra/ssl/letsencrypt/
cd /opt/zimbra/ssl/letsencrypt/
4. At the end of the chain.pem file, add the intermediate Let's encrypt certificate:
-----BEGIN CERTIFICATE-----
MIIDSjCCAjKgAwIBAgIQRK+wgNajJ7qJMDmGLvhAazANBgkqhkiG9w0BAQUFADA/
MSQwIgYDVQQKExtEaWdpdGFsIFNpZ25hdHVyZSBUcnVzdCBDby4xFzAVBgNVBAMT
DkRTVCBSb290IENBIFgzMB4XDTAwMDkzMDIxMTIxOVoXDTIxMDkzMDE0MDExNVow
PzEkMCIGA1UEChMbRGlnaXRhbCBTaWduYXR1cmUgVHJ1c3QgQ28uMRcwFQYDVQQD
Ew5EU1QgUm9vdCBDQSBYMzCCASIwDQYJKoZIhvcNAQEBBQADggEPADCCAQoCggEB
AN+v6ZdQCINXtMxiZfaQguzH0yxrMMpb7NnDfcdAwRgUi+DoM3ZJKuM/IUmTrE4O
rz5Iy2Xu/NMhD2XSKtkyj4zl93ewEnu1lcCJo6m67XMuegwGMoOifooUMM0RoOEq
OLl5CjH9UL2AZd+3UWODyOKIYepLYYHsUmu5ouJLGiifSKOeDNoJjj4XLh7dIN9b
xiqKqy69cK3FCxolkHRyxXtqqzTWMIn/5WgTe1QLyNau7Fqckh49ZLOMxt+/yUFw
7BZy1SbsOFU5Q9D8/RhcQPGX69Wam40dutolucbY38EVAjqr2m7xPi71XAicPNaD
aeQQmxkqtilX4+U9m5/wAl0CAwEAAaNCMEAwDwYDVR0TAQH/BAUwAwEB/zAOBgNV
HQ8BAf8EBAMCAQYwHQYDVR0OBBYEFMSnsaR7LHH62+FLkHX/xBVghYkQMA0GCSqG
SIb3DQEBBQUAA4IBAQCjGiybFwBcqR7uKGY3Or+Dxz9LwwmglSBd49lZRNI+DT69
ikugdB/OEIKcdBodfpga3csTS7MgROSR6cz8faXbauX+5v3gTt23ADq1cEmv8uXr
AvHRAosZy5Q6XkjEGB5YGV8eAlrwDPGxrancWYaLbumR9YbK+rlmM6pZW87ipxZz
R8srzJmwN0jP41ZL9c8PDHIyh8bwRLtTcm1D9SZImlJnt1ir/md2cXjbDaJWFBM5
JDGFoqgCWjBH4d1QB7wCCZAA62RjYJsWvIjJEubSfZGL+T0yjWW06XyxV3bqxbYo
Ob8VZRzI9neWagqNdwvYkQsEjgfbKbYK7p2CNTUQ
-----END CERTIFICATE-----
If you do not add an intermediate certificate, you will receive an error during the verification phase:
ERROR: Unable to validate certificate chain: cert.pem: C = US, O = Let's Encrypt, CN = Let's Encrypt Authority X3
error 2 at 1 depth lookup:unable to get issuer certificate
5. Check the installed keys and certificates:
su zimbra
$ cp /opt/zimbra/ssl/letsencrypt/privkey.pem /opt/zimbra/ssl/zimbra/commercial/commercial.key
$ /opt/zimbra/bin/zmcertmgr verifycrt comm privkey.pem cert.pem chain.pem
6. If the check was successful, then install the updated certificates:
$ /opt/zimbra/bin/zmcertmgr deploycrt comm cert.pem chain.pem7. To apply the installed certificate, restart all Zimbra services:
# /etc/init.d/zimbra restartDone!
Source: https://habr.com/ru/post/345844/
All Articles