Eat three donuts from UWP and not choke
Hi, Habr! UWP is a platform for Windows 10, with which you can develop applications using one set of APIs, one package of applications and one store. This is enough to ensure the work of applications on all devices running Windows 10 - a computer, tablet, phone, Xbox, HoloLens, Surface Hub and others. In this article we will give answers to three frequently asked questions when working with UWP: about customization of icons, about displaying settings in a window, and restricting access. Look under the cat!
The article was prepared jointly with an active member of the Microsoft Developer community, Alexey Plotnikov .

')
The UWP application is required to allow the user to choose a color for interface elements such as icons.
The ability to customize the look of your application is an important element of user interaction. Setting the background image and color palette allows the user to dive as deeply as possible into your application, which significantly increases its retention. In addition to the ability to customize the colors of different interface elements, it may be necessary to dynamically change the colors of application icons, however, as such, PNG bitmaps are most often used, the dynamic repainting of which seems difficult.
Use BitmapIcon .
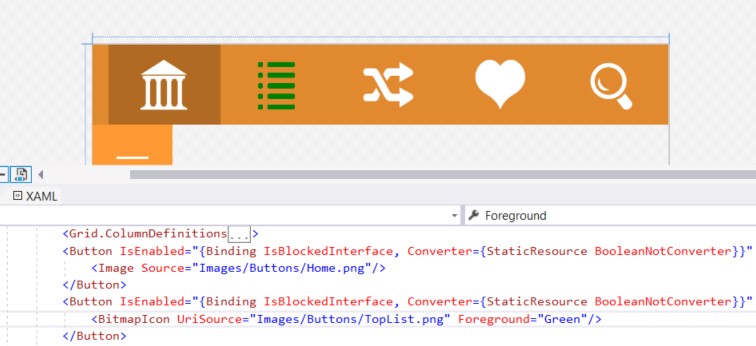
BitmapIcon is inherited from IconElement and is described in the documentation as content for the Icon property in the AppBarButton, but despite this, this class can be used anywhere in the UI. Unlike the Image class, the BitmapIcon class has the Foreground property, which allows you to repaint the specified image without additional effort. It is enough to specify the path to the PNG image and set the Foreground color. After that, the internal algorithm will repaint the image itself.
It is important to remember that the image is stained over the original PNG only by means of a solid SolidColorBrush brush (others are ignored). If you use a full-fledged image with a variety of colors, before this operation will flood all the opaque areas of the image in the same color as indicated.
You want to display the UWP application settings in the pop-up panel.
According to the recommendations described in the UWP documentation, you should use a separate page for the settings of your application, but this doesn’t suit all applications. In Windows 8, there was the SettingsFlyout class, which called the built-in sidebar with settings, but in Windows 10, this class is kept solely for backward compatibility and is not supported by UWP applications.
Use SplitView .
The SplitView element consists of a pop-up part and content and is most often used to create a hamburger menu, but it is also ideal for creating a replacement for SettingsFlyout.
The above XAML is enough to place in the head grid of the page and implement the panel call in the code by setting the SplitView.IsPaneOpen property to true. Please note that the Content property is completely ignored in this case.
An additional bonus is the finished implementation of hiding the panel when you press the Back button in mobile devices or by clicking outside the panel on the PC.
Also, as a homework task, you can snap the width of the pop-up panel to the screen width so that on mobile devices in a vertical orientation the panel fills the entire screen, and on a PC in horizontal orientation it is displayed a maximum of one-third the width.
It is required to restrict unauthorized user access to the protected page of the UWP application.
In some UWP applications, there may be scenarios where users have different levels of access, depending on which they are allowed or denied to view individual pages of the application. In the case of the new launch of the application, you can track the current level of user access and, depending on the result, make active or inactive buttons to jump to protected pages. However, there may be situations when the transition is made directly to a secure page, for example, from the Windows notification center.
Use Async / wait with the While loop.
Despite the fact that the solution to this problem seems quite obvious and is based on the implementation of the verification code at the start of the page, there is a much more elegant solution.
In the starting method of the page, before starting the initial requests and assignments, place the following code (on VB.Net):
Where UserStatus is the current user's access level, and CurentPageAccess is the allowed access level to the page. Thanks to Await, further code execution will be suspended until the execution of the procedure inside the task (Task) is completed, but the interface will remain responsive to the user's actions. In contrast to the solution with the addition of a verification code, this solution allows you to implement the user's background login with previously saved data, or to perform an overlay login procedure outside a specific page. With this approach, you only need to duplicate this code on each protected page and take care of displaying the login indicator so that the user knows that waiting is required, or actions to enter login data.
The use of an infinite loop in the background thread significantly increases the load on the processor, and therefore this recipe is proposed to be used only in scenarios where a small additional waiting time is required before the execution of the main code. For example, the user's login background, as described above.
In the comments below you can suggest other (perhaps more obvious) situations where the suspension of execution by a cycle with the expectation of the desired result may be useful, or bring your own solution to this problem.
The article was prepared jointly with an active member of the Microsoft Developer community, Alexey Plotnikov .
')
Donut 1: Icon Color
Task
The UWP application is required to allow the user to choose a color for interface elements such as icons.
Prerequisites
The ability to customize the look of your application is an important element of user interaction. Setting the background image and color palette allows the user to dive as deeply as possible into your application, which significantly increases its retention. In addition to the ability to customize the colors of different interface elements, it may be necessary to dynamically change the colors of application icons, however, as such, PNG bitmaps are most often used, the dynamic repainting of which seems difficult.
Decision
Use BitmapIcon .
BitmapIcon is inherited from IconElement and is described in the documentation as content for the Icon property in the AppBarButton, but despite this, this class can be used anywhere in the UI. Unlike the Image class, the BitmapIcon class has the Foreground property, which allows you to repaint the specified image without additional effort. It is enough to specify the path to the PNG image and set the Foreground color. After that, the internal algorithm will repaint the image itself.
It is important to remember that the image is stained over the original PNG only by means of a solid SolidColorBrush brush (others are ignored). If you use a full-fledged image with a variety of colors, before this operation will flood all the opaque areas of the image in the same color as indicated.
Donut 2: Settings in the window
Task
You want to display the UWP application settings in the pop-up panel.
Prerequisites
According to the recommendations described in the UWP documentation, you should use a separate page for the settings of your application, but this doesn’t suit all applications. In Windows 8, there was the SettingsFlyout class, which called the built-in sidebar with settings, but in Windows 10, this class is kept solely for backward compatibility and is not supported by UWP applications.
Decision
Use SplitView .
The SplitView element consists of a pop-up part and content and is most often used to create a hamburger menu, but it is also ideal for creating a replacement for SettingsFlyout.
<SplitView DisplayMode="Overlay" PanePlacement="Right" IsPaneOpen="False" HorizontalAlignment="Right" Canvas.ZIndex="2"> <SplitView.Pane> <Grid> <!-- --> </Grid> </SplitView.Pane> </SplitView> The above XAML is enough to place in the head grid of the page and implement the panel call in the code by setting the SplitView.IsPaneOpen property to true. Please note that the Content property is completely ignored in this case.
An additional bonus is the finished implementation of hiding the panel when you press the Back button in mobile devices or by clicking outside the panel on the PC.
Also, as a homework task, you can snap the width of the pop-up panel to the screen width so that on mobile devices in a vertical orientation the panel fills the entire screen, and on a PC in horizontal orientation it is displayed a maximum of one-third the width.
Donut 3: Access Restriction
Task
It is required to restrict unauthorized user access to the protected page of the UWP application.
Prerequisites
In some UWP applications, there may be scenarios where users have different levels of access, depending on which they are allowed or denied to view individual pages of the application. In the case of the new launch of the application, you can track the current level of user access and, depending on the result, make active or inactive buttons to jump to protected pages. However, there may be situations when the transition is made directly to a secure page, for example, from the Windows notification center.
Decision
Use Async / wait with the While loop.
Despite the fact that the solution to this problem seems quite obvious and is based on the implementation of the verification code at the start of the page, there is a much more elegant solution.
In the starting method of the page, before starting the initial requests and assignments, place the following code (on VB.Net):
Await Task.Run(Sub() While UserStatus <> CurentPageAccess End While End Sub) Where UserStatus is the current user's access level, and CurentPageAccess is the allowed access level to the page. Thanks to Await, further code execution will be suspended until the execution of the procedure inside the task (Task) is completed, but the interface will remain responsive to the user's actions. In contrast to the solution with the addition of a verification code, this solution allows you to implement the user's background login with previously saved data, or to perform an overlay login procedure outside a specific page. With this approach, you only need to duplicate this code on each protected page and take care of displaying the login indicator so that the user knows that waiting is required, or actions to enter login data.
Important note
The use of an infinite loop in the background thread significantly increases the load on the processor, and therefore this recipe is proposed to be used only in scenarios where a small additional waiting time is required before the execution of the main code. For example, the user's login background, as described above.
In the comments below you can suggest other (perhaps more obvious) situations where the suspension of execution by a cycle with the expectation of the desired result may be useful, or bring your own solution to this problem.
Source: https://habr.com/ru/post/345746/
All Articles