Git: Newbies Tips - Part 1
Many new employees come to Playrix and most of them have not worked with Git. This is especially true of game designers and artists. Although it is not uncommon for programmers, experience with other version control systems does not help much. For example, experience with SVN is often found. But Git is noticeably different in ideology. To memorize which buttons to press is not difficult in most cases, but a step to the side is difficult to understand what is happening.
Therefore, we decided to write an introductory material. We will talk about the version control system and the logic of its work, from the very beginning. You can work with Git with the help of different clients, so the article will not discuss the user interface. This may seem unusual, but it was done on purpose. Instead, we will focus on the working directory, commits, branches, pull, push, and other commands. When you understand these concepts, you will need to choose one of the Git-clients and master its interface.
Imagine that you have a Work directory in which you will work. We will call it the working directory. It contains a text file document.txt. Every day you work with this file, add new text to it, delete unnecessary text, change something. Suddenly, you needed a text that you deleted a couple of days ago. What to do? If you do not use a version control system (SCR), then this text cannot be restored. And if you use hard currency - it will not be a problem.
')
How it works? You can always send your file to hard currency and she will remember it. This is called “commit file” (commit command). If you make such commits after all important file changes, then inside the hard currency there are a lot of copies of its different versions. You will not see these copies in your Work directory — there will still be only one file. But all its copies, which you commit, you can, if necessary, get out of hard currency. There you can view a list of all versions of your file and check the lines that changed in each version. Convenient, isn't it?
Suppose you change your file and even made several commits. SLE remembered the commited versions of the file (for brevity, we will call the commited version of the file simply “commit”). Now we will execute the push command - it sends your commits to the server. There are two main goals:
What does simultaneous work look like? Other employees on the computer also have a Work folder and also have a document.txt file in it. If you have edited the file, made a commit and push, then your changes will go to the server. If another person executes the pull command, your changes will be downloaded from the server and the person will see them in his file.
So several employees can work on the same file at once. They periodically take away other people's changes (pull), and also make their own changes, commit them (commit), and send them to the server (push). From there, other employees can pick them up.
Interestingly, the pull command downloads from the server not only the latest version of the file, but also all the previous ones that someone commited. That is, all your colleague's commits will be stored not only on his computer, but now on yours too. Because of this, you can view the entire history of the file: who, when and what lines in it changed.
For version control, we use the Git program. To view the change history of a file, Git does not contact the server. It simply shows all versions of the file that are already stored on your computer. File versions that others have edited come to your computer after the pull command.
Results:
Make sure you clearly understand the difference between changing a file, its commit and pushing.
Congratulations! You have learned the basic features of the Git version control system. Please note that we do not specifically describe how to invoke commands. Because there are several Git clients with different interfaces. A little later you select one and study it. In the meantime, we'll just tell you what the teams are and what they do.
The place where Git saves your file after each commit is called the local repository. It is on your computer - and therefore "local." Above, we said that the push command sends your commits to the server. So, in Git it’s not quite right to say “server” - it’s more correct to call it “remote repository”. “Deleted” is not because someone deleted it, but because it is far away (not on your computer). In our case, the remote repository is on the GitHub site. By its structure, it is the same repository as on your computer. It also stores commits. The push command sends commits from your local repository to the remote one, and pull the other way around - pull the new ones from the remote repository to your local repository. Where did the fresh commits come from? They were sent there by other employees.
Writing a remote repository each time is too long. Git calls it origin. That is the tradition. Further, for brevity, we will use the term origin instead of “remote repository”.
It's time to get into important technical details. There are quite a few of them, but an understanding of the logic of Git will come in handy for you. So have patience.
Of course, work in your working directory is usually done not only in one file. Git allows you to work with any number of files within your working directory, as well as within nested directories.
Each commit can memorize changes in several files at once. Good practice is to include only changes that are logically related to one commit. Do not commit at the same time many different changes - it will be difficult for them and other employees to understand their history.
If you added a new file to your working directory and you want it to be committed too (and that other employees see it), you need to add the file to Git yourself. This is done by the add command. Until you have done this, Git will not include your new file in the commits. You can also create subdirectories in the working directory. Files in them need to be added to Git with the help of the add command.
It is important to understand that some of the files in your working directory may be controlled by Git, and some may not (for example, logs). Watching this and adding new files to Git is your task.
By the way, where does your working directory even come from on your computer? It will appear there after you pick it up from the server (clone command).
At each commit, you need to add a comment. It is brief but informative to describe - what changes are you committing now.
Git can show you the list of files that you have changed since the last commit. You do not have to commit them all at once. You can select a group of files, the changes in which are logically related, and commit them. Then select another - make another commit and so on. It is important to break commits into logical ones.
Before pushing (send commits to the remote origin repository), you must first pull (pick up the last changes of other people that they sent to origin). If you do not do this, the system will not let you push (an error message will appear). When you learn more about the features of Git, you will understand why this is happening, but for now just remember this rule.
If you have changed some files, but have not yet committed them, they say that there are uncommitted changes in your working directory. A number of Git commands cannot be executed in this state. For example, pull or checkout (switching the working copy files to another commit). What are the options out of this situation?
When you pick up changes from origin, conflicts may arise. This happens if:
If this happens, you will have to resolve the conflicts manually in all files where they occurred. For each group of conflicting lines, you will see two options - which you wrote and which someone else wrote.
You need to choose which of these options to leave as a result of merging your changes. Or you can manually write some third option - if you need a more subtle combination than just a copy of one of the options.
Then we repeat the same actions for each group of conflicting lines in each file in which there are conflicts.
If the conflict is not in a text file, but in a binary file (for example, a picture), then there are no lines, of course, no. Then you need to completely choose which of the files to leave after the merge - your version of the file or someone else's. If you are not sure how to correct it - contact the one who last changed this file (this can be found in the file change history) and discuss with it whose version of the file should remain. You should not always take your version without understanding - suddenly the changes of another person are more correct. And you wipe them with your changes, if you resolve the conflict in your favor. This is clearly not going to be good.
When all conflicts are resolved, you can continue the operation that was interrupted due to the conflict - usually these are pull, merge, rebase operations.
If you are frightened by conflicts and you are not ready to resolve them right now, you can execute the abort command. It will roll back the state of the working directory — make it the same as it was before the start of the operation that caused the conflict.
Provide the current status of all files in your working directory at the same time.
Submitted? Let's call this state of the working directory "cast". Each time you commit the next changed file, Git remembers the new snapshot (the state of all the files in the working directory). The concept of "cast" we will use in the next chapter.
Note 1: The cast is NOT the state of just the changed files. This is the state of ALL files in the working directory.
Note 2: When we say "all the files in the working directory", then of course we mean the files under the control of Git. Git knows nothing about all the other files.
The history of changes in the files of the working directory can be represented in this form:
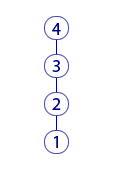
Each circle is one commit. The picture shows commits that are made one by one. This is a graphic representation of the commit history.
By the way, a commit can be considered in one of two ways:
In some cases, it is convenient to consider history as a chain of changes, and in others - as a chain of casts. So learn to mentally operate with both options.
Here is an example when it is convenient to consider "snapshots". Imagine that you want to see what your working directory looked like three commits back. It is easy to arrange. We take the story (see the picture), count 3 circles (commit) back and say Git: “I want to see what the working directory looked like after this commit”. Git will change the files in the working directory accordingly. In other words, we switched the working directory to a cast of this commit (or just “to this commit”).
In the next part of the article we will tell about:
→ Git: tips for newbies - part 1
→ Git: tips for newbies - part 2
→ Git: tips for newbies - part 3
Therefore, we decided to write an introductory material. We will talk about the version control system and the logic of its work, from the very beginning. You can work with Git with the help of different clients, so the article will not discuss the user interface. This may seem unusual, but it was done on purpose. Instead, we will focus on the working directory, commits, branches, pull, push, and other commands. When you understand these concepts, you will need to choose one of the Git-clients and master its interface.
Chapter 1. First acquaintance
Imagine that you have a Work directory in which you will work. We will call it the working directory. It contains a text file document.txt. Every day you work with this file, add new text to it, delete unnecessary text, change something. Suddenly, you needed a text that you deleted a couple of days ago. What to do? If you do not use a version control system (SCR), then this text cannot be restored. And if you use hard currency - it will not be a problem.
')
How it works? You can always send your file to hard currency and she will remember it. This is called “commit file” (commit command). If you make such commits after all important file changes, then inside the hard currency there are a lot of copies of its different versions. You will not see these copies in your Work directory — there will still be only one file. But all its copies, which you commit, you can, if necessary, get out of hard currency. There you can view a list of all versions of your file and check the lines that changed in each version. Convenient, isn't it?
Suppose you change your file and even made several commits. SLE remembered the commited versions of the file (for brevity, we will call the commited version of the file simply “commit”). Now we will execute the push command - it sends your commits to the server. There are two main goals:
- Safety (if your computer goes bad, the entire history of file changes will remain on the server);
- Ability of several people to work simultaneously on one file.
What does simultaneous work look like? Other employees on the computer also have a Work folder and also have a document.txt file in it. If you have edited the file, made a commit and push, then your changes will go to the server. If another person executes the pull command, your changes will be downloaded from the server and the person will see them in his file.
So several employees can work on the same file at once. They periodically take away other people's changes (pull), and also make their own changes, commit them (commit), and send them to the server (push). From there, other employees can pick them up.
Interestingly, the pull command downloads from the server not only the latest version of the file, but also all the previous ones that someone commited. That is, all your colleague's commits will be stored not only on his computer, but now on yours too. Because of this, you can view the entire history of the file: who, when and what lines in it changed.
For version control, we use the Git program. To view the change history of a file, Git does not contact the server. It simply shows all versions of the file that are already stored on your computer. File versions that others have edited come to your computer after the pull command.
Results:
- We trusted Git to keep track of our working folder;
- There is a text file in the folder in which our colleagues work;
- Periodically, we take away the changes of other employees in this file (pull command);
- We also change this file ourselves and make commits, allowing Git to remember the new version of the file. Then we send our commits to the server (push command). You can send one commit or several at once. But it is better to push more often, so that employees see the current version of the file. Another thing, if the work is not finished - of course, it is not worth pushing such a “working” version of the file. After all, you will create inconvenience to other employees.
Make sure you clearly understand the difference between changing a file, its commit and pushing.
Congratulations! You have learned the basic features of the Git version control system. Please note that we do not specifically describe how to invoke commands. Because there are several Git clients with different interfaces. A little later you select one and study it. In the meantime, we'll just tell you what the teams are and what they do.
Chapter 2. Remote repository that no one deleted
The place where Git saves your file after each commit is called the local repository. It is on your computer - and therefore "local." Above, we said that the push command sends your commits to the server. So, in Git it’s not quite right to say “server” - it’s more correct to call it “remote repository”. “Deleted” is not because someone deleted it, but because it is far away (not on your computer). In our case, the remote repository is on the GitHub site. By its structure, it is the same repository as on your computer. It also stores commits. The push command sends commits from your local repository to the remote one, and pull the other way around - pull the new ones from the remote repository to your local repository. Where did the fresh commits come from? They were sent there by other employees.
Writing a remote repository each time is too long. Git calls it origin. That is the tradition. Further, for brevity, we will use the term origin instead of “remote repository”.
Chapter 3. Dive into the details.
It's time to get into important technical details. There are quite a few of them, but an understanding of the logic of Git will come in handy for you. So have patience.
Of course, work in your working directory is usually done not only in one file. Git allows you to work with any number of files within your working directory, as well as within nested directories.
Each commit can memorize changes in several files at once. Good practice is to include only changes that are logically related to one commit. Do not commit at the same time many different changes - it will be difficult for them and other employees to understand their history.
If you added a new file to your working directory and you want it to be committed too (and that other employees see it), you need to add the file to Git yourself. This is done by the add command. Until you have done this, Git will not include your new file in the commits. You can also create subdirectories in the working directory. Files in them need to be added to Git with the help of the add command.
It is important to understand that some of the files in your working directory may be controlled by Git, and some may not (for example, logs). Watching this and adding new files to Git is your task.
By the way, where does your working directory even come from on your computer? It will appear there after you pick it up from the server (clone command).
At each commit, you need to add a comment. It is brief but informative to describe - what changes are you committing now.
Git can show you the list of files that you have changed since the last commit. You do not have to commit them all at once. You can select a group of files, the changes in which are logically related, and commit them. Then select another - make another commit and so on. It is important to break commits into logical ones.
Before pushing (send commits to the remote origin repository), you must first pull (pick up the last changes of other people that they sent to origin). If you do not do this, the system will not let you push (an error message will appear). When you learn more about the features of Git, you will understand why this is happening, but for now just remember this rule.
Chapter 4. Uncommitted Changes
If you have changed some files, but have not yet committed them, they say that there are uncommitted changes in your working directory. A number of Git commands cannot be executed in this state. For example, pull or checkout (switching the working copy files to another commit). What are the options out of this situation?
- If these changes are not needed, undo changes can be undone. This will return the file to the state of the last commit;
- If the changes are useful, you can commit them;
- You can also temporarily hide these changes (stash command). In this case, your changes will be rolled back in the working directory. You can later return the hidden changes to the working directory.
Chapter 5. Conflicts and their resolution
When you pick up changes from origin, conflicts may arise. This happens if:
- You have changed some lines in the text file, committed changes, but have not yet made a push.
- At the same time, someone changed the same lines in the file and managed to send the changes to origin.
- You do a pull to pick up someone else's changes. Git tries to combine other people's changes with yours and finds that the same lines are changed. This is called a conflict.
If this happens, you will have to resolve the conflicts manually in all files where they occurred. For each group of conflicting lines, you will see two options - which you wrote and which someone else wrote.
You need to choose which of these options to leave as a result of merging your changes. Or you can manually write some third option - if you need a more subtle combination than just a copy of one of the options.
Then we repeat the same actions for each group of conflicting lines in each file in which there are conflicts.
If the conflict is not in a text file, but in a binary file (for example, a picture), then there are no lines, of course, no. Then you need to completely choose which of the files to leave after the merge - your version of the file or someone else's. If you are not sure how to correct it - contact the one who last changed this file (this can be found in the file change history) and discuss with it whose version of the file should remain. You should not always take your version without understanding - suddenly the changes of another person are more correct. And you wipe them with your changes, if you resolve the conflict in your favor. This is clearly not going to be good.
When all conflicts are resolved, you can continue the operation that was interrupted due to the conflict - usually these are pull, merge, rebase operations.
If you are frightened by conflicts and you are not ready to resolve them right now, you can execute the abort command. It will roll back the state of the working directory — make it the same as it was before the start of the operation that caused the conflict.
Chapter 6. Slaps
Provide the current status of all files in your working directory at the same time.
Submitted? Let's call this state of the working directory "cast". Each time you commit the next changed file, Git remembers the new snapshot (the state of all the files in the working directory). The concept of "cast" we will use in the next chapter.
Note 1: The cast is NOT the state of just the changed files. This is the state of ALL files in the working directory.
Note 2: When we say "all the files in the working directory", then of course we mean the files under the control of Git. Git knows nothing about all the other files.
Chapter 7. Change History and Visual Presentation
The history of changes in the files of the working directory can be represented in this form:
Each circle is one commit. The picture shows commits that are made one by one. This is a graphic representation of the commit history.
By the way, a commit can be considered in one of two ways:
- Commit, like changing files from previous commit;
- A commit, as a cast, is the new state of all the files in the working directory, which appeared after the committed changes.
In some cases, it is convenient to consider history as a chain of changes, and in others - as a chain of casts. So learn to mentally operate with both options.
Here is an example when it is convenient to consider "snapshots". Imagine that you want to see what your working directory looked like three commits back. It is easy to arrange. We take the story (see the picture), count 3 circles (commit) back and say Git: “I want to see what the working directory looked like after this commit”. Git will change the files in the working directory accordingly. In other words, we switched the working directory to a cast of this commit (or just “to this commit”).
In the next part of the article we will tell about:
- Branches
- Merging branches
- Several merzhy from branch A to branch B.
- Merzh between branches in both directions
- Commits and their hashes
- Branches and pointers
- Head pointer
- Origin \ master pointer
→ Git: tips for newbies - part 1
→ Git: tips for newbies - part 2
→ Git: tips for newbies - part 3
Source: https://habr.com/ru/post/345732/
All Articles