JetBrains CLion for microcontrollers
Prehistory
CLion is a development environment for C / C ++, a close relative of IntelliJ IDEA and, accordingly, Android Studio.
I bring to the attention of the community a translation of my blog post, which describes in steps how to use this IDE to write microcontroller firmware.
About a year and a half ago, I wrote a blog post in English , in which I described how JetBrains CLion can be used to program microcontrollers.
In short, at that time I used one of the boards of the STM32-Discovery series. The onboard programmer has been upgraded to SEGGER compatible JLink. The STM32CubeMX code generator, the GCC ARM toolchain, and the SEGGER Ozone debugger were also used. With all this it was possible to blink the LED :).
Such a set of tools as a whole worked, but it required re-programming of the programmer, launching an external debugger (why should we have it, if there is a wonderful CLion?), In addition, SEGGER imposes rather tough licensing restrictions on such programmed programmers.
Naturally, all these problems did not please me, and I tried to find a better solution. Fortunately, progress does not stand still, and since then, both CLion and CubeMX have been significantly improved, and most importantly, CLion now supports Remote GDB. Now it has become really possible to use OpenOCD (Open On-Chip-Debugger) as software for uploading and debugging microcontroller firmware. This way, you can get rid of the limitations of the SEGGER license in favor of open source tools. No more programmer flashing is required, demo boards can be used directly, even for flashing target devices (see documentation on ST Nucleo or Discovery boards).
I managed to run it all on vanilla CLion, but setting up projects was so complicated that I eventually came to the idea of writing my own plugin that would allow all the tools to be linked to each other at once. And so, I brought the plugin to a beta version, published it in the JetBrains repository, and is ready to show how this all works. For example, we will make a small demo project (surprise! We will blink LEDs!) Using one of the most popular boards from ST Microelectronics - STM32F4-Discovery. The same example, with minor modifications, can be run on any board in the STM32 Nucleo, Discovery or EVAL series, since there are LEDs on each of them.
Tools
CLion
First of all, we need, in fact, IDE. CLion is available for download on the JetBrains website. Just run the installer and follow the instructions. You will need a license, but the monthly trial should be enough for the first time. Installation instructions here .
Plugin
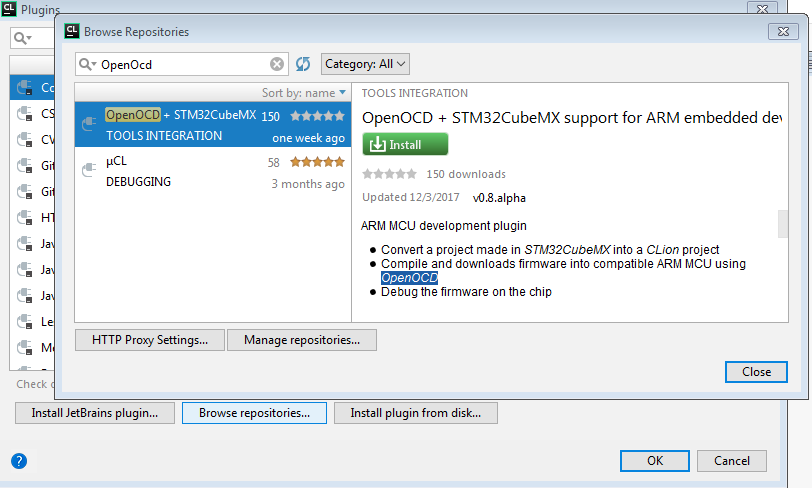
Open the CLion preferences, Plugins tab, click Browse Repositories ... and find the plugin by the openocd keyword. Next Install and restart CLion.
 Now in CLion there is another Run Configuration , two additional items in the Tools menu, another tab in the settings.
Tulchain
Toolchain is a cross-platform toolkit for building programs and firmware. Cross-platform - this means that the compilation takes place on a PC or Mac, and the build result will only work on the target device. In our case, it is ARM-compatible MK.
There are several different toolchains, such as the free and supported CLion Clang or GCC, as well as several commercial ones (Keil, IAR, Raisonance, etc). I use GCC, downloaded from an official source - https://developer.arm.com/open-source/gnu-toolchain/gnu-rm . Please note that after installation the toolchain should be included in the system path. You can verify this by running arm-none-eabi-gcc from the command line.
Openocd
OpenOCD is a debugger that supports hardware debugging of various MKs using one of the many supported programmers. It can also flash FPGA and flash memory. Thus, it is potentially possible to work with a huge number of different chips, not limited to ST products.
Of all the features of OpenOCD, the plugin uses three:
ST-Link / V2 flash driver support
Support MC with ARM Cortex M core
- Remote GDB protocol support
OpenOCD is officially distributed as source code, but there are also semi-official builds for all popular platforms. See here for more details: http://openocd.org/getting-openocd/ . Under Windows, you still need a driver for ST-LINK / V2. The driver usually goes into building OpenOCD for Windows, but you can download it directly from the ST site, along with a very handy utility for MK firmware, from here: http://www.st.com/en/development-tools/stsw-link004.html .
STM32CubeMX
STM32CubeMX is a free code generator for any STM32 MK. It can configure the configuration of pins, peripherals, CPU clocking, and so on. All this happens in a very convenient visual editor. After that, Cube creates the backbone of the source code, that is, all the necessary .c and .h files, as well as project files for one of the supported IDEs (which, alas, does not include CLion). Cube consists of the editor-generator itself and the so-called downloadable ones. "Firmware Packages", one for each MK family. The generator itself is available for download here .
Let's get started
One of the most popular boards for STmovskih MK - STM32F4-Discovery. Take it for our example. On board is quite powerful (although not the top) MK - STM32F407, ST-LINK / V2 compatible flash driver, and 4 controlled LEDs. There is still a microphone, sound output, accelerometer, USB, but in this article we will not delve into them - we will deal only with LEDs. If you already have some other board from the STM32 Discovery series, Eval or Nucleo, then it doesn't matter, you can do the same for any of them, since There is at least one LED.
Board setup
After installing all the tools, let's finally write an "improved flasher" for our STM32F4-Discovery. First of all, we launch CubeMX. At startup, it loads the list of available MK and boards from the network, and after that you can choose any of the MK. Naturally, we are more interested in boards. Go to the “Board Selector”, find and double click STM32F4DISCOVERY.
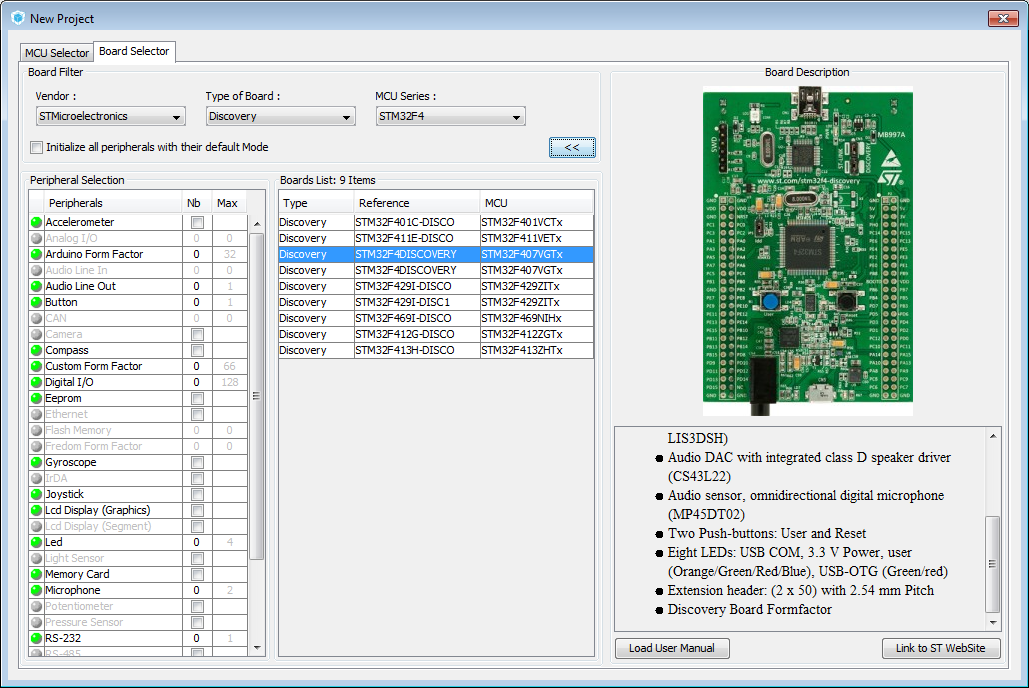
After that, the editor will open, which shows the MK chip itself, and you can configure the pin modes, any peripherals and the processor clocking scheme using three tabs. On the last, fourth, tab, you can not configure anything, but you can calculate the power consumption of the chip, depending on the configuration.
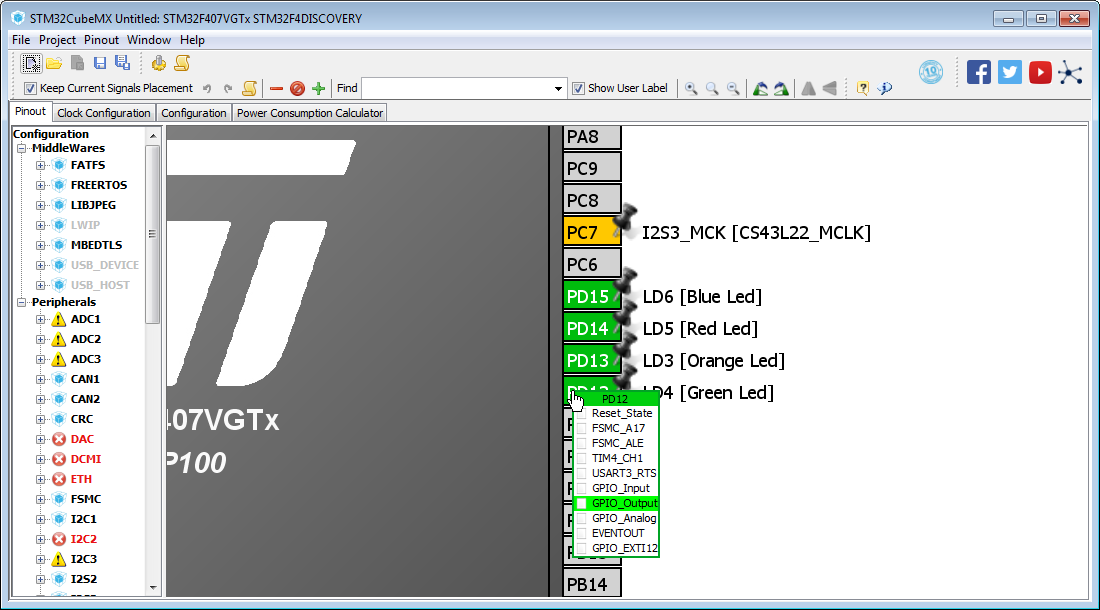
Since we started not with the "bare" MK, but with the board, something has already been done for us. In particular, the necessary GPIO for the LEDs is configured, they are even named LD3 ... LD6. We only need to tune the project itself and generate the code. You need to select the project folder, the name of the project itself and set SW4STM32 as the Toolchain / IDE.
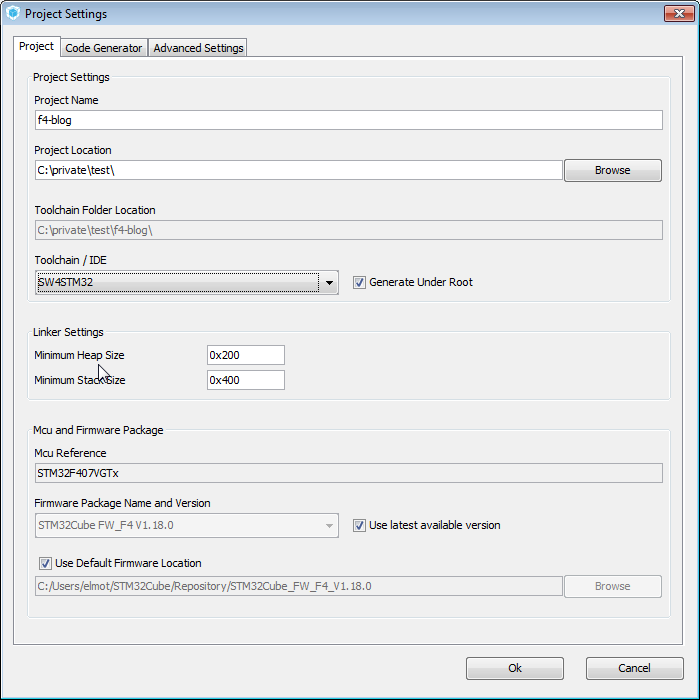
Now you need to close the settings and click Generate Code, i.e. button with gear. When the code generation is complete, just close the final dialog (i.e. do not touch the "Open Project" button).
Finally we can open the resulting year with CLion. Select File -> Import from the main menu or Import Project from Sources from the Welcome screen. During the import process, the CLIon may show confirmation dialogs or show errors - just ignore this. When the project is finally imported, select Tools-> Update CMake project with STM32CubeMX project in the menu .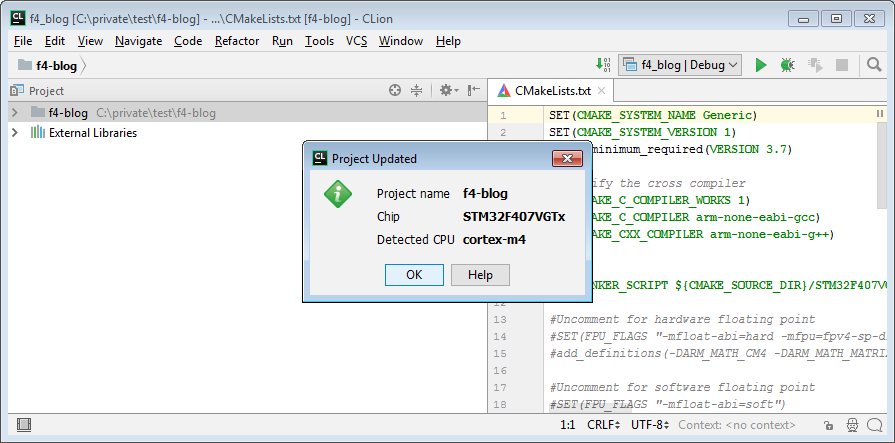 At this point, the plugin will rewrite CMakeLists.txt completely, and thus connect the toolchain and all the necessary scripts. Now CLion can compile and build the project. In addition, the plugin configures the new Run Configuration to fill and debug the compiled project.
Configure plugin settings.
Again open the CLion settings, this time the OpenOCD Support tab in the Build, Execution, Deployment group.
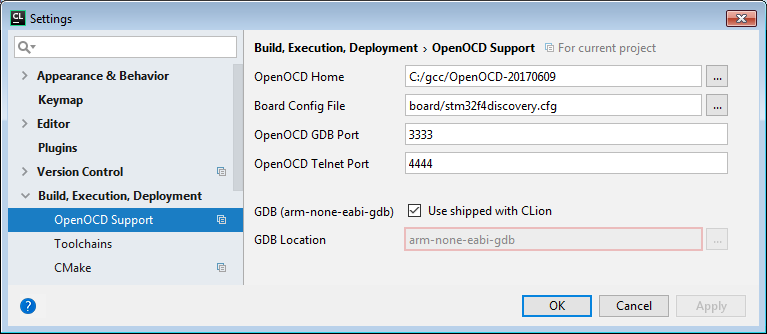 There you must specify the folder where OpenOCD is located and the configuration file for the board. The plugin tries to find OpenOCD in the system path itself, but sometimes you need to explicitly register the exact location. In most cases, you don’t need to change the port settings and the path to GDB , but Mac users still need another gdb. For example, you can take arm-none-eabi-gdb from the toolchain.
The last thing to do is select the board configuration file (Board Config File) using the appropriate dialog. These files are located in the boards subfolder of the OpenOCD installation. For this project, the best choice is obviously stm32f4discovery.cfg.
Now add the code
Now we have all the necessary settings made, you can write code. Open main.c , find the infinite while loop and add a few lines there, see lines 106-111:
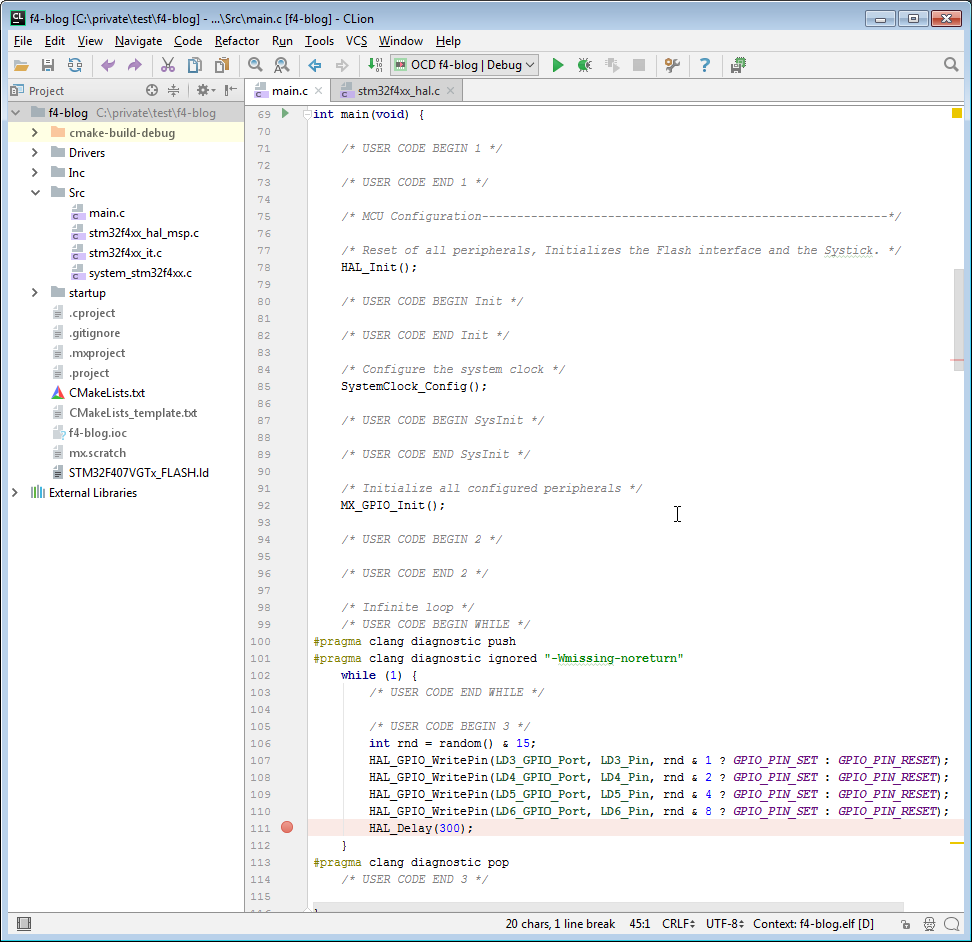
These lines light up a random combination of LEDs every 300 ms.
You can also add a few #pragma directives (lines 100, 101 and 113) to get rid of CLion warnings - infinite loops are not used in "normal" C programs and, therefore, our IDE doesn't like them.
The key to start!
The time has come to put breakpoint somewhere inside main () body and run it all! CLion will build the project, load it into our board, launch the debugger and reset the MC. Now you can use breakpoints and watches for debugging.
It is better to see once than to read three times:
What's next?
If a respected reader managed to do all of the above, a simple example of the firmware works. But how to write the code further? Ok, here are some question-and-answer tips.
Q: What boards are supported?
A: More or less, any STMicroelectronics STM32 Discovery, Nucleo or EVAL demo cards should work.
Q: What should I do if I need to change the hardware configuration of the MK?
A: Run STM32CubeMX again and open your project, make the necessary changes and redirect the code. The plug-in IDE will ask if you need to update the project. Just answer "Yes".
Q: How can I protect the code written by me from being overwritten at the time of generation?
A: Always write your code between pseudo-comments./* USER CODE BEGIN ??? */ /* USER CODE BEGIN ??? */ and /* USER CODE END ??? */ /* USER CODE END ??? */ .
Cube does not touch these fragments when generating code. Don't forget to transfer the automatically added #include directives to such places. An alternative approach for large pieces of code is separate .c / .h files.
Q: I need to add an external library, connect the FPU, make some other changes to CMakeLists.txt . But how?
A: CMakeLists.txt is automatically overwritten by the plugin from the template, directly there it is better not to change anything. The template itself is automatically recorded among the project files, you should make changes there, and then update the project using the menu item Tools-> Update CMake project with STM32CubeMX .
Q: I want to use CLion for my ARM-based development, but not on STM32. Can I use this plugin?
A: Most likely, yes. You need to install all the same tools (except STM32CubeMX), and then write your own CMakeLists.txt ( here is the template ), the script for the linker and the board configuration file. When everything is ready, select Tools -> CMake -> Reset Cache and Reload Project and create your Run Configuration type OpenOCD Download & Run. One of the plug-in users did all this for the Atmel SAM E70.
Q: I want to use CLion and a plugin for my development, but not for ARM. Is it possible
A: Well, if your MK is supported by GCC, the firmware is compatible with OpenOCD, then at least you can try. Take the appropriate toolchain and see the previous answer.
Q: I can not find the appropriate configuration file for the board. Can I use several separate configuration files?
A: You can write your board configuration file by combining them. Put it in your project, and take one of the standard ones for the sample.
Q: I like it! Can I somehow support the project or participate in it?
A: Of course !
Links
')
Source: https://habr.com/ru/post/345670/
All Articles