The complete guide to Splash Screen on Android
Translation of the Elvis Chidera article "The (Complete) Android Splash Screen Guide" . But first, a little story about the Splash Screen problem on Android.
Two kinds of Splash Screen
Google’s Material Design Guidelines introduces two concepts of Splash Screen (or Launch Screen):
- Placeholder UI
- Branded launch screen
Placeholder UI is a concept for applications that load rather quickly and do not require display before launching logos, beautiful animations and other decorations. The bottom line is that during a cold start, the main background of the application, the status bar, the background for the toolbar are already painted in the colors of the application, but until full download without content. This approach, according to the designers of Google, allows more smoothly from the point of view of the user to move from the moment the application is launched to work with it.
Branded launch screen - in fact, this is what most developers (at least Android developers) call Splash Screen. This is some kind of logo, image, less often animation, which the user briefly sees during the start of the application.

Now, before we move on to the translation of the article by Elvis, which talks about the Branded launch screen, a little about the sad things in the camp of Placeholder UI fans.
Placeholder does not work even with applications from Google
Despite its own guidelines, Google was unable to implement the Placeholder UI approach in its own applications. I offhand chose three popular applications from Google where, according to the logic, there should be a Placeholder UI, but it does not work. The transition from cold start to application state is shown:
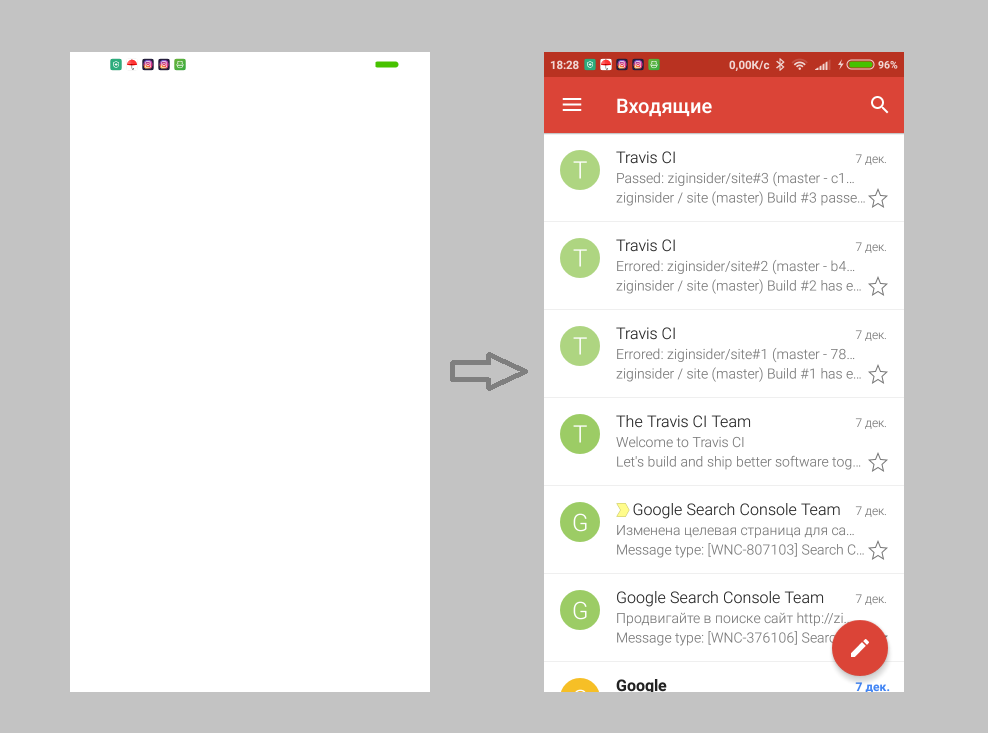
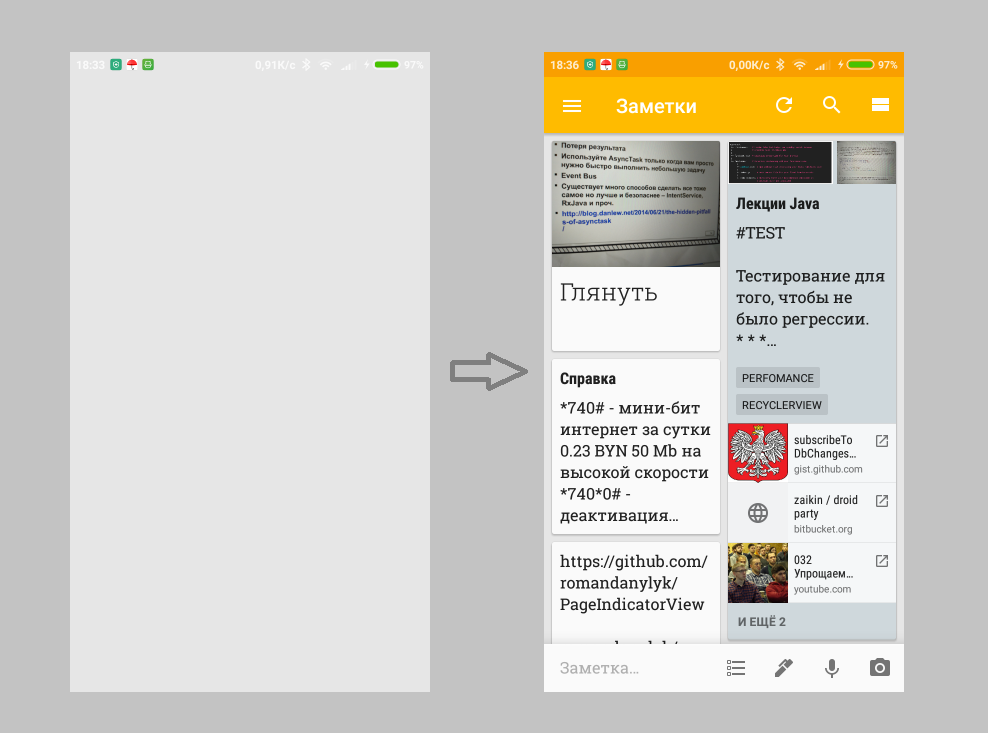
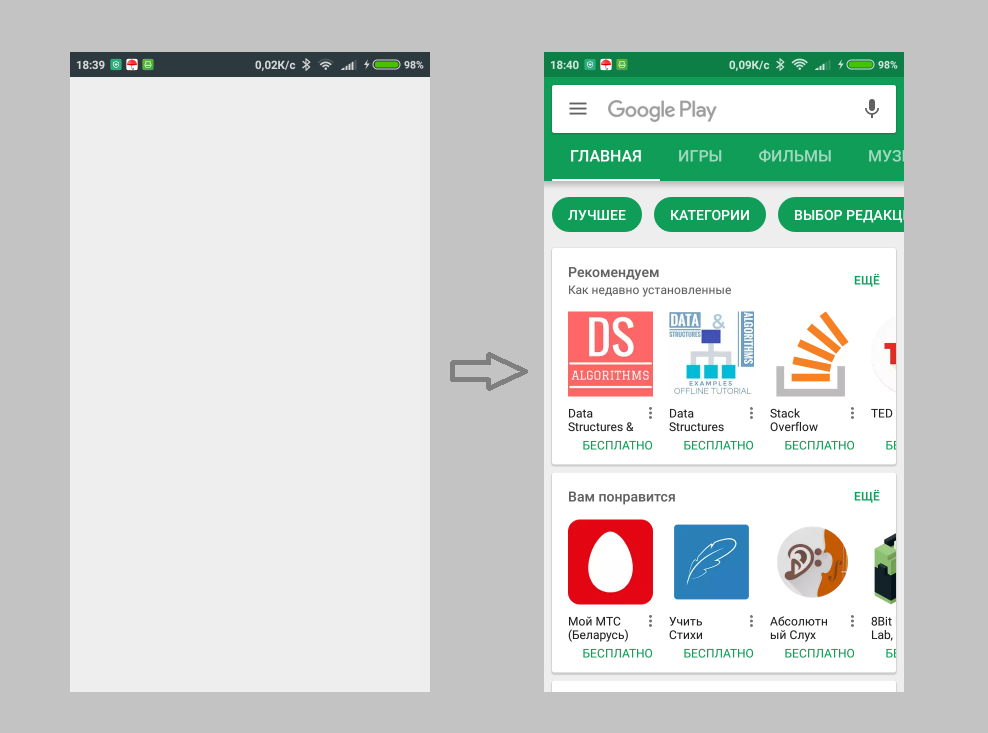
As you can see, during a cold start, only the background of the application, the toolbar and the status bar are loaded either under the background color or in a random color (as in the Play Market example).
The reasons for this are as follows:
- Today it is considered good practice to use the
Toolbaras part of the toolbar layout. This gives a lot of goodies: reaction to scrolling, animation, etc. But at the same time, you need to use the themeNoActionBar. This affects the fact that the colors of the main theme of the application are not loaded during a cold start. - Problem in AppCompat library. Even if we use the usual ActionBar for the toolbar, we will see a similar effect. The transition from
@style/Theme.AppCompat.Light.DarkActionBarto@android:style/Theme.Material.Light.DarkActionBarcures this problem, but probably applications are still designed to support versions prior to Lollipop.
However, there is a solution .
About Placeholder UI approach everything. Go to the translation of the article by Elvis.
How to work with the Branded launch screen
In the past, Android was not recommended to do Splash Screen in applications. There was no point in forcing the user to wait n seconds to show the screensaver. And undoubtedly, no one launches the application for the saver (more on that below).
Providing content to the user should be your # 1 priority.
When a section called Launch Screen (Splash Screen) appeared in Material Design , someone from the Android team posted a post on how to make Splash Screen right.
In this post I will look at four basic ways to implement Splash Screen on Android:
- Using the Launcher Theme ( Good )
- Using the Launcher Theme with predefined for Splash Screen Activity ( Come Off )
- Using Timers ( Bad )
- Using smart timers (Smart Timers) ( Awful )
Using the Launcher Theme
When your application starts and is not yet in memory, there may be a delay between when the user has clicked on the launch and when the Activity called onCreate() . This so-called “cold start” is the best time to show your Splash Screen.
During the cold start, the window manager tries to draw the placeholder UI using elements from the application theme (app theme), such as windowBackground . And what the windowBackground shows by default (usually white or black background), you can change to any drawable, thereby creating your own Splash Screen. This method shows the Splash Screen only where needed and does not slow down the user.
So, you need to create a custom theme by redefining android:windowBackground , replacing the use of the standard theme with yours before calling super.onCreate in your Activity.
In this example, I assume that the main theme of your application is called AppTheme , but if this is not the case, simply replace AppTheme with the name of the main theme of your application in all places.
You must create a new AppTheme.Launcher theme. The only element that needs to be overridden is windowBackground . In the styles.xml file, add:
<?xml version="1.0" encoding="utf-8"?> <resources> <!-- AppTheme --> <!-- AppTheme.Launcher. drawable --> <style name="AppTheme.Launcher"> <item name="android:windowBackground">@drawable/launch_screen</item> <!-- Android 5+ colorPrimaryDark, windowBackground --> <!-- <item name="colorPrimaryDark">@android:color/white</item> --> </style> </resources> At the same time, we inherit all the other attributes of the main AppTheme theme, using its name as a prefix for the name of our Launcher theme.
We define drawable launch_screen . Although you could use a simple picture, it will be stretched to full screen. Instead, use the XML file:
<?xml version="1.0" encoding="utf-8"?> <!-- android:opacity=”opaque” --> <layer-list xmlns:android="http://schemas.android.com/apk/res/android" android:opacity="opaque"> <!-- , --> <item android:drawable="@android:color/white"/> <!-- - 144dp --> <item> <bitmap android:src="@drawable/product_logo_144dp" android:gravity="center"/> </item> </layer-list> Register the topic for Splash Screen in the manifest file in your starting Activity:
<activity android:theme="@style/AppTheme.Launcher">
Now we need to return the main theme to the starting Activity (unless, of course, we want the Splash Screen to please us even while the application is running)
The easiest way to do this is to call setTheme(R.style.AppTheme) before super.onCreate() and setContentView() :
import android.os.Bundle import android.support.v7.app.AppCompatActivity class MainActivity: AppCompatActivity() { override fun onCreate(savedInstanceState: Bundle?) { // , super.onCreate() setTheme(R.style.AppTheme) super.onCreate(savedInstanceState) // … } } Everything. You can learn more about this approach here .
Pros:
- There is no special Activity for Splash Screen. There is no time delay, as if you were invoking a worker Activity from the Activity for Splash Screen.
- No artificial delays - Splash Screen is shown only when the application is loading.
Minuses:
I have met three fairly common complaints about this approach:
- Splash Screen is shown again if the Activity has been killed by the system and restored again. In most cases, this is not a problem at all, but if desired, if you use the second method , this can be avoided.
- Some developers need that after running Splash Screen, the user gets on different Activities, depending on any parameters. Again, for such tasks, you can use the second method , but sometimes the implementation of such an intermediate Activity is rather messy.
- Unable to load heavy data / components when Splash Screen is shown. Although it is a bad idea: to load heavy data or components while the application starts (there are some exceptions, such as the initialization of some libraries). You can try one of the following approaches.
- Try to use the lazy loading method for your components / modules / libraries. With the exception of components that are vital for the operation of the application, try not to load anything during the application launch, but download when you need a component, or load it in the background thread immediately after the application starts. Keep your application's
onCreate()as easy as possible. - Use caching. With the exception of information that is rapidly changing, the rest is better to cache. When the user accesses your application again, you can show the cached content while the more recent content is loading.
- Try to use the lazy loading method for your components / modules / libraries. With the exception of components that are vital for the operation of the application, try not to load anything during the application launch, but download when you need a component, or load it in the background thread immediately after the application starts. Keep your application's
I think you should avoid things like a long Splash Screen, like ProgressDialog, that make the user just look at the screen and prevent him from performing any action.
If your application connects to the network, assume that everything that should go wrong will go wrong. This way you can build apps for the millions of people who still use unstable 2G and 3G connections.
Splash Screen in a separate Activity using Launcher Theme
This method is based on the first method . It requires a separate Activity for Splash Screen. The first two steps are skipped, they are similar to the first method .
It remains to create an Activity for Splash Screen and specify AppTheme.Launcher for it in the manifest. Now edit the Activity so that it redirects to other pages. See the example below:
import android.os.Bundle import android.support.v7.app.AppCompatActivity class SplashActivity: AppCompatActivity() { override fun onCreate(savedInstanceState: Bundle?) { // , super.onCreate() setTheme(R.style.AppTheme) super.onCreate(savedInstanceState) val user = UserDb.getCurrentUser() routeToAppropriatePage(user) finish() } private fun routeToAppropriatePage(user: User?) { // when { user == null -> OnboardingActivity.start(this) user.hasPhoneNumber() -> EditProfileActivity.start(this) user.hasSubscriptionExpired() -> PaymentPlansActivity.start(this) else -> HomeActivity.start(this) } } } Pros:
- Solves the first two problems of the first method .
Minuses:
- I have seen how similar routing easily becomes ugly.
- Slight delay between two Activities.
- Danger of forgetting and starting to do lengthy operations here.
Using timers
This is a good old approach. You just need to create a separate one for Splash Screen Activity, which will be shown in x seconds. Then open the appropriate Activity. Using this approach, you get more flexibility, because you can add animation, custom view or any other elements that you can put in the Activity layout. Here is the minimal implementation of this approach:
import android.os.Bundle import android.os.Handler import android.support.v7.app.AppCompatActivity class SplashActivity: AppCompatActivity() { override fun onCreate(savedInstanceState: Bundle?) { super.onCreate(savedInstanceState) setContentView(R.layout.activity_splash) scheduleSplashScreen() } private fun scheduleSplashScreen() { val splashScreenDuration = getSplashScreenDuration() Handler().postDelayed( { // Splash Screen Activity val user = UserDb.getCurrentUser() routeToAppropriatePage(user) finish() }, splashScreenDuration ) } private fun getSplashScreenDuration() = 2000L private fun routeToAppropriatePage(user: User?) { // when { user == null -> OnboardingActivity.start(this) user.hasPhoneNumber() -> EditProfileActivity.start(this) user.hasSubscriptionExpired() -> PaymentPlansActivity.start(this) else -> HomeActivity.start(this) } } } Pros:
- It is possible to show your super-animation, or any other custom design that you want. It makes sense for gaming apps or apps for kids.
- Greater flexibility in what you can show on Splash Screen.
Minuses:
- Double strike - your Activity not starting Activity does not appear immediately after the application is launched, especially during a cold start. The user waits during a cold start, watching only the
windowBackgroundand, then, looking at the Splash Screen before the working Activity starts. - Your super animation or design usually delights the user only the first couple of times. Then, most users find it boring, and they only want content. I think the fourth way is able to fix this.
- In most cases, the additional delay is unjustified.
Using smart timers.
This approach is based on the third method . But instead of a constant delay, you run Splash Screen or not, based on whether it is the first to launch or not. Here is an example that uses SharedPreferences :
import android.content.Context import android.os.Bundle import android.os.Handler import android.support.v7.app.AppCompatActivity class SplashActivity: AppCompatActivity() { override fun onCreate(savedInstanceState: Bundle?) { super.onCreate(savedInstanceState) setContentView(R.layout.activity_splash) scheduleSplashScreen() } private fun scheduleSplashScreen() { val splashScreenDuration = getSplashScreenDuration() Handler().postDelayed( { // Splash Screen Activity val user = UserDb.getCurrentUser() routeToAppropriatePage(user) finish() }, splashScreenDuration ) } private fun getSplashScreenDuration(): Long { val sp = getPreferences(Context.MODE_PRIVATE) val prefKeyFirstLaunch = "pref_first_launch" return when(sp.getBoolean(prefKeyFirstLaunch, true)) { true -> { // (> 3 ) false sp.edit().putBoolean(prefKeyFirstLaunch, false).apply() 5000 } false -> { // , Splash Screen (<= 1 ) 1000 } } } private fun routeToAppropriatePage(user: User?) { // when { user == null -> OnboardingActivity.start(this) user.hasPhoneNumber() -> EditProfileActivity.start(this) user.hasSubscriptionExpired() -> PaymentPlansActivity.start(this) else -> HomeActivity.start(this) } } } Pros:
- This is a possible solution to a problem when a user gets tired of watching your Splash Screen for a long time.
Minuses:
- Double hit - problems of the third way are still not here
- In most cases, the additional delay is unjustified.
- I have not used this method, but I think there may be some delay in reading from
SharedPreferences.
It is all about Splash Screen. If I missed something, write in the comments.
It should be noted that on Habré was already an article (translation), where it was a question of Splash Screen. However, the approach touched there (corresponds to the second method in this article), as we could see, is not the most optimal for most cases. And finally , the Splash Screen API is supposedly added to Android Oreo, which will allow developers to easily add Splash Screen to their applications, but at the moment there is no information in the official documentation about this.
')
Source: https://habr.com/ru/post/345380/
All Articles