Dagger 2 for novice Android developers. Dagger 2. Advanced. Part 1
This article is the sixth part of a series of articles that, according to the author, are intended for those who cannot understand the implementation of dependencies and the Dagger 2 framework, or are only going to do it. The original was written on December 23, 2017. Free translation.

This is the sixth article in the series "Dagger 2 for novice Android developers." . If you have not read the previous, then you here .
We analyzed the class generated by Dagger 2 and looked at how Dagger 2 uses the Builder pattern to provide the necessary dependencies.
After we have analyzed a simple example of using annotations
')
This article may seem a little big. Usually my articles do not exceed 800 characters. I wanted to break it up into smaller parts, but the reason why the article is so big is because if you solve the problem of strong connections (hard dependencies) for a long time in the middle, there is a chance to get lost.
But I included checkpoints in the article. In these places you can take a short break and get distracted. I think this will be useful for newbies in Dagger 2 and dependency injection (DI).

So far, we have considered the usual Java projects in the examples. I hope that most of you now have an idea about DI and how Dagger 2 allows you to implement DI. Now let's dive into the real example of the Android application and try using Dagger 2 in this project.
To collect everything in one place, as in Google code labs, I created a kickstart branch . Our goal will be to eliminate the strong links in this project. Parts of the solution will be located in separate branches of this project.
This is a very simple project. In it, we will receive random users using the Random Users API and display them in
To implement the project functions, the following libraries will be used:
As we saw in the previous examples, there are dependencies in
(Checkpoint)
...
If you look at the
When you look at the
You also need to find a way to test our code. And
The dependencies presented above in the
In addition to the previously considered dependencies, add the following:
The code will look like this (you can view the full example in a separate thread ):
(Checkpoint)
...
A dependency graph is nothing more than a diagram explaining the dependencies between classes. The formation of such a graph makes the implementation more understandable (you will see this closer to the end). Look at the dependency graph for our project.
Green indicates high-level dependencies, which means that they are not needed by any other dependencies, but they need some of the dependencies.
How to read this chart? For example,
To get random users using the API, you need
Take time to look at the code in
(Checkpoint)
...
The full code can be found in a separate branch of the project .
Just add a few lines to the
The component will be the interface for the entire dependency graph. The best practice for using Component is to declare only top-level dependencies in it and to hide other dependencies.
This means that only those dependencies that are marked in the dependency graph in green, that is,
How does Component itself understand where to get the dependencies of
Now we need to move the code from
The first is the
The second is the
In the
Create an
The modules are almost ready, but the
Now we have all the modules and components, as in the picture below. But how to transfer

To implement communication between modules, the
What modules need to be connected?
So we connected all the modules.
At the moment, all modules are connected and communicate with each other. Now is the time to tell the Component or train it to access modules that provide it with the required dependencies.
As we connected the modules to each other using the
Considering the needs of the created component (the

If you did everything right, Dagger 2 will generate a class based on the component we have created that provides the necessary dependencies.
Now in
You did it! You used Dagger 2 in an Android application. Congratulate yourself and take a break.
(Checkpoint)
...
What? What is the problem?
Each time you call
Abstract
The
To use the created region, you need to start with the component, marking the annotation you created, and then tick each method that we need as a singleton.
This is how we create a single instance.
As a rule, in each application we use two kinds of context -
But the class created does not solve the problem. Now we provide two dependencies with the
Abstract
This summary will help us to distinguish the context. Just add this annotation to the methods, not forgetting the attribute.
Next, let Dagger 2 use the appropriate context in the right places.
Alternative annotations
To replace the
Then we annotate the method that provides the corresponding dependency.
Next, we note the parameters of all methods where we need the
Take a look at the corresponding commit to see how you can replace the
At the moment, we have taken a simple project and implemented dependencies in it using Dagger 2 and annotations.
We also studied 3 new annotations. The first is
At the moment we have considered only dependencies of the application level. In the next article, we will look at the dependencies of the
This is the sixth article in the series "Dagger 2 for novice Android developers." . If you have not read the previous, then you here .
Article series
- Dagger 2 for novice Android developers. Introduction
- Dagger 2 for novice Android developers. The introduction of dependencies. Part 1 .
- Dagger 2 for novice Android developers. The introduction of dependencies. Part 2 .
- Dagger 2 for novice Android developers. Dagger 2. Part 1 .
- Dagger 2 for novice Android developers. Dagger 2. Part 2 .
- Dagger 2 for novice Android developers. Dagger 2. Advanced.
Part 1 (you are here) . - Dagger 2 for novice Android developers. Dagger 2. Advanced.
Part 2.
Earlier in the series of articles
We analyzed the class generated by Dagger 2 and looked at how Dagger 2 uses the Builder pattern to provide the necessary dependencies.
After we have analyzed a simple example of using annotations
@Module and @Provides .')
Foreword
This article may seem a little big. Usually my articles do not exceed 800 characters. I wanted to break it up into smaller parts, but the reason why the article is so big is because if you solve the problem of strong connections (hard dependencies) for a long time in the middle, there is a chance to get lost.
But I included checkpoints in the article. In these places you can take a short break and get distracted. I think this will be useful for newbies in Dagger 2 and dependency injection (DI).
Android House
So far, we have considered the usual Java projects in the examples. I hope that most of you now have an idea about DI and how Dagger 2 allows you to implement DI. Now let's dive into the real example of the Android application and try using Dagger 2 in this project.
To collect everything in one place, as in Google code labs, I created a kickstart branch . Our goal will be to eliminate the strong links in this project. Parts of the solution will be located in separate branches of this project.
Project Description
This is a very simple project. In it, we will receive random users using the Random Users API and display them in
RecyclerView . I will not spend much time explaining the project, I will explain in the abstract. But please disassemble the code carefully, so that the implementation of Dagger 2 in the project will be as clear and simple for you as possible.# Classes and packages
MainActivity.java- Makes requests to the API and shows the items received inRecyclerView.- Package
Model- POJO for the response from the API, created using JSON Schema to POJO RandomUsersAdapter.java-AdapterforRecyclerView
Dependencies
To implement the project functions, the following libraries will be used:
Retrofit- for API callsGsonBuilderandGson- for working with JSONHttpLoggingInterceptor- for logging network operationsOkHttpClient- client forRetrofitPicasso- working with images in theAdapter
As we saw in the previous examples, there are dependencies in
MainActivity . And each time you create a MainActivity , dependency instances will be created again and again. public class MainActivity extends AppCompatActivity { Retrofit retrofit; RecyclerView recyclerView; RandomUserAdapter mAdapter; @Override protected void onCreate(Bundle savedInstanceState) { super.onCreate(savedInstanceState); setContentView(R.layout.activity_main); initViews(); GsonBuilder gsonBuilder = new GsonBuilder(); Gson gson = gsonBuilder.create(); Timber.plant(new Timber.DebugTree()); HttpLoggingInterceptor httpLoggingInterceptor = new HttpLoggingInterceptor(new HttpLoggingInterceptor.Logger() { @Override public void log(@NonNull String message) { Timber.i(message); } }); httpLoggingInterceptor.setLevel(HttpLoggingInterceptor.Level.BODY); OkHttpClient okHttpClient = new OkHttpClient() .newBuilder() .addInterceptor(httpLoggingInterceptor) .build(); retrofit = new Retrofit.Builder() .client(okHttpClient) .baseUrl("https://randomuser.me/") .addConverterFactory(GsonConverterFactory.create(gson)) .build(); populateUsers(); } private void initViews() { recyclerView = findViewById(R.id.recyclerView); recyclerView.setLayoutManager(new LinearLayoutManager(this)); } private void populateUsers() { Call<RandomUsers> randomUsersCall = getRandomUserService().getRandomUsers(10); randomUsersCall.enqueue(new Callback<RandomUsers>() { @Override public void onResponse(Call<RandomUsers> call, @NonNull Response<RandomUsers> response) { if(response.isSuccessful()) { mAdapter = new RandomUserAdapter(); mAdapter.setItems(response.body().getResults()); recyclerView.setAdapter(mAdapter); } } @Override public void onFailure(Call<RandomUsers> call, Throwable t) { Timber.i(t.getMessage()); } }); } public RandomUsersApi getRandomUserService(){ return retrofit.create(RandomUsersApi.class); } } (Checkpoint)
...
Existing problems
If you look at the
MainActivity , you will notice the following problems:# Awkward object initialization
When you look at the
onCreate() method, you may find awkward initialization inside it. Of course, we can continue to initialize objects in this way in this way, but it is better to find the right way to solve the problem.# Testability
You also need to find a way to test our code. And
Picasso inside the Adapter also interferes with testing capabilities. It would be nice to pass this dependency through the constructor. public class RandomUserAdapter extends RecyclerView.Adapter<RandomUserAdapter.RandomUserViewHolder> { private List<Result> resultList = new ArrayList<>(); public RandomUserAdapter() { } @Override public RandomUserViewHolder onCreateViewHolder(ViewGroup parent, int viewType) { View view = LayoutInflater.from(parent.getContext()).inflate(R.layout.list_item_random_user, parent, false); return new RandomUserViewHolder(view); } @Override public void onBindViewHolder(RandomUserViewHolder holder, int position) { Result result = resultList.get(position); holder.textView.setText(String.format("%s %s", result.getName().getFirst(), result.getName().getLast())); Picasso.with(holder.imageView.getContext()) .load(result.getPicture().getLarge()) .into(holder.imageView); } ...... Let's make an example a little more complicated.
The dependencies presented above in the
MainActivity class were needed only for you to get a little insight into the project and feel comfortable. If you go deeper, then as in any real project dependencies will be more. Let's add some more.In addition to the previously considered dependencies, add the following:
File- to store the cacheCache- for network cacheOkHttp3Downloader- downloader usingOkHttpClientto upload imagesPicasso- for processing images from the network
The code will look like this (you can view the full example in a separate thread ):
public class MainActivity extends AppCompatActivity { Retrofit retrofit; RecyclerView recyclerView; RandomUserAdapter mAdapter; Picasso picasso; @Override protected void onCreate(Bundle savedInstanceState) { super.onCreate(savedInstanceState); setContentView(R.layout.activity_main); initViews(); GsonBuilder gsonBuilder = new GsonBuilder(); Gson gson = gsonBuilder.create(); Timber.plant(new Timber.DebugTree()); File cacheFile = new File(this.getCacheDir(), "HttpCache"); cacheFile.mkdirs(); Cache cache = new Cache(cacheFile, 10 * 1000 * 1000); //10 MB HttpLoggingInterceptor httpLoggingInterceptor = new HttpLoggingInterceptor(new HttpLoggingInterceptor.Logger() { @Override public void log(@NonNull String message) { Timber.i(message); } }); httpLoggingInterceptor.setLevel(HttpLoggingInterceptor.Level.BODY); OkHttpClient okHttpClient = new OkHttpClient() .newBuilder() .cache(cache) .addInterceptor(httpLoggingInterceptor) .build(); OkHttp3Downloader okHttpDownloader = new OkHttp3Downloader(okHttpClient); picasso = new Picasso.Builder(this).downloader(okHttpDownloader).build(); retrofit = new Retrofit.Builder() .client(okHttpClient) .baseUrl("https://randomuser.me/") .addConverterFactory(GsonConverterFactory.create(gson)) .build(); populateUsers(); } private void initViews() { recyclerView = findViewById(R.id.recyclerView); recyclerView.setLayoutManager(new LinearLayoutManager(this)); } private void populateUsers() { Call<RandomUsers> randomUsersCall = getRandomUserService().getRandomUsers(10); randomUsersCall.enqueue(new Callback<RandomUsers>() { @Override public void onResponse(Call<RandomUsers> call, @NonNull Response<RandomUsers> response) { if(response.isSuccessful()) { mAdapter = new RandomUserAdapter(picasso); mAdapter.setItems(response.body().getResults()); recyclerView.setAdapter(mAdapter); } } @Override public void onFailure(Call<RandomUsers> call, Throwable t) { Timber.i(t.getMessage()); } }); } public RandomUsersApi getRandomUserService(){ return retrofit.create(RandomUsersApi.class); } } (Checkpoint)
...
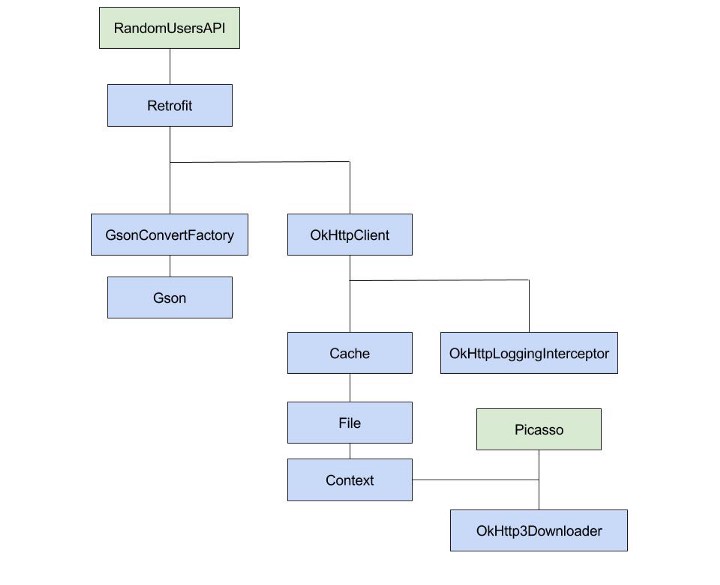
Dependency graph
A dependency graph is nothing more than a diagram explaining the dependencies between classes. The formation of such a graph makes the implementation more understandable (you will see this closer to the end). Look at the dependency graph for our project.
Green indicates high-level dependencies, which means that they are not needed by any other dependencies, but they need some of the dependencies.
How to read this chart? For example,
Picasso two dependencies - OkHttp3Downloader and Context .To get random users using the API, you need
Retrofit . He, in turn, needs two dependencies - GsonConvertFactory and OkHttpClient and so on.Take time to look at the code in
MainActivity and compare it with the diagram for a better understanding.(Checkpoint)
...
Implementing dependencies with Dagger 2
The full code can be found in a separate branch of the project .
The note:
RandomUsersAPIandRandomUsersApiare the same. Just a typo in the chart.RandomUsersComponentwill differ in the branch above and in the examples below. I suggest you use a new thread for full compliance with the examples below, and leave the above for reference.- Please remember to bookmark the project on GitHub (Star) if it really helped you in your training.
Step 1. Installing the Dagger 2
Just add a few lines to the
build.gradle file. dependencies { implementation 'com.google.dagger:dagger:2.13' annotationProcessor 'com.google.dagger:dagger-compiler:2.13' } Step 2. Create Component
The component will be the interface for the entire dependency graph. The best practice for using Component is to declare only top-level dependencies in it and to hide other dependencies.
This means that only those dependencies that are marked in the dependency graph in green, that is,
RandomUsersAPI and Picasso will be present in the Component. @Component public interface RandomUserComponent { RandomUsersApi getRandomUserService(); Picasso getPicasso(); } How does Component itself understand where to get the dependencies of
RandomUsersAPI and Picasso ? We use the modules.Step 3. Creating modules
Now we need to move the code from
MainActivity to different modules. Looking at the dependency graph, you can decide which modules are needed.The first is the
RandomUsersModule , it will provide the dependencies RandomUsersApi , GsonConverterFactory , Gson and Retrofit . @Module public class RandomUsersModule { @Provides public RandomUsersApi randomUsersApi(Retrofit retrofit){ return retrofit.create(RandomUsersApi.class); } @Provides public Retrofit retrofit(OkHttpClient okHttpClient, GsonConverterFactory gsonConverterFactory, Gson gson){ return new Retrofit.Builder() .client(okHttpClient) .baseUrl("https://randomuser.me/") .addConverterFactory(gsonConverterFactory) .build(); } @Provides public Gson gson(){ GsonBuilder gsonBuilder = new GsonBuilder(); return gsonBuilder.create(); } @Provides public GsonConverterFactory gsonConverterFactory(Gson gson){ return GsonConverterFactory.create(gson); } } The second is the
PicassoModule , which will provide the Picasso and OkHttp3Downloader . @Module public class PicassoModule { @Provides public Picasso picasso(Context context, OkHttp3Downloader okHttp3Downloader){ return new Picasso.Builder(context). downloader(okHttp3Downloader). build(); } @Provides public OkHttp3Downloader okHttp3Downloader(OkHttpClient okHttpClient){ return new OkHttp3Downloader(okHttpClient); } } In the
RandomUsersModule module for Retrofit need OkHttpClient . Which, in turn, needs other dependencies. Why not make a separate module for this?Create an
OkHttpClientModule that provides the OkHttpCkient , Cache , HttpLoggingInterceptor and File . @Module public class OkHttpClientModule { @Provides public OkHttpClient okHttpClient(Cache cache, HttpLoggingInterceptor httpLoggingInterceptor){ return new OkHttpClient() .newBuilder() .cache(cache) .addInterceptor(httpLoggingInterceptor) .build(); } @Provides public Cache cache(File cacheFile){ return new Cache(cacheFile, 10 * 1000 * 1000); //10 MB } @Provides public File file(Context context){ File file = new File(context.getCacheDir(), "HttpCache"); file.mkdirs(); return file; } @Provides public HttpLoggingInterceptor httpLoggingInterceptor(){ HttpLoggingInterceptor httpLoggingInterceptor = new HttpLoggingInterceptor(new HttpLoggingInterceptor.Logger() { @Override public void log(String message) { Timber.d(message); } }); httpLoggingInterceptor.setLevel(HttpLoggingInterceptor.Level.BODY); return httpLoggingInterceptor; } } The modules are almost ready, but the
PicassoModule and OkHttpClientModule require a Context and maybe it will be useful to us in other places. We will make a module for this purpose. @Module public class ContextModule { Context context; public ContextModule(Context context){ this.context = context; } @Provides public Context context(){ return context.getApplicationContext(); } } Step 4. We connect modules
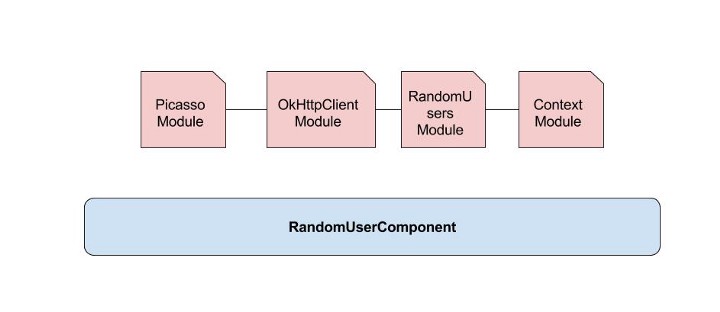
Now we have all the modules and components, as in the picture below. But how to transfer
Context to other modules? We need to link modules that depend on each other.To implement communication between modules, the
includes attribute is required. This attribute includes in the current module dependencies of the modules that are referenced.What modules need to be connected?
RandomUsersModuleneedsOkHttpClientModuleOkHttpClientModuleneeds aContextModulePicassoModuleneedsOkHttpClientModuleandContextModule. SinceOkHttpClientModulealready connected toContextModule, onlyOkHttpClientModulecan be dispensed withOkHttpClientModule
// RandomUsersModule.java @Module(includes = OkHttpClientModule.class) public class RandomUsersModule { ... } // OkHttpClientModule.java @Module(includes = ContextModule.class) public class OkHttpClientModule { ... } // PicassoModule.java @Module(includes = OkHttpClientModule.class) public class PicassoModule { ... } So we connected all the modules.
Step 5. Linking Component and Modules
At the moment, all modules are connected and communicate with each other. Now is the time to tell the Component or train it to access modules that provide it with the required dependencies.
As we connected the modules to each other using the
includes attribute, in a similar way, we can link the component and modules using the modules attribute.Considering the needs of the created component (the
getRandomUserService() and getPicasso() methods), we include in the component links to the RandomUsersModule and PicassoModule modules using the modules attribute. @Component(modules = {RandomUsersModule.class, PicassoModule.class}) public interface RandomUserComponent { RandomUsersApi getRandomUserService(); Picasso getPicasso(); } Step 6. Build the project
If you did everything right, Dagger 2 will generate a class based on the component we have created that provides the necessary dependencies.
Now in
MainActivity you can conveniently retrieve the dependencies Picasso and RandomUsersApi using the RandomUserComponent . public class MainActivity extends AppCompatActivity { RandomUsersApi randomUsersApi; Picasso picasso; .... @Override protected void onCreate(Bundle savedInstanceState) { super.onCreate(savedInstanceState); setContentView(R.layout.activity_main); ... RandomUserComponent daggerRandomUserComponent = DaggerRandomUserComponent.builder() .contextModule(new ContextModule(this)) .build(); picasso = daggerRandomUserComponent.getPicasso(); randomUsersApi = daggerRandomUserComponent.getRandomUserService(); populateUsers(); ... } ... } Step 7. Congratulate yourself!
You did it! You used Dagger 2 in an Android application. Congratulate yourself and take a break.
(Checkpoint)
...
Gif
But there is a problem
What? What is the problem?
Each time you call
DaggerComponent.build() , new instances of all the objects or dependencies you have configured are created. In this case, why doesn't Dagger 2 know that I only need one copy of Picasso ? In other words, how can we tell Dagger 2 to provide us with a dependency like singleton?Abstract @Scope
The
@Scope tells Dagger 2 to create only a single instance, even if DaggerComponent.build() is called multiple times. This makes the dependency work like singleton. To customize the desired area (Scope) you need to create your own annotation. @Scope @Retention(RetentionPolicy.CLASS) public @interface RandomUserApplicationScope { } @Retention is an annotation to indicate the point of deviation of the use of annotation. She talks about when annotation can be used. For example, with the SOURCE mark the annotation will be available only in the source code and will be discarded during compilation, with the CLASS mark the annotation will be available at compile time, but not during program operation, with the RUNTIME mark the annotation will be available during program execution.Scope Usage
To use the created region, you need to start with the component, marking the annotation you created, and then tick each method that we need as a singleton.
@RandomUserApplicationScope @Component(modules = {RandomUsersModule.class, PicassoModule.class}) public interface RandomUserComponent { ...} @Module(includes = OkHttpClientModule.class) public class PicassoModule { ... @RandomUserApplicationScope @Provides public Picasso picasso(Context context, OkHttp3Downloader okHttp3Downloader){ return new Picasso.Builder(context). downloader(okHttp3Downloader). build(); } ... } @Module(includes = OkHttpClientModule.class) public class RandomUsersModule { ... @RandomUserApplicationScope @Provides public Retrofit retrofit(OkHttpClient okHttpClient, GsonConverterFactory gsonConverterFactory, Gson gson){ return new Retrofit.Builder() .client(okHttpClient) .baseUrl("https://randomuser.me/") .addConverterFactory(gsonConverterFactory) .build(); } ... } This is how we create a single instance.
One more problem!
Gif
As a rule, in each application we use two kinds of context -
ApplicationContext and Activity context. How to provide them? You can use ContextModule to provide an ApplicationContext . Let's create another module. @Module public class ActivityModule { private final Context context; ActivityModule(Activity context){ this.context = context; } @RandomUserApplicationScope @Provides public Context context(){ return context; } } But the class created does not solve the problem. Now we provide two dependencies with the
Context type and Dagger 2 will not be able to figure out how to use, an error will occur.Abstract @Named
This summary will help us to distinguish the context. Just add this annotation to the methods, not forgetting the attribute.
@Module public class ActivityModule { .... @Named("activity_context") @RandomUserApplicationScope @Provides public Context context(){ return context; } } @Module public class ContextModule { .... @Named("application_context") @RandomUserApplicationScope @Provides public Context context(){ return context.getApplicationContext(); } } Next, let Dagger 2 use the appropriate context in the right places.
@Module(includes = ContextModule.class) public class OkHttpClientModule { .... @Provides @RandomUserApplicationScope public File file(@Named("application_context") Context context){ File file = new File(context.getCacheDir(), "HttpCache"); file.mkdirs(); return file; } .... } @Module(includes = OkHttpClientModule.class) public class PicassoModule { ... @RandomUserApplicationScope @Provides public Picasso picasso(@Named("application_context")Context context, OkHttp3Downloader okHttp3Downloader){ return new Picasso.Builder(context). downloader(okHttp3Downloader). build(); ... } Alternative annotations @Named - @Qualifier
To replace the
@Named annotation with @Qualifier you need to create a separate annotation and use it where necessary. @Qualifier public @interface ApplicationContext {} Then we annotate the method that provides the corresponding dependency.
@Module public class ContextModule { .... @ApplicationContext @RandomUserApplicationScope @Provides public Context context(){ return context.getApplicationContext(); } } Next, we note the parameters of all methods where we need the
ApplicationContext created by the annotation. @Module(includes = ContextModule.class) public class OkHttpClientModule { ... @Provides @RandomUserApplicationScope public File file(@ApplicationContext Context context){ File file = new File(context.getCacheDir(), "HttpCache"); file.mkdirs(); return file; } .... } @Module(includes = OkHttpClientModule.class) public class PicassoModule { @RandomUserApplicationScope @Provides public Picasso picasso(@ApplicationContext Context context, OkHttp3Downloader okHttp3Downloader){ return new Picasso.Builder(context). downloader(okHttp3Downloader). build(); } .... } Take a look at the corresponding commit to see how you can replace the
@Named annotation with @Qualifier .Summary
At the moment, we have taken a simple project and implemented dependencies in it using Dagger 2 and annotations.
We also studied 3 new annotations. The first is
@Scope , to get the dependencies in a single copy. The second is @Named , to separate methods that provide dependencies of the same type. The third is @Qualifier , as an alternative to @Named .What's next?
At the moment we have considered only dependencies of the application level. In the next article, we will look at the dependencies of the
Activity level, create several components and learn how to work with them. The next article will be released in a week.Source: https://habr.com/ru/post/345372/
All Articles