We include support for TLS v1.3 in Nginx using the example of Debian 9
Good day to all!
This post was written as a result of the victory of the desire to get to the bottom of fatigue, sleepiness, thetemptation to overturn another bottle of beer on Friday evening. I’ll say right away that I don’t reveal anything super complicated, just the inclusion of TLS v1.3 in Nginx.
Surely there will be on Habré those who have already done it 100 times, so this article is more for beginners or for those who want to find a ready-made solution in the form of a manual without spending a lot of time searching, like me, for example. Remembering that he hadn’t written on Habré for a long time and putting the article “tutorial” on the article, set to work.
A quick search on Habr showed that there were no posts on this topic, and there was a topic on the “toaster” where the questioner was answered in the comments in the style of “the fool himself”.
')
It turns out that the question remains unanswered, at least I did not find working manuals in open access. Not good, you need to fix the situation :)
It all started with the fact that once again setting up an SSL certificate from Letsencrypt (the certificate issuer is completely irrelevant for this article), when everything seemed to be fine,
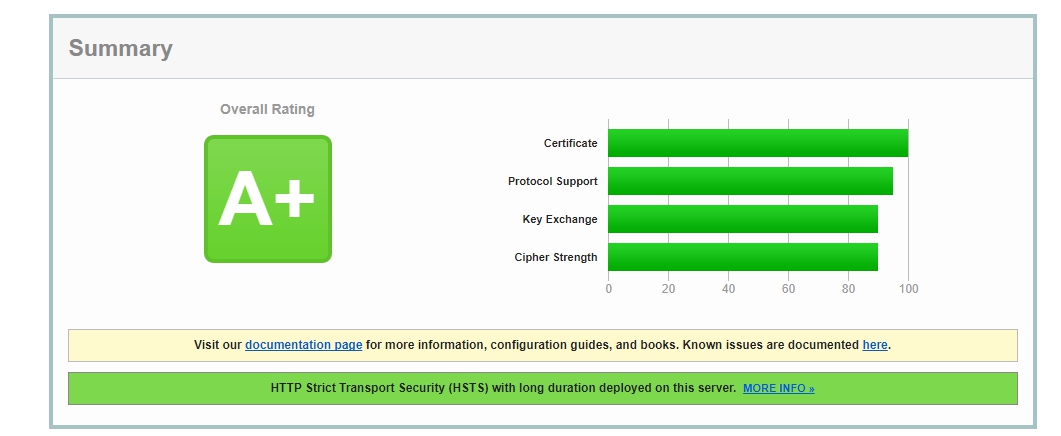
(test SSL certificate settings on ssllabs.com, review)
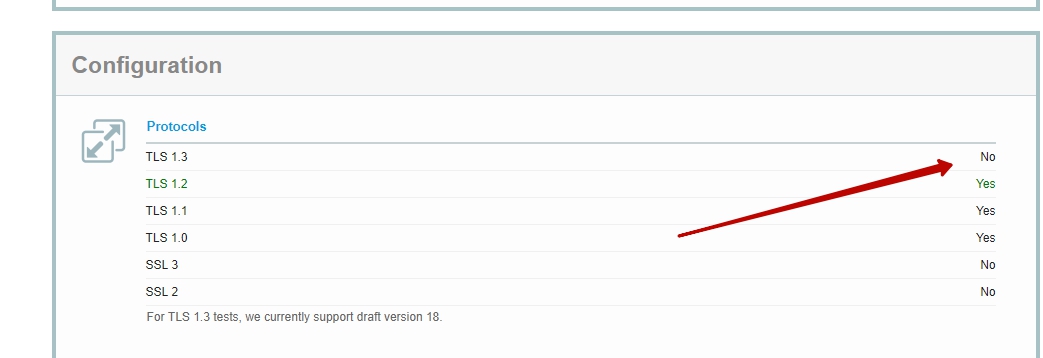
and it would be easy to close the task in Jira and go home, but then my eye was drawn to the item on support for TLS 1.3. More precisely, it was stated there that this very support for TLS 1.3 is just not there!
(test SSL certificate settings on ssllabs.com, details)
Well, as they say,

Of course, I have seen this point before, but somehow did not attach any importance, everything was not up to that. And this time he said to himself mentally: “enough is to endure it!” We still have to figure out how to enable the new protocol.
A little background. Exit TLS v1.3 is not the news of the last days, work on the new version has been going on for many years. Almost 10 years have passed since the announcement of TLS v1.2. And so, in April 2017, the nginx version 1.13.0 was released, which supports TLS v1.3.
If a respected reader thinks that it is enough to install nginx> = 1.13.0 and prescribe
in the virtualhost settings, do not rush to draw conclusions and disperse, I also fell for this “divorce” :)
With the installed version of nginx> = 1.13.0 and in the presence of the above line in the config
no errors, this is a plus, but the ssllabs test shows that TLS 1.3 is still not included, and this is a big minus.
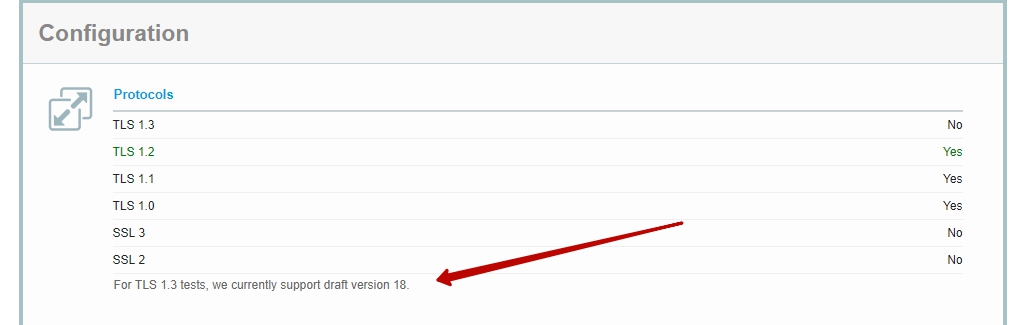
Later, having studied the requirements, I realized that it is possible to make the new version of the protocol work by compiling nginx> = 1.13.0 with support for openssl> = 1.1.1, which is currently being developed, and the draft version of the protocol is strictly 18. If you take other versions of draft, the result will be different. I didn’t go into details, for some reason at the moment they were based on the 18th version of the draft, which ssllabs kindly reports in my disclaimer in the test results
(test SSL certificate settings on ssllabs.com, details)
Procedure:
1. Save the contents of / etc / nginx somewhere in / backup, if you have already configured the required virtualhost, so as not to do it all over again. You can immediately make
2. Download and unpack the sources of openssl 1.1.1 tls1.3 draft 18.
3. Preparatory work for openssl
4. Build openssl.
Go to the directory with the unzipped contents of the openssl archive
5. Preparatory work for nginx
When running the nginx configurator, it is important to specify the correct path to the unpacked openssl source code of the version we need. I have this /root/openssl-tls1.3-draft-18, if you have a different path to the openssl source directory, then make changes to the option --with-openssl =.
At the stage of execution of the openssl and / or nginx configurator, errors may appear, mainly treated with ordinary googling. As a rule, there will be some lack of lib, nothing special.
90% is solved by taking the name of the component / package that the configurator did not find and do
and run the configurator again. Repeat the procedure until the configurator runs without errors.
Then
The last command fixes the nginx compilation bug. It is connected with the fact that openssl v1.1.1 is now only at the development stage, and in nginx about this something is not taken into account at the moment .
6. Compiling nginx
Run
After successful compilation do not rush to make make install , it is better to make everything beautiful
It is necessary to create directories before performing checkinstall, since after building the deb package, an attempt will be made to install it into the system, if some directory is not enough, it will fail.
At this stage, nginx should be installed on the system, but if you run
will indicate that nginx - there is no such command / binary. Do not be in a hurry to get upset, the whole thing is that it is not installed completely along the standard PATH path, but here it is / usr / share / nginx / sbin / nginx
Therefore, it is necessary to perform
To be beautiful, we will do
and then we run
yourself on health and without mistakes.
A small minus - after the installation of nginx there is neither an init.d script, nor a config for systemd.
It is treated as follows (one of the ways):
this is a new file, we create it ourselves, enter the contents
Then
Returning the nginx directory from / backup to / etc, it is better to remove / etc / nginx before this, since something was put there after running checkinstall and dpkg -i
Ready to run nginx
Everything should go up, if not, a little troubleshooting will even be useful.
Another little touch. You need to tweak nginx virtualhost, activate the new cipher suite.
I don’t remember exactly, but it took more than an hour to find the source where the ciphers were mentioned, and that in TLS 1.3 they should be like this:
In general, the nginx configuration I got is this:
This is not a ready-made configuration for the production environment, there is no caching, compression, and other useful and important things. Let me remind you, the purpose of the article is to activate TLS 1.3 only.
After editing, we check that everything is fine
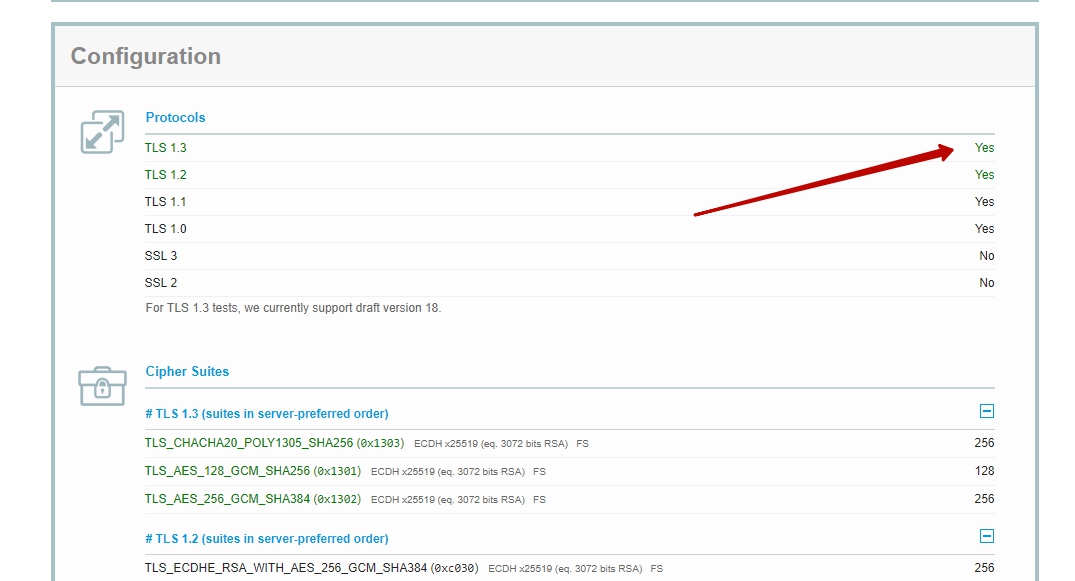
If so, restart nginx and run the ssllabs test. It should be like this

and so
How to enable TLS 1.3 support in Chrome and Firefox browsers, in order to test the new protocol it was possible directly on the local machine, you can find it here.
On this you can just calm down and go home :)
I hope someone will be useful. Thank!
This post was written as a result of the victory of the desire to get to the bottom of fatigue, sleepiness, the
Surely there will be on Habré those who have already done it 100 times, so this article is more for beginners or for those who want to find a ready-made solution in the form of a manual without spending a lot of time searching, like me, for example. Remembering that he hadn’t written on Habré for a long time and putting the article “tutorial” on the article, set to work.
A quick search on Habr showed that there were no posts on this topic, and there was a topic on the “toaster” where the questioner was answered in the comments in the style of “the fool himself”.
')
It turns out that the question remains unanswered, at least I did not find working manuals in open access. Not good, you need to fix the situation :)
It all started with the fact that once again setting up an SSL certificate from Letsencrypt (the certificate issuer is completely irrelevant for this article), when everything seemed to be fine,
(test SSL certificate settings on ssllabs.com, review)
and it would be easy to close the task in Jira and go home, but then my eye was drawn to the item on support for TLS 1.3. More precisely, it was stated there that this very support for TLS 1.3 is just not there!
(test SSL certificate settings on ssllabs.com, details)
Well, as they say,
Of course, I have seen this point before, but somehow did not attach any importance, everything was not up to that. And this time he said to himself mentally: “enough is to endure it!” We still have to figure out how to enable the new protocol.
A little background. Exit TLS v1.3 is not the news of the last days, work on the new version has been going on for many years. Almost 10 years have passed since the announcement of TLS v1.2. And so, in April 2017, the nginx version 1.13.0 was released, which supports TLS v1.3.
If a respected reader thinks that it is enough to install nginx> = 1.13.0 and prescribe
ssl_protocols TLSv1.1 TLSv1.2 TLSv1.3; in the virtualhost settings, do not rush to draw conclusions and disperse, I also fell for this “divorce” :)
With the installed version of nginx> = 1.13.0 and in the presence of the above line in the config
nginx -t no errors, this is a plus, but the ssllabs test shows that TLS 1.3 is still not included, and this is a big minus.
Later, having studied the requirements, I realized that it is possible to make the new version of the protocol work by compiling nginx> = 1.13.0 with support for openssl> = 1.1.1, which is currently being developed, and the draft version of the protocol is strictly 18. If you take other versions of draft, the result will be different. I didn’t go into details, for some reason at the moment they were based on the 18th version of the draft, which ssllabs kindly reports in my disclaimer in the test results
(test SSL certificate settings on ssllabs.com, details)
Procedure:
1. Save the contents of / etc / nginx somewhere in / backup, if you have already configured the required virtualhost, so as not to do it all over again. You can immediately make
apt-get remove --purge nginx 2. Download and unpack the sources of openssl 1.1.1 tls1.3 draft 18.
wget https://github.com/openssl/openssl/archive/tls1.3-draft-18.zip 3. Preparatory work for openssl
apt-get install build-essential libpcre3 libpcre3-dev zlib1g-dev checkinstall 4. Build openssl.
Go to the directory with the unzipped contents of the openssl archive
cd openssl-tls1.3-draft-18 ./config make && make install 5. Preparatory work for nginx
apt-get build-dep nginx apt-get install libossp-uuid-dev apt-get install libxml2 libxml2-dev apt-get install libxslt-dev apt-get install libgd-dev apt-get install libgeoip-dev wget http://nginx.org/download/nginx-1.13.7.tar.gz tar xvf nginx-1.13.7.tar.gz cd nginx-1.13.7 ./configure --with-cc-opt='-g -O2 -fstack-protector-strong -Wformat -Werror=format-security -D_FORTIFY_SOURCE=2' --with-ld-opt='-Wl,-z,relro -Wl,-z,now' --prefix=/usr/share/nginx --conf-path=/etc/nginx/nginx.conf --http-log-path=/var/log/nginx/access.log --error-log-path=/var/log/nginx/error.log --lock-path=/var/lock/nginx.lock --pid-path=/run/nginx.pid --modules-path=/usr/lib/nginx/modules --http-client-body-temp-path=/var/lib/nginx/body --http-fastcgi-temp-path=/var/lib/nginx/fastcgi --http-proxy-temp-path=/var/lib/nginx/proxy --http-scgi-temp-path=/var/lib/nginx/scgi --http-uwsgi-temp-path=/var/lib/nginx/uwsgi --with-debug --with-pcre-jit --with-ipv6 --with-http_ssl_module --with-http_stub_status_module --with-http_realip_module --with-http_auth_request_module --with-http_v2_module --with-http_dav_module --with-file-aio --with-threads --with-http_addition_module --with-http_geoip_module=dynamic --with-http_gunzip_module --with-http_gzip_static_module --with-http_image_filter_module=dynamic --with-http_secure_link_module --with-http_sub_module --with-http_xslt_module=dynamic --with-stream=dynamic --with-stream_ssl_module --with-mail=dynamic --with-mail_ssl_module --with-ld-opt=-lossp-uuid --with-cc-opt=-I/usr/include/ossp --with-openssl=/root/openssl-tls1.3-draft-18 --with-openssl-opt='enable-tls1_3' When running the nginx configurator, it is important to specify the correct path to the unpacked openssl source code of the version we need. I have this /root/openssl-tls1.3-draft-18, if you have a different path to the openssl source directory, then make changes to the option --with-openssl =.
At the stage of execution of the openssl and / or nginx configurator, errors may appear, mainly treated with ordinary googling. As a rule, there will be some lack of lib, nothing special.
90% is solved by taking the name of the component / package that the configurator did not find and do
apt-get install [ ]-dev and run the configurator again. Repeat the procedure until the configurator runs without errors.
Then
gawk -i inplace '/pthread/ { sub(/-lpthread /, ""); sub(/-lpthread /, ""); sub(/\\/, "-lpthread \\"); print } ! /pthread/ { print }' "objs/Makefile" The last command fixes the nginx compilation bug. It is connected with the fact that openssl v1.1.1 is now only at the development stage, and in nginx about this something is not taken into account at the moment .
6. Compiling nginx
Run
make After successful compilation do not rush to make make install , it is better to make everything beautiful
mkdir /usr/lib/nginx mkdir /var/log/nginx/ mkdir -p /var/lib/nginx/body checkinstall --pkgname=nginx --pkgversion=1.13.7 --nodoc It is necessary to create directories before performing checkinstall, since after building the deb package, an attempt will be made to install it into the system, if some directory is not enough, it will fail.
At this stage, nginx should be installed on the system, but if you run
nginx -t will indicate that nginx - there is no such command / binary. Do not be in a hurry to get upset, the whole thing is that it is not installed completely along the standard PATH path, but here it is / usr / share / nginx / sbin / nginx
Therefore, it is necessary to perform
/usr/share/nginx/sbin/nginx -t To be beautiful, we will do
ln -s /usr/share/nginx/sbin/nginx /usr/sbin/nginx and then we run
nginx -t yourself on health and without mistakes.
A small minus - after the installation of nginx there is neither an init.d script, nor a config for systemd.
It is treated as follows (one of the ways):
vim /lib/systemd/system/nginx.service this is a new file, we create it ourselves, enter the contents
[Unit] Description=A high performance web server and a reverse proxy server After=network.target [Service] Type=forking PIDFile=/run/nginx.pid ExecStartPre=/usr/share/nginx/sbin/nginx -t -q -g 'daemon on; master_process on;' ExecStart=/usr/share/nginx/sbin/nginx -g 'daemon on; master_process on;' ExecReload=/usr/share/nginx/sbin/nginx -g 'daemon on; master_process on;' -s reload ExecStop=-/sbin/start-stop-daemon --quiet --stop --retry QUIT/5 --pidfile /run/nginx.pid TimeoutStopSec=5 KillMode=mixed [Install] WantedBy=multi-user.target Then
systemctl enable nginx.service Returning the nginx directory from / backup to / etc, it is better to remove / etc / nginx before this, since something was put there after running checkinstall and dpkg -i
Ready to run nginx
systemctl start nginx Everything should go up, if not, a little troubleshooting will even be useful.
Another little touch. You need to tweak nginx virtualhost, activate the new cipher suite.
I don’t remember exactly, but it took more than an hour to find the source where the ciphers were mentioned, and that in TLS 1.3 they should be like this:
ssl_ciphers TLS13-CHACHA20-POLY1305-SHA256:TLS13-AES-128-GCM-SHA256:TLS13-AES-256-GCM-SHA384:ECDHE:!COMPLEMENTOFDEFAULT; In general, the nginx configuration I got is this:
server { listen 443 ssl http2; server_name tls1.3.netforce.ua; access_log /var/log/nginx/tls1.3.netforce.ua_access.log combined; error_log /var/log/nginx/tls1.3.netforce.ua_error.log; ssl on; ssl_dhparam /etc/nginx/dhparam.pem; ssl_certificate "/etc/nginx/ssl/server.crt"; ssl_certificate_key "/etc/nginx/ssl/server.key"; add_header Strict-Transport-Security "max-age=31536000"; ssl_ciphers TLS13-CHACHA20-POLY1305-SHA256:TLS13-AES-128-GCM-SHA256:TLS13-AES-256-GCM-SHA384:ECDHE:!COMPLEMENTOFDEFAULT; ssl_prefer_server_ciphers on; ssl_protocols TLSv1 TLSv1.1 TLSv1.2 TLSv1.3; root /var/www/tls1.3; index index.html; } server { listen 80; server_name tls1.3.netforce.ua; rewrite ^(.*)$ https://tls1.3.netforce.ua$1 permanent; } This is not a ready-made configuration for the production environment, there is no caching, compression, and other useful and important things. Let me remind you, the purpose of the article is to activate TLS 1.3 only.
After editing, we check that everything is fine
nginx -t If so, restart nginx and run the ssllabs test. It should be like this
and so
How to enable TLS 1.3 support in Chrome and Firefox browsers, in order to test the new protocol it was possible directly on the local machine, you can find it here.
On this you can just calm down and go home :)
I hope someone will be useful. Thank!
Source: https://habr.com/ru/post/345364/
All Articles