Automatic update of LetsEncrypt certificates in MDaemon mail server: step-by-step instructions

Hello!
Some time ago a good friend of mine approached me with a problem that suddenly appeared to him and asked for help in solving it. The problem was as follows: the organization in which he worked had a Windows server with MDaemon's mailer from Alt-N Technologies. A couple of years ago, the StartSSL SSL certificate from StartCom was installed on this mailer. And everything worked quite well for himself, the porridge did not ask, when suddenly a sad letter came from StartCom informing that soon all their certificates would come full and unconditional kirdyk. Like, save yourself - who can, until it was bombed. Today I will tell you how we were saved - you see, someone will find this information useful.
Some lyrics
What is the first thing that comes to mind when a person is asked a question about replacing a certificate? There are two options: or - why don't you buy it? Or - so there is a great team of Let's Encrypt, which distributes certificates to the right and left for free! The first option was embarrassedly rejected as untenable, due to the fact that, as was said earlier, the server was working, I did not ask for porridge, and there was no desire to explain to the management why it should part with the unlimited amount of evergreen money. The second option was just super-attractive, but some problems that were to be overlooked loomed on the horizon: the window-mailer window led to sad reflections on its compatibility with LetsEncrypt scripts, and did not want to receive and install the certificate every three months.
Therefore, the second option was chosen - it was only necessary to find a way to automate the process of obtaining a certificate and linking it to the mailer.
')
We began, naturally, with digging up the great and terrible Internet in search of a ready-made solution. And, lo and behold! It turned out that the valiant programmers from Alt-N Technologies have already bothered with this and have given out to the surface scripts that do everything they need! As they say - hats off! But even here it was not without a fly in the ointment: these scripts were not distributed to anyone and everyone, but were included in the latest versions of MDaemon. However, our ward server had a rather old version of MDaemon - 13.6.3. The software was completely legal, once bought for the most real money, it worked remarkably and its upgrade was of course not included in the management plans (see the clause about purchasing a certificate).
Therefore, it was decided to try to surgically transplant the scripts from the new version of MDaemon into the old one and make them work there. Thought and done: the latest MDaemon trial version at that time was installed on the virtual machine and the LetsEncrypt folder with all its contents was removed from it. What now to do with this good? - read below.
Initial data
- Server running Windows Server 2008 R2.
- MDaemon mail server version 13.6.3.
- On the same server raised IIS, serving the corporate website of the organization.
- MDaemon used WorldClient's own built-in WEB-server, which was accessible from the Internet through port 3000.
Mandatory Requirements
As it was written in this article , LetsEncrypt scripts for MDaemon are not completely universal and assume the following mandatory conditions:
- Availability of PowerShell version 3.0.
- Presence of the installed framework Microsoft .NET version not lower than 4.0.
- Presence of the installed IIS Management Scripts and Tools package.
- From the Internet via port 80, the WorldClient server should be accessible either directly or via IIS.
As you can see, some of these requirements were not initially fulfilled, so the WorldClient was first linked to IIS in order to transfer it to port 80. Information on how to do this was obtained from this article from the Alt-N website.
A couple of words about the "rake"
Before proceeding with the description of the step-by-step instructions, I want to hold your attention on some unforeseen problems that have complicated the process of transplanting scripts and obtaining certificates.
First, almost at the very beginning of the script, a check was implemented that the 'EnableWCServer' parameter in the 'Mdaemon.ini' file is set to 'Yes'. And if this was not the case, the script immediately terminated its work with a critical error message 'Error: WorldClient must be enabled'. But, oddly enough, in our case, this parameter was set to 'No' - despite the fact that we had already done the binding of WorldClient to IIS and WorldClient was perfectly open from the Internet. Without thinking, we turned off this check by commenting it in the script. This allowed the script to continue working.
Secondly, the corporate site was raised on the same server and access to some pages of this site was carried out via the https protocol using a self-signed certificate. And old Windows servers assume that only one certificate can be bound to a single IP. We stepped on this rake at the very end of the path - when the certificate from LE was already successfully obtained, but could not reach the address 0.0.0.0. As a result, the problem was solved quickly, but in a somewhat crooked way: WorldClient was sent to a separate IP address (since it was available), and again the script had to be edited - the IP address to which it was attached was added to the list of input parameters certificate. And since the WorldClient linking to IIS was already fully completed, we did not launch MDaemon's own WEB server and left everything as is.
Go.
Part 1: Preliminary Training
- In any way known to you we make server backup!
- Install the .NET version above or equal to 4.0.
- Add Role Services: go to 'Control Panel' -> 'Administrative Tools' -> 'Server Manager' -> 'Roles' and click on the link 'Add Role Services'.We put kryzhiki on:
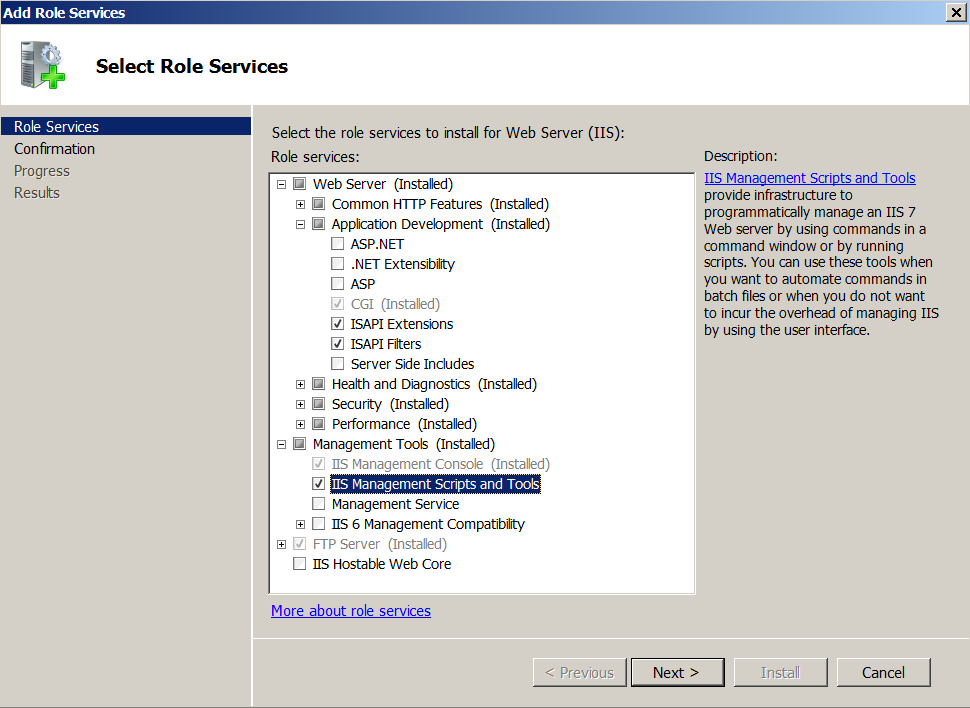
- Web Server / Application Development / ISAPI Extensions
- Web Server / Application Development / ISAPI Filters
- Management Tools / IIS Management Scripts and Tools
Click 'Next', and so on. - Installing Windows Management Framework 3.0 - this will install PowerShell version 3.0 (see the 'Requirements' section):
- Download WMF 3.0 from Microsoft.
- Install the necessary WMF. For Windows Server 2008 R2, this is 'Windows6.1-KB2506143-x64.msu'.
- Reboot the server.
Part 2: Creating a site in IIS to access the WorldClient server
Note 1: if you use WorldClient's server built into MDaemon and it is already exclusively on port 80, you can safely skip this part and go directly to part 3.
Note 2: The site’s host name should be the same as the fully qualified domain name of the MDaemon host for which it is accessible from the Internet.
To find out MDaemon's full domain name: run the Mdaemon GUI, go to the menu: 'Settings' -> 'Primary domain / servers' -> 'Domain and servers by default' -> 'Domain' and look at the field 'Fully Qualified Domain Name' .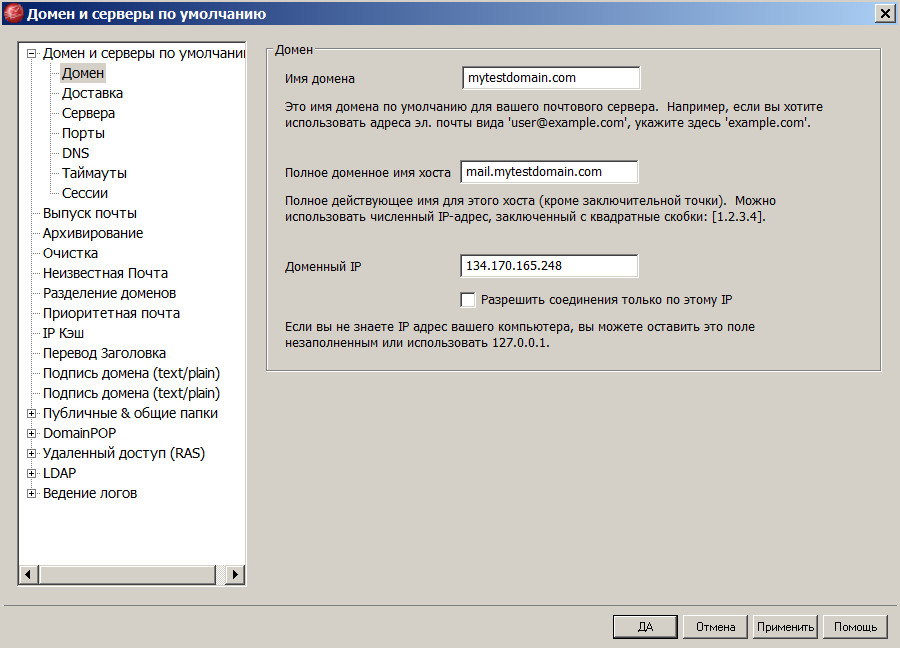
So let's get started. We launch the IIS-manager and add a new site in it: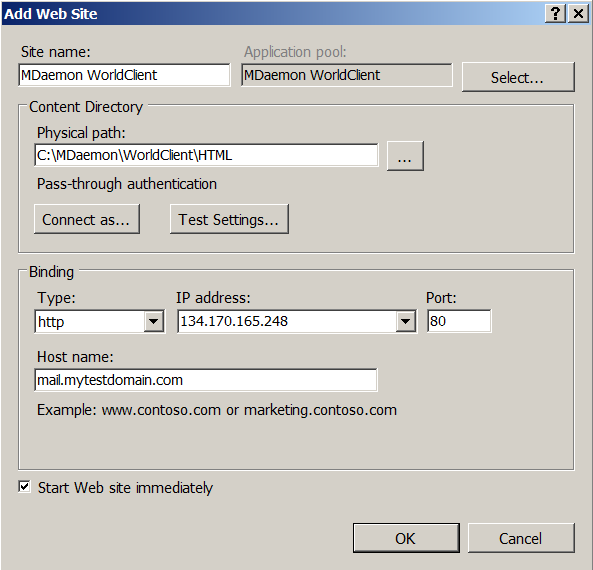
- In the field 'Site name' we enter the name of the site - what you like
- In the 'Physical path' field, enter the path to the HTML folder of the World client.
- In the 'Host name' field, enter the fully qualified domain name of the host (see note 2 above).
- In the 'IP-address' field, leave the 'All unassigned' if the interface is used exclusively, or from the list select IP that belongs to the mailer.
- The 'Type' and 'Port' fields are left as is - 'http' and '80', respectively.
We edit the list of the site default documents - go to the 'Default Document' subsection:
- Clear the entire list.
- Add the document 'WorldClient.dll': in the right pane of the 'Actions' click 'Add ...' and in the 'Name' field type 'WorldClient.dll'.
- Add the document 'MDSyncML.dll': in the right pane of the 'Actions' click 'Add ...' and in the 'Name' field type 'MDSyncML.dll'.
- Put 'WorldClient.dll' first on the list: select it and click 'Move Up' in the right 'Actions' panel.
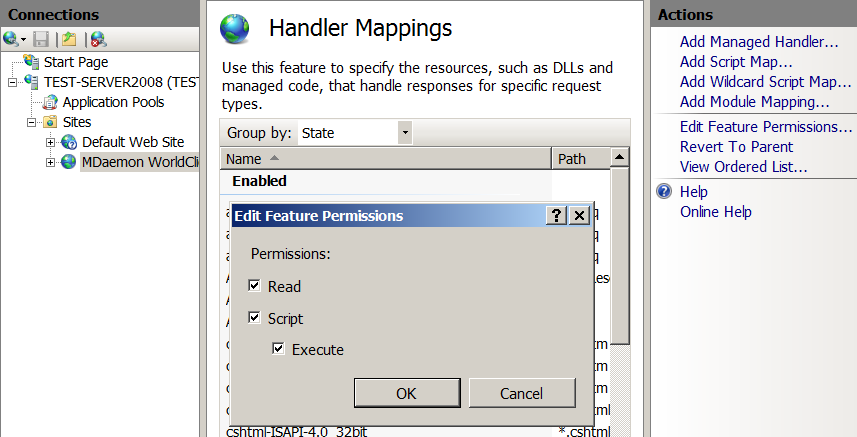
Go to the 'Handler Mappings' section: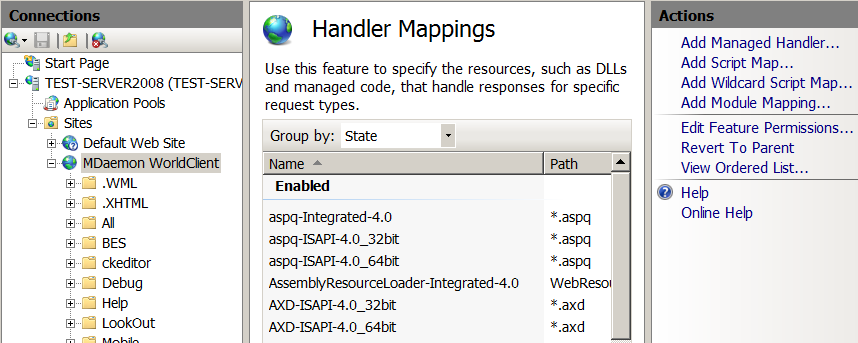
- Edit the 'Feature Permissions': in the right pane of the 'Actions' click on 'Edit Feature Permissions ...' and put all the little caps - 'Read', 'Script' and 'Execute'.
- Find the list 'ISAPI-dll' and go to it.
- In the field 'Request path' we write 'WorldClient.dll'.
- In the 'Module' list, select 'IsapiModule'.
- In the 'Executable (optional)' field, specify the path to WorldClient.dll.
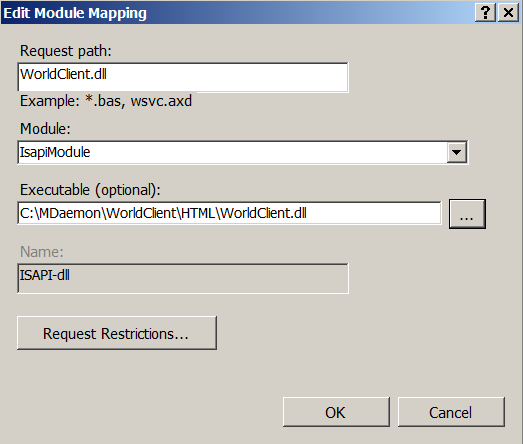
- Add a new handler: in the right 'Actions' panel click 'Add Module Mapping ...'

- In the field 'Request path' we write 'MDSyncML.dll'.
- In the 'Module' list, select 'IsapiModule'.
- In the 'Executable (optional)' field, specify the path to MDSyncML.dll.
- In the field 'Name' we write something articulate. For example, 'SyncML-ISAPI'.
Edit 'MIME Types' - if this is not done, then the LetsEncrypt robot will not be able to get a file from us without an extension: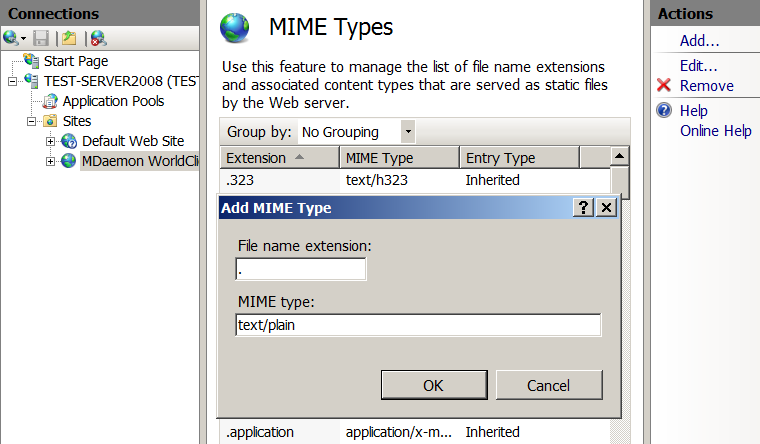
- Go to the section 'MIME Types'.
- In the right-hand pane of Actions, click Add.
- In the field 'File name extension' we write a period.
- In the field 'MIME type' we write 'text / plain'.
Edit the 'Application Pool', automatically created when you create our site: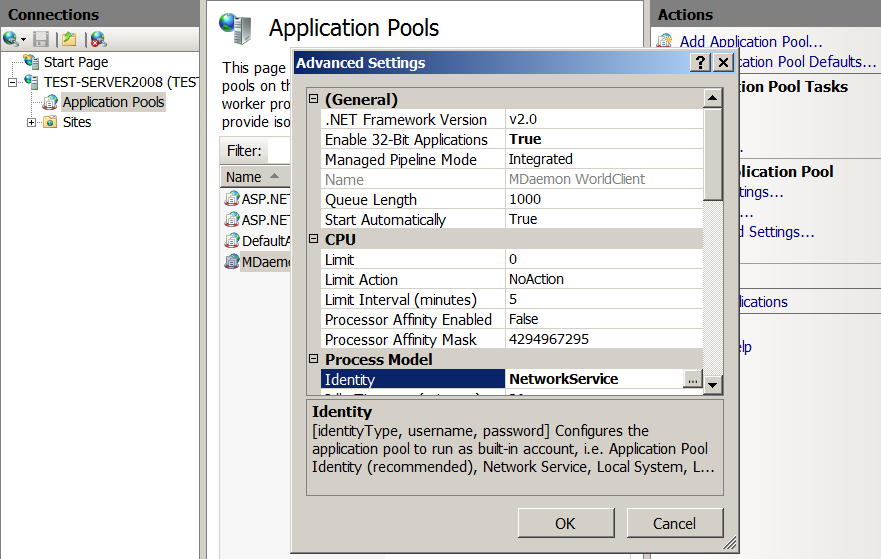
- Go to 'Application Pools' -> 'MDaemon WorldClient' -> 'Advanced Settings ...'.
- In the 'Process Model' section, change 'Identity' to 'Network Service'.
- If the OS is 64-bit, then in the 'General' section we change the 'Enable 32-Bit Applications' to 'True'.
Close the console. IIS is configured.
Next, we give users 'IUSR' and 'NETWORK SERVICE' full access to the MDaemon folder: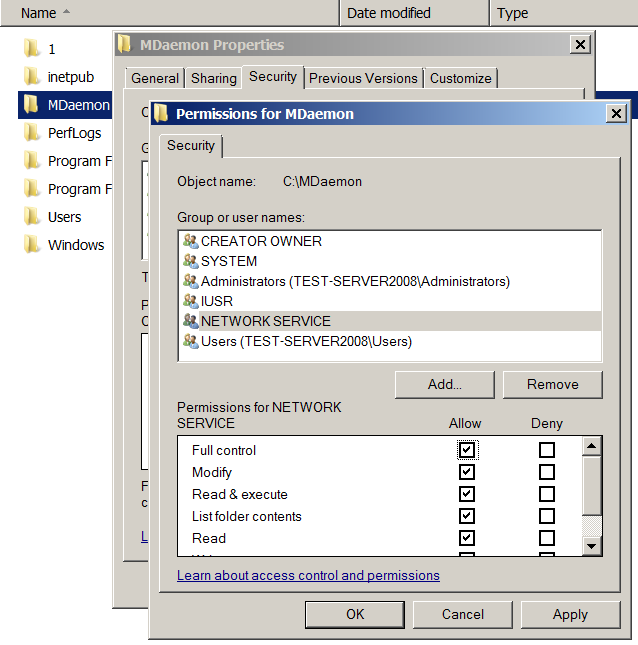
- Go to the explorer, open the 'Properties' of the 'MDaemon' folder, go to the 'Security' tab, click on 'Edit'.
- Click 'Add' -> 'Advanced' -> 'Find Now' - select the 'IUSR' user in the 'Search Results' list, click 'OK'.
- We put the 'Full control' cap in the 'Permissions for IUSR' list.
- Click 'Add' -> 'Advanced' -> 'Find Now' - select the 'NETWORK SERVICE' user in the 'Search Results' list, click 'OK'.
- We put the 'Full control' cap in the 'Permissions for NETWORK SERVICE' list.
- Close both windows by clicking on 'OK'.
WorldClient is configured. We check that WorldClient opens normally by accessing it with a browser via the Internet using the full domain name of the host.
Part 3: Installing and Configuring LetsEncrypt Scripts
- Download the archive with the scripts from here and unpack it into the root of the 'MDaemon' folder. Important note: in the script, the main LetsEncrypt server is replaced with a test one - to prevent a ban due to repeated attempts to obtain a certificate during the debugging process. The next part will be written - how to switch to the main server.
- Add the path to the modules used by the script into the 'PSModulePath' environment variable:
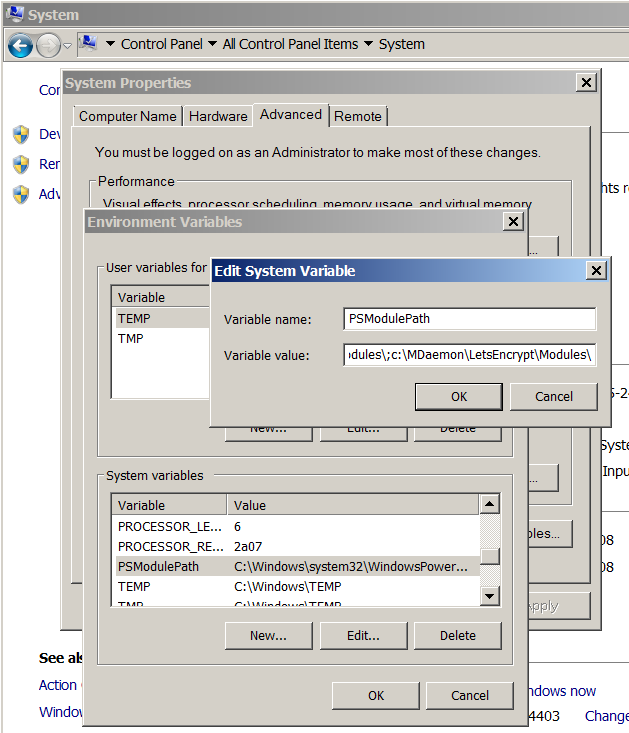
- Go to 'Control Panel' -> 'System' -> 'Advanced system settings' -> 'Advanced' -> 'Environment Variables'.
- We are looking for the 'PSModulePath' variable in the 'System Variables' list.
- We finish in ';' at its end is the path to the 'Modules' folder inside the 'LetsEncrypt' folder. In my case, this: 'c: \ MDaemon \ LetsEncrypt \ Modules \'
- We are logging.
- Run the cmd console.
- Run the letsencrypt.ps1 script with the command:
powershell -ExecutionPolicy ByPass -File c:\mdaemon\letsencrypt\letsencrypt.ps1
You can use additional parameters:- -IISSiteName "MDaemon WorldClient"
If WorldClient works through IIS, then this parameter needs to specify the script name WorldClient site (see part 2) - -WCIPAddress xxx.xxx.xxx.xxx
This parameter specifies the IP address to which the script should attach the received certificate. It is not necessary to specify it if no other certificates are attached to port 443. - -To "admin@server.com"
This parameter sets the email to which the script log will be sent in case of any error.
We look into the console window - the script should run without errors.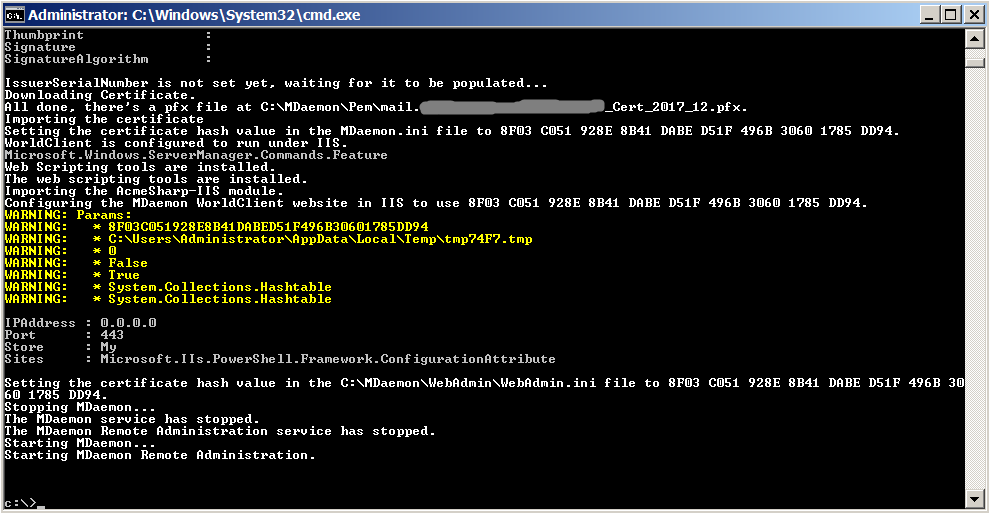
If something goes wrong, you will have to deal with this problem yourself.
If everything is successful, you can try to access the WorldClient browser using the https protocol: since we used the LetsEncrypt test server, the browser should swear to the site certificate with the message 'SEC_ERROR_UNKNOWN_ISSUER'.
By the way, remember - I talked about the "rake" with the 'EnableWCServer' parameter in the 'Mdaemon.ini' file - what is when using the bundle with IIS it is set to 'No'? So, after successful script development, this parameter changed to 'Yes'. However, this happened somewhat late in the day, so we didn’t begin commenting this parameter in the script. - -IISSiteName "MDaemon WorldClient"
Part 4: translation of the script in the "battle mode"
- Open the letsencrypt.ps1 script in the LetsEncrypt folder in a text editor.
- Find lines in it:
#Initialize-ACMEVault -ErrorVariable LogText Initialize-ACMEVault -BaseURI https://acme-staging.api.letsencrypt.org/ -ErrorVariable LogText - The first line is uncommented, and the second is commented out:
Initialize-ACMEVault -ErrorVariable LogText #Initialize-ACMEVault -BaseURI https://acme-staging.api.letsencrypt.org/ -ErrorVariable LogText - Save the script.
Part 5: Removal of all traces of "test" activity
If this is not done, the script will continue to issue us a “fake” certificate for a couple of months, despite the fact that we have made the necessary changes to the script.
- Remove the test certificate from MDaemon:
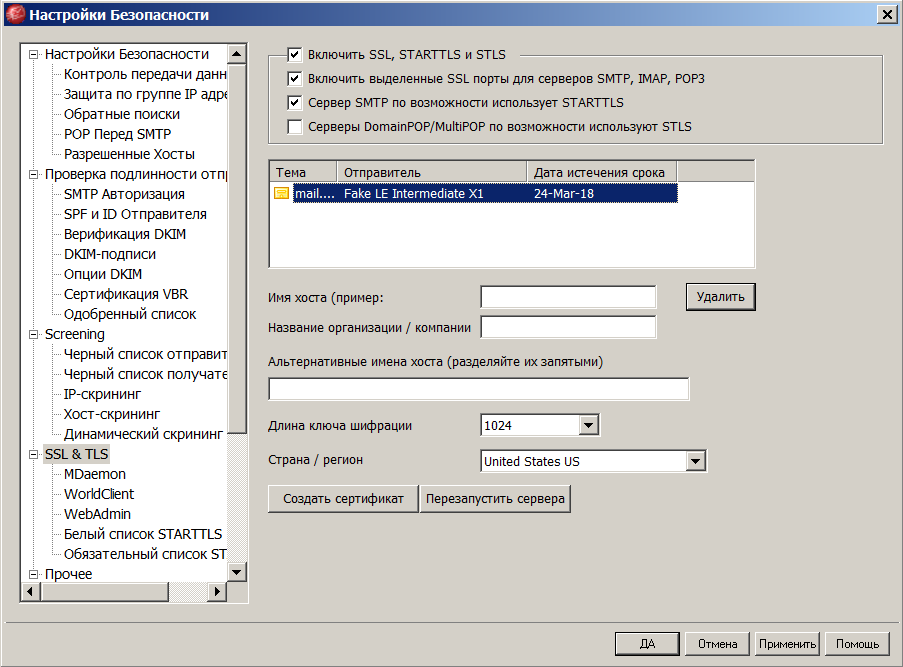
- Launch GUI MDaemon and go to the menu 'Security' -> 'Security Settings' -> 'SSL & TLS'.
- In the list of certificates, select our test certificate (it will have 'Fake LE Intermediate X1' in its 'Sender' field) and click the 'Delete' button below the list.
- If the list of certificates is empty, you will have to create a self-signed certificate, otherwise MDaemon will swear when you try to close the window.
- Delete the keystore created by the script: if you worked under the admin account, then go to 'c: \ ProgramData \', and if you’ve worked under the user account - go to 'C: \ Users \ username \ AppData \ Local \' and delete the folder 'ACMESharp' from there along with all the content.
- Delete the XML file created by the script: go to the 'MDaemon \ LetsEncrypt' folder and delete the LetsEncrypt.XML file from there.
- Remove the test certificate: go to the 'MDaemon \ Pem' folder, find the certificate (file with the extension 'pfx') and delete it.
Part 6: Configuring Script Launch
- Go to 'Control Panel' -> 'Administrative Tools' -> 'Computer Management' -> 'System Tools' -> 'Task Scheduler' -> 'Task Scheduler Library'.
- Create a new task: click on 'Create Task ...' in the right 'Actions' panel.
- On the 'General' tab:
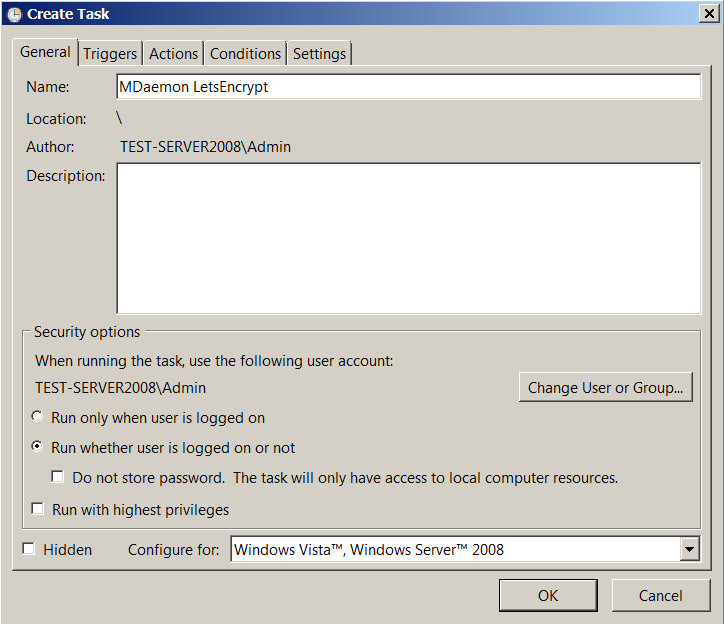
- In the 'Name' field we write the name of the task - arbitrarily as you wish.
- In the subsection 'Security Options' select the item 'Run whether user is logged on or not'.
- On the 'Triggers' tab:
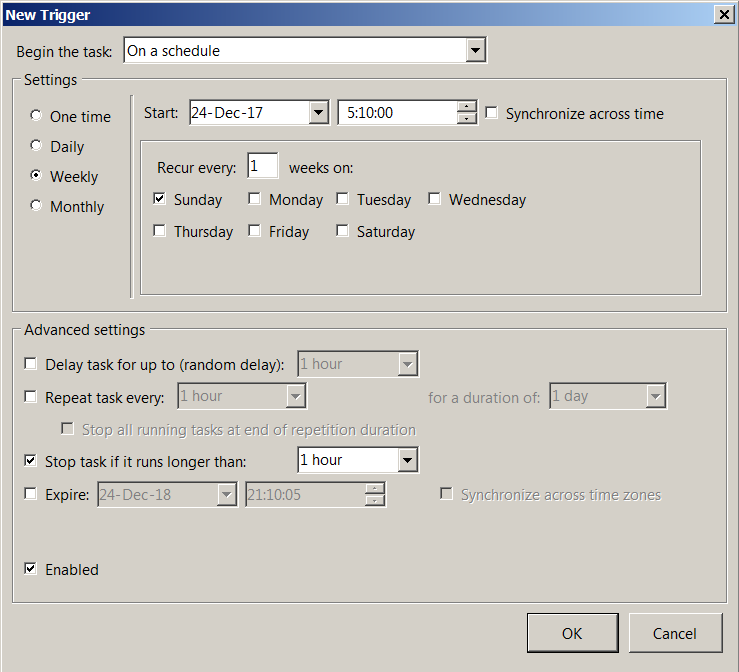
- Press the 'New ...' button - the 'New Trigger' window will open.
- In the 'Begin the task' list, select 'On a schedule'.
- Set the appropriate startup frequency: for example, once a week on Sundays. The script at each start will check - how much certificate is left to live: and if less than a month, then update it.
- On the 'Actions' tab:
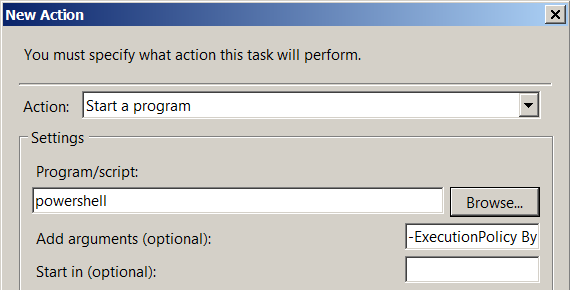
- Press the 'New' button - the 'New Action' window will open.
- In the list of 'Action' select 'Start a program'.
- In the field 'Program / script' we write 'powershell'.
- In the 'Add arguments (optional)' field, we write '-ExecutionPolicy ByPass -File c: \ MDaemon \ LetsEncrypt \ letsencrypt.ps1'. In the tail of the line we add the required additional parameters (see part 3).
- On the 'Conditions' tab, we put the little wings at our discretion.
- On the 'Settings' tab we put the little wings:
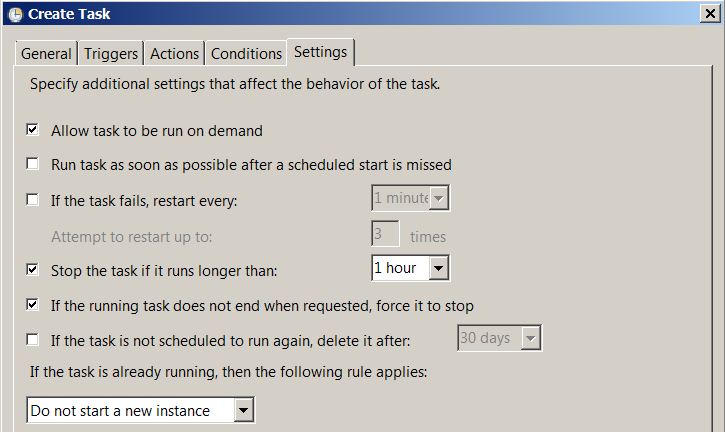
- Allow task to be run on demand
- Stop the task if it runs longer than 1 hour
- If it is a running task
- Click the 'OK' button. Enter the password of the current user.
Part 7: the first "combat" launch
Run the script manually:
- Select the newly created task in the list.
- Click 'Run' in the right pane of the Actions'. No window will open.
- From time to time to refresh the task list - to see the changes in the 'Status' field: the 'Status' should change to 'Run'. Refresh the list until 'Status' becomes 'Ready' again.
- See the result of the script in the log file 'MDaemon \ Logs \ LetsEncrypt.log'.
If, judging by the log file, everything went well, then it’s done - the certificate has been received and you can check the performance of receiving / sending mail via a secure channel. And yes, do not forget to enter the browser via the https protocol - to make sure that WorldClient also works without problems.
Part last - final
In conclusion, I want to say that at the time of writing this article I did not have access to the combat server, so all the screenshots were taken from a virtual machine, on which an even older version of MDaemon was installed - 13.0.4 - which is why the windows can look differ from other versions.
Well that's all. All he knew - told. Congratulations to all the upcoming New Year! I wish you health and good luck!
Source: https://habr.com/ru/post/345298/
All Articles