UIKit performance optimization
Despite the fact that many articles and videos from WWDC conferences are devoted to the performance of UIKit, this topic is still incomprehensible to many iOS developers. For this reason, we decided to collect the most interesting questions and problems, which primarily depend on the speed and smoothness of the UI application.
The first problem to pay attention to is mixing colors.
The article specifically used the original images and code. So that everyone who has an interesting topic could understand ... and conduct experiments in the new Xcode and Instruments .
Blending is a frame rendering operation that determines the final color of a pixel. Each UIView (to be honest, CALayer) influences the color of the final pixel, for example, in the case of combining a set of properties such as alpha , backgroundColor , and opaque of all overlying views.
')
Let's start with the most commonly used UIView properties, such as UIView.alpha, UIView.opaque, and UIView.backgroundColor.
UIView.opaque is a hint for the renderer, which allows you to view images as a completely opaque surface, thereby improving the quality of rendering. Opacity means: “Draw nothing under the surface .” UIView.opaque allows you to skip the drawing of the lower layers of the image and thus the mixing of colors does not occur. The topmost color for the twist will be used.
If the alpha value is less than 1, then the opaque value will be ignored, even if it is equal to YES .
Although the default opacity value is YES, the result is a mix of colors, since we made our image transparent by setting the Alpha value to less than 1.
Note: If you want to get accurate information about actual performance, you need to test the application on a real device, and not on a simulator. The CPU of the device runs slower than the processor of your Mac device, which greatly distinguishes them.
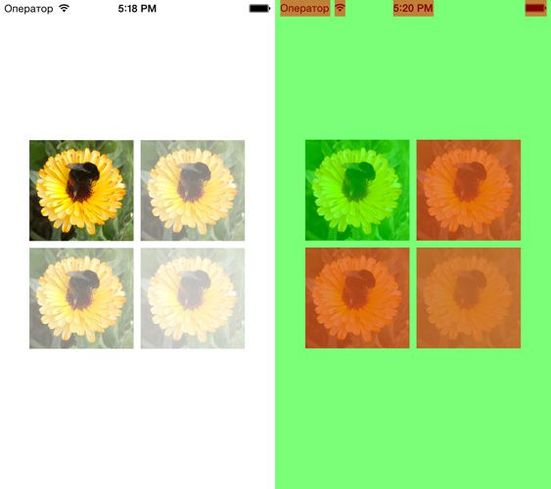
You can find the item “Color Blended Layers” in the debug menu of the iOS simulator. The debugger can show mixed image layers, where several translucent layers overlap each other. Multiple image layers that are stacked on top of each other with blending enabled are highlighted in red, while multiple image layers that are displayed without blending are highlighted in green.

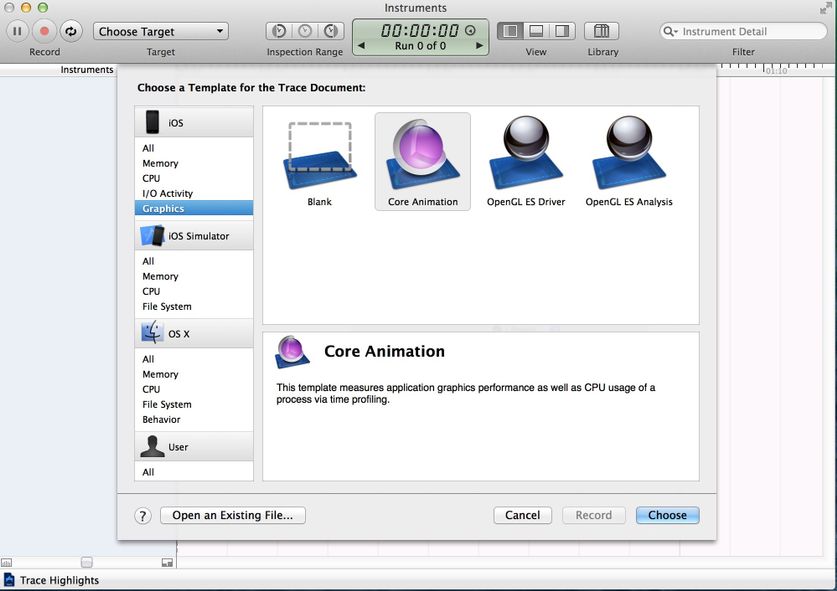
To use the Core Animation tool, you need to connect a real device.
You can find 'Color Blended Layers' here.

The same problem occurs when we try to understand how changing the alpha channel can affect the transparency of the UIImageView (also consider the effect of the alpha property). Let's use a category for a UIImage to get another image with a custom alpha channel:
Consider 4 cases:
Mixed image layers are displayed by the simulator. Therefore, even when the alpha property for UIImageView has a default value of 1.0, and the image has a converted alpha channel, we will get a mixed layer.
Apple's official documentation encourages developers to pay more attention to color mixing:
“To significantly improve the performance of your application, reduce the amount of red when mixing colors. Using color blending often slows down scrolling. ”
To create a transparent layer, you need to perform additional calculations. The system must mix the top and bottom layers to determine the color and draw it.
The off-screen visualization is the drawing of an image that cannot be performed using GPU hardware acceleration; instead, use a CPU.
At a low level, it looks like this: while drawing a layer that needs off-screen rendering, the GPU stops the rendering process and transfers control to the CPU. In turn, the CPU performs all the necessary operations (for example, it stuffs your fantasies into DrawRect :) and returns control to the GPU with the layer already drawn. The GPU visualizes it and the drawing process continues.
In addition, off-screen visualization requires the allocation of additional memory for the so-called backup storage. At the same time, it is not needed for drawing layers that use hardware acceleration.

What effects / settings lead to off-screen rendering? Let's look at them:
custom DrawRect: (any, even if you just fill the background with color)
We can easily detect off-screen visualization using Core Animation in Instruments if we turn on the Color Offscreen-Rendered Yellow option. Places where off-screen visualization occurs will be indicated by a yellow layer.

Consider a few cases and test the quality of work. We will try to find the optimal solution that will improve the quality of work and, at the same time, realize your vision of good design.
Create a simple Tableview with our custom cell and add a UIImageView and UILabel to our cell. Remember the good old days when the buttons were round? To achieve this fantastic effect in Tableview we need to set the YES value for CALayer.cornerRadius and CALayer.masksToBounds.
Despite the fact that we have achieved the desired effect, even without Instruments, it is obvious that the performance is very far from the recommended 60 FPS . But we will not look into the crystal ball to find unverified numerical answers. Instead, we'll just check the performance with Instruments .
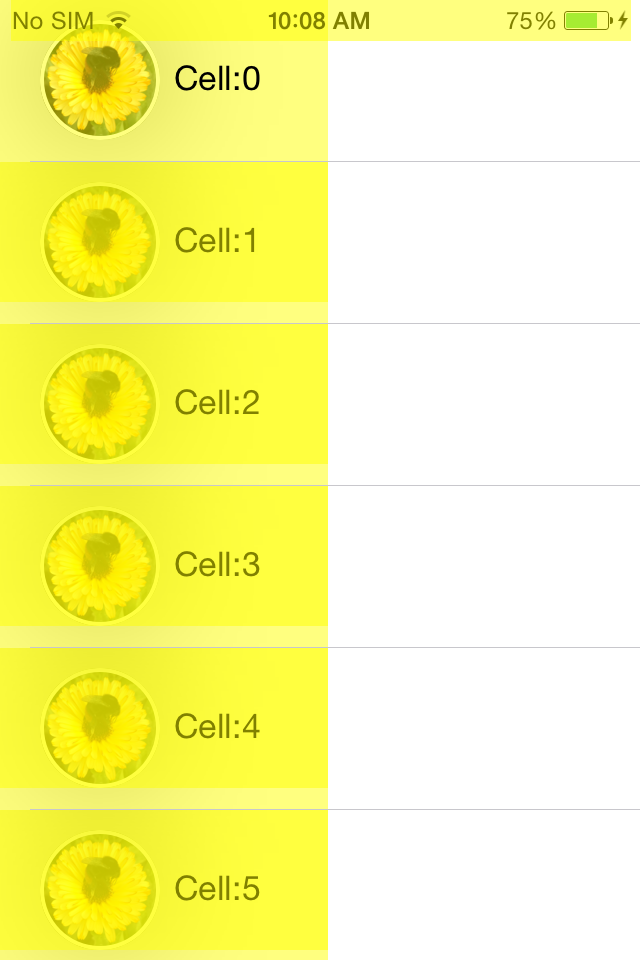
First of all, turn on the Color Offscreen-Rendered Yellow option. Each cell of the UIImageView is covered with a yellow layer.

It is also worth checking out the work with the Animation and OpenGL ES Driver in Instruments.
Speaking of the OpenGL ES Driver tool, what does this give us? To understand how it works, look at the GPU from the inside. The GPU consists of two components - Renderer and Tiler. The renderer's duty is to draw the data, although the order and composition are determined by the Tiler component. Thus, the job of Tiler is to divide the frame into pixels and determine their visibility. Only then the visible pixels are transferred to the renderer (i.e. the rendering process slows down ).
If the Renderer Utilization value is above ~ 50%, then this means that the animation process can be limited by the fill rate. If Tiler Utilization is above 50%, then it means that the animation may be limited geometrically, that is, on the screen, most likely, there are too many layers.
Now it is clear that we must look for a different approach to achieve the desired effect and, at the same time, improve performance. Use the category for UIImage to round the corners without using the cornerRadius properties:
And now we will change the dataSource implementation of the cellForRowAtIndexPath method.
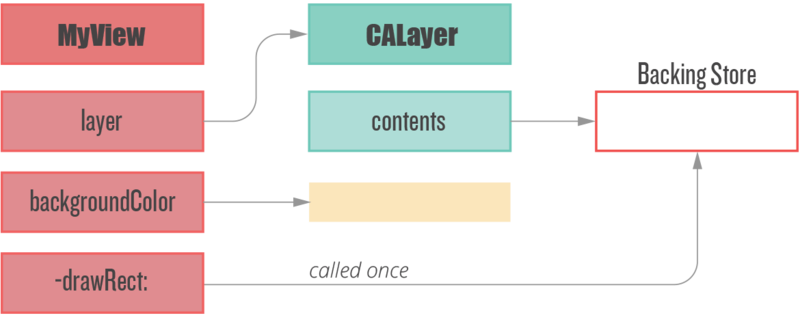
The drawing code is called only once, when the object is first displayed on the screen. The object is cached by CALayer and subsequently displayed without additional drawing. Regardless of the fact that it is slower than the methods of Core Animation, this approach allows you to convert frame-by-frame drawing one-time.
Before we get back to the performance measurement, let's check the offscreen visualization again.


57 - 60 FPS! We managed the best way to double the performance and reduce Tiler Utilization and Renderer Utilization.
Keep in mind that the -drawRect method leads to off-screen rendering, even when you just need to fill the background with color.
Especially if you want to make your own implementation of the method, DrawRect, for such simple operations as setting the background color instead of using the UIView BackgroundColor property.
This approach is irrational for two reasons.
First: system UIViews can implement their own drawing methods to display their contents, and it is obvious that Apple is trying to optimize these processes. In addition, we need to remember about backup storage — a new backup image, with pixel sizes equal to the image size multiplied by the contentsScale to be cached, until the next image update.
Secondly, if we avoid abuse of the method - DrawRect, we do not need to allocate additional memory for backup storage and reset it every time we perform a new rendering cycle.

Another way to speed performance for offscreen rendering is to use the CALayer.shouldRasterize property. The layer is rendered once and cached, until the moment when you need to draw the layer again.
However, despite the potential performance improvement, if a layer needs to be redrawn too often, the additional caching costs make it useless, because the system will rasterize the layer after each drawing.
In the end, the use of CALayer.shouldRasterize depends on the specific use case and Instruments.
With the help of shadows it is possible to make the user interface more beautiful. In iOS, it's very easy to add a shadow effect:
With the “Offscreen Rendering” enabled, we can see that the shadow adds off-screen rendering because of which CoreAnimation calculates shadow rendering in real time, which reduces FPS .
“Allowing Core Animation to determine the shape of the shadow can affect the performance of your application. Instead, determine the shape of the shadow using the shadowPath property for CALayer. When using shadowPath, Core Animation uses the specified form to draw and cache the shadow effect. For layers whose state does not change or changes rarely, this significantly improves performance by reducing the number of visualizations performed by Core Animation. "
Therefore, we must provide shadow caching (CGPath) for CoreAnimation, which is fairly easy to do:
With one line of code, we avoided off-screen visualization and greatly improved performance.
So, as you can see, many problems related to the performance of the UI can be solved quite easily. One small note - do not forget to measure the performance before and after optimization :)
WWDC 2011 Video: Understanding UIKit rendering
WWDC 2012 Video: iOS App performance: Graphics and Animations
Book: iOS Core animation. Advanced Techniques by Nick Lockwood
iOS image caching. Libraries benchmark
WWDC 2014 Video: Advanced Graphics and Animations for iOS Apps
The first problem to pay attention to is mixing colors.
From the author of the translation
The article specifically used the original images and code. So that everyone who has an interesting topic could understand ... and conduct experiments in the new Xcode and Instruments .
Mixing colors
Blending is a frame rendering operation that determines the final color of a pixel. Each UIView (to be honest, CALayer) influences the color of the final pixel, for example, in the case of combining a set of properties such as alpha , backgroundColor , and opaque of all overlying views.
')
Let's start with the most commonly used UIView properties, such as UIView.alpha, UIView.opaque, and UIView.backgroundColor.
Opacity vs Transparency
UIView.opaque is a hint for the renderer, which allows you to view images as a completely opaque surface, thereby improving the quality of rendering. Opacity means: “Draw nothing under the surface .” UIView.opaque allows you to skip the drawing of the lower layers of the image and thus the mixing of colors does not occur. The topmost color for the twist will be used.
Alpha
If the alpha value is less than 1, then the opaque value will be ignored, even if it is equal to YES .
- (void)viewDidLoad { [super viewDidLoad]; UIView *view = [[UIView alloc] initWithFrame:CGRectMake(35.f, 35.f, 200.f, 200.f)]; view.backgroundColor = [UIColor purpleColor]; view.alpha = 0.5f; [self.view addSubview:view]; } Although the default opacity value is YES, the result is a mix of colors, since we made our image transparent by setting the Alpha value to less than 1.
How to check?
Note: If you want to get accurate information about actual performance, you need to test the application on a real device, and not on a simulator. The CPU of the device runs slower than the processor of your Mac device, which greatly distinguishes them.
You can find the item “Color Blended Layers” in the debug menu of the iOS simulator. The debugger can show mixed image layers, where several translucent layers overlap each other. Multiple image layers that are stacked on top of each other with blending enabled are highlighted in red, while multiple image layers that are displayed without blending are highlighted in green.
To use the Core Animation tool, you need to connect a real device.
You can find 'Color Blended Layers' here.
Alpha image channel
The same problem occurs when we try to understand how changing the alpha channel can affect the transparency of the UIImageView (also consider the effect of the alpha property). Let's use a category for a UIImage to get another image with a custom alpha channel:
- (UIImage *)imageByApplyingAlpha:(CGFloat) alpha { UIGraphicsBeginImageContextWithOptions(self.size, NO, 0.0f); CGContextRef ctx = UIGraphicsGetCurrentContext(); CGRect area = CGRectMake(0, 0, self.size.width, self.size.height); CGContextScaleCTM(ctx, 1, -1); CGContextTranslateCTM(ctx, 0, -area.size.height); CGContextSetBlendMode(ctx, kCGBlendModeMultiply); CGContextSetAlpha(ctx, alpha); CGContextDrawImage(ctx, area, self.CGImage); UIImage *newImage = UIGraphicsGetImageFromCurrentImageContext(); UIGraphicsEndImageContext(); return newImage; } Consider 4 cases:
- UIImageView has the standard value of the alpha property (1.0) and the image does not have an alpha channel.
- UIImageView has the standard value of the alpha property (1.0) and the image has an alpha channel of 0.5.
- UIImageView has a variable value of the alpha property, but the image has no alpha channel.
- UIImageView has a variable value of the alpha property and the image has an alpha channel of 0.5.
- (void)viewDidLoad { [super viewDidLoad]; UIImage *image = [UIImage imageNamed:@"flower.jpg"]; UIImage *imageWithAlpha = [image imageByApplyingAlpha:0.5f]; //1st case [self.imageViewWithImageHasDefaulAlphaChannel setImage:image]; //The 2nd case [self.imageViewWihImageHaveCustomAlphaChannel setImage:imageWithAlpha]; //The 3d case self.imageViewHasChangedAlphaWithImageHasDefaultAlpha.alpha = 0.5f; [self.imageViewHasChangedAlphaWithImageHasDefaultAlpha setImage:image]; //The 4th case self.imageViewHasChangedAlphaWithImageHasCustomAlpha.alpha = 0.5f; [self.imageViewHasChangedAlphaWithImageHasCustomAlpha setImage:imageWithAlpha]; } Mixed image layers are displayed by the simulator. Therefore, even when the alpha property for UIImageView has a default value of 1.0, and the image has a converted alpha channel, we will get a mixed layer.
Apple's official documentation encourages developers to pay more attention to color mixing:
“To significantly improve the performance of your application, reduce the amount of red when mixing colors. Using color blending often slows down scrolling. ”
To create a transparent layer, you need to perform additional calculations. The system must mix the top and bottom layers to determine the color and draw it.
Off-screen visualization
The off-screen visualization is the drawing of an image that cannot be performed using GPU hardware acceleration; instead, use a CPU.
At a low level, it looks like this: while drawing a layer that needs off-screen rendering, the GPU stops the rendering process and transfers control to the CPU. In turn, the CPU performs all the necessary operations (for example, it stuffs your fantasies into DrawRect :) and returns control to the GPU with the layer already drawn. The GPU visualizes it and the drawing process continues.
In addition, off-screen visualization requires the allocation of additional memory for the so-called backup storage. At the same time, it is not needed for drawing layers that use hardware acceleration.
Screen visualization
Off-screen visualization
What effects / settings lead to off-screen rendering? Let's look at them:
custom DrawRect: (any, even if you just fill the background with color)
- rounding radius for CALayer
- shadow for calayer
- mask for CALayer
- any custom drawing using CGContext
We can easily detect off-screen visualization using Core Animation in Instruments if we turn on the Color Offscreen-Rendered Yellow option. Places where off-screen visualization occurs will be indicated by a yellow layer.
Consider a few cases and test the quality of work. We will try to find the optimal solution that will improve the quality of work and, at the same time, realize your vision of good design.
Test environment:
- Device: iPhone 4 with iOS 7.1.1 (11D201)
- Xcode: 5.1.1 (5B1008)
- MacBook Pro 15 Retina (ME294) with OS X 10.9.3 (13D65)
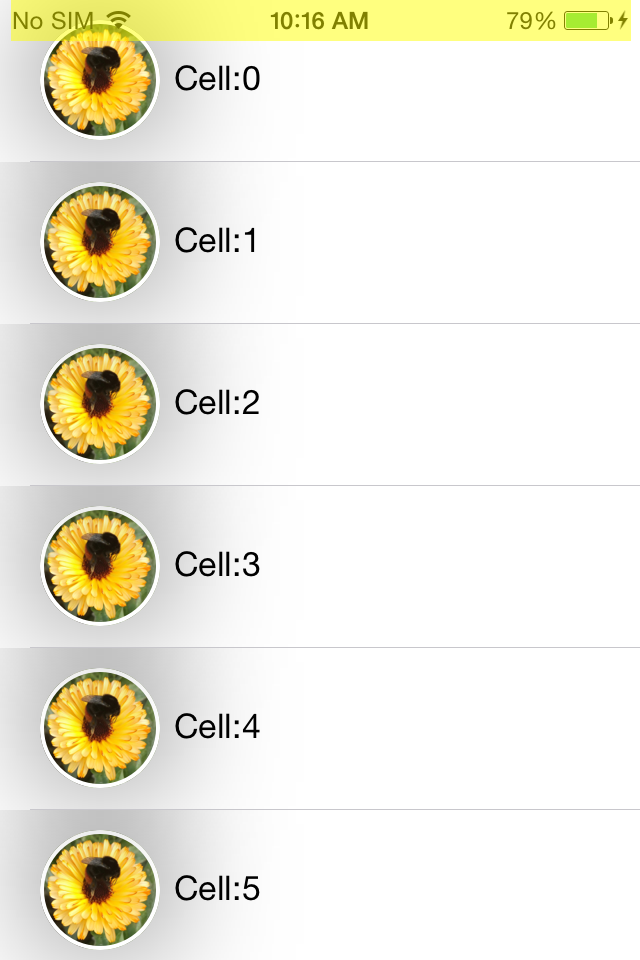
Rounding corners
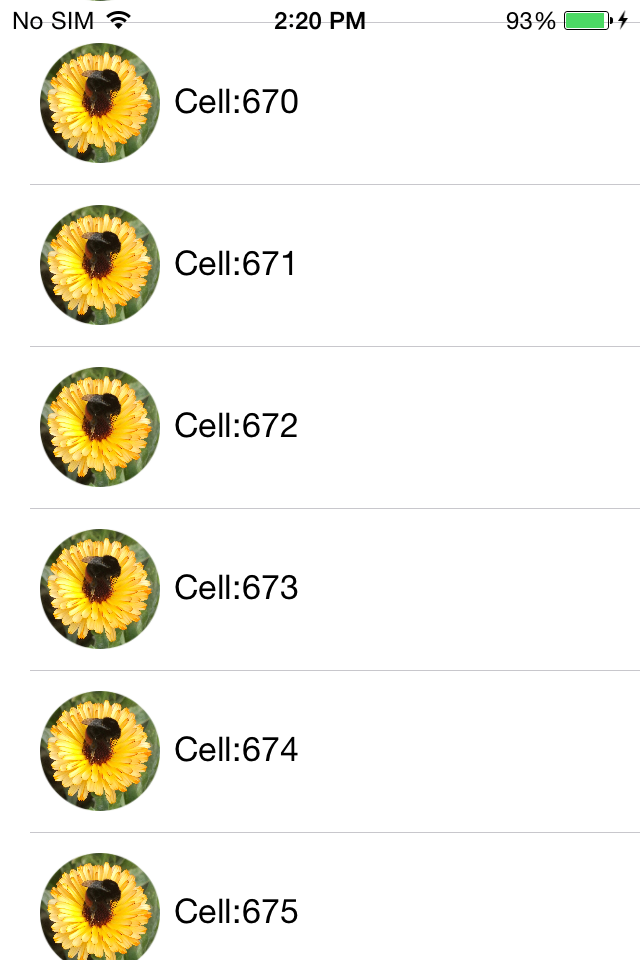
Create a simple Tableview with our custom cell and add a UIImageView and UILabel to our cell. Remember the good old days when the buttons were round? To achieve this fantastic effect in Tableview we need to set the YES value for CALayer.cornerRadius and CALayer.masksToBounds.
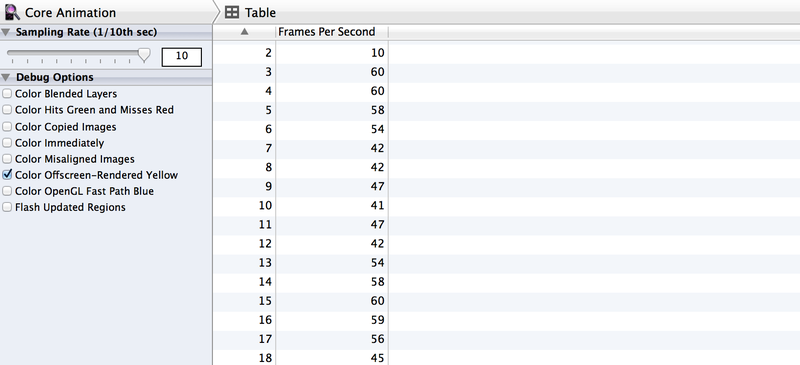
- (UITableViewCell *)tableView:(UITableView *)tableView cellForRowAtIndexPath:(NSIndexPath *)indexPath { NSString *identifier = NSStringFromClass(CRTTableViewCell.class); CRTTableViewCell *cell = [self.tableView dequeueReusableCellWithIdentifier:identifier]; cell.imageView.layer.cornerRadius = 30; cell.imageView.layer.masksToBounds = YES; cell.imageView.image = [UIImage imageNamed:@"flower.jpg"]; cell.textLabel.text = [NSString stringWithFormat:@"Cell:%ld",(long)indexPath.row]; return cell; } Despite the fact that we have achieved the desired effect, even without Instruments, it is obvious that the performance is very far from the recommended 60 FPS . But we will not look into the crystal ball to find unverified numerical answers. Instead, we'll just check the performance with Instruments .
First of all, turn on the Color Offscreen-Rendered Yellow option. Each cell of the UIImageView is covered with a yellow layer.
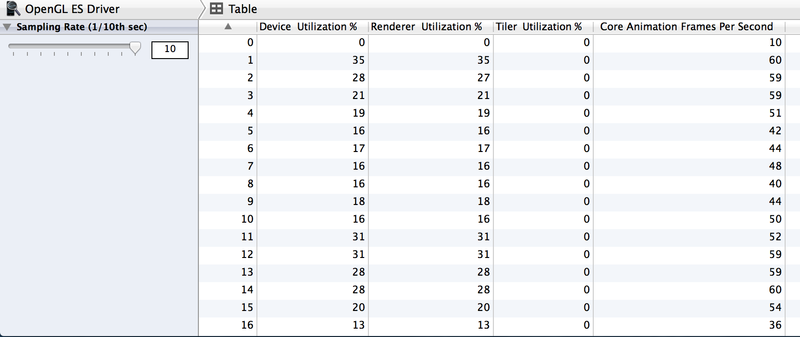
It is also worth checking out the work with the Animation and OpenGL ES Driver in Instruments.
Speaking of the OpenGL ES Driver tool, what does this give us? To understand how it works, look at the GPU from the inside. The GPU consists of two components - Renderer and Tiler. The renderer's duty is to draw the data, although the order and composition are determined by the Tiler component. Thus, the job of Tiler is to divide the frame into pixels and determine their visibility. Only then the visible pixels are transferred to the renderer (i.e. the rendering process slows down ).
If the Renderer Utilization value is above ~ 50%, then this means that the animation process can be limited by the fill rate. If Tiler Utilization is above 50%, then it means that the animation may be limited geometrically, that is, on the screen, most likely, there are too many layers.
Now it is clear that we must look for a different approach to achieve the desired effect and, at the same time, improve performance. Use the category for UIImage to round the corners without using the cornerRadius properties:
@implementation UIImage (YALExtension) - (UIImage *)yal_imageWithRoundedCornersAndSize:(CGSize)sizeToFit { CGRect rect = (CGRect){0.f, 0.f, sizeToFit}; UIGraphicsBeginImageContextWithOptions(sizeToFit, NO, UIScreen.mainScreen.scale); CGContextAddPath(UIGraphicsGetCurrentContext(), [UIBezierPath bezierPathWithRoundedRect:rect cornerRadius:sizeToFit.width].CGPath); CGContextClip(UIGraphicsGetCurrentContext()); [self drawInRect:rect]; UIImage *output = UIGraphicsGetImageFromCurrentImageContext(); UIGraphicsEndImageContext(); return output; } @end And now we will change the dataSource implementation of the cellForRowAtIndexPath method.
- (UITableViewCell *)tableView:(UITableView *)tableView cellForRowAtIndexPath:(NSIndexPath *)indexPath { NSString *identifier = NSStringFromClass(CRTTableViewCell.class); CRTTableViewCell *cell = [self.tableView dequeueReusableCellWithIdentifier:identifier]; cell.myTextLabel.text = [NSString stringWithFormat:@"Cell:%ld",(long)indexPath.row]; UIImage *image = [UIImage imageNamed:@"flower.jpg"]; cell.imageViewForPhoto.image = [image yal_imageWithRoundedCornersAndSize:cell.imageViewForPhoto.bounds.size]; return cell; } The drawing code is called only once, when the object is first displayed on the screen. The object is cached by CALayer and subsequently displayed without additional drawing. Regardless of the fact that it is slower than the methods of Core Animation, this approach allows you to convert frame-by-frame drawing one-time.
Before we get back to the performance measurement, let's check the offscreen visualization again.
57 - 60 FPS! We managed the best way to double the performance and reduce Tiler Utilization and Renderer Utilization.
Avoid overriding the drawRect method
Keep in mind that the -drawRect method leads to off-screen rendering, even when you just need to fill the background with color.
Especially if you want to make your own implementation of the method, DrawRect, for such simple operations as setting the background color instead of using the UIView BackgroundColor property.
This approach is irrational for two reasons.
First: system UIViews can implement their own drawing methods to display their contents, and it is obvious that Apple is trying to optimize these processes. In addition, we need to remember about backup storage — a new backup image, with pixel sizes equal to the image size multiplied by the contentsScale to be cached, until the next image update.
Secondly, if we avoid abuse of the method - DrawRect, we do not need to allocate additional memory for backup storage and reset it every time we perform a new rendering cycle.
CALayer.shouldRasterize
Another way to speed performance for offscreen rendering is to use the CALayer.shouldRasterize property. The layer is rendered once and cached, until the moment when you need to draw the layer again.
However, despite the potential performance improvement, if a layer needs to be redrawn too often, the additional caching costs make it useless, because the system will rasterize the layer after each drawing.
In the end, the use of CALayer.shouldRasterize depends on the specific use case and Instruments.
Shadows & shadowPath
With the help of shadows it is possible to make the user interface more beautiful. In iOS, it's very easy to add a shadow effect:
cell.imageView.layer.shadowRadius = 30; cell.imageView.layer.shadowOpacity = 0.5f; With the “Offscreen Rendering” enabled, we can see that the shadow adds off-screen rendering because of which CoreAnimation calculates shadow rendering in real time, which reduces FPS .
What does Apple say?
“Allowing Core Animation to determine the shape of the shadow can affect the performance of your application. Instead, determine the shape of the shadow using the shadowPath property for CALayer. When using shadowPath, Core Animation uses the specified form to draw and cache the shadow effect. For layers whose state does not change or changes rarely, this significantly improves performance by reducing the number of visualizations performed by Core Animation. "
Therefore, we must provide shadow caching (CGPath) for CoreAnimation, which is fairly easy to do:
UIBezierPath *shadowPath = [UIBezierPath bezierPathWithRect:cell.imageView.bounds]; [cell.imageView.layer setShadowPath:shadowPath.CGPath]; With one line of code, we avoided off-screen visualization and greatly improved performance.
So, as you can see, many problems related to the performance of the UI can be solved quite easily. One small note - do not forget to measure the performance before and after optimization :)
Useful links and resources
WWDC 2011 Video: Understanding UIKit rendering
WWDC 2012 Video: iOS App performance: Graphics and Animations
Book: iOS Core animation. Advanced Techniques by Nick Lockwood
iOS image caching. Libraries benchmark
WWDC 2014 Video: Advanced Graphics and Animations for iOS Apps
Source: https://habr.com/ru/post/345178/
All Articles