Tutorial on the Unreal Engine. Part 8: Particle Systems

Particle systems are an essential component of visual effects. They allow artists to create effects such as explosions, smoke and rain.
Unreal Engine 4 has a robust and convenient system called Cascade for creating particle effects. This system allows you to create modular effects and easily control the behavior of particles.
In this part of the tutorial, you will learn the following:
')
- Create particle systems
- Set the speed and particle size
- Change the frequency of spawn particles
- Scale particle size over their lifetime using curves
- Set particle color with Cascade
- Activate and deactivate the particle system using Blueprints
- Set particle colors using Blueprints
Note: this article is one of the eight parts of the tutorial on the Unreal Engine:
- Part 1: Introduction to the engine
- Part 2: Blueprints
- Part 3: Materials
- Part 4: UI
- Part 5: How to create a simple game
- Part 6: Animation
- Part 7: Sound
- Part 8: Particle Systems
- Part 9: Artificial Intelligence
- Part 10: How to create a simple FPS
Getting Started
Download the project blank and unpack it. Navigate to the project folder and open SpaceshipBattle.uproject .
Click on Play to start the game. Hold down the left mouse button to shoot, and move with the W , A , S and D keys.
Gif
In this tutorial we will create two particle effects. One for the engines of the ship, and the second for its explosion. To create them we will use particle systems .
What is a "particle system"?
As the name implies, a particle system is a system for creating and controlling particles . A particle is just a point in space. Using particle systems, you can control the appearance and behavior of particles.
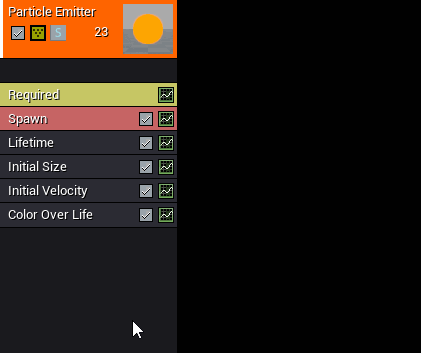
Particle systems consist of one or more components, called emitters . They perform particle spawning.
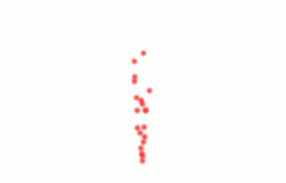
Emitters also have components called modules . The modules control the individual properties of the particles created by the emitter, for example, the material and the initial velocity of the particle. In the example below, two modules are used to give each particle of material a red circle and a random velocity.

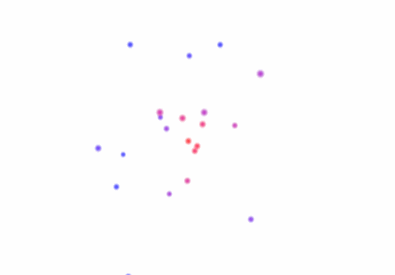
You can also change the color of the particle over its lifetime. In this example, the particle color changes from red to blue:
Now we know what a particle system is, and we can create it for ship engines.
Creating a particle system
Go to the ParticleSystems folder and click on Add New \ Particle System . Rename the particle system to PS_Thruster and open it.
Cascade: Particle System Editor
Cascade consists of four main panels:
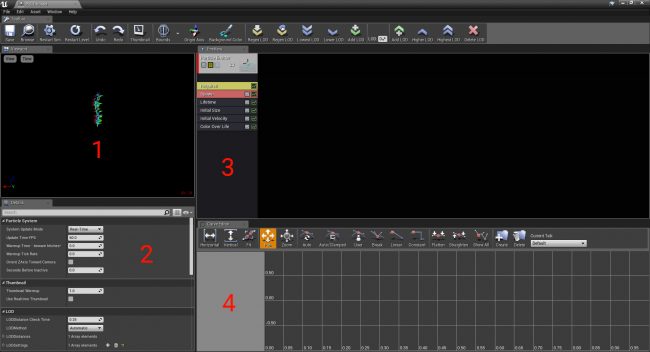
- Viewport: This panel displays the appearance of the particle system. You can rotate it by holding the right mouse button and moving it. To move, hold the right mouse button and press the WASD keys .
- Details: all properties of the selected components (emitters, modules, etc.) are displayed here. If nothing is selected, the properties of the particle system are displayed here.
- Emitters: This panel displays a list of emitters from left to right. Each emitter shows a list of its modules.
- Curve Editor: The Curve Editor allows you to visualize and change the values of curved modules. Not all module properties support curves.
For now, our system uses the default particle material.
First, let's replace the material of the particles with the material of the circle.
Apply material to particles
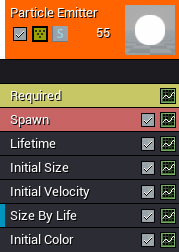
Go to the Emitters panel and select the Required module.

The Required module contains the necessary properties, such as the material of the particles and the duration of the emitter. Required module should be at each emitter.
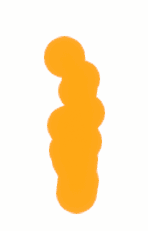
To change the material, go to the Details panel and set the Material to M_Particle . At the same time particles will become orange circles.
Now we will attach the particle system to the player's ship.
Joining a particle system
Return to the main editor and go to the Blueprints folder. Open BP_Player and go to the Components panel.
To use the particle system, you can use the Particle System component. Create it and rename it to ThrusterParticles . Connect it to the Collision component.
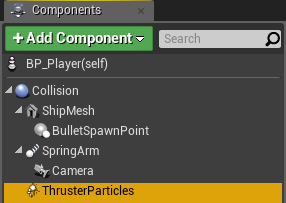
To add a particle system, go to the Details panel and find the Particles section. Set Template to PS_Thruster .
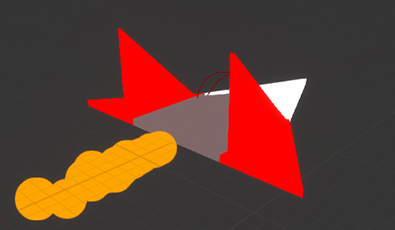
Then set the values for the Location of the ThrusterParticles component (-80, 0, 0) . In this case, the particles will be located behind the ship.

Finally, set the Rotation values (0, 90, 0) . This will direct the particle system in such a way that the particles will move away from the ship.
Click on Compile and return to the main editor. Click on Play to see the particle system in action.
Gif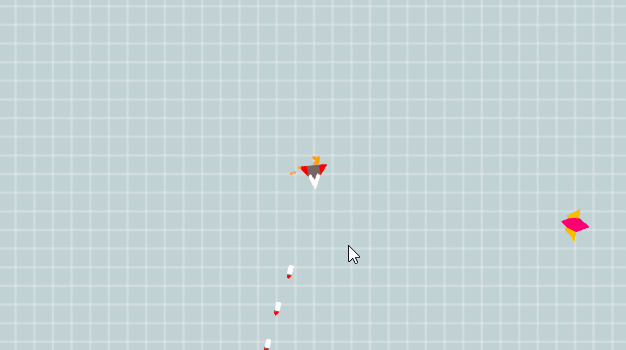
The particle system works, but the particles move too slowly and they are very small. This can be corrected by setting the initial velocity and particle size.
Speed and particle size
First we set the initial velocity of the particles. Open PS_Thruster and select the Initial Velocity module. Then expand Start Velocity \ Distribution .
By default, the initial particle velocity is in the range from (-10, -10, 50) to (10, 10, 100) .

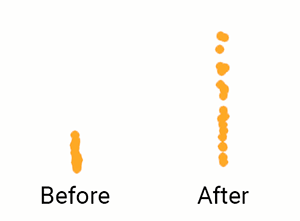
In order for particles to move away from the ship faster, we need to increase the speed along Z. Set Min Z to 300 , and Max Z to 400 .
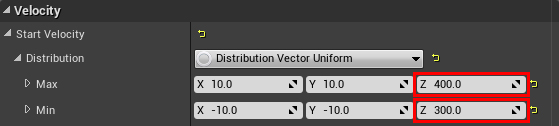
Here is a comparison of the original and the new speeds:
Next we need to set the initial particle size.
Particle size setting
Select the Initial Size module and go to the Details panel. Then expand Start Size \ Distribution .
As in the Initial Velocity module, the Initial Size also has an interval of minimum and maximum values. However, in this tutorial we will set a constant particle size. To do this, select for Distribution the Distribution Vector Constant value.
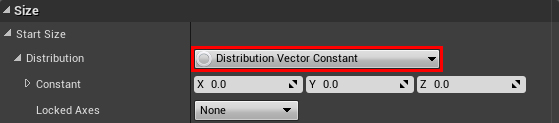
Note: Distributions allow you to set constant values, values in an interval or on a curve. You can also set values using Blueprints. To learn more, check out the Distributions page in the Unreal Engine documentation.
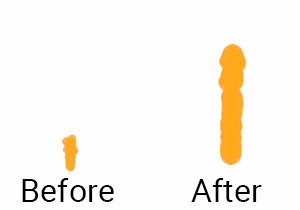
Then set the Constant values (70, 70, 70) . Here is an illustration of the size comparison:
Return to the main editor and click on Play .
Gif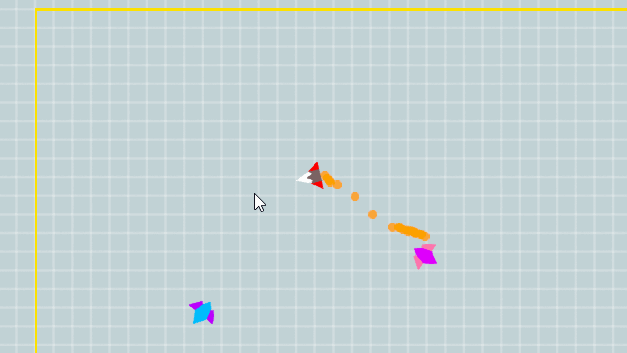
Particles look better, but the distance between them is still too large. This happened because of the too long interval between spawn particles. To fix this, we can increase the speed of the spawn.
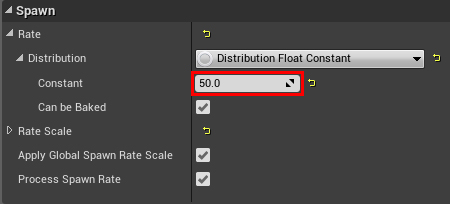
Increase particle spawn speed
To increase the speed of spawn, we need to use the Spawn module. This module controls the speed of the spawn particle emitter. Together with Required, each emitter must have a Spawn module.
Open PS_Thruster and select Spawn . Go to the Details panel and expand the Spawn \ Rate section.

Set Constant to 50 . This will increase the spawn speed to 50 particles per second.
Return to the main editor and click on Play .
Gif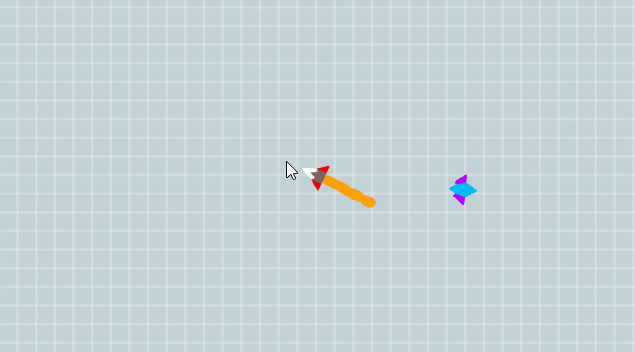
As you can see, now the particles are more like a trace. To make the particles more like an engine flame, you can reduce their lifespan.
Reduced particle life
Open PS_Thruster and go to the Emitters panel.
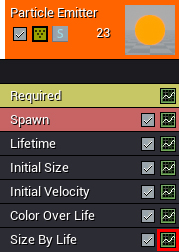
To reduce the lifetime of particles, you need to use the module Size By Life . This module uses a particle size multiplier during its lifetime. Create it by right-clicking on the empty space in the emitter and selecting Size \ Size By Life .
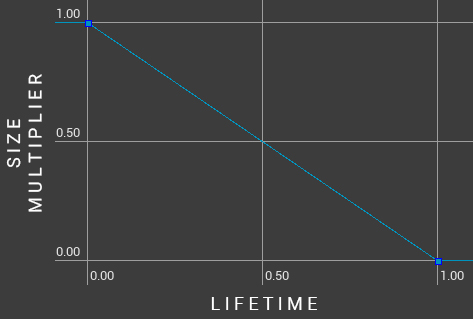
By default, this will not visually affect the particle size, because by default the multiplier is always 1. To reduce a particle, we need to change the modulus curve so that the size multiplier decreases over time. But first you need to figure out what is a curve?
What is a "curve"?
A curve is a set of points. Each point has two properties: position and value.
When we have two or more points, they create a line. Below is an example of a simple linear curve. Point A has a position and a value of 0 . Point B has position 2 and value 1 .
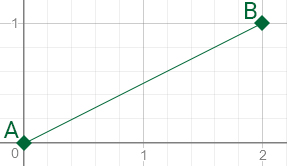
If you sample a linear curve at any point, it works like linear interpolation. For example, if you sample the curve at point 1 , we get the value 0.5 .

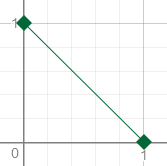
If you create a decreasing curve, then the resulting value will gradually decrease. This is the curve we want to use for the Size By Life module.
Now we will create the curve shown above in Cascade.
Modify Modulus Curve
Select Size By Life and go to the Details panel. Expand Life Multiplier \ Distribution \ Constant Curve \ Points . Here is a list of points in the Life Multiplier curve.
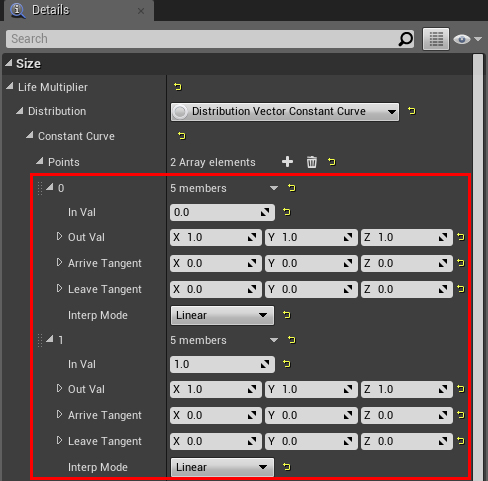
In Val is the position of a point on a curve. For Size By Life, a value of 0 indicates the beginning of the life of the particle. A value of 1 indicates the end of the particle's lifetime.
To reduce the size multiplier over time, we need to decrease the Out Val of the second point. Set the Out Val point 1 to (0, 0, 0) . This will gradually reduce the particle size to 0.

You can clearly see the Life Multiplier curve in the Curve Editor. To do this, click on the graph icon of the Size By Life module.
This will add a Life Multiplier to the Curve Editor. To fit the curve to the window, click on Fit in the Curve Editor.
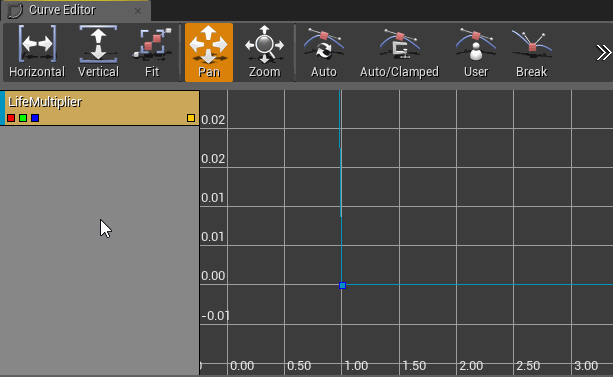
As you can see, the size multiplier decreases from 1 to 0 over the lifetime of the particle.
Return to the main editor and click on Play.
Gif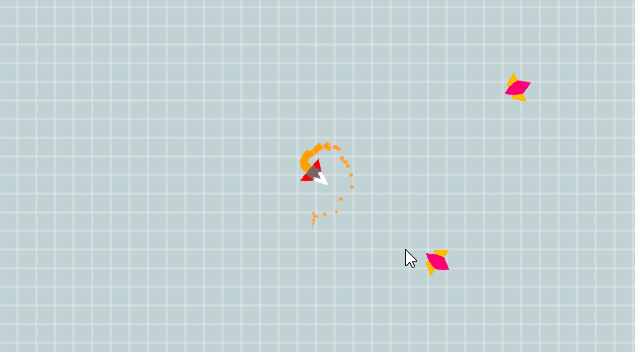
Now the particles are more like a flame! The last thing we add to this particle system is color variations.
Adding color variations
To set the particle color using Cascade, we need to choose the right particle material. Go to the Materials folder and open M_Particle .
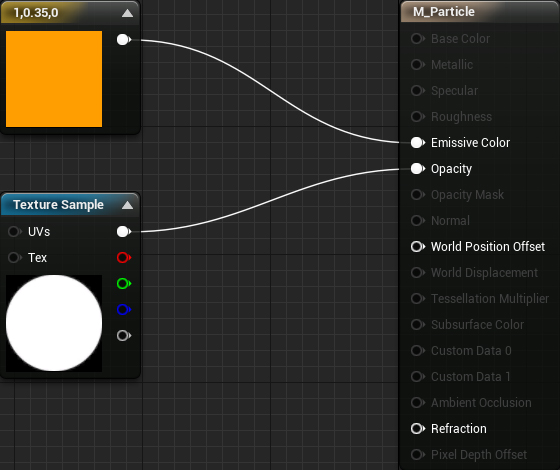
Now the color is set in the material. To use color from a particle system, we need to use the ParticleColor node.
First, remove the node connected to Emissive Color . Then add the ParticleColor node and connect it as follows:

Additionally
If you want to control particle opacity, add a Multiply node and connect it as follows:

Click on Apply and close M_Particle .
To set the color of a particle, you can use the Initial Color module.
Initial Color Module
Open PS_Thruster and add the Initial Color module. It can be found in the Color category.
To add color variations, we need to set the interval in which the color can be. To do this, you can use distributions.
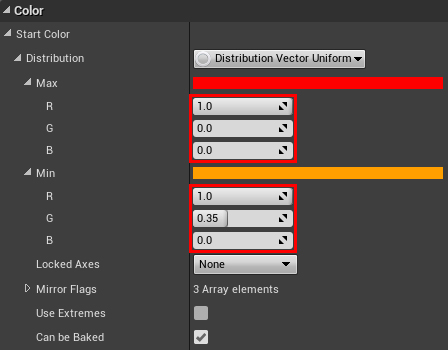
Select Initial Color and go to the Details panel. Expand the Start Color section and change Distribution to Distribution Vector Uniform . This will allow us to specify the interval for each color channel.

In this tutorial, the color will be in the range from orange to red. To do this, set the Max values (1.0, 0.0, 0.0) , and the Min values (1.0, 0.35, 0.0) .
If you look at the Viewport, you will see that the color behaves strangely.
Gif
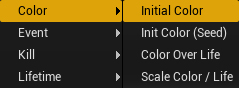
This is because the Color Over Life module constantly makes the color white. To fix this, select Color Over Life and click Delete . Now your list of modules will look like this:
Close PS_Thruster and click on Play in the main editor. Admire these engine flames!
Gif
Now we need to learn how to switch the particle system depending on whether the ship is moving.
Enable / Disable Particle System
To check if the ship is moving, we can check if the player presses the movement keys.
Open BP_Player and find the Event Tick node. Add the following scheme at the end of the node chain:

Let's look at what this scheme does:
- It checks the bindings of the MoveUp and MoveRight axes . If both return 0 , this means that the player does not press the movement keys.
- If Branch returns true (the player does not press the movement keys), then ThrusterParticles is deactivated.
- If Branch returns false (player presses the movement key), then ThrusterParticles is activated.
Click on Compile and close the BP_Player . Click on Play , and then press and release the movement keys to see the difference.
Gif
Now the time has come for the most interesting: create an explosion particle system!
Creating an explosion effect
Instead of creating a new particle system, we are duplicating engine particles. Go to the ParticleSystems folder, right-click on the PS_Thruster and select Duplicate . Rename the duplicate to PS_Explosion and open it.
For an explosion, all particles must spawn at the same time, and not one after the other. This effect is called pulse emission .
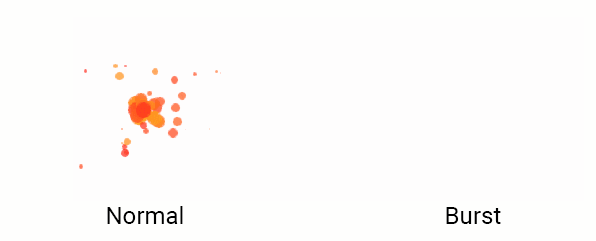
Creating momentum
First we need to set the spawn speed to zero, because we don’t want to use the default spawn behavior. Select the Spawn module and set the Spawn \ Rate \ Distribution \ Constant value to 0 .

Next you need to inform the emitter that we want to create a pulse. Scroll down to the Burst section and add a new item to the Burst List . This can be done by clicking on the + icon.
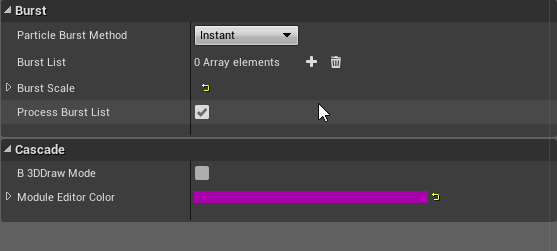
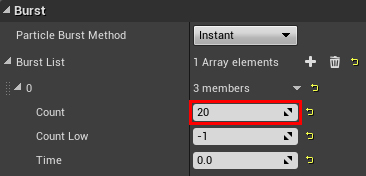
Each element will contain three fields:
- Count: the number of particles to create. Please enter 20 .
- Count Low: if it is greater than or equal to 0, then the number of particles created will vary from Count Low to Count . Leave here the value -1 .
- Time: moment spawn particles. A value of 0 indicates the beginning of the life of the emitter. A value of 1 indicates the end of the life of the emitter. Leave here the value 0.0 .
Note: the life of the emitter is in the Required module. It is listed as the Emitter Duration in the Duration section.
This means that the emitter will create 20 particles at the beginning of its life.

To make the impulse look like an explosion, we need to add the speed at which the particles will fly apart.
Particle scattering
Since the game has a top view, we need to specify only the X and Y speeds. Select the Initial Velocity module and expand Start Velocity \ Distribution . Set the Max value (1000, 1000, 0) , and the Min value (-1000, -1000, 0) .
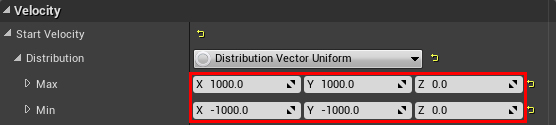
We specified the interval from negative to positive values, so the particles will scatter from the emitter.

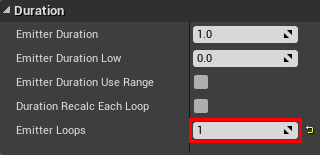
Now you need to set the number of repeats of the emitter.
Defining Emitter Repeats
By default, emitters repeat infinitely. This is great for such effects. like smoke and light, but the impulse must be played only once. To fix this, we need to inform the emitter that it should be repeated only once.
Select the Required module and find the Duration section. Set Emitter Loops to 1 .
Now we will reproduce the explosion at the death of the enemy.
Creating particles at the death of the enemy
Return to the main editor and go to the Blueprints folder. Open BP_Enemy and search for the OnDeath event.
To spawn a particle system, you can use the Spawn Emitter at Location node. Create it and connect to Destroy Actor .
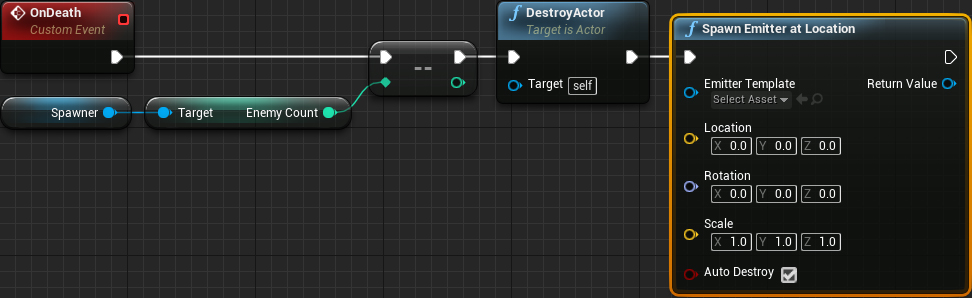
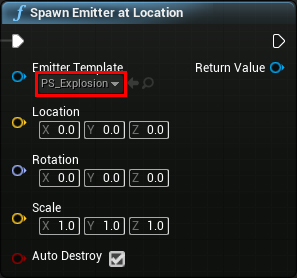
Then set the Emitter Template to PS_Explosion .
Finally, create a GetActorLocation and connect it to the Location contact.
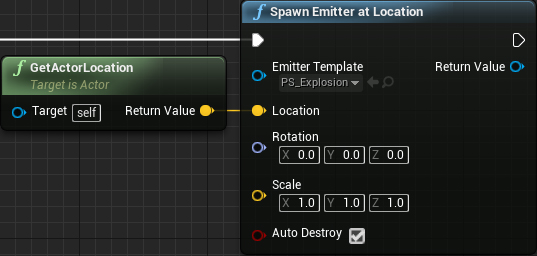
Now when the enemy dies, the event will create an instance of PS_Explosion at the location of the enemy.
Click on Compile and return to the main editor. Click on Play and start shooting enemies.
Gif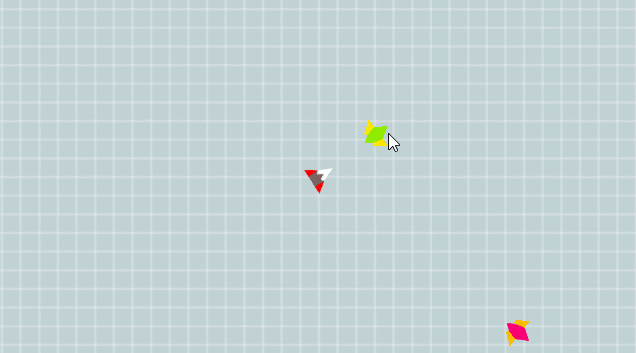
Look, here are the explosions! Now we will make them more interesting by giving them the same color as the enemies.
Replacing the color of the explosion on the color of the enemy
To use color, we need a way to get this information from Blueprints. Fortunately, Cascade has a distribution type that allows this.
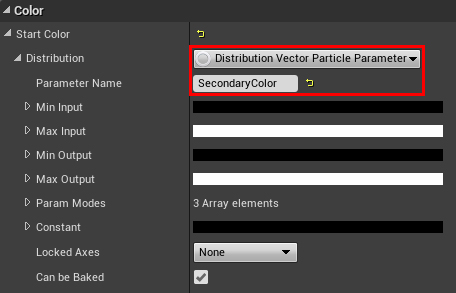
Open PS_Explosion and select the Initial Color module. Set the Start Color \ Distribution value to Distribution Vector Particle Parameter .
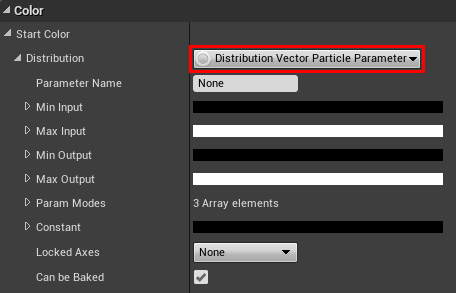
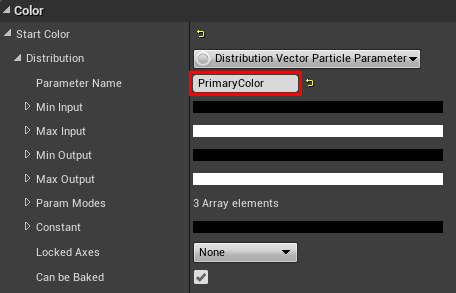
This will give us a parameter that we can change using Blueprints. Give the Parameter Name the name PrimaryColor
For the explosion, we will use both colors of the enemy. To use the second color, we need another emitter. Right-click on the empty space in the emitter and select Emitter \ Duplicate and Share Emitter . So we duplicate the emitter.
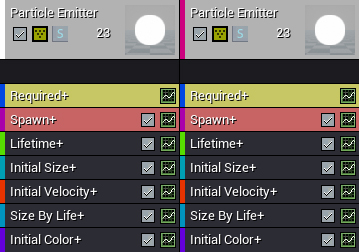
You will notice that each module now has a + sign. By using Duplicate and Share Emitter instead of Duplicate , we linked the modules, rather than copying them. All changes made to one module will be reflected on the same module of another emitter. This is useful if we want to change properties in all emitters, for example, size.
The only module we need to change is Initial Color . However, if we make changes, they will affect both emitters. In this case, we do not need the modules to be connected, because they need separate parameter names. The easiest way to disable their communication is to remove the duplicate Initial Color module and create a new one.
Note: at the time of writing, there are no built-in methods for breaking the connection between modules.
Select the new Initial Color and set the Start Color \ Distribution value to Distribution Vector Particle Parameter . Then set the Parameter Name to SecondaryColor .
At this stage, the particle system is ready. Close PS_Explosion .
Next, we will need to set the parameters using Blueprints.
Particle Parameters Using Blueprints
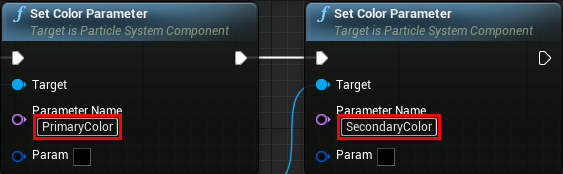
Open BP_Enemy and add selected nodes after Spawn Emitter at Location :
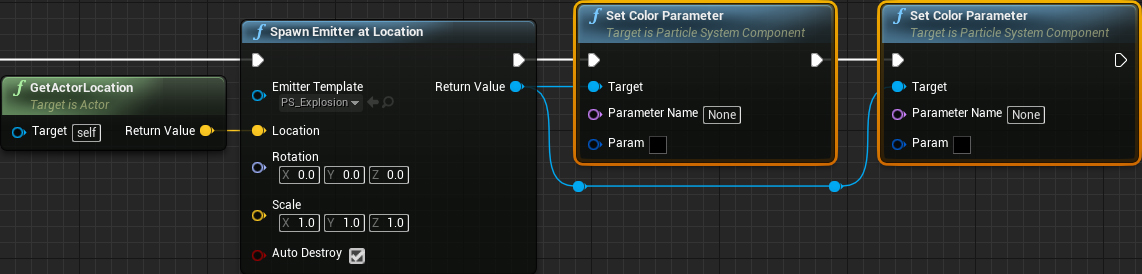
This allows changing two PS_Explosion parameters.
Now we need to give the parameters the correct names. Set the Parameter Name of the first Set Color Parameter to PrimaryColor . Set the Parameter Name of the second Set Color Parameter to SecondaryColor
Finally, we need to convey the colors. To simplify the work, we have already saved the colors in the PrimaryColor and SecondaryColor variables. Connect each variable with the appropriate node:

This is what you should end up with:
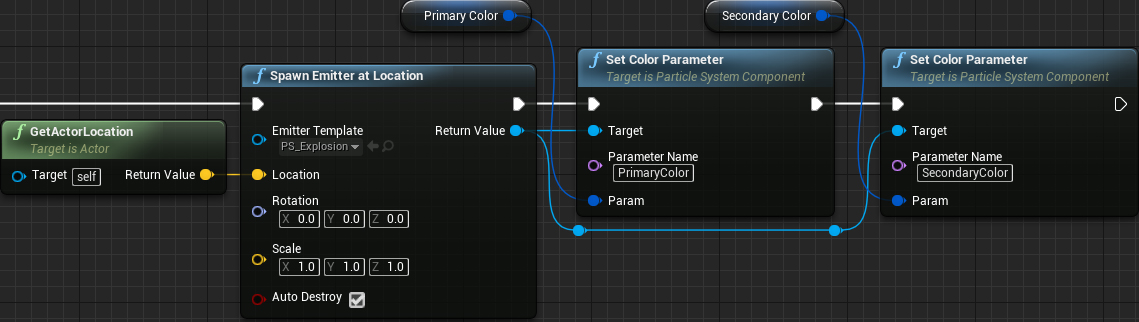
Let's look at the events in order:
- When an enemy dies, he will spawn a copy of PS_Explosion at his location
- Sets the value of the PrimaryColor PS_Explosion parameter
- Sets the value of the SecondaryColor PS_Explosion parameter
Click on Compile and close BP_Enemy . Click on Play and start shooting enemies to see the explosions.
Gif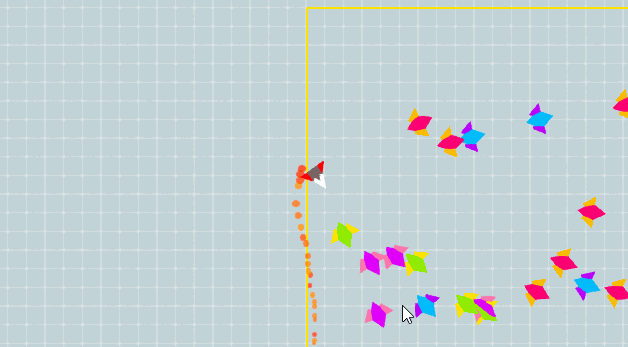
Look at all these juicy particles. Let's now try to add an explosion when a player dies.
Solution inside
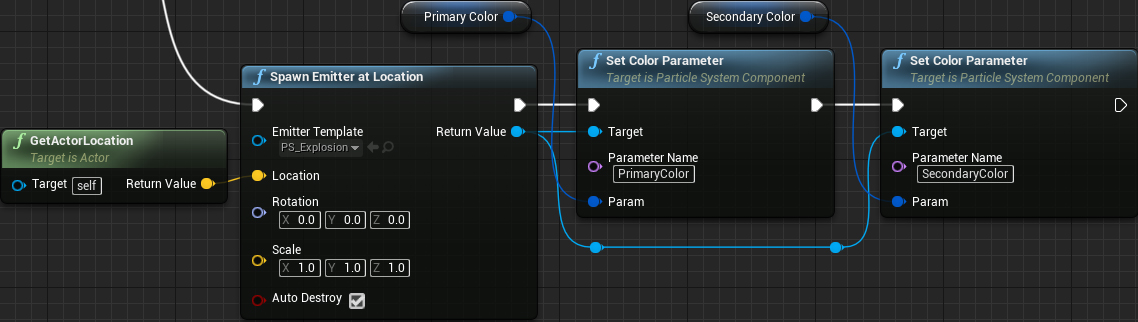
- Open BP_Player and find the OnDeath event .
- Add the Spawn Emitter at Location node to the Then contact of the Sequence node. Set the Emitter Template value to PS_Explosion .
- Create a GetActorLocation and connect it to the Location contact of the Spawn Emitter at Location node.
- Create a Set Color Parameter and connect it to the Spawn Emitter at Location . Set the Parameter Name to PrimaryColor and connect the PrimaryColor variable to Param .
- Create another Set Color Parameter and connect it to the first Set Color Parameter . Set the Parameter Name to SecondaryColor and connect the SecondaryColor variable to Param .
Where to go next?
You can download the finished project from here .
Would you believe that we covered only the very basics of Cascade? We have created interesting effects, but there are much more modules to experiment with. I recommend learning more about TypeData modules. With their help, you can create effects such as swinging a sword, lightning, or even raining cows!
If you want to continue learning, then read the next post of the series , in which we will start working with artificial intelligence.
Source: https://habr.com/ru/post/345110/
All Articles