The battlefield is augmented reality. Part III: engine capabilities, animation and POI
In the last two articles, we became acquainted with the basics of the process and began to sort out the case for working with AR. Read to stay up to date.
Part I: The Basics of Object Recognition
Part II: how to recognize the object and show the 3D model
We are pleased to present the final third part (yukh!), In which we will discuss the engine's capabilities in more detail and find out:
')
We have already seen an application for downloading images for recognition. So, Wikitude has an editor for loading models and animations. The tool is called the Wikitude 3D encoder.
With it, you can download content from files of the type * .fbx or * .dae, and subsequently export it in a format friendly for Wikitude * .wt3.

3D model in the Wikitude 3D encoder editor
We have already disassembled the example with the 3D model, let's talk about animation. Animation can be exported from special software, or programmed independently. In the first case, the Autodesk maya program was used for this.
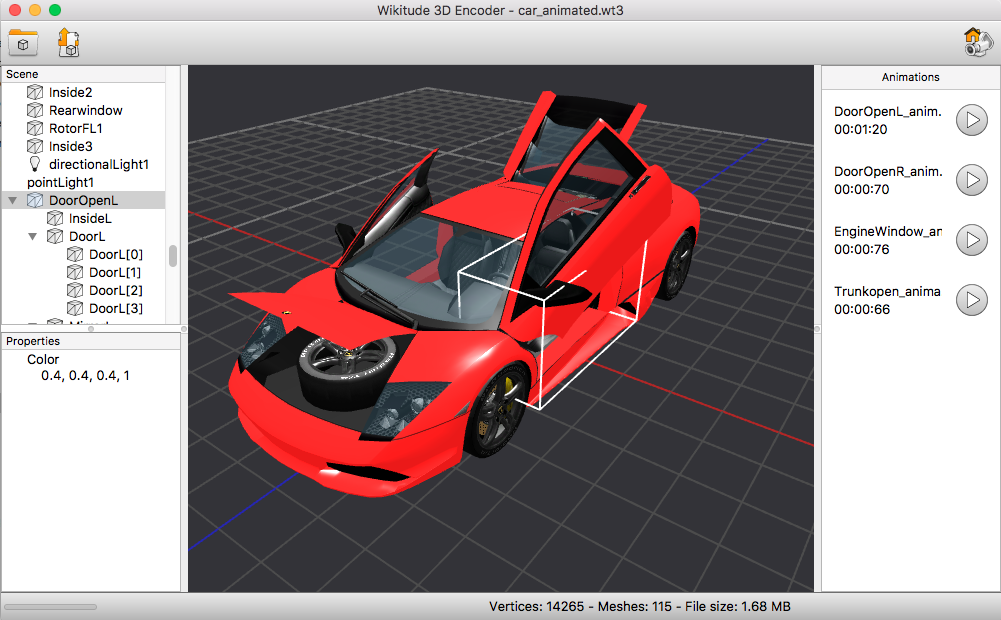
An example of animation right in the editor. Notice that all the available animations appeared on the right side.
This will start the animation. The original animation itself is embedded in the file type * .wt3
Diversify the task: let's program the animation. Let's make the model appear with animation when the picture is recognized.
It remains to slightly edit the initialization functions of the tracker and we will get this example:
- Created earlier and put into a * .wt3 file
- Manually programmed
The most frequent case is to display the text. It is quite simple. So:
As you can see, we have a loadable model. When loading, it is assigned an animation that twists the model around its axis.
When you click on this model, we have an inscription in the window. In the window there is also an animation button. It appears only when the object is recognized and animates the car in its own way.
POI - points of interests, object marked with a pin.
In our case, POI means an object that is too far from us. When we are with him within a radius of 100 meters, he ceases to be for us a point in the world, and is transformed into a model inside the add. reality and we get the opportunity to interact with it.
The question arises: why not use the model immediately?
As you saw in the game Pokemon go, Pokemon appear in front of you at a certain point. It turns out that they are not tied to their geo-location, they are tied to your geo-position and you are for them the center of the universe (the point 0.0.0) from which it is read.
The second nuance is that we display the POI as a 2D image and its size does not depend on the distance to the point. Otherwise, when working with 3D, it is necessary to calculate the dimensions and dynamically change as they approach, which in my opinion, makes work much more difficult.
Next, we need to do a few things:
- Add point of interest. We do this in the loadPoisFromJsonData method
- Add 3D model. Above we have already done it. Now we just wrap the createModelAtLocation () function and add a trigger + attach it to the geo.
- Track the distance to a given point and take appropriate action.
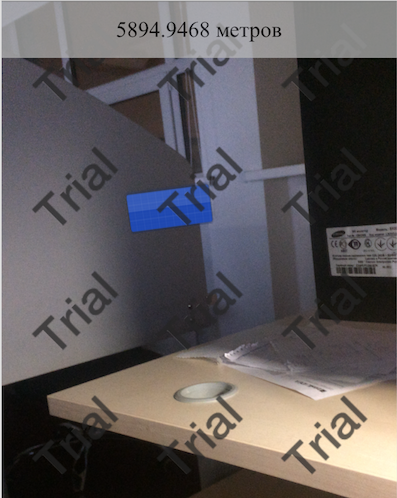
At a distance from us we see POI
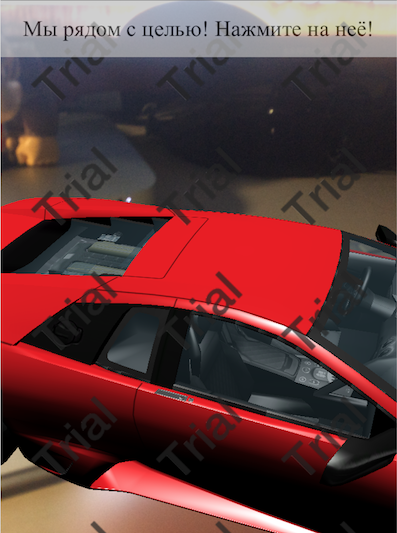
Zoom in on the object and see a 3D model with a constant rotation animation.
Let's summarize our work on the case. Here is what we got:
- Pattern recognition.
- Overlay animation on the 3D model in the place of recognition.
- A 3D model that is far away from us by geography and is reflected in the form of POI.
- Transformation of POI in a 3D model when approaching.
- Processing clicks, display labels.
- 3D model instead of geo-referencing is attached to our geo-location and is located relative to us.
I hope you can find a useful application for everything I wrote. I understand that this is not the only option. Therefore, I will be glad to your suggestions in the comments.
All augmented reality, peace and chewing gum!
Initially, I did not even dare to think that the topic would stretch into three articles. The paradox is that this is not all. This area is extremely interesting and difficult. Just yesterday, Google announced the closure of Google Tango, because it was no longer necessary, because ARCore and so wonderful copes with the task. Well, what's going on in the market of neural networks here and can not say.

Author: Vitaly Zarubin, Senior Development Engineer Reksoft
Part I: The Basics of Object Recognition
Part II: how to recognize the object and show the 3D model
We are pleased to present the final third part (yukh!), In which we will discuss the engine's capabilities in more detail and find out:
')
- How to animate a 3D object for AR. Display the text by clicking on the object.
- How to show a 3D object at given coordinates as a POI (point of interest).
- How to show a 3D object in relation to you.
A few words about 3D models and animation
We have already seen an application for downloading images for recognition. So, Wikitude has an editor for loading models and animations. The tool is called the Wikitude 3D encoder.
With it, you can download content from files of the type * .fbx or * .dae, and subsequently export it in a format friendly for Wikitude * .wt3.
3D model in the Wikitude 3D encoder editor
We have already disassembled the example with the 3D model, let's talk about animation. Animation can be exported from special software, or programmed independently. In the first case, the Autodesk maya program was used for this.
An example of animation right in the editor. Notice that all the available animations appeared on the right side.
This will start the animation. The original animation itself is embedded in the file type * .wt3
Diversify the task: let's program the animation. Let's make the model appear with animation when the picture is recognized.
It remains to slightly edit the initialization functions of the tracker and we will get this example:
- Created earlier and put into a * .wt3 file
- Manually programmed
How to display the caption
The most frequent case is to display the text. It is quite simple. So:
- Creates a window for text.
- A 3D model appears.
- At loading animation of rotation is appropriated.
- When you click on the model, an inscription appears in the window.
As you can see, we have a loadable model. When loading, it is assigned an animation that twists the model around its axis.
When you click on this model, we have an inscription in the window. In the window there is also an animation button. It appears only when the object is recognized and animates the car in its own way.
Geolocation and POI
POI - points of interests, object marked with a pin.
In our case, POI means an object that is too far from us. When we are with him within a radius of 100 meters, he ceases to be for us a point in the world, and is transformed into a model inside the add. reality and we get the opportunity to interact with it.
The question arises: why not use the model immediately?
As you saw in the game Pokemon go, Pokemon appear in front of you at a certain point. It turns out that they are not tied to their geo-location, they are tied to your geo-position and you are for them the center of the universe (the point 0.0.0) from which it is read.
The second nuance is that we display the POI as a 2D image and its size does not depend on the distance to the point. Otherwise, when working with 3D, it is necessary to calculate the dimensions and dynamically change as they approach, which in my opinion, makes work much more difficult.
Next, we need to do a few things:
- Add point of interest. We do this in the loadPoisFromJsonData method
- Add 3D model. Above we have already done it. Now we just wrap the createModelAtLocation () function and add a trigger + attach it to the geo.
- Track the distance to a given point and take appropriate action.
At a distance from us we see POI
Zoom in on the object and see a 3D model with a constant rotation animation.
Let's summarize our work on the case. Here is what we got:
- Pattern recognition.
- Overlay animation on the 3D model in the place of recognition.
- A 3D model that is far away from us by geography and is reflected in the form of POI.
- Transformation of POI in a 3D model when approaching.
- Processing clicks, display labels.
- 3D model instead of geo-referencing is attached to our geo-location and is located relative to us.
I hope you can find a useful application for everything I wrote. I understand that this is not the only option. Therefore, I will be glad to your suggestions in the comments.
All augmented reality, peace and chewing gum!
Initially, I did not even dare to think that the topic would stretch into three articles. The paradox is that this is not all. This area is extremely interesting and difficult. Just yesterday, Google announced the closure of Google Tango, because it was no longer necessary, because ARCore and so wonderful copes with the task. Well, what's going on in the market of neural networks here and can not say.
Author: Vitaly Zarubin, Senior Development Engineer Reksoft
Source: https://habr.com/ru/post/345062/
All Articles