Git bottom to top
This translation is not an ordinary story. Version control systems are far from my professional interests. For working projects, I needed them infrequently, and, differently, so that, every time such a need arose, I recalled how this or that operation was done in them. And for personal projects, I had enough features of Dropbox, which stores the history of file versions.
Twitter image @girlie_mac
But once I went to the hospital for three unforgettable days - it sometimes happens to women. From entertainment I had a newborn daughter and a phone with a large screen. My daughter initially entertained poorly (at home she quickly corrected herself), and on the phone, in addition to books and films, the text “Git from the bottom up” appeared, which turned out to be more than good ... Since then, almost 3 years have passed,it’s time for an older daughter to start using Git Git has become the mainstream, if not the standard in modern development, and I was surprised to find that the translation of this miracle into Russian, useful not only for beginners, but also for advanced Git users, is still not there. Correct this situation.
Welcome to the world of git. Although when looking outside, the bulk of the Git features seems confusing, when viewed from the bottom up, Git is beautiful and simple. I hope that this document will help you to deal with this powerful version control system.
')
And we begin with a list of terms that appear in the text and are necessary for its understanding.
Interacting with Git usually looks like this:
After creating the repository, the work takes place in the working tree. As soon as a significant milestone is reached - eliminate the bug; the end of the working day; The moment when, finally, everything starts to compile, you add your changes to the index. As soon as everything that you are about to commit is in the index, you write its contents to the repository. The diagram below is a typical project life cycle:

Now let's see how each of the entities shown in the picture works in git
As follows from the definitions above, what Git does is elementary: it contains snapshots of the contents of a directory. Most of its internal design can be understood in terms of this basic task.
The design of the Git repository in many ways reproduces the UNIX file system. The file system starts with the root directory, which usually consists of other directories, many of which have leaf nodes, i.e. files containing data. File metadata is stored both in the directory (names) and in i-nodes, which are referenced to the contents of these files (size, type, access permissions, etc.). Each i-node has a unique number that identifies the contents of the corresponding file. Although there may be many objects in a directory pointing to a specific i-node (i.e. hard links), it is the i-node that “owns” the content stored in your file system.
The internal architecture of Git has a strikingly similar structure with one small difference.
It all starts with the fact that Git presents the contents of your files in the form of so-called “fragments” (“blobs”), which are leaf nodes in a structure that is very similar to a directory and is called a tree. Just as an i-node is uniquely identified by a number assigned to it by a system, a fragment in Git is marked by calculating the SHA-1 hash of its size and content. For all possible applications, this is just an arbitrary number, just like an i-node, with the exception of two additional properties: firstly, it controls the immutability of the fragment contents, and secondly, it guarantees that the same content will always be represented by the same the same fragment regardless of where it will be found - in different commits, repositories, or even in different parts of the Internet. If several trees refer to the same fragment, then it looks like hard links: the fragment will not disappear from your repository as long as there is at least one link to it.
The difference between a file in a file system and a fragment in Git is that the fragment itself does not store metadata about its contents. All this information is stored in the tree to which the fragment belongs. One tree may consider this content as a “foo” file created in August 2004, while another tree may know the same content under the file name “bar” created five years later. In a normal file system, such two files with matching content but differing metadata will always be represented as two independent files.
What caused this difference? Basically, the file system is designed to support changing files, but Git is not. Because of the immutability of the data in the repository, Git needed a new design. And, as it turned out, this design made it possible to more compact storage - after all, all objects with identical content will be common regardless of their location.
Now that the overall picture is drawn, let's look at practical examples. Let's create a test repository and show how Git works in it from the bottom. (a comment of the translator - all examples of this text are checked for git version 2.13.0.windows.1 )
Here I created a new sample directory containing a file with prosaically predictable content. So far I have not even created a repository, but I can already start using some Git commands to understand what it is going to do. First, I want to know how Git will store my greeting.
When you run this command on your system, you will get the same hash identifier ( note of the translator: further in the text - the hash id ). Although we create two different repositories (perhaps in different parts of the world), our greeting fragments will have the same hash id.
I can even get commits from your repository to mine, and Git will understand that we are tracking the same content, and, accordingly, will only store one copy of it.
The next step is to initialize the new repository and commit to it:
At this stage, our fragment should be in the system and use, as we expected, the hash id defined above. For convenience, Git requires only initial hash digits that uniquely identify a fragment in the repository. Usually 6 or 7 digits is enough.
Here it is! I did not even look at which commit or tree it is in, but based solely on the content, I could assume that it is there, and I was not mistaken. This content will have the same identifier regardless of the repository lifetime or the position of the file in it. That is, the data is guaranteed to be saved forever.
Thus, a fragment is a fundamental unit of data in Git. In fact, this whole system is just fragment management.
The unique content of your files is stored in fragments, but the fragments themselves are completely faceless. They have no name, no structure, fragments - they are fragments. Therefore, to represent the structure and names of your files, Git attaches fragments as nodes - “leaves” to a tree.
Now I cannot find out which tree (s) the fragment belongs to, since it can have so many owners. But I know that it definitely has to be somewhere in the tree that the committer I just created owns.
That is, this first commit, which added my greeting file to the repository, contains one tree with a single leaf: a greeting fragment.
Although with the help of the ls-tree HEAD command I can look at the tree containing my fragment, but I have not yet seen the underlying tree object to which this commit refers.
Here are some more commands to highlight this difference and explore my tree:
The first command decodes the HEAD header to the commit it refers to, the second checks its type, and the third shows the hash id of the tree that the commit owns, as well as other information stored in the commit. The hash id of a commit is unique to my repository, since it includes my name and the date of the commit, but the hash id of the tree should be the same for my and your examples, since it contains the same fragment under the same name.
Make sure that this is really the same object:
That is, my repository contains a single commit that references a tree containing a fragment with what I want to write.
Here is another command that I can use to confirm this:
This shows that my entire repository contains 3 objects, the hash id of which we have already seen in previous examples. Let's just take a curious look at the types of these objects:
I could also use the show command to view a summary of each of these objects, but I will leave this exercise to readers.
Each commit contains a single tree. But how are trees formed? We know that fragments are created using the "slicing" of the contents of your file, and that trees own fragments, but we have not yet seen how these trees are formed and how the trees are associated with their parent commits.
Let's start again with a new repository, but this time we'll do everything manually.
It all starts with adding a file to the index. So far, we can assume that the index is what you use for the initial creation of fragments from files. When I added the greeting file, there were changes in my repository. Although it is not a commit yet, there is a way to look at them:
What is it? There are no commits yet, but the object is already there. It has the same hash id from which I started the whole enterprise, so I know that it represents the contents of the greeting file. I could use the git cat-file -t command for this hash id, and I would see that this is a fragment — the same one I received the first time I created this repository (who would doubt).
Neither the tree nor the commits refer to this fragment. So far, there is a link to it only in the .git / index file, which contains links to the fragments and trees that actually form the current index. And now let's create a tree in the repository, on which fragments will hang:
A familiar number, isn't it? A tree containing the same fragments (and sub-trees) will always have the same hash. Although I still do not have a commit object, but in this repository there is a tree object containing fragments. The goal of the low-level write-tree command is to take the contents of the index and place it in a new tree for further creation of a commit.
A new commit object can be created manually using this tree directly. This is exactly what the commit-tree command does: it takes the hash id of the tree and creates a commit object for it. If I wanted a commit to have a parent object, I would have to specify it explicitly using the -p option.
Note that the resulting hash id is different from the one that happens on your system because the commit refers to my name and the time it was created, and these details will always be different from yours.
But the work does not end there - I have not yet registered a commit as a new header for the current branch:
This command tells Git that the “master” branch should now reference this commit.
Another safer way to achieve the same goal is to use the update-ref command:
After creating the master branch, we need to associate our tree with it. This usually happens when you switch a branch:
This command creates a HEAD symbolic link to the master branch. This is very important, as all further commits from the working tree will now automatically update the refs / heads / master value.
It's hard to believe that this is so easy, but now I can use the log command to view my newly created commit.
I note that if I didn’t have refs / heads / master pointing to a new commit, it could be considered unavailable - since no one refers to it, and it is not the parent object of another available commit. In this case, the commit object will someday be removed from the repository along with its own tree and all the fragments (this happens automatically with the help of the “gc” command, which is rarely used manually by Git users). When you link a commit to the name in the refs / heads , as we did above, it becomes available, which guarantees that Git will continue to be saved.
Some version control systems make branches magical entities, often distinguishing them from the main line of development, while others discuss the concept of branching as if it is very different from commits. But in Git, branches are not a separate entity - there are only fragments, trees and commits (well, tags, but they are just links to commits, so they can be ignored) Since a commit can have one or more parents and these commits in turn, they can belong to their parents, we can consider a single commit as a branch - after all, he knows his whole "family tree".
You can view all top-level commits at any time using the branch command
Repeat after me: A branch is just a named link to a commit.
Branches and tags are identical with one exception - tags can have their own descriptions - like commits to which they refer. Branches are just names, and tags are descriptions, one might say, labels.
In truth, we don’t really need to use these “pseudonyms”. For example, if desired, I could refer to any object of the repository, using only the hash-id of its commits.
Here, for example, the command that reboots NEAD of my working tree to a given commit;
The --hard switch causes deletion of all current changes to my working tree, regardless of whether they were registered for future repository (we'll talk about this command below).
A safer way to go to a specific commit is to use the checkout command:
The difference with the previous command is that the files changed in my working tree will be saved. If I add the -f switch to checkout , the command will act in the same way as reset -hard , except that checkout only changes the working tree, and reset -hard also changes the HEAD of the current branch so that it points to the specified version of the tree.
Another advantage of a commit-based system is the ability to rephrase the terms of even the most complex version control systems in a simple language. For example, if a commit has several parents, then this is a merged commit. Or, if a commit has several descendants, then it is an ancestor of the branch and so on. But for Git between these entities there is no difference for him, the world is simply a set of commits, each of which contains a tree that refers to other trees and fragments that store your data. Anything more complicated than that is just a legend.
Here is an illustration of how it all works:

Understanding commits is the key to comprehending Git. You will realize that you have achieved enlightenment, when your mind will contain only the topology of commits, and not a jumble of branches, tags, local and remote repositories, and so on. I hope that this understanding will not require you to cut off your hands (as the second follower of the Zen teachings did), although I would appreciate if by that moment you had such a desire.
If commits are key, their names are the door to mastery. There are many ways to name commits, groups of commits, and even some of the objects contained in commits, which are supported by most Git commands. Here is a summary of the main ones:
Most of these options can be combined. Here is an example showing how to get information about all changes in the current branch (split from master) that I made in the last month and containing the text “foo”.
One of the most effective commands for working with commits is the command with the unassuming name rebase . It works like this: each existing branch in Git has one or more "basic commits" - those from which it originated. Let's take an example of the following typical scenario (in the figure below). Here, the arrows point back in time as each commit refers to its parent (s), but not descendants. Therefore, D and Z are the headers of their branches.

You can verify this with the command
And in detail:
It is required to get used to this type of designation, but, in essence, this is just a description of the diagram above. ( comment of the translator: pay attention to the spaces in the record, they matter - they divide the output into columns )
And that's what it tells us:
Our current branch was first split into commit A (also known as commit
D ~ 3, and even Z ~ 4 if you like it that way. For those who missed the table above, let me remind you that the commit ^ syntax is used to denote the commit parent, and commit ~ 3 is its third-level ancestor, i.e. great grandfather.
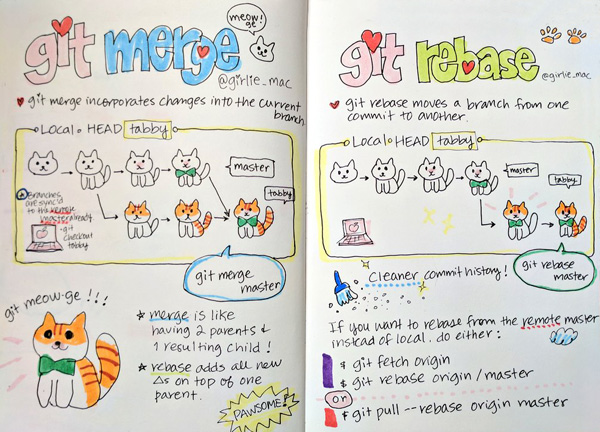
Now we need to bring the working branch Z in accordance with the main D. Ie include work done in B, C, and D in Z. In other version control systems, such things are done solely by the use of a branch merge . In Git, there is also the possibility of merging. It is implemented by the merge command and is used when Z is a published branch, and we do not want to change its commit history. Here are the necessary commands for this:
Now the repository will look like this:

If we now select branch Z, it will contain everything that was there before, combined with the contents of D (here the translator sighs heavily: the real merge operation would require resolving conflicts between states D and Z) .
Although the new Z now contains changes from D, it also includes the new commit Z ', which is a merger of Z and D. It does not add anything new, but it represents the work of combining Z and D. In a sense, this is “meta -commit "because its contents relate exclusively to the measurements of the repository, and not to the new work done in the working tree.
But in Git there is a method of transplanting Z directly into D, actually moving Z in time - using the powerful rebase command. , :

, Z D. rebase — , . , , , .
, rebase — merge :
, merge rebase .
rebase — , , , . , merge.
, . , W A, A W, , D W'. W , A+W+X D+W'+X' . , , Z — . , , - Z, Z, Z'.
— rebase , , — merge . merge , .
rebase , W Z, Z D ( D). , . -i rebase, , Z.
.
rebase , . rebase :
, rebase , . , - rebase .
, , , I Z:

, — D, Z. - , C X , , L. , L — , , D, Z, . , J, . , :
( ) , :

, Git, , — Git . , . , , add. , , . . , reset, , , . — , : , CVS Subversion, Darcs — .

, , — -a commit. , , , — Subversion.
svn status , , svn commit . « » , HEAD. - , . , , , svn add .
Git commit -a : , , add, , , .
, Subversion , : Subversion « » , Git , , , HEAD. — , commit .
, : foo.c, . 2 , . Subversion :
? .
Git, :
Git reset — , . , reset , HEAD. .
, reset — , . — . , Git.
--mixed ( , mixed — ), reset , HEAD . -soft , -soft HEAD, .
reset -soft HEAD . . :
HEAD, git status , . — , , . .
, , commit -amend , , .
, , : - HEAD, , reset , ( merge ) , .
soft reset :

HEAD — :

--hard reset — , hard reset HEAD, , HEAD.
— checkout , , reset --hard, , . .
, hard reset - , reset --soft , reset -hard . , :
, hard reset . , — git stash (. )
, , :
new-branch , master, :
: reset --soft reset --hard ( ), , . Git , , , master. !
reset -hard , , master? stash (. ), .
, , reflog ( ):
Git stash reset -hard . . stash , :
, Git: , , , , , .
, , . — Git reflog, -, . , ( commit ), , reflog, :
reflog . , - ( reset ), reflog 30 , « ». , .
, — . . , , foo.c, , Git , , . , Git. , , SHA1 id, :
? , . stash: ( . .: stash — «» )
, , , : , , , stash — . stash.
stash stash apply , reflog .
, , ( WIP — «Work in Progress» — «…»:
stash , , . , , , :
: , ! , : stash , (, - ), stash apply .
stash — , 30 , stash clear, reflog expire
stash — . stash , (Unix OS):
, , — reflog expire
. . , . , . , , . Git , , — .
— , , . , Git, . , , Git.
— , , . Git . , .
. 2009 . git GitHub, , , , Git. ? , .
Twitter image @girlie_mac
But once I went to the hospital for three unforgettable days - it sometimes happens to women. From entertainment I had a newborn daughter and a phone with a large screen. My daughter initially entertained poorly (at home she quickly corrected herself), and on the phone, in addition to books and films, the text “Git from the bottom up” appeared, which turned out to be more than good ... Since then, almost 3 years have passed,
Welcome to the world of git. Although when looking outside, the bulk of the Git features seems confusing, when viewed from the bottom up, Git is beautiful and simple. I hope that this document will help you to deal with this powerful version control system.
')
And we begin with a list of terms that appear in the text and are necessary for its understanding.
- Working tree - Any directory in your file system associated with the repository (as can be seen from the presence of the “.git” subdirectory in it). Includes all files and subdirectories.
- Commit In the role of a noun: "snapshot" of the working tree at some point in time. In the role of the verb: commit (commit) - add commit to the repository .
- A repository (Repository) is a set of commits , i.e. just an archive of past states of the working project tree on your or someone else's machine.
- A branch is simply a name for a commit , also called a reference . Determines the origin - “pedigree” of a commit , and thus is a typical representation of the “development branch”
- Checkout - operation of switching between branches or restoration of working tree files
- A tag is also a name for a commit , which differs from a branch in that it always points to the same commit and can also have its own text description.
- Master Conventionally, the "main" or "main" branch of the repository , but in essence no different from other branches
- Index . Unlike other similar tools, Git does not send changes from the working tree to the repository directly. Instead, changes are first recorded in the index , or “staging area”. This can be viewed as a way of "confirming" your changes before committing, which will write to the repository all approved changes.
- HEAD - header. Used by the repository to determine what is selected using checkout
- If the checkout subject is a branch, HEAD will refer to it, indicating that the name of the branch should be updated during the next commit.
- If the checkout subject is a commit, then HEAD will refer only to it. In this case, HEAD is called detached.
Interacting with Git usually looks like this:
After creating the repository, the work takes place in the working tree. As soon as a significant milestone is reached - eliminate the bug; the end of the working day; The moment when, finally, everything starts to compile, you add your changes to the index. As soon as everything that you are about to commit is in the index, you write its contents to the repository. The diagram below is a typical project life cycle:
Now let's see how each of the entities shown in the picture works in git
Repository: tracking the contents of a directory
As follows from the definitions above, what Git does is elementary: it contains snapshots of the contents of a directory. Most of its internal design can be understood in terms of this basic task.
The design of the Git repository in many ways reproduces the UNIX file system. The file system starts with the root directory, which usually consists of other directories, many of which have leaf nodes, i.e. files containing data. File metadata is stored both in the directory (names) and in i-nodes, which are referenced to the contents of these files (size, type, access permissions, etc.). Each i-node has a unique number that identifies the contents of the corresponding file. Although there may be many objects in a directory pointing to a specific i-node (i.e. hard links), it is the i-node that “owns” the content stored in your file system.
The internal architecture of Git has a strikingly similar structure with one small difference.
It all starts with the fact that Git presents the contents of your files in the form of so-called “fragments” (“blobs”), which are leaf nodes in a structure that is very similar to a directory and is called a tree. Just as an i-node is uniquely identified by a number assigned to it by a system, a fragment in Git is marked by calculating the SHA-1 hash of its size and content. For all possible applications, this is just an arbitrary number, just like an i-node, with the exception of two additional properties: firstly, it controls the immutability of the fragment contents, and secondly, it guarantees that the same content will always be represented by the same the same fragment regardless of where it will be found - in different commits, repositories, or even in different parts of the Internet. If several trees refer to the same fragment, then it looks like hard links: the fragment will not disappear from your repository as long as there is at least one link to it.
The difference between a file in a file system and a fragment in Git is that the fragment itself does not store metadata about its contents. All this information is stored in the tree to which the fragment belongs. One tree may consider this content as a “foo” file created in August 2004, while another tree may know the same content under the file name “bar” created five years later. In a normal file system, such two files with matching content but differing metadata will always be represented as two independent files.
What caused this difference? Basically, the file system is designed to support changing files, but Git is not. Because of the immutability of the data in the repository, Git needed a new design. And, as it turned out, this design made it possible to more compact storage - after all, all objects with identical content will be common regardless of their location.
We get acquainted with a fragment
Now that the overall picture is drawn, let's look at practical examples. Let's create a test repository and show how Git works in it from the bottom. (a comment of the translator - all examples of this text are checked for git version 2.13.0.windows.1 )
$ mkdir sample; cd sample $ echo 'Hello, world!' > greeting Here I created a new sample directory containing a file with prosaically predictable content. So far I have not even created a repository, but I can already start using some Git commands to understand what it is going to do. First, I want to know how Git will store my greeting.
$ git hash-object greeting af5626b4a114abcb82d63db7c8082c3c4756e51b When you run this command on your system, you will get the same hash identifier ( note of the translator: further in the text - the hash id ). Although we create two different repositories (perhaps in different parts of the world), our greeting fragments will have the same hash id.
I can even get commits from your repository to mine, and Git will understand that we are tracking the same content, and, accordingly, will only store one copy of it.
The next step is to initialize the new repository and commit to it:
$ git init $ git add greeting $ git commit -m "Added my greeting" At this stage, our fragment should be in the system and use, as we expected, the hash id defined above. For convenience, Git requires only initial hash digits that uniquely identify a fragment in the repository. Usually 6 or 7 digits is enough.
$ git cat-file -t af5626b blob $ git cat-file blob af5626b Hello, world! Here it is! I did not even look at which commit or tree it is in, but based solely on the content, I could assume that it is there, and I was not mistaken. This content will have the same identifier regardless of the repository lifetime or the position of the file in it. That is, the data is guaranteed to be saved forever.
Thus, a fragment is a fundamental unit of data in Git. In fact, this whole system is just fragment management.
Fragments are stored in trees.
The unique content of your files is stored in fragments, but the fragments themselves are completely faceless. They have no name, no structure, fragments - they are fragments. Therefore, to represent the structure and names of your files, Git attaches fragments as nodes - “leaves” to a tree.
Now I cannot find out which tree (s) the fragment belongs to, since it can have so many owners. But I know that it definitely has to be somewhere in the tree that the committer I just created owns.
$ git ls-tree HEAD 100644 blob af5626b4a114abcb82d63db7c8082c3c4756e51b greeting That is, this first commit, which added my greeting file to the repository, contains one tree with a single leaf: a greeting fragment.
Although with the help of the ls-tree HEAD command I can look at the tree containing my fragment, but I have not yet seen the underlying tree object to which this commit refers.
Here are some more commands to highlight this difference and explore my tree:
$ git rev-parse HEAD 588483b99a46342501d99e3f10630cfc1219ea32 # $ git cat-file -t HEAD commit $ git cat-file commit HEAD tree 0563f77d884e4f79ce95117e2d686d7d6e282887 author John Wiegley <johnw@newartisans.com> 1209512110 -0400 committer John Wiegley <johnw@newartisans.com> 1209512110 -0400 Added my greeting The first command decodes the HEAD header to the commit it refers to, the second checks its type, and the third shows the hash id of the tree that the commit owns, as well as other information stored in the commit. The hash id of a commit is unique to my repository, since it includes my name and the date of the commit, but the hash id of the tree should be the same for my and your examples, since it contains the same fragment under the same name.
Make sure that this is really the same object:
$ git ls-tree 0563f77 100644 blob af5626b4a114abcb82d63db7c8082c3c4756e51b greeting That is, my repository contains a single commit that references a tree containing a fragment with what I want to write.
Here is another command that I can use to confirm this:
$ find .git/objects -type f | sort .git/objects/05/63f77d884e4f79ce95117e2d686d7d6e282887 .git/objects/58/8483b99a46342501d99e3f10630cfc1219ea32 .git/objects/af/5626b4a114abcb82d63db7c8082c3c4756e51b This shows that my entire repository contains 3 objects, the hash id of which we have already seen in previous examples. Let's just take a curious look at the types of these objects:
$ git cat-file -t 588483b99a46342501d99e3f10630cfc1219ea32 commit $ git cat-file -t 0563f77d884e4f79ce95117e2d686d7d6e282887 tree $ git cat-file -t af5626b4a114abcb82d63db7c8082c3c4756e51b blob I could also use the show command to view a summary of each of these objects, but I will leave this exercise to readers.
How are trees formed?
Each commit contains a single tree. But how are trees formed? We know that fragments are created using the "slicing" of the contents of your file, and that trees own fragments, but we have not yet seen how these trees are formed and how the trees are associated with their parent commits.
Let's start again with a new repository, but this time we'll do everything manually.
$ rm -fr greeting .git $ echo 'Hello, world!' > greeting $ git init $ git add greeting It all starts with adding a file to the index. So far, we can assume that the index is what you use for the initial creation of fragments from files. When I added the greeting file, there were changes in my repository. Although it is not a commit yet, there is a way to look at them:
$ git log # - ! fatal: bad default revision 'HEAD' $ git ls-files --stage # , 100644 af5626b4a114abcb82d63db7c8082c3c4756e51b 0 greeting What is it? There are no commits yet, but the object is already there. It has the same hash id from which I started the whole enterprise, so I know that it represents the contents of the greeting file. I could use the git cat-file -t command for this hash id, and I would see that this is a fragment — the same one I received the first time I created this repository (who would doubt).
Neither the tree nor the commits refer to this fragment. So far, there is a link to it only in the .git / index file, which contains links to the fragments and trees that actually form the current index. And now let's create a tree in the repository, on which fragments will hang:
$ git write-tree # 0563f77d884e4f79ce95117e2d686d7d6e282887 A familiar number, isn't it? A tree containing the same fragments (and sub-trees) will always have the same hash. Although I still do not have a commit object, but in this repository there is a tree object containing fragments. The goal of the low-level write-tree command is to take the contents of the index and place it in a new tree for further creation of a commit.
A new commit object can be created manually using this tree directly. This is exactly what the commit-tree command does: it takes the hash id of the tree and creates a commit object for it. If I wanted a commit to have a parent object, I would have to specify it explicitly using the -p option.
$ echo "Initial commit" | git commit-tree 0563f77 5f1bc85745dcccce6121494fdd37658cb4ad441f Note that the resulting hash id is different from the one that happens on your system because the commit refers to my name and the time it was created, and these details will always be different from yours.
But the work does not end there - I have not yet registered a commit as a new header for the current branch:
$ echo 5f1bc85745dcccce6121494fdd37658cb4ad441f > .git/refs/heads/master This command tells Git that the “master” branch should now reference this commit.
Another safer way to achieve the same goal is to use the update-ref command:
$ git update-ref refs/heads/master 5f1bc857 After creating the master branch, we need to associate our tree with it. This usually happens when you switch a branch:
$ git symbolic-ref HEAD refs/heads/master This command creates a HEAD symbolic link to the master branch. This is very important, as all further commits from the working tree will now automatically update the refs / heads / master value.
It's hard to believe that this is so easy, but now I can use the log command to view my newly created commit.
$ git log commit 5f1bc85745dcccce6121494fdd37658cb4ad441f Author: John Wiegley <johnw@newartisans.com> Date: Mon Apr 14 11:14:58 2008 -0400 Initial commit I note that if I didn’t have refs / heads / master pointing to a new commit, it could be considered unavailable - since no one refers to it, and it is not the parent object of another available commit. In this case, the commit object will someday be removed from the repository along with its own tree and all the fragments (this happens automatically with the help of the “gc” command, which is rarely used manually by Git users). When you link a commit to the name in the refs / heads , as we did above, it becomes available, which guarantees that Git will continue to be saved.
The beauty of commits
Some version control systems make branches magical entities, often distinguishing them from the main line of development, while others discuss the concept of branching as if it is very different from commits. But in Git, branches are not a separate entity - there are only fragments, trees and commits (well, tags, but they are just links to commits, so they can be ignored) Since a commit can have one or more parents and these commits in turn, they can belong to their parents, we can consider a single commit as a branch - after all, he knows his whole "family tree".
You can view all top-level commits at any time using the branch command
$ git branch -v * master 5f1bc85 Initial commit Repeat after me: A branch is just a named link to a commit.
Branches and tags are identical with one exception - tags can have their own descriptions - like commits to which they refer. Branches are just names, and tags are descriptions, one might say, labels.
In truth, we don’t really need to use these “pseudonyms”. For example, if desired, I could refer to any object of the repository, using only the hash-id of its commits.
Here, for example, the command that reboots NEAD of my working tree to a given commit;
$ git reset --hard 5f1bc85 The --hard switch causes deletion of all current changes to my working tree, regardless of whether they were registered for future repository (we'll talk about this command below).
A safer way to go to a specific commit is to use the checkout command:
$ git checkout 5f1bc85 The difference with the previous command is that the files changed in my working tree will be saved. If I add the -f switch to checkout , the command will act in the same way as reset -hard , except that checkout only changes the working tree, and reset -hard also changes the HEAD of the current branch so that it points to the specified version of the tree.
Another advantage of a commit-based system is the ability to rephrase the terms of even the most complex version control systems in a simple language. For example, if a commit has several parents, then this is a merged commit. Or, if a commit has several descendants, then it is an ancestor of the branch and so on. But for Git between these entities there is no difference for him, the world is simply a set of commits, each of which contains a tree that refers to other trees and fragments that store your data. Anything more complicated than that is just a legend.
Here is an illustration of how it all works:
A commit under any other name ...
Understanding commits is the key to comprehending Git. You will realize that you have achieved enlightenment, when your mind will contain only the topology of commits, and not a jumble of branches, tags, local and remote repositories, and so on. I hope that this understanding will not require you to cut off your hands (as the second follower of the Zen teachings did), although I would appreciate if by that moment you had such a desire.
If commits are key, their names are the door to mastery. There are many ways to name commits, groups of commits, and even some of the objects contained in commits, which are supported by most Git commands. Here is a summary of the main ones:
- The name of the code branch (branchname) - As mentioned above, the name of any branch is simply the pseudonym of the most recent commit to this branch. This is equivalent to the use of the word HEAD when selecting this branch.
- Tagname (tagname) - As well as the name of the branch - this is the name of the commit. The only difference is that the tag name never changes, while the name of the branch changes every time a new commit arrives there.
- HEAD - Alias of the name of the currently selected commit. If you choose a particular commit - instead of the name of a branch, then HEAD refers exclusively to it, and not to the name of the branch. This is a special case called “using a separated head” (I'm sure there must be some joke).
- c82a22c39cbc32 ... - A commit can always be accessed by its full, 40-character hash id. Usually this happens during copying and pasting, since There are usually other, more convenient ways to do this.
- c82a22c - You need to use only that part of the hash id that uniquely identifies the commit in the repository. Usually 6-7 numbers are enough for this.
- name ^ - The symbol ^ is used to refer to the parent of any commit. In the case when a commit has more than one parent (a merge commit), the first one is taken. If you need the nth parent, you can refer to it as name ^ n
- name ^^ - Parent of parent of this commit. You can continue this sequence ...
- name ~ 10 - .... but not necessary. ~ N is used to refer to the n-ancestor of this commit (equivalent to n consecutive ^ characters)
- name: path - To access a specific file within the commit tree, specify the file name after the colon. This is useful for the show command or for comparing two versions of a file between commits:
$ git diff HEAD^1:Makefile HEAD^2:Makefile - name ^ {tree} - You can refer not to the commit itself, but to the tree containing it.
- name1..name2 - This and the following names refer to the range of commits and are very useful in commands of the type log to view the changes made in a selected period of time.
In this case, the command addresses all previous commits starting with name2 up to (but not inclusive!) Name1. If one of these names is omitted, then HEAD is used instead. - name1 ... name2 - The ellipsis in the range is not at all like two points. For commands of type log, it denotes all commits referenced by either name1 or name2, but not both. The result is a list of unique commits in both branches.
- --since = "2 weeks ago" - Address all commits, starting from the given date
- --until = "1 week ago" - Address all commits, up to the specified date
- --grep = pattern - Address all commits whose message matches the specified regular expression pattern.
- --committer = pattern - Addresses all commits entered into the repository by the person whose information matches the specified pattern.
- --author = pattern - Addresses all commits, information about the author of which fits a given pattern. A commit author is the creator of the changes that the commit represents. For local development, this is the same person who commits. But when patches are sent by mail, the author and the person who actually commits is usually different.
- --no-merges - Address all commits with a single parent, i.e. ignores merge commits
Most of these options can be combined. Here is an example showing how to get information about all changes in the current branch (split from master) that I made in the last month and containing the text “foo”.
$ git log --grep='foo' --author='johnw' --since="1 month ago" master.. Branching and rebase power
One of the most effective commands for working with commits is the command with the unassuming name rebase . It works like this: each existing branch in Git has one or more "basic commits" - those from which it originated. Let's take an example of the following typical scenario (in the figure below). Here, the arrows point back in time as each commit refers to its parent (s), but not descendants. Therefore, D and Z are the headers of their branches.
You can verify this with the command
$ git branch Z * D And in detail:
$ git show-branch ! [Z] Z * [D] D -- * [D] D * [D^] C * [D~2] B + [Z]Z + [Z^]Y + [Z~2] X + [Z~3] W +* [D~3] A It is required to get used to this type of designation, but, in essence, this is just a description of the diagram above. ( comment of the translator: pay attention to the spaces in the record, they matter - they divide the output into columns )
And that's what it tells us:
Our current branch was first split into commit A (also known as commit
D ~ 3, and even Z ~ 4 if you like it that way. For those who missed the table above, let me remind you that the commit ^ syntax is used to denote the commit parent, and commit ~ 3 is its third-level ancestor, i.e. great grandfather.
- If you read from the bottom up, the first column (with the + signs) shows a budged Z branch with four commits — W, X, Y, and Z.
- The second column (with asterisks) shows commits made in the current branch (and the * symbol always denotes it), namely three commits - B, C and D.
- And finally, the top of the output, separated from the bottom by a dividing line, shows a list of available branches, in which column their commits are and in which symbol they are marked.
Now we need to bring the working branch Z in accordance with the main D. Ie include work done in B, C, and D in Z. In other version control systems, such things are done solely by the use of a branch merge . In Git, there is also the possibility of merging. It is implemented by the merge command and is used when Z is a published branch, and we do not want to change its commit history. Here are the necessary commands for this:
$ git checkout Z # Z $ git merge D # B, C D Z Now the repository will look like this:
If we now select branch Z, it will contain everything that was there before, combined with the contents of D (here the translator sighs heavily: the real merge operation would require resolving conflicts between states D and Z) .
Although the new Z now contains changes from D, it also includes the new commit Z ', which is a merger of Z and D. It does not add anything new, but it represents the work of combining Z and D. In a sense, this is “meta -commit "because its contents relate exclusively to the measurements of the repository, and not to the new work done in the working tree.
But in Git there is a method of transplanting Z directly into D, actually moving Z in time - using the powerful rebase command. , :
, Z D. rebase — , . , , , .
, rebase — merge :
$ git checkout Z # Z $ git rebase D # Z, D , merge rebase .
rebase — , , , . , merge.
, . , W A, A W, , D W'. W , A+W+X D+W'+X' . , , Z — . , , - Z, Z, Z'.
— rebase , , — merge . merge , .
rebase
rebase , W Z, Z D ( D). , . -i rebase, , Z.
.
- pick () — , , . , ( ) . rebase .
- squash ()— «» . . ( , , ), Z D. , , , .
- edit () — , rebase , , , rebase --continue , .
- drop () — rebase, — , . , , .
rebase , . rebase :
- ,
- ,
- , ,
- ,
- .
, rebase , . , - rebase .
, , , I Z:
, — D, Z. - , C X , , L. , L — , , D, Z, . , J, . , :
$ git checkout L $ git rebase -i Z ( ) , :
:
, Git, , — Git . , . , , add. , , . . , reset, , , . — , : , CVS Subversion, Darcs — .
, , — -a commit. , , , — Subversion.
svn status , , svn commit . « » , HEAD. - , . , , , svn add .
Git commit -a : , , add, , , .
, Subversion , : Subversion « » , Git , , , HEAD. — , commit .
, : foo.c, . 2 , . Subversion :
$ svn diff foo.c > foo.patch $ vi foo.patch < foo.patch, , > $ patch -p1 -R < foo.patch # $ svn commit -m " " $ patch -p1 < foo.patch # $ svn commit -m " " ? .
Git, :
$ git add --patch foo.c < > $ git commit -m " " $ git add foo.c # $ git commit -m " " Reset reset?
Git reset — , . , reset , HEAD. .
, reset — , . — . , Git.
reset
--mixed ( , mixed — ), reset , HEAD . -soft , -soft HEAD, .
$ git add foo.c # $ git reset HEAD # , $ git add foo.c # , soft reset
reset -soft HEAD . . :
$ git reset --soft HEAD^ # HEAD , .. $ git update-ref HEAD HEAD^ # HEAD, git status , . — , , . .
, , commit -amend , , .
, , : - HEAD, , reset , ( merge ) , .
soft reset :
HEAD — :
hard reset
--hard reset — , hard reset HEAD, , HEAD.
— checkout , , reset --hard, , . .
, hard reset - , reset --soft , reset -hard . , :
$ git reset --hard HEAD~3 # , $ git reset --soft HEAD~3 # HEAD $ git reset --hard # , hard reset . , — git stash (. )
$ git stash $ git checkout -b new-branch HEAD~3 # ! new HEAD HEAD , , :
- (stash), . , , , .
- Stash , . , .
new-branch , master, :
$ git branch -D master # , master ( reflog) $ git branch -m new-branch master # new-branch master : reset --soft reset --hard ( ), , . Git , , , master. !
reset -hard , , master? stash (. ), .
, , reflog ( ):
$ git reset --hard HEAD@{1} # reflog Git stash reset -hard . . stash , :
$ git stash # , $ git reset --hard HEAD~3 # $ git reset --hard HEAD@{1} # ! , $ git stash apply # . : stash reflog
, Git: , , , , , .
, , . — Git reflog, -, . , ( commit ), , reflog, :
$ git reflog 5f1bc85... HEAD@{0}: commit (initial): Initial commit reflog . , - ( reset ), reflog 30 , « ». , .
, — . . , , foo.c, , Git , , . , Git. , , SHA1 id, :
$git hash-object foo.c < hash id> ? , . stash: ( . .: stash — «» )
$ git stash , , , : , , , stash — . stash.
stash stash apply , reflog .
, , ( WIP — «Work in Progress» — «…»:
$ git stash list stash@{0}: WIP on master: 5f1bc85... Initial commit $ git reflog show stash # id stash 2add13e... stash@{0}: WIP on master: 5f1bc85... Initial commit $ git stash apply stash , , . , , , :
$ git stash list stash@{0}: WIP on master: 73ab4c1... Initial commit ... stash@{32}: WIP on master: 5f1bc85... Initial commit $ git log stash@{32} # ? $ git show stash@{32} # , $ git checkout -b temp stash@{32} # ! : , ! , : stash , (, - ), stash apply .
stash — , 30 , stash clear, reflog expire
$ git stash clear # ! $ git reflog expire --expire=30.days refs/stash < stash > stash — . stash , (Unix OS):
$ cat <<EOF > /usr/local/bin/git-snapshot #!/bin/sh git stash && git stash apply EOF $ chmod +x $_ $ git snapshot , , — reflog expire
findings
. . , . , . , , . Git , , — .
— , , . , Git, . , , Git.
— , , . Git . , .
. 2009 . git GitHub, , , , Git. ? , .
Source: https://habr.com/ru/post/344962/
All Articles