How to animate the picture in the browser. Multi-pass WebGL rendering
Anyone who came across three-dimensional graphics sooner or later opened documentation on drawing methods that involve several passes of the renderer. Such methods allow you to add a picture with beautiful effects, such as the glow of bright spots (Glow), Ambient occlusion, depth of field effect.
Both the adult OpenGL and my favorite WebGL offer rich functionality for drawing results into intermediate textures. However, managing this functionality is a rather complicated process, in which it is very easy to get an error at any stage, from creating the necessary resolution textures to naming uniforms and passing them to the appropriate shader.
To figure out how to properly prepare WebGL, we turned to the specialists of Align Technology . They decided to create a special manager to manage all of this zoo from different textures, which would be convenient to use. What came out of it will be under the cut. It is important that an unprepared reader, who has never before encountered the need to organize multi-pass rendering, may seem incomprehensible to the article. The task is quite specific, but also incredibly interesting.

So that you understand the seriousness of the briefing, I will briefly tell you about the company. Align has a product that allows people to correct smiles without traditional braces. That is, their immediate consumers are doctors. This is a fairly limited audience with specific requests that impose fantastic demands on the reliability, performance and quality of the user interface. At one time, C ++ was chosen as the main tool, but it had a serious limitation: only the desktop application, only for Windows. About two years ago, the transition to the web version began. The capabilities of modern browsers and technology stack made it possible to quickly and conveniently re-create the user interface and adapt the code base, which had been written for almost 15 years. Of course, this led to the need to solve a bunch of tasks on the front and back end, including the need to optimize data volumes and download speeds. This and the following articles will be devoted to these tasks.
And in order not to get up twice, I will try not to clutter the post with source code. That is, everything that goes into the details of the implementation and depresses the readers of the code will, if possible, be skipped or reduced to a pure, uncluttered idea. The story will be conducted in the first person, as Vasily Stavenko told - one of the specialists of Align Technology, who agreed to lift the curtain of the inner kitchen of the WebGL-front.
Description of the problem
To begin with, it would be worthwhile to tell what, in fact, we wanted to implement and what was required for this. Our specifics do not imply a large number of visual effects. We decided to implement Screen Space Ambient Occlusion (or SSAO) and a simple shadow.
SSAO is, roughly speaking, the calculation of total shading at a point surrounded by other points. Here is the essence of this idea:
float light = 0; float deltaLight; for(int astep =0; astep < ANGULAR_STEPS; ++astep){ vec2 offset = getOffset(astep, ANGULAR_STEPS); for (int rstep = 0; rstep < RADIAL_STEPS; ++rstep ){ float radius = getRadius(rstep, RADIAL_STEPS); vec4 otherPointPosition = textureLookup(offset, radius); float screenSpaceDistance = length(point.xy - otherPointPosition.xy); screenSpaceDistance = max(screenSpaceDistance, 0.00001); float deltaHeight = otherPointPosition.z - point.z; float lightness = (deltaHeight / screenSpaceDistance); // ! deltaLight = companyRelatedMagic(lightness); } light += companyRelatedMagic2(deltaLight); } The textureLookup function selects a pixel from the connected texture, which is not a color, but a point position. Next, we calculate its illumination as the ratio of its depth to its distance from the current, drawn fragment in the coordinates gl_FragCoords . Then we do special magic with magic numbers to get the value in the right range.
The resulting texture will look something like this:
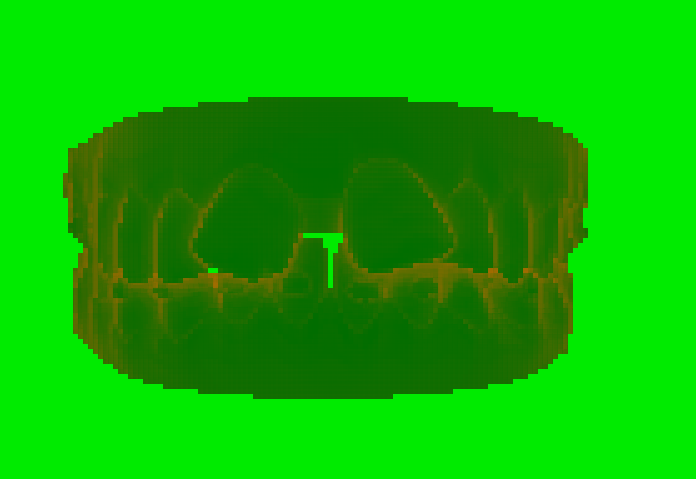
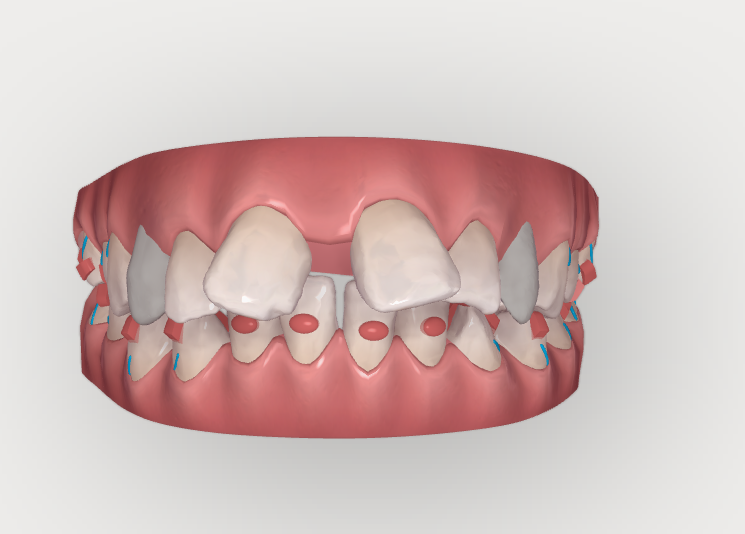
This is the final result:
It is noticeable that the SSAO-texture has a lower resolution than the full image. This is done on purpose. Immediately after drawing the positions into fragments, we shrink the texture, and only after that we calculate the SSAO. Lower resolution means faster rendering and processing. This means that before we compose the final image, we need to increase the resolution of the intermediate image.
Summarizing, we need to draw the following textures:
- The texture of the original resolution positions in
GL_FLOATformat - Low resolution texture.
- Texture SSAO low resolution.
- Blurred texture SSAO low resolution.
- Blurred texture SSAO high resolution.
- Shadow mask texture.
- The image of the scene, drawn with the correct materials.
Dependency and Reuse
Most of the textures can be drawn only if there are already some drawn textures. And some of them can be used several times. That is, a mechanism that works with dependencies is needed.
Debugging
For debugging the rendering process, it can be useful to bring any of the textures into the existing context.
Texture and Framebuffer Management
Since we already use the THREE.js framework for our work, the following requirements already follow from interaction with it. We decided not to slide into a clean WebGL and used THREE.WebGLRenderTarget , which unfortunately gives the overhead framebuffers, linking the texture and the created framebuffer object together, not allowing existing buffers to be used for other textures. But even with this overhead projector, our rendering works at acceptable speeds, and managing such an object is much easier than managing two related, but at the same time independent objects.
Texture Resolution Management
We would very much like to be able to “play” with the parameters of downsampling, with the magic of numbers and light limits, and not bother with the fact that we need to completely change the image output code — change its resolutions, matrices and other things. Therefore, it was decided to “sew” the sampling mechanism into our manager.
Replacing the material before rendering the scene
The material of all objects in THREE.Scene must be replaced for drawing positions, taking into account the visibility of objects, and then restored without loss. It should be noted here that one could use the Scene.overrideMaterial parameter. But in our case, the logic turned out to be somewhat more complex.
Implementation - the main idea
What have we done in the end?
First, make a manager, the description of which you will find below. And they wrote classes that automatically read shaders and see what textures they need to render themselves. The manager must be able to understand that there are dependencies for drawing a texture, and must draw the necessary dependencies.
This manager was supposed to be initialized with instances of the Pass class. That is, we need another object that will add passages to it and will already be application-specific. Due to the fact that in modern WebGL shaders we cannot set the name of the outgoing texture, we had to make ScreenSpacePass nameless and give it a name when adding. And you could read it from the shader text.
Here is such a method:
addPass(name, pass){ if(!pass instanceof Pass) throw new Error("Adding wrong class to renderer passes"); pass.setSceneAndCamera(this.screenSpaceScene, this.camera); this.passes.set(name, pass); } Yes, on the same manager, we hung up and managing the state of screenSpaceScene. Fortunately, this is one single mesh with geometry to close the entire screen.
This is the method we needed to draw a specific passage to the screen:
if(!this.passes.has(name)) throw new Error(`Multipass manager has no rendertarget named ${name}`) const target = this.passes.get(name); if(target.dependencies) { this._prepareDependencies(target.dependencies); // <--- target.installDependencies(this.passes); } if(this.prerenderCallbacks[name]) // . this.prerenderCallbacks[name].forEach(fn=>fn(this)); let clear = options.clear || {color:true, depth:true, stencil:true}; clear = {...clear, ...target.clearOptions} target.setResolutionWithoutScaling(this.width, this.height); // - target.prerender(); this.setupClearing(clear); this.renderer.render(target.getScene(), target.getCamera()); this.restoreClearing(); target.postrender(); A few comments:
- Each target is our Pass to draw.
this.passesis an instance of javascript Map () (Type:Map<String, Pass>).target.dependenciesis a list of texture uniforms in the shader. We read them from the shader source using regular expressions.installDependenciesis nothing more than installing uniforms.prepareDependenciesfor each dependency runs the functionthis.prerender, which is the younger sister of the specified function. The difference of methods is small, for example, the drawing goes to the target frame buffer:
this.renderer.render(target.getScene(), target.getCamera(), target.framebuffer); Thus, we have drawn a common class for our passes with this interface:
class Pass{ // : constructor(framebufferOptions = {}) {} // get clearOptions() get framebuffer() resize(w, h) // setResolution(width, height) // . setResolutionWithoutScaling(width, height) // . touchUniformFunctions() prerender() postrender() installDependencies(dependenciesMap) getScene() getCamera() } How it should work
First you need to set up our manager. To do this, we instantiate it and add a certain number of Pass-s to it. Then, when we need to draw some kind of Pass to our context, we just call
manager.renderOnCanvas("passName"); This Pass should be drawn on the screen, and the manager should prepare all the dependencies before that. Since we want to reuse textures, our manager will check for the presence of already rendered textures, and so that he does not decide that the textures from the previous frame are those textures that can be left off, we reset the old textures before drawing. For this, the manager has a function with the appropriate name start .
function render(){ manager.start(); manager.renderOnCanvas('mainPass'); } The confusion in the slender scheme was made by the need to paint translucent textures on the main canvas. When blending does not need to erase the previous results, and the blending itself must be configured. In our case, the prepared textures are superimposed on the image at the final rendering by blending. The procedure is as follows:
- We erase the background with gl.Clear - three.js does it automatically, if he doesn’t say that it is not necessary to erase it.
- Shading with blending.
- We superimpose the image of our jaw using transparency.
- Impose SSAO.
Like this:
function render(){ this.passManager.start(); if(showShadow) this.passManager.renderOnCanvas('displayShadow'); this.passManager.renderOnCanvas('main', { clear:{color:false, stencil:true, depth:true} }); if(showSSAO) this.passManager.renderOnCanvas('displaySSAO',{ clear:{color:false, stencil:true, depth:true} }); } It can be seen that the slight difference is that the color buffer is not erased, and all other buffers are cleared.
If we want to display some kind of intermediate texture (for example, for debugging purposes), we can only slightly modify the render. For example, the texture with SSAO, which I quoted above, was drawn with this code:
function render(){ this.passManager.start(); this.passManager.renderOnCanvas('ssao'); } ScenePass implementation
Now let's take a closer look at exactly how to draw our passage of scenes into textures. Obviously, we need something that can draw the scene, replacing the material, and something that will draw everything in screen coordinates.
export class ScenePass extends Pass{ constructor(scene, camera, options={}){ let prerender=options.prerender ||null, postrender=options.postrender || null; super(options.framebufferOptions); this.scene = scene; this.camera = camera; this._prerender = prerender; this._postrender = postrender; this._clearOptions = options.clearOptions; this.overrideMaterial = options.overrideMaterial || null; } setSceneAndCamera(){ // Do not rewrite our scene } } This is the whole class. It turned out pretty simple, because almost all the functionality was left in the parent. As you can see, I decided to leave overrideMaterial on the possible case when we can replace the material on the whole scene at once in one assignment operation, and not during the sequential replacement of material on all suitable objects. Actually, _prerender and _postrender are pretty smart substitutes for material for each individual mesh. Here is what they look like in our case:
class Pass{ /// Skip-skip prerender(){ if(this.overrideMaterial) this.scene.overrideMaterial = this.overrideMaterial; if(this._prerender) this.scene.traverse(this._prerender); } postrender(){ if(this.scene.overrideMaterial) this.scene.overrideMaterial = null; if(this._postrender) this.scene.traverse(this._postrender); } /// Skip-skip } Scene.traverse is a THREE.js method that recursively passes through the entire scene.
ScreenSpacePass implementation
ScreenSpacePass was conceived so as to pull out the maximum necessary information from the shader in order to work with it without an extra boilerplate. The class turned out pretty complicated. The main difficulty came in the logic that provides sampling - that is, the installation of the correct resolution in the texture. We had to add an additional method to set the resolution of the current framebuffer in cases when we want to draw onto the screen, and not into the texture. I had to make a compromise between technical complexity, the responsibility of classes, the number of entities and the time allotted for the task.
Automatic search and installation of uniforms helped quickly find problems such as typos in textural uniforms. In such cases, the GL can take some other texture, and what you get on the screen looks completely wrong, and you have no idea why.
export class ScreenSpacePass extends Pass { constructor(fragmentShader, options = {}){ // scaleFactor = 1.0, uniforms={}){ let scaleFactor = options.scaleFactor || 1.0; let uniforms = options.uniforms || {}; let blendingOptions = options.blendingOptions || {}; super(options.framebufferOptions); /// Skip } resize(w, h){ const scaler = getScaler(this.scaleFactor, w, h); let v = new Vector2(w,h).multiply(scaler); this.framebuffer.setSize(Math.round(vx), Math.round(vy)); } setResolution(width, height){ const scaling = getScaler(this.scaleFactor, width, height); let v = new Vector2(width, height).multiply(scaling); this.uniforms.resolution.value = v; } setResolutionWithoutScaling(width, height){ this.uniforms.resolution.value = new Vector2(width, height); } isSampler(uname){ return this.samplerUniforms.indexOf(uname) != -1; } tryFindDefaultValueForUniformType(utype){ switch(utype){ case 'vec2': return new Vector2(0., 0.); default: return null; } } getValueForUniform(uniformDescr){ if(!this.uniformData.hasOwnProperty(uniformDescr.name )){ if(uniformDescr.name != 'resolution' && !this.isSampler(uniformDescr.name)) console.warn(`Value for uniform '${uniformDescr.name}' is not found.`); return this.tryFindDefaultValueForUniformType(uniformDescr.type); } if(typeof(this.uniformData[uniformDescr.name]) == 'function'){ this.uniformData[uniformDescr.name] = this.uniformData[uniformDescr.name].bind(this); return this.uniformData[uniformDescr.name](); } else return this.uniformData[uniformDescr.name]; } touchUniformFunctions(){ for(const k in this.uniformData){ if(typeof this.uniformData[k] !== 'function') continue; this.uniforms[k].value = this.uniformData[k](); } } prerender(){ this.scene.overrideMaterial = this.shader; this.touchUniformFunctions(); } parseUniforms(glslShader){ let shaderLines = glslShader.split('\n'); const uniformRe = /uniform ([\w\d]+) ([\w\d]+);/; let foundUniforms = shaderLines.map(line=>line.match(uniformRe)) .filter(x=>x) .map(x=>{return {type:x[1],name:x[2]}}); const umap = this.mapping; this.dependencies = foundUniforms.filter(x=>x.type == 'sampler2D').map(x=>umap[x.name]?umap[x.name]:x.name); this.samplerUniforms = foundUniforms.filter(x=>x.type == 'sampler2D').map(x=>x.name); this.uniforms = {}; foundUniforms.forEach(u=>{ this.uniforms[u.name] = {value:this.getValueForUniform(u)}; }); if(!this.uniforms.hasOwnProperty('resolution')) throw new Error('ScreenSpace shader in WebGL must have resolution uniform'); } installDependencies(dependenciesMap){ this.samplerUniforms.forEach(uname=>{ this.uniforms[uname].value = dependenciesMap.get(uname).framebuffer.texture; }) } parseShader(fragmentShader){ let glslShader = parseIncludes(fragmentShader); this.parseUniforms(glslShader); return new RawShaderMaterial({ vertexShader: ssVertex, fragmentShader:glslShader, uniforms: this.uniforms, transparent: this.blendingOptions.transparent || false }); } } function parseIncludes( string ) { // Stolen from three.js var pattern = /#include +<([\w\d.]+)>/g; function replace( match, include ) { var replace = ShaderChunk[ include ]; if ( replace === undefined ) { throw new Error( 'Can not resolve #include <' + include + '>' ); } return parseIncludes( replace ); } return string.replace( pattern, replace ); } Here the source turned out to be quite large, and the class - quite clever. However, it can be seen that most of the code just finds out if there are textural uniforms in the shader, and sets them as dependencies.
Well, at the very end, I will show how we used it. Application specific entity we called EffectComposer . In its constructor we create the described manager and create passes for it:
this.passManager = new PassManager(threeRenderer); this.passManager.addPass('downscalePositionSSAO', new ScreenSpacePass(require('./shaders/passingFragmentShader.glsl'), {scaleFactor}) ); this.passManager.addPass('downscalePositionShadow', new ScreenSpacePass(require('./shaders/positionDownSampler.glsl'), {scaleFactor}) ); this.passManager.addPass('ssao', new ScreenSpacePass(require('./shaders/SSAO.glsl'), {scaleFactor}) ); /// Skip-skip-skip As an example, the contents of the file passingFragmentShader.glsl:
precision highp float; uniform sampler2D positions; // - positions uniform vec2 resolution; void main(){ vec2 vUv = gl_FragCoord.xy / resolution; gl_FragColor = texture2D(positions, vUv); } The shader is very short - get a pixel that will be interpolated, and immediately give it away. All work will be done by linear interpolation in the texture settings ( GL_LINEAR ).
Now let's see how the positions will be drawn.
We need the working scene elsewhere in the program, so the EffectComposer not its owner, it is asked when necessary.
function updateScenes(scenes, camera){ this.passManager.addPass('main', new ScenePass(scene, camera)); this.passManager.addPass('positions', new ScenePass(scene, camera, { prerender: materialReplacer, postrender:materialRestore, framebufferOptions })) } As you can see, if someone tells us about a scene change, the EffectComposer will create two Pass-as: one with the default settings and the other with a tricky substitute material. Scene passages do not contain any tricky dependencies, they, as a rule, are drawn by themselves, however, the described approach allows us to do this if we add several methods to ScenePass to add dependencies. Because it is not obvious what kind of material from the scene will want to be drawn dependency.
Conclusion
Despite the ease of use in our case, we were not able to achieve fully automatic generation of passes based on shaders. I did not want to add markers to the shaders that would complement the scene rendering passes with additional parameters, such as texture output parameters - GL_RGB , GL_RGBA , GL_FLOAT , GL_UNSIGNED_BYTE . This would, on the one hand, simplify the code, but would give less freedom to reuse shaders. That is, this setting still had to be described.
It is worth mentioning that I still had to implement dependency mapping. This turned out to be useful if we want to use a single shader in several passes and with different incoming textures. In this case, each pass became more like a function, so I had an idea how to do it a bit more “functional”.
However, all development has proven to be very useful. In particular, it allows us to add any effects to our project without significant difficulties. Although I personally like the possibility of easy debugging of images.
')
Source: https://habr.com/ru/post/344930/
All Articles