Load testing on the Gatling framework
The article is published on behalf of Sergey Maslennikov, sergeymasle
UPD. Added section "Implementing an extension for gatling"

We continue the cycle of articles about load testing on the gatling.io framework. This article will tell you about the basic techniques for using Gatling DSL, which in most cases are used when developing any load testing scripts. So, please under the cat.
Gatling structure
In our previous article, we wrote about installing SBT and setting up the environment for the Gatling framework. After completing all the actions you should have a project (1), the structure of which is shown in the image below.
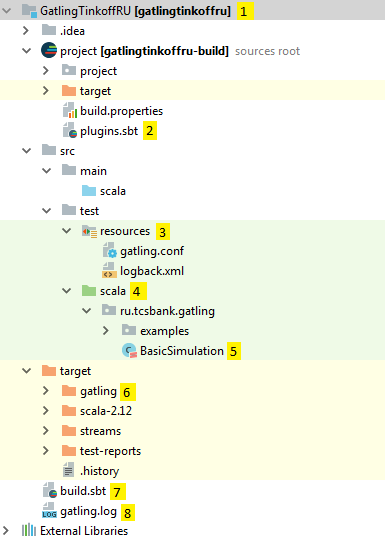
In the plugins.sbt (2) file, the gatling plug-in for sbt must be connected, if the file was not created, then create it manually. Please note that you need to specify the latest version of the plugin, at the time of this writing, it is 2.2.2. File code below.
//plugins.sbt addSbtPlugin("io.gatling" % "gatling-sbt" % "2.2.2") Next, in the src / test directory, you need to create the resources (3) directory. It contains configuration files, as well as test data. The gatling.conf file contains the basic settings, logback.xml is responsible for the logging level and log output interfaces. These files can be taken from https://gatling.io/download/ .
The scala directory contains test packages. Package names can be called whatever you want, but as a rule, companies use their inverted name ru.tcsbank.load.
The BasicSimulation file is the main test file and is the script entry point.
The target \ gatling (6) directory generates reports on the launch log (the one you see in the console). You should look there more often - it grows very quickly.
The main project file is build.sbt (7). Contains dependencies on all libraries that you connect. This is where the link to the Gatling framework is indicated, its code below.
//build.sbt /* Gatling. plugins.sbt */ enablePlugins(GatlingPlugin) /* */ name := "GatlingForArticle" /* */ version := "0.1" /* Scala */ scalaVersion := "2.12.4" /* */ libraryDependencies += "io.gatling.highcharts" % "gatling-charts-highcharts" % "2.3.0" % "test,it" libraryDependencies += "io.gatling" % "gatling-test-framework" % "2.3.0" % "test,it" /* , JVM */ javaOptions in Gatling := overrideDefaultJavaOptions("-Xss10m", "-Xms2G", "-Xmx8G") The last important file is gatling.log. It is in it that you can see the requests and responses sent. To see all requests, do not forget to uncomment the "ALL HTTP" line in the logback.xml file.
Main idea of gatling
At first glance, the scripts and DSL Gatling may seem complicated, but if you understand the idea of building scripts, then everything will become quite simple.
Gatling presents a virtual user as a scenario() . For the script, the number of users is indicated through the inject method, the load model, as well as the http protocol settings and various emulation conditions. All this is specified in the setUp() construction. For example, when carrying out the load online store for the buyer and the administrator will be several scenarios:
- Buyer makes a purchase
- The buyer only adds to the basket
- The buyer only looks goods
This separation makes it easy to adjust the load by increasing the number of virtual users for specific scenarios.
The script is a chain of executions exactly in this chain inside the exec() function are placed queries.
- +-(1) +-(2) +-(3) +-(<>){ (4) } { (5) } The chain of executions begins with a scenario(<Name>) expression scenario(<Name>) and is then assembled by calling the exec() function.
#1 val scn2 = scenario("ChainScenario") .exec(http().get()) .exec(http().get()) .exec(http().get()) .doIfOrElse(true) { exec(http().get()) } { exec(http().get()) } If we compare the emulation of virtual users JMeter and Gatling, then we can distinguish some feature. In JMeter, users are placed in a ThreadGroup coil, where their number is set and it is this (coil) that repeatedly plays the virtual user script over the loop. Those. when "raising" two virtual users, they will run the same script until the test time ends.
Gatling manages virtual users in a slightly different way. When raising two virtual users, they will execute their script and finish their work on this. In order for users to run a script in a loop, it is necessary to place a chain in a loop block. Consider a simple test script, which is presented at https://gatling.io/docs/current/quickstart/#gatling-scenario-explained , it can be taken as a basis.
//BasicSimulation.scala package ru.tcsbank.gatling /* : io.gatling.core.Predef._ - import io.gatling.http.Predef._ - HTTP import scala.concurrent.duration._ - , `4 minutes`, `15 seconds` */ import io.gatling.core.Predef._ import io.gatling.http.Predef._ import scala.concurrent.duration._ /* . , Simulation, . */ class BasicSimulation extends Simulation { /* HTTP */ val httpConf = http .baseURL("http://computer-database.gatling.io") .acceptHeader("text/html,application/xhtml+xml,application/xml;q=0.9,*/*;q=0.8") .doNotTrackHeader("1") .acceptLanguageHeader("en-US,en;q=0.5") .acceptEncodingHeader("gzip, deflate") .userAgentHeader("Mozilla/5.0 (Windows NT 5.1; rv:31.0) Gecko/20100101 Firefox/31.0") /* . "" , , (pacing) . */ val scn = scenario("BasicSimulation") .exec( http("request_1") .get("/") ) .pause(5) /* . , , . */ setUp( scn.inject(atOnceUsers(1)) ).protocols(httpConf) } At first glance, the script of scripts may look difficult, but if you look at it, DSL Gatling is quite simple and you don't need in-depth knowledge of Scala to write load tests.
The script of scripts begins with assignment of a function to scenario() . The name of the script must be unique! Next, the exec() function is called, which accepts other functions that implement the test script: http and websocket. It is in it that all actions for emulating requests are performed.
When the script script is written, in the setUp() function we specify how many users will execute it and how these users will load. Next, analyze in detail how to work with all this.
HTTP
The default framework supports the following methods GET, POST, PUT, PATCH, DELETE, OPTIONS. Consider writing GET and POST requests as an example. To begin with, assign the scn function to the scn constant and write a simple GET request to the exec() :
val scn = scenario("GetScenario") .exec( http("GETRequest") /* .get("/foo.php") */ .get("http://bar.com/foo.php") ) If it is necessary to install headers, then add the following:
val scn = scenario("GetScenario") .exec( http("GETRequest") .get("http://bar.com/foo.php") /* .headers("foo","bar") Map */ .headers( Map( "foo1" -> "bar1", "foo2" -> "bar2" ) ) ) Passing parameters to the request:
val scn = scenario("GetScenario") .exec( http("GETRequest") .get("http://bar.com/foo.php") .headers( Map( "foo1" -> "bar1", "foo2" -> "bar2" ) ) /* .queryParam("param","value") Map */ .queryParamMap( Map( "param1" -> "value1", "param2" -> "value2" ) ) Parameters can also be passed directly through the .get("http://bar.com/foo.php?param=value") function .get("http://bar.com/foo.php?param=value") . If there is a loading of static resources, then we use resources() for parallel loading.
val scn = scenario("GetScenario") .exec( http("GETRequest") .get("http://bar.com/foo.php") .headers( Map( "foo1" -> "bar1", "foo2" -> "bar2" ) ) .queryParamMap( Map( "param1" -> "value1", "param2" -> "value2" ) ) .resources( http("css").get("/main.css"), http("js").get("http://bar.com/main.js") ) For the POST method, when passing parameters, the formParam() function is used.
val scn = scenario("PostScenario") .exec( http("GETRequest") .post("http://bar.com/foo.php") .headers( Map( "foo1" -> "bar1", "foo2" -> "bar2" ) ) /* .formParam("param","value") Map */ .formParamMap( "param1" -> "value", "param2" -> "value2" ) To transfer data directly through the request body, you must use body() .
val scn = scenario("PostScenario") .exec( http("GETRequest") .post("http://bar.com/foo.php") .headers( Map( "foo1" -> "bar1", "foo2" -> "bar2" ) ) .body( /* . stripMargin , */ StringBody( """ |{ | "login": "password" |}""".stripMargin ) ) Checks
When emulating requests, you need to check the response code or the presence of any text in the response body. It is also often necessary to extract data from the response. All this can be done using the check() function. Checks must be made after the function of the http-method.
val scn = scenario("CheckScenario") .exec( http("ForChecks") .get("/check.php") /* , 200 */ .check(status.is(200)) /* , 200 500 */ .check(status.in(200, 500)) /* foo_bar */ .check(substring("foo_bar")) /* */ .check(regex(""" \d{4} – \d{4}""")) /* */ .check(regex("""key=(\d{4}-\w{4})""").saveAs("AuthKey")) /* , , . checkIf()() Response Session. Response "id=" , "id_some_value" */ .check( checkIf( (r: Response, s: Session) => r.body.string.contains("id=") )( regex("""id=(\d+)""").saveAs("id_some_value") ) ) ) Session
All virtual user data and variables are stored in Session. If you want to betray something in the framework of the script, then it needs to be done through the session.
val scn = scenario("SessionScenario") /* - password_param . , - . */ .exec( session => session.set("password_param","anyPassword") ) .exec( http("param") .get("/anything.php") /* "${}" */ .queryParam("login","${password_param}") ) Dynamic values cannot be directly transferred to DSL functions, since Scala uses CallByValue and they will be received at compilation and then always be used without receiving new ones.
exec( http("timestamp") .get("/") /* , */ .queryParam("timestamp", System.currentTimeMillis() ) /* Session, */ .queryParam("timestamp", session => { session("var").as[String] } ) /* Just magic! . X - */ .queryParam("timestamp", x => { System.currentTimeMillis() } ) ) Logical constructions
As in other testing tools, logical constructions are often used to execute queries depending on any conditions.
val scn = scenario("doIfSimulation") /* foo bar */ .exec( session => session.set("foo","bar") ) /* , foo bar. , . */ .doIf(session => session("cond").as[String].startsWith("bar")){ // exec( http("IFrequest") .get("/") ) } Test data
To perform a quality load and test the system, rather than its cache, you need to send data in requests that change dynamically during the test. To store and retrieve such data, the easiest way is to read from a file. The file must contain data separated by a symbol. Gatling has functions for reading such data.
csv ("foo.csv") // comma separated data
tsv ("foo.tsv") // tab-delimited data
ssv ("foo.ssv") // semi-colon delimited data
separatedValues ("foo.txt", '#') // data separated by another character
Using the example of a small csv file, we will show work with test data:
//csv model, Macbook, MacBook Pro, ASUS Eee PC, Acer, Asus, Sony Vaio, Chromebook Gatling, when reading a file, uses the first line as the names of the parameters, and later reading the values stores them under these names. Thus, the values with the names of laptops described in the csv file will be substituted into the ${model} parameter.
To read a csv file, you must call the csv() function.
/* .queue // .random // .shuffle // , .circular // */ val feeder = csv("data.csv").circular val scn = scenario("doIfSimulation").feed(feeder) //#1 .repeat(5)( exec( http("request") .get("/") ) // .feed(feeder) #2 .exec(http("search").get("/computers?f=${model}")) ) So, we created the feeder variable and specified the name of the file that lies in src\test\resources\data.csv . In the script, we call the feed() function and specify the feeder constant. A new value is read every time the feed() function is called.
With option # 1, the feed() function is called before repeat() , so the ${model} variable will use the first read value for 5 iterations.
With option # 2, the value will be read before each request.
Load models
Gatling supports various load models. These models are responsible for the "rise" of users and the generated intensity.
nothingFor (duration) - specifies the duration of the pause duration before starting the load
atOnceUsers (nbUsers) - virtual users in the number of nbUsers will “rise” immediately (by readiness).
rampUsers (nbUsers) over (duration) - during the duration , virtual users in the number of nbUsers will "rise" at regular time intervals.
constantUsersPerSec (rate) during (duration) - indicates the frequency of “raising” virtual users rate (virtual user per second) and the time interval duration . During the duration number of virtual users will increase by the rate every second.
constantUsersPerSec (rate) during (duration) randomized - similar to the upper construction, only the time intervals between "raising" virtual users will be random.
rampUsersPerSec (rate1) to (rate2) during (duration) - during the duration virtual users will increase from rate1 to rate2 .
rampUsersPerSec (rate1) to (rate2) during (duration) randomized - similar to the upper construction, only the time intervals between the “raises” of virtual users will be random.
splitUsers (nbUsers) into (injectionStep) separatedBy (duration) - at each time interval, virtual users will be added to the injectionStep model until their number reaches nbUsers . In injectionStep you can specify the models described above.
splitUsers (nbUsers) into (injectionStep1) separatedBy (injectionStep2) - similar to the top construction, just the splitter model injectionStep2 .
heavisideUsers (nbUsers) over (duration) - virtual users in the number of nbUsers will rise in steps during the duration .
Startup load
Option 1
To run the load, the easiest way is to use bundle. You must put the script file in gatling-charts-highcharts-bundle-2.3.0\user-files\simulations\ and then run gatling-charts-highcharts-bundle-2.3.0\bin\gatling.bat . The console will offer a choice of script to run.
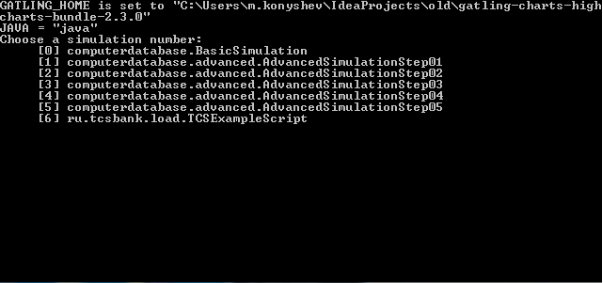
Our script is under option 6. After selecting, a load will be generated with information output to the console.
Option 2
This option involves running the load directly from the IDE IntelliJ IDEA Community.
After you have made all the steps to set up the libraries, press ALT + F12 and open the terminal. In the terminal, type the command sbt .

After downloading all the components, we run the scripts with the gatling:testOnly command gatling:testOnly .

The console will display the current load status.
To launch from the IDEA launch panel, you need to add our launch command to the SBT Task.

Implementing an extension for gatling
The Gatling documentation says that out of the box there is support for protocols only for HTTP / 1.1 and WebSocket. There are also official and unofficial Gatling extensions, which are available via the link ( https://gatling.io/docs/2.3/extensions/ ).
Often there are tasks when it is necessary to test a system in which the application level protocol is different from HTTP or WebSocks under load. In this case, for Gatling, you can write your own extension and implement the necessary functionality.
And so, we need to implement this opportunity:
val scn = scenario("BasicSimulation") .exec( new ExampleActionBuilder("MyAction") ) Since the exec() function can take the ActionBuilder type, ActionBuilder need to write your own class and extend it with the ActionBuilder type.
class ExampleActionBuilder(myNameAction: String) extends ActionBuilder { override def build(ctx: ScenarioContext, next: Action): Action = { new ExampleChainableAction(myNameAction, next, ctx) } } In the override function build you need to create an instance of the class that will implement the necessary code. This class needs to be extended from ChainableAction .
class ExampleChainableAction(myNameAction: String, myNextAction: Action, ctx: ScenarioContext) extends ChainableAction { override def next: Action = myNextAction override def name: String = myNameAction override def execute(mySession: Session): Unit = { /* */ } } Below is a working example of this approach. It is important to note that this method is not the best solution, but it is the most “simple” to implement.
package ru.tcsbank.load /* : io.gatling.core.Predef._ - import io.gatling.http.Predef._ - HTTP import scala.concurrent.duration._ - , `4 minutes`, `15 seconds` */ import io.gatling.commons.stats.{KO, OK} import io.gatling.core.Predef._ import io.gatling.core.action.builder.ActionBuilder import io.gatling.core.action.{Action, ChainableAction} import io.gatling.core.stats.message.ResponseTimings import io.gatling.core.structure.ScenarioContext import io.gatling.http.Predef._ import scala.concurrent.duration._ /* . , Simulation, . */ class ExampleProtocolScript extends Simulation { /* HTTP */ val httpConf = http .baseURL("http://computer-database.gatling.io") .acceptHeader("text/html,application/xhtml+xml,application/xml;q=0.9,*/*;q=0.8") .doNotTrackHeader("1") .acceptLanguageHeader("en-US,en;q=0.5") .acceptEncodingHeader("gzip, deflate") .userAgentHeader("Mozilla/5.0 (Windows NT 5.1; rv:31.0) Gecko/20100101 Firefox/31.0") /* . "" , , (pacing) , . */ val scn = scenario("BasicSimulation") .exec( /* Action */ new ExampleActionBuilder("MyAction") ) /* . , , . */ setUp( scn.inject(atOnceUsers(1)).protocols(httpConf) ) } /* exec(). ExampleActionBuilder() , ExampleChainableAction() */ class ExampleActionBuilder(myNameAction: String) extends ActionBuilder { override def build(ctx: ScenarioContext, next: Action): Action = { new ExampleChainableAction(myNameAction, next, ctx) } } /* Action. ExampleChainableAction() . */ class ExampleChainableAction(myNameAction: String, myNextAction: Action, ctx: ScenarioContext) extends ChainableAction { /* . . */ override def next: Action = myNextAction /* Action. , . http(<>).get(...) */ override def name: String = myNameAction /* Action. */ override def execute(mySession: Session): Unit = { /* Action */ val startTime = System.currentTimeMillis() try { /* Action */ System.out.println(myNameAction+" Hello world!") /* Action */ /* Action */ val stopTime = System.currentTimeMillis() /* Action */ ctx.coreComponents.statsEngine.logResponse( session = mySession, requestName = name, timings = new ResponseTimings(startTime, stopTime), status = OK, None, None, Nil ) /* . . */ myNextAction ! mySession } catch { /* , . */ case e: Exception => { /* Action */ val stopTime = System.currentTimeMillis() /* Action */ ctx.coreComponents.statsEngine.logResponse( session = mySession, requestName = name, timings = new ResponseTimings(startTime, stopTime), status = KO, None, Some(e.getMessage), // , /target/.../simulation.log Nil ) /* . . */ myNextAction ! mySession } } } } This article described the main points that will help you independently develop scripts for carrying out the load on the Gatling framework. , .
')
Source: https://habr.com/ru/post/344818/
All Articles