Acceleration build C and C ++ projects
Many programmers know firsthand that a program in C and C ++ is going to be very long. Someone solves this problem by fighting with swords during assembly, someone with a trip to the kitchen to "drink coffee." This article is for those who are tired of it, and he decided it was time to do something. This article discusses various ways to speed up the project build, as well as the treatment of the disease "corrected one header file - half of the project was reassembled."

Before we begin, let's find out / recall the main phases of translation of C / C ++ code into an executable program.
According to clause 5.1.1.2 of the draft N1548 “Programming languages - C” and clause 5.2 of the draft N4659 “Working Draft Standard for Programming Language C ++” (published versions of the standards can be purchased here and here ), 8 and 9 translation phases are defined, respectively. Let's omit the details and take an abstract look at the translation process:
')
The program is composed of translation units (* .c, * .cc, * .cpp, * .cxx), each is self-sufficient and can be preprocessing / compiled independently of the other. It also follows from this that each translation unit has no information about the other units. If two translation units need to exchange any information (for example, a function), then this is solved by linking by name: the external entity is declared with the keyword extern , and in phase III the linker links them. A simple example.
TU1.cpp file:
TU2.cpp file:
To simplify the negotiation of different translation units, a header file mechanism was invented, which consists in declaring a clear interface. Subsequently, each translation unit, if necessary, includes a header file through the preprocessor directive #include .
Next, we consider how to speed up the assembly at different phases. In addition to the principle itself, it will also be useful to describe how to implement this or that method into the assembly system. Examples will be given for the following build systems: MSBuild , Make , CMake .
Dependencies when compiling is what most influences the speed of building C / C ++ projects. They occur whenever you include a header file through the preprocessor directive #include . This gives the impression that there is only one source of ad for an entity. The reality is far from ideal - the compiler has to repeatedly process the same ads in different translation units. Macros spoil the picture even more: it is necessary to add a macro declaration before including the title, how its contents can change radically.
Consider a couple of ways to reduce the number of dependencies.
Method N1: remove unused inclusions. No need to pay for what you do not use. So you reduce the work of both the preprocessor and the compiler. You can manually crack the headers / source files or use the utilities: include-what-you-use , ReSharper C ++ , CppClean , Doxygen + Graphviz (for visualizing the diagram of inclusions), etc.
Method N2: Use ad dependency, not definition. We highlight 2 main aspects:
1) In header files do not use objects where you can use links or pointers. For references and pointers, a forward declaration is sufficient, since the compiler knows the size of the link / pointer (4 or 8 bytes depending on the platform), and the size of the transmitted objects does not matter. A simple example:
Now, when changing the first header, the compiler will have to recompile the translation units dependent on both Foo.h and Bar.h.
To break such a link, it is enough to refuse to transfer the obj object by value in favor of passing by a pointer or a link in the Bar.h header:
As for the standard headers, here you can worry less and just include them in the header file, if necessary. The only exception is iostream . This header file has grown so much in size that it additionally comes with an iosfwd header, containing only the leading declarations of the necessary entities. This is what should be included in your header files.
2) Use Pimpl or Interface Class idioms. Pimpl removes implementation details by placing them in a separate class whose object is accessible through a pointer. The second approach is based on the creation of an abstract base class, the implementation details of which are transferred to a derived class that overrides pure virtual functions. Both options eliminate dependencies at the compilation stage, but also introduce their overhead during the program operation, namely: creating and deleting a dynamic object, adding an indirect addressing level (due to the pointer); and separately in the case of the interface class, the cost of calling virtual functions.
Method N3 (optional): in addition, you can create headlines containing only leading ads (similar to iosfwd ). These "leading" headers can then be included in other regular headers.
With the standard approach, the compiler will receive a new file for preprocessing and compiling time after time. Since each translation unit is self-sufficient, a good way to accelerate is to parallelize phases I-II of the broadcast, processing N files at a time.
In Visual Studio, the mode is enabled with the / MP [processMax] flag at the project level, where processMax is an optional argument that is responsible for the maximum number of compilation processes.
The make mode is enabled with the -jN flag, where N is the number of compilation processes.
If you use CMake (besides in cross-platform development), then they can generate files for an extensive list of build systems via the -G flag. For example, CMake generates a solution for Visual Studio under Windows and Unix Makefiles under Linux for the C ++ analyzer PVS-Studio. In order for CMake to generate projects in the Visual Studio solution with the / MP flag, add the following lines to your CMakeLists.txt :
Also via CMake (from version 2.8.0) you can call the assembly system with parallelization flags. For MSVC ( / MP is listed in CMakeLists.txt) and Ninja (concurrency is already enabled):
For makefiles:
Using the previous advice, you can significantly reduce the assembly time. However, when the project is huge, and this may not be enough. Increasing the number of compilation processes, you run across the barrier in the form of the maximum number of simultaneously compiled files due to processor / RAM / disk operations. This is where distributed compilation comes to the rescue, using the free resources of a friend behind his back. The idea is simple:
1) preprocessing source files on one local machine or on all available machines;
2) compile preprocessed files on local and remote machines;
3) expect results from other machines in the form of object files;
4) compose object files;
five) ????
6) PROFIT!
Highlight the main features of distributed compilation:
The most famous representatives are:
Distcc and Icecream can be fairly easily integrated into Linux in several ways:
1) Universal, through a symbolic link (symlink)
2) For CMake, starting with version 3.4
Another way to reduce build time is to use the compiler cache. Let's slightly change the phase II of the code translation:
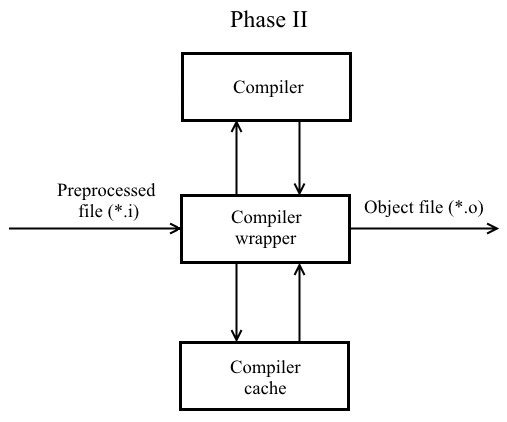
Now when compiling a preprocessed file based on its contents, compilation flags, compiler output, a hash value is calculated (it takes into account compilation flags). Subsequently, the hash value and the corresponding object file are registered in the compiler cache. When recompiling with the same flags of an unmodified file, the already prepared object file will be taken from the cache and fed to the linker's input.
What can be used:
Registering ccache for later use can be done in several ways:
1) Universal, through a symbolic link
2) For CMake, starting with version 3.4
The compiler cache can also be integrated into a distributed compilation. For example, to use ccache with distcc / Icecream, follow these steps:
1) Set the CCACHE_PREFIX variable:
2) Use one of points 1 - 2 of the ccache registration.
When compiling a large number of source files, the compiler, in fact, performs many times the same job of parsing heavy headers (for example, iostream ). The basic idea is to put these heavy headers into a separate file (usually referred to as a prefix header), which is compiled once and then included in all translation units the very first .
In MSVC, to create a precompiled header, 2 files are generated by default: stdafx.h and stdafx.cpp (other names can also be used). The first step is to compile stdafx.cpp with the flag of / Yc73p " . By default, a file with a .pch extension is created . To use a precompiled header when compiling a source file, use the / Yu file synpath-to-stdafx.h flag . ” Together with the / Yc and / Yu flags, you can also use / Fp "path-to-pch" to specify the path to the .pch file. Now it is necessary to connect the first prefix header in each translation unit: either directly via #include "path-to-stdafx.h" , or by force via the / FI holypath -to-stdafx.h flag.
The approach to GCC / Clang differs little: you must pass the prefix header itself to the compiler itself instead of the usual compiled file. The compiler will automatically generate a precompiled header with the default .gch extension. With the -x option, you can optionally specify whether to treat it as c-header or c ++ - header . Now include the prefix header manually via #include or through the -include flag.
You can read more about precompiled headers here .
If you use CMake, we recommend that you try the cotire module: it can automatically analyze the source files, generate prefix and precompiled headers and connect them to translation units. It is also possible to specify your prefix header (for example, stdafx.h ).
The essence of this method is to create a single compiled file (translation block), which includes other translation units:
If all translation units are included in a single compiled file, then this method is otherwise called Unity build. We single out the main features of the Single Compilation Unit:
Note possible problems when applying the approach:
The maximum benefit on multi-core systems will be given by the schemes:
If you use CMake, you can automate the generation of SCUs using this module.
Replacing one of the translation components with a faster analog can also increase the assembly speed. However, it is worth doing at your own risk.
As a faster compiler, you can use Zapcc . The authors promise to repeatedly accelerate the recompilation of projects. This can be seen in the example of recompiling Boost.Math :

Zapcc does not sacrifice program performance, is based on Clang and is fully compatible with it. Here you can learn how Zapcc works. If your project is based on CMake, then replacing the compiler is very easy:
or so:
If your OS uses the ELF format of object files (Unix-like systems), then you can replace the GNU ld linker with GNU gold. GNU gold comes as part of binutils, starting with version 2.19, and is activated with the -fuse-ld = gold flag. In CMake, you can activate it, for example, with the following code:
The obvious bottleneck in the assembly is the speed of disk operations (especially random access). Transferring temporary files of a project or oneself to faster memory (HDD with increased random access speed, SSD, RAID from HDD / SSD, RAMDisk) can help a lot in some situations.
Most of the above methods have historically arisen due to the choice of the principle of translation of C / C ++ languages. The mechanism of header files, despite its apparent simplicity, causes a lot of trouble for C / C ++ programmers.
For quite a long time there has been a discussion about the inclusion of modules in the C ++ standard (and, possibly, will appear in C ++ 20). A module will be considered an associated set of translation units ( modular unit ) with a specific set of external (exported) names, called module interfaces . The module will be available to all translation units importing it only through its interface. Non-exported names are placed in the implementation of the module .
Another important advantage of modules is that they are not subject to change through macros and preprocessor directives, unlike header files. The reverse is also true: macros and preprocessor directives inside a module do not affect translation units that import it. Semantically, modules are independent, fully compiled translation units.
This article will not consider in detail the device of future modules. If you want to know more about them, then we recommend viewing Boris Kolpakov’s speech at CppCon 2017 on C ++ modules (the difference in build time is also shown there):
At present, MSVC , GCC , Clang compilers offer experimental support for modules.
In this section, let's look at how effective and useful the approaches described are.
Take the core of the PVS-Studio analyzer for analyzing C and C ++ code. It is, of course, written in C ++ and is a console application. The kernel is a small project compared to such giants as LLVM / Clang, GCC, Chromium, etc. Here, for example, that produces CLOC on our code base:
Note that before doing any work, our project was going in 1.5 minutes (parallel compilation and one precompiled header were used) on the following configuration of the working machine:
We take as a starting point the assembly of the project on the HDD, turning off all the optimization of the build time. Further we will designate the first stage of measurements:
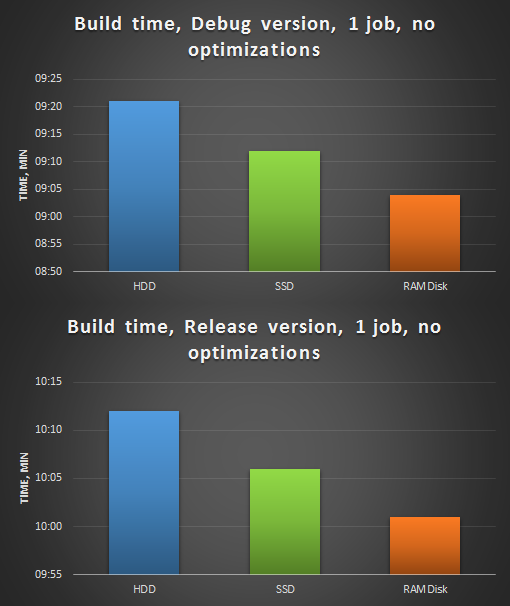
Figure 1. Assembly of the PVS-Studio analyzer, 1 stream, without optimizations. Above - build Debug version, below - Release.
As can be seen from the diagram, due to the higher speed of random access, a project on RAMDisk without optimizations gathers in 1 stream faster.
The second stage of measurements - we modify the source code with a file: remove unnecessary inclusions of headers, eliminate dependencies on the definition, improve the precompiled header (remove frequently changed headers from it) - and gradually fasten the optimization:
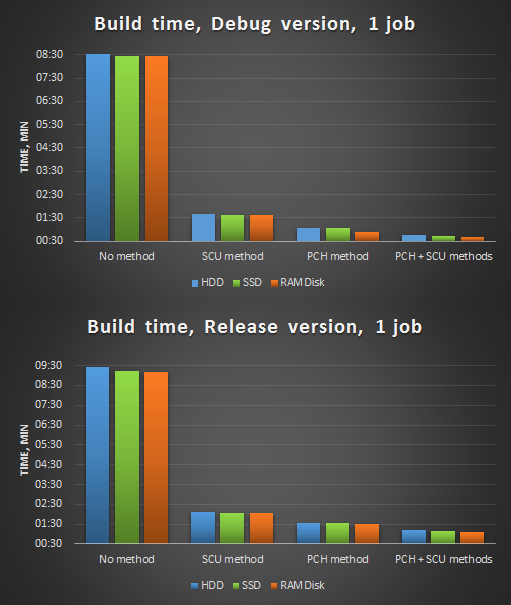
Figure 2. Compilation in 1 stream after optimizations.
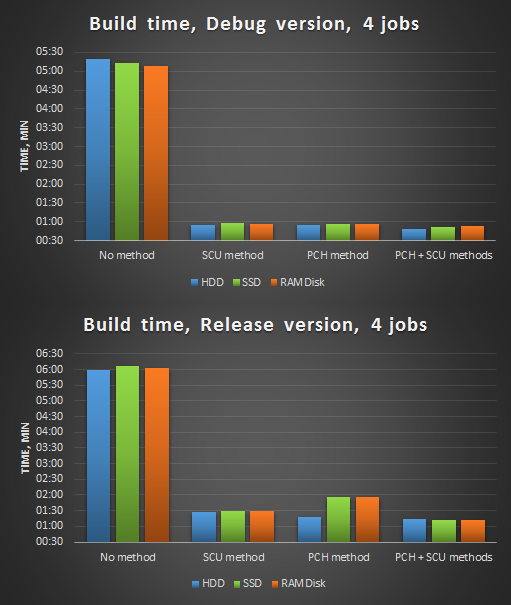
Figure 3. Compilation in 4 threads after optimizations.
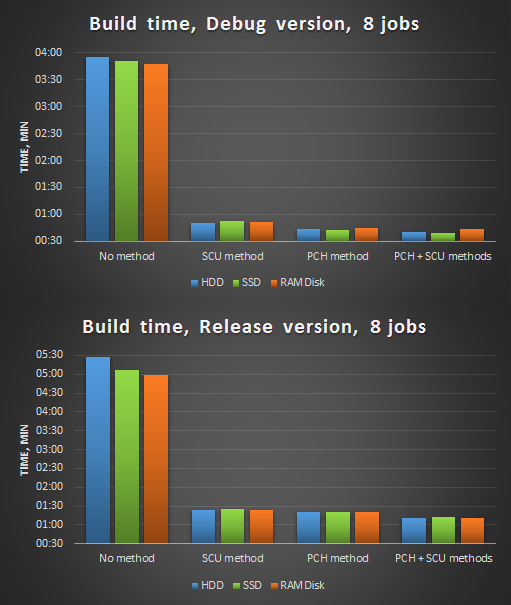
Figure 4. Compilation in 8 threads after optimizations.
We make brief conclusions:
For many programmers, C / C ++ languages are associated as something “long compiled.” And there are some reasons for this: the broadcast method chosen at one time, metaprogramming (for C ++), thousands of them. Thanks to the described optimization methods, you can deprive yourself of such prejudices about excessively long compilation. In particular, the build time of our PVS-Studio analyzer core for analyzing C and C ++ code was reduced from 1 minute 30 seconds to 40 seconds by integrating Single Compilation Units and processing header and source files. Moreover, if parallel compilation and precompiled headers were not used before the start of optimizations, we would have received a sevenfold reduction in build time!
In the end, I would like to add that this problem is well remembered in the standardization committee and the solution to this problem is in full swing: we are all waiting for the C ++ 20 standard, which may be one of the innovations that will bring modules into many people’s favorite language and make life C ++ programmers are much simpler.
General principles
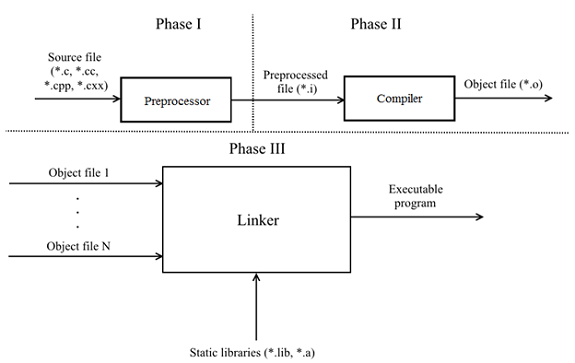
Before we begin, let's find out / recall the main phases of translation of C / C ++ code into an executable program.
According to clause 5.1.1.2 of the draft N1548 “Programming languages - C” and clause 5.2 of the draft N4659 “Working Draft Standard for Programming Language C ++” (published versions of the standards can be purchased here and here ), 8 and 9 translation phases are defined, respectively. Let's omit the details and take an abstract look at the translation process:
')
- Phase I - the source file is input to the preprocessor. The preprocessor makes the substitution of the contents of the files specified in #include and opens macros. Corresponds to phases 1 - 4 of the C11 and C ++ 17 draft.
- Phase II - the preprocessed file enters the input of the compiler and is converted to an object. Corresponds to phases 5 - 7 Draft C11 and 5 - 8 Draft C ++ 17.
- Phase III — the linker links the object files and the provided static libraries to form an executable program. Corresponds to phase 8 and 9 of the draft of C11 and C ++ 17, respectively.
The program is composed of translation units (* .c, * .cc, * .cpp, * .cxx), each is self-sufficient and can be preprocessing / compiled independently of the other. It also follows from this that each translation unit has no information about the other units. If two translation units need to exchange any information (for example, a function), then this is solved by linking by name: the external entity is declared with the keyword extern , and in phase III the linker links them. A simple example.
TU1.cpp file:
// TU1.cpp #include <cstdint> int64_t abs(int64_t num) { return num >= 0 ? num : -num; } TU2.cpp file:
// TU2.cpp #include <cstdint> extern int64_t abs(int64_t num); int main() { return abs(0); } To simplify the negotiation of different translation units, a header file mechanism was invented, which consists in declaring a clear interface. Subsequently, each translation unit, if necessary, includes a header file through the preprocessor directive #include .
Next, we consider how to speed up the assembly at different phases. In addition to the principle itself, it will also be useful to describe how to implement this or that method into the assembly system. Examples will be given for the following build systems: MSBuild , Make , CMake .
Compile dependencies
Dependencies when compiling is what most influences the speed of building C / C ++ projects. They occur whenever you include a header file through the preprocessor directive #include . This gives the impression that there is only one source of ad for an entity. The reality is far from ideal - the compiler has to repeatedly process the same ads in different translation units. Macros spoil the picture even more: it is necessary to add a macro declaration before including the title, how its contents can change radically.
Consider a couple of ways to reduce the number of dependencies.
Method N1: remove unused inclusions. No need to pay for what you do not use. So you reduce the work of both the preprocessor and the compiler. You can manually crack the headers / source files or use the utilities: include-what-you-use , ReSharper C ++ , CppClean , Doxygen + Graphviz (for visualizing the diagram of inclusions), etc.
Method N2: Use ad dependency, not definition. We highlight 2 main aspects:
1) In header files do not use objects where you can use links or pointers. For references and pointers, a forward declaration is sufficient, since the compiler knows the size of the link / pointer (4 or 8 bytes depending on the platform), and the size of the transmitted objects does not matter. A simple example:
// Foo.h #pragma once class Foo { .... }; // Bar.h #pragma once #include "Foo.h" class Bar { void foo(Foo obj); // <= .... }; Now, when changing the first header, the compiler will have to recompile the translation units dependent on both Foo.h and Bar.h.
To break such a link, it is enough to refuse to transfer the obj object by value in favor of passing by a pointer or a link in the Bar.h header:
// Bar.h #pragma once class Foo; // <= Foo class Bar { void foo(const Foo &obj); // <= .... }; As for the standard headers, here you can worry less and just include them in the header file, if necessary. The only exception is iostream . This header file has grown so much in size that it additionally comes with an iosfwd header, containing only the leading declarations of the necessary entities. This is what should be included in your header files.
2) Use Pimpl or Interface Class idioms. Pimpl removes implementation details by placing them in a separate class whose object is accessible through a pointer. The second approach is based on the creation of an abstract base class, the implementation details of which are transferred to a derived class that overrides pure virtual functions. Both options eliminate dependencies at the compilation stage, but also introduce their overhead during the program operation, namely: creating and deleting a dynamic object, adding an indirect addressing level (due to the pointer); and separately in the case of the interface class, the cost of calling virtual functions.
Method N3 (optional): in addition, you can create headlines containing only leading ads (similar to iosfwd ). These "leading" headers can then be included in other regular headers.
Parallel compilation
With the standard approach, the compiler will receive a new file for preprocessing and compiling time after time. Since each translation unit is self-sufficient, a good way to accelerate is to parallelize phases I-II of the broadcast, processing N files at a time.
In Visual Studio, the mode is enabled with the / MP [processMax] flag at the project level, where processMax is an optional argument that is responsible for the maximum number of compilation processes.
The make mode is enabled with the -jN flag, where N is the number of compilation processes.
If you use CMake (besides in cross-platform development), then they can generate files for an extensive list of build systems via the -G flag. For example, CMake generates a solution for Visual Studio under Windows and Unix Makefiles under Linux for the C ++ analyzer PVS-Studio. In order for CMake to generate projects in the Visual Studio solution with the / MP flag, add the following lines to your CMakeLists.txt :
if (MSVC) target_compile_options(target_name /MP ...) endif() Also via CMake (from version 2.8.0) you can call the assembly system with parallelization flags. For MSVC ( / MP is listed in CMakeLists.txt) and Ninja (concurrency is already enabled):
cmake --build /path/to/build-dir For makefiles:
cmake --build /path/to/build-dir -- -jN Distributed compilation
Using the previous advice, you can significantly reduce the assembly time. However, when the project is huge, and this may not be enough. Increasing the number of compilation processes, you run across the barrier in the form of the maximum number of simultaneously compiled files due to processor / RAM / disk operations. This is where distributed compilation comes to the rescue, using the free resources of a friend behind his back. The idea is simple:
1) preprocessing source files on one local machine or on all available machines;
2) compile preprocessed files on local and remote machines;
3) expect results from other machines in the form of object files;
4) compose object files;
five) ????
6) PROFIT!
Highlight the main features of distributed compilation:
- Scalability - we hook up the car, and now it can help in the assembly.
- The effectiveness of distributed compilation depends on the performance of the network and each machine. It is highly recommended that similar performance of each machine.
- The need for the identity of the environment on all machines (versions of compilers, libraries, etc.). This is especially necessary if preprocessing occurs on all machines.
The most famous representatives are:
Distcc and Icecream can be fairly easily integrated into Linux in several ways:
1) Universal, through a symbolic link (symlink)
mkdir -p /opt/distcc/bin # /opt/icecc/bin ln -s /usr/bin/distcc /opt/distcc/bin/gcc ln -s /usr/bin/distcc /opt/distcc/bin/g++ export PATH=/opt/distcc/bin:$PATH 2) For CMake, starting with version 3.4
cmake -DCMAKE_CXX_COMPILER_LAUNCHER=/usr/bin/distcc /path/to/CMakeDir Compiler cache
Another way to reduce build time is to use the compiler cache. Let's slightly change the phase II of the code translation:
Now when compiling a preprocessed file based on its contents, compilation flags, compiler output, a hash value is calculated (it takes into account compilation flags). Subsequently, the hash value and the corresponding object file are registered in the compiler cache. When recompiling with the same flags of an unmodified file, the already prepared object file will be taken from the cache and fed to the linker's input.
What can be used:
Registering ccache for later use can be done in several ways:
1) Universal, through a symbolic link
mkdir -p /opt/ccache/bin ln -s /usr/bin/ccache /opt/ccache/bin/gcc ln -s /usr/bin/ccache /opt/ccache/bin/g++ export PATH=/opt/ccache/bin:$PATH 2) For CMake, starting with version 3.4
cmake -DCMAKE_CXX_COMPILER_LAUNCHER=/usr/bin/ccache /path/to/CMakeDir The compiler cache can also be integrated into a distributed compilation. For example, to use ccache with distcc / Icecream, follow these steps:
1) Set the CCACHE_PREFIX variable:
export CCACHE_PREFIX=distcc # icecc 2) Use one of points 1 - 2 of the ccache registration.
Precompiled header files
When compiling a large number of source files, the compiler, in fact, performs many times the same job of parsing heavy headers (for example, iostream ). The basic idea is to put these heavy headers into a separate file (usually referred to as a prefix header), which is compiled once and then included in all translation units the very first .
In MSVC, to create a precompiled header, 2 files are generated by default: stdafx.h and stdafx.cpp (other names can also be used). The first step is to compile stdafx.cpp with the flag of / Yc73p " . By default, a file with a .pch extension is created . To use a precompiled header when compiling a source file, use the / Yu file synpath-to-stdafx.h flag . ” Together with the / Yc and / Yu flags, you can also use / Fp "path-to-pch" to specify the path to the .pch file. Now it is necessary to connect the first prefix header in each translation unit: either directly via #include "path-to-stdafx.h" , or by force via the / FI holypath -to-stdafx.h flag.
The approach to GCC / Clang differs little: you must pass the prefix header itself to the compiler itself instead of the usual compiled file. The compiler will automatically generate a precompiled header with the default .gch extension. With the -x option, you can optionally specify whether to treat it as c-header or c ++ - header . Now include the prefix header manually via #include or through the -include flag.
You can read more about precompiled headers here .
If you use CMake, we recommend that you try the cotire module: it can automatically analyze the source files, generate prefix and precompiled headers and connect them to translation units. It is also possible to specify your prefix header (for example, stdafx.h ).
Single Compilation Unit
The essence of this method is to create a single compiled file (translation block), which includes other translation units:
// SCU.cpp #include "translation_unit1.cpp" .... #include "translation_unitN.cpp" If all translation units are included in a single compiled file, then this method is otherwise called Unity build. We single out the main features of the Single Compilation Unit:
- The number of compiled files is noticeably reduced, and hence the number of disk operations. The compiler processes the same files much less and instantiates templates. This is noticeably reflected in the build time.
- The compiler can now perform optimizations that are available to the linker (Link time optimization / Whole program optimization).
- The incremental build deteriorates somewhat, since modifying one file as part of the Single Compilation Unit causes it to be recompiled.
- When using Unity Build, it becomes impossible to use a distributed build.
Note possible problems when applying the approach:
- Violation of ODR (match of macro names, local static functions, global static variables, variables in anonymous namespaces).
- Name collisions due to using namespace .
The maximum benefit on multi-core systems will be given by the schemes:
- parallel compilation of several Single Compilation Unit using a precompiled header;
- distributed compilation of multiple single compilation unit using compiler cache.
If you use CMake, you can automate the generation of SCUs using this module.
Replacing translation components
Replacing one of the translation components with a faster analog can also increase the assembly speed. However, it is worth doing at your own risk.
As a faster compiler, you can use Zapcc . The authors promise to repeatedly accelerate the recompilation of projects. This can be seen in the example of recompiling Boost.Math :
Zapcc does not sacrifice program performance, is based on Clang and is fully compatible with it. Here you can learn how Zapcc works. If your project is based on CMake, then replacing the compiler is very easy:
export CC=/path/to/zapcc export CXX=/path/to/zapcc++ cmake /path/to/CMakeDir or so:
cmake -DCMAKE_C_COMPILER=/path/to/zapcc \ -DCMAKE_CXX_COMPILER=/path/to/zapcc++ \ /path/to/CMakeDir If your OS uses the ELF format of object files (Unix-like systems), then you can replace the GNU ld linker with GNU gold. GNU gold comes as part of binutils, starting with version 2.19, and is activated with the -fuse-ld = gold flag. In CMake, you can activate it, for example, with the following code:
if (UNIX AND NOT APPLE) execute_process(COMMAND ${CMAKE_CXX_COMPILER} -fuse-ld=gold -Wl,--version ERROR_QUIET OUTPUT_VARIABLE ld_version) if ("${ld_version}" MATCHES "GNU gold") message(STATUS "Found Gold linker, use faster linker") set(CMAKE_EXE_LINKER_FLAGS "${CMAKE_EXE_LINKER_FLAGS} -fuse-ld=gold") set(CMAKE_SHARED_LINKER_FLAGS "${CMAKE_SHARED_LINKER_FLAGS} -fuse-ld=gold ") endif() endif() Using SSD / RAMDisk
The obvious bottleneck in the assembly is the speed of disk operations (especially random access). Transferring temporary files of a project or oneself to faster memory (HDD with increased random access speed, SSD, RAID from HDD / SSD, RAMDisk) can help a lot in some situations.
Modular system in C ++
Most of the above methods have historically arisen due to the choice of the principle of translation of C / C ++ languages. The mechanism of header files, despite its apparent simplicity, causes a lot of trouble for C / C ++ programmers.
For quite a long time there has been a discussion about the inclusion of modules in the C ++ standard (and, possibly, will appear in C ++ 20). A module will be considered an associated set of translation units ( modular unit ) with a specific set of external (exported) names, called module interfaces . The module will be available to all translation units importing it only through its interface. Non-exported names are placed in the implementation of the module .
Another important advantage of modules is that they are not subject to change through macros and preprocessor directives, unlike header files. The reverse is also true: macros and preprocessor directives inside a module do not affect translation units that import it. Semantically, modules are independent, fully compiled translation units.
This article will not consider in detail the device of future modules. If you want to know more about them, then we recommend viewing Boris Kolpakov’s speech at CppCon 2017 on C ++ modules (the difference in build time is also shown there):
At present, MSVC , GCC , Clang compilers offer experimental support for modules.
And will there be anything about the build of PVS-Studio?
In this section, let's look at how effective and useful the approaches described are.
Take the core of the PVS-Studio analyzer for analyzing C and C ++ code. It is, of course, written in C ++ and is a console application. The kernel is a small project compared to such giants as LLVM / Clang, GCC, Chromium, etc. Here, for example, that produces CLOC on our code base:
---------------------------------------------------------------- Language files blank comment code ---------------------------------------------------------------- C++ 380 28556 17574 150222 C/C++ Header 221 9049 9847 46360 Assembly 1 13 22 298 ---------------------------------------------------------------- SUM: 602 37618 27443 196880 ---------------------------------------------------------------- Note that before doing any work, our project was going in 1.5 minutes (parallel compilation and one precompiled header were used) on the following configuration of the working machine:
- Intel Core i7-4770 3.4 GHz processor (8 CPU).
- RAM 16 Gb RAM DDR3-1333 MHz.
- Samsung SSD 840 EVO 250 Gb as a system drive.
- WDC WD20EZRX-00D8PB0 2 Tb for work needs.
We take as a starting point the assembly of the project on the HDD, turning off all the optimization of the build time. Further we will designate the first stage of measurements:
- assembly on HDD, compilation in 1 stream, without optimizations;
- assembly on SSD, compilation in 1 stream, without optimizations;
- assembly on RAMDisk, compilation in 1 stream, without optimizations.
Figure 1. Assembly of the PVS-Studio analyzer, 1 stream, without optimizations. Above - build Debug version, below - Release.
As can be seen from the diagram, due to the higher speed of random access, a project on RAMDisk without optimizations gathers in 1 stream faster.
The second stage of measurements - we modify the source code with a file: remove unnecessary inclusions of headers, eliminate dependencies on the definition, improve the precompiled header (remove frequently changed headers from it) - and gradually fasten the optimization:
- compilation in 1 stream, project on HDD, SSD and RAMDisk:
- single compilation units (SCU);
- precompiled header (PCH);
- single compilation units + precompiled header (SCU + PCH).
Figure 2. Compilation in 1 stream after optimizations.
- compilation in 4 streams, project on HDD, SSD, RAMDisk:
- single compilation units;
- precompiled header;
- single compilation units + precompiled header
Figure 3. Compilation in 4 threads after optimizations.
- 8 streams compilation, HDD, SSD, RAMDisk project:
- single compilation units;
- precompiled header;
- single compilation units + precompiled header
Figure 4. Compilation in 8 threads after optimizations.
We make brief conclusions:
- The benefits of using SSD / RAMDisk can vary depending on their model, random access speed, launch conditions, moon phases, etc. Although they are faster analogues HDD, specifically in our case, they do not give a significant gain.
- Precompiled headers are a very effective tool. This method was previously used in our analyzer, and its use, even when compiled into 1 stream, gave 7-8 times the acceleration.
- (SCU) . , (> 10).
Conclusion
For many programmers, C / C ++ languages are associated as something “long compiled.” And there are some reasons for this: the broadcast method chosen at one time, metaprogramming (for C ++), thousands of them. Thanks to the described optimization methods, you can deprive yourself of such prejudices about excessively long compilation. In particular, the build time of our PVS-Studio analyzer core for analyzing C and C ++ code was reduced from 1 minute 30 seconds to 40 seconds by integrating Single Compilation Units and processing header and source files. Moreover, if parallel compilation and precompiled headers were not used before the start of optimizations, we would have received a sevenfold reduction in build time!
In the end, I would like to add that this problem is well remembered in the standardization committee and the solution to this problem is in full swing: we are all waiting for the C ++ 20 standard, which may be one of the innovations that will bring modules into many people’s favorite language and make life C ++ programmers are much simpler.
Source: https://habr.com/ru/post/344534/
All Articles