Learn OpenGL. Part 4.2. - Stencil Test

Once the fragment shader has processed the fragment, a so-called stencil test is performed, which, like the depth test, can discard fragments. Then the remaining fragments go to the depth test, which, can discard even more fragments. The stencil test is based on the contents of another buffer, called a stencil buffer . We can update it during rendering to achieve interesting effects.
- Opengl
- Creating a window
- Hello window
- Hello triangle
- Shaders
- Textures
- Transformations
- Coordinate systems
- Camera
Part 2. Basic lighting
')
Part 3. Loading 3D Models
Part 4. OpenGL advanced features
Stencil test
The stencil buffer usually contains 8 bits for each stencil value , which in total gives 256 different stencil values per fragment / pixel. We can set these values to our taste, and then discard or save fragments, whenever a certain fragment has a certain pattern value.
Each window library should set up a stencil buffer for you. GLFW does this automatically, so you don’t need to worry about it, but other window libraries can’t not create a default stencil buffer, so be sure to review your library’s documentation.
A simple example of a stencil buffer is shown below:
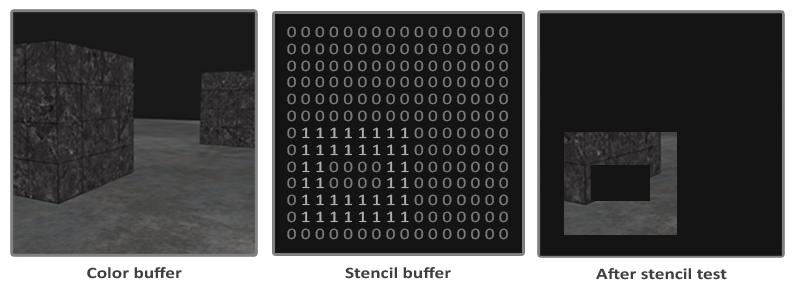 First, the stencil buffer is filled with zeros, and then the buffer area, which looks like a rectangular frame, is filled with ones. Only those fragments of the scene are displayed, the stencil value of which is equal to one, the rest are discarded.
Stencil buffer operations allow us to set a different value for the stencil buffer where we display fragments. By changing the stencil buffer values during rendering, we perform a write operation. In the same (or next) rendering iteration, we can read the values from the buffer in order to, based on the read values, discard or accept certain fragments. Using a stencil buffer, you can fool around as you please, but the general scheme is:
- Enable writing to the stencil buffer.
- Draw objects, update the contents of the stencil buffer.
- Disable writing to the stencil buffer.
- Draw (other) objects, this time discarding certain objects, based on the contents of the stencil buffer.
In summary, we can say that, using a stencil buffer, we can discard certain fragments based on fragments of other objects in the scene.
You can turn on stencil testing by turning on GL_STENCIL_TEST . From this point on, all rendering calls will somehow affect the stencil buffer.
glEnable(GL_STENCIL_TEST); Note that you need to clear the stencil buffer at each iteration, as well as the color and depth buffer:
glClear(GL_COLOR_BUFFER_BIT | GL_DEPTH_BUFFER_BIT | GL_STENCIL_BUFFER_BIT); For the stencil buffer, there is an analogue of the glDepthMask function used to parameterize the depth test. The glStencilMask function allows us to set a bit mask that will participate in the bitwise AND operation with the stencil values written to the buffer. By default, the bitmask is equal to one, which does not affect the output, but if we set the mask to 0x00 , then all the stencil values would eventually be written as zeros. The equivalent of setting the depth test mask for glDepthMask(GL_FALSE) would be the following pair of calls:
glStencilMask(0xFF); // glStencilMask(0x00); // ( ) In most cases, simply write 0x00 or 0xFF to a stencil mask, but it would be nice to know that it is possible to set custom bitmasks.
Stencil functions
As well as in the depth test, we have a certain ability to control when the stencil test is passed, and when it is not, and how this should affect the stencil buffer. We have only two functions that we can use to customize screen testing: glStencilFunc and glStencilOp .
The glStencilFunc(GLenum func, GLint ref, GLuint mask) function glStencilFunc(GLenum func, GLint ref, GLuint mask) has three parameters:
func: sets the screening function. This function is applied to the stored stencil value and the value of therefparameter. The options are:GL_NEVER,GL_LESS,GL_LEQUAL,GL_GREATER,GL_GEQUAL,GL_EQUAL,GL_NOTEQUALandGL_ALWAYS. The meaning of these functions is similar to the functions of the depth test.
ref: Specifies the reference value for the stencil test. The stencil buffer content is compared with this value.mask: sets the mask used in the bitwise AND operation with the stored and reference values before comparing them. The default is set to 1.
So, in the case of our simple stencil example, which we showed at the beginning, the function would be:
glStencilFunc(GL_EQUAL, 1, 0xFF) This tells OpenGL that, whenever the stencil fragment value is equal to the reference value 1, the fragment passes the test and is drawn, otherwise it is discarded.
But the glStencilFunc function glStencilFunc describes what OpenGL should do with the stencil buffer contents, not how we can refresh the buffer. This is where glStencilOp comes to the glStencilOp .
The glStencilOp(GLenum sfail, GLenum dpfail, GLenum dppass) function glStencilOp(GLenum sfail, GLenum dpfail, GLenum dppass) contains three parameters with which we can determine actions for each option:
sfail: action taken in case of stencil failure.dpfail: action taken when the stencil test is passed, but the depth test is not.dppass: action taken when both tests pass
Then, for each case, you can do one of the following:
| Act | Description |
|---|---|
GL_KEEP | The currently stored stencil value is saved. |
GL_ZERO | Stencil value is reset. |
GL_REPLACE | The stencil value is replaced by the reference value set by glStencilFunc . |
GL_INCR | The stencil value is incremented by one if it is less than the maximum value. |
GL_INCR_WRAP | It behaves in the same way as GL_INCR , but when passing through the maximum, the value in the buffer is reset. |
GL_DECR | The stencil value is reduced by one if it exceeds the minimum value. |
GL_DECR_WRAP | It behaves in the same way as GL_DECR , but when going through 0, the value in the buffer is set to the maximum. |
GL_INVERT | Bitwise inverts the current stencil buffer value. |
By default, the arguments to glStencilOp are set to (GL_KEEP, GL_KEEP, GL_KEEP) , so that, regardless of the test results, the values in the stencil buffer are saved. Standard behavior does not update the stencil buffer, so if we want to write to the stencil buffer, we need to set at least one action different from the standard one for any variant.
So, using glStencilFunc and glStencilOp we can set exactly when and how we want to update the stencil buffer, and we also determine when the stencil test will be passed, and when not - that is, when the fragments should be dropped.
Stroke objects
It is unlikely that you fully understood how screen testing works on the basis of the previous sections, so we will demonstrate a useful technique that can be implemented using screen testing. This is a stroke object .

There is no need to explain what is meant by the stroke of the object. For each object (or only for one) we create a small color frame. This effect is especially useful when we, for example, need to select units in a strategic game, and then show the user which ones have been selected. The algorithm for forming a stroke for an object is as follows:
- Set the stencil function in
GL_ALWAYS, before drawing the objects (which will be circled), update the stencil buffer with units where the fragments of the objects will be drawn. - Draw objects.
- Disable depth testing and stencil buffer writing.
- Slightly enlarge each object.
- Use another fragmentary shader, which output only one color (the color of the stroke).
- Draw the object again, but only if the stencil value of their fragments is not equal to one.
- Re-enable stencil buffer entry and depth testing.
This process sets the buffer contents for each object fragment to unity, and when we want to draw borders, we essentially draw scalable versions of objects, and where the test allows, the scalable version is drawn (around the object borders). Using the stencil test, we discard those fragments of scaled objects that are superimposed on the fragments of the original objects.
First we create a very simple fragmentary shader that displays the color of the stroke. We simply set the hard-coded color and call the shaderSingleColor shader:
void main() { FragColor = vec4(0.04, 0.28, 0.26, 1.0); } We plan to include a stroke for only two containers, but not for the floor. Therefore, you first need to display the floor, then two containers (with writing to the stencil buffer), and then - enlarged versions of the containers (with rejection of fragments superimposed on the already drawn fragments of the original containers).
First, we need to turn on stencil testing and set actions to be taken if any of the tests are successful or unsuccessful:
glEnable(GL_DEPTH_TEST); glStencilOp(GL_KEEP, GL_KEEP, GL_REPLACE); If any of the tests fail, then we do nothing, but simply leave the current value in the stencil buffer. If the stencil test and the depth test are passed successfully, then we replace the current stencil value with the reference value set via glStencilFunc , which we will later set to 1.
The buffer is cleared by filling with zeros, and for containers we update the stencil buffer to 1 for each drawn fragment:
glStencilFunc(GL_ALWAYS, 1, 0xFF); // glStencilMask(0xFF); // normalShader.use(); DrawTwoContainers(); Using GL_ALWAYS in the glStencilFunc function glStencilFunc we ensure that each container fragment updates the stencil buffer with the stencil value 1. Since the fragments always pass the stencil test, the stencil buffer is updated with the reference value, everywhere we drew them.
Now that the stencil buffer has been updated to one, where we painted the containers, we need to draw enlarged versions of the containers, but, now having turned off the recording in the stencil buffer:
glStencilFunc(GL_NOTEQUAL, 1, 0xFF); glStencilMask(0x00); // glDisable(GL_DEPTH_TEST); shaderSingleColor.use(); DrawTwoScaledUpContainers(); We use the GL_NOTEQUAL argument in glStencilFunc , which guarantees that we draw only parts of objects that are not equal to one, so we draw only those parts of objects that are outside the previously drawn objects. Note that we also turned off the depth test so that elements of enlarged containers, for example, their boundaries, are not overwritten by the floor.
Also be sure to re-enable the depth test.
The overall object stroke pattern for our scene looks something like this:
glEnable(GL_DEPTH_TEST); glStencilOp(GL_KEEP, GL_KEEP, GL_REPLACE); glClear(GL_COLOR_BUFFER_BIT | GL_DEPTH_BUFFER_BIT | GL_STENCIL_BUFFER_BIT); glStencilMask(0x00); // , normalShader.use(); DrawFloor() glStencilFunc(GL_ALWAYS, 1, 0xFF); glStencilMask(0xFF); DrawTwoContainers(); glStencilFunc(GL_NOTEQUAL, 1, 0xFF); glStencilMask(0x00); glDisable(GL_DEPTH_TEST); shaderSingleColor.use(); DrawTwoScaledUpContainers(); glStencilMask(0xFF); glEnable(GL_DEPTH_TEST); If you understand the general idea behind stencil testing, this piece of code should not be too complicated to understand. Otherwise, try to carefully read the previous sections and fully understand what each function does, now that you have seen an example of its use.
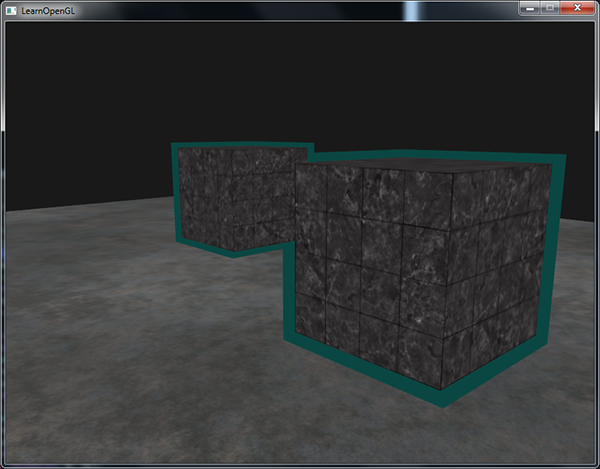
The result of applying the stroke algorithm to the scene from the depth test lesson looks like this:
Check the source code here to see the full code of the object's stroke algorithm.
You can see that the boundaries between the two containers overlap. Usually, this is exactly what you need (remember strategic games when we select several units). If you need a complete border around each object, you need to clear the stencil buffer for each object and poke a little with the depth test setting.
The object stroke algorithm that you saw is quite often used in some games to visualize selected objects (remember strategic games), and such an algorithm can be easily implemented in the model class. Then you can simply set the logical flag in the model class to draw with or without borders. If you show a little creativity, you can make the borders more organic by using post-processing filters, such as Gaussian blur.
With the help of screen testing, you can do more things than just trace objects, for example, to draw textures inside the rearview mirror so that they fit into the frame of the mirror. Or render shadows in real time using shadow volumes . Stencil buffer provides us with another great tool in our already extensive OpenGL toolkit.
PS
More thanks for the help and comments on the transfer to the user UberSchlag !
If you want to help with the translation, join the conversation in the Telegram:
Could not add a link to the original publication (writes: not a link ), so, here .
Source: https://habr.com/ru/post/344238/
All Articles