Preparing your UI interface for Zabbix API using React component
Hello! It all started with the integration of a telephone platform into a corporate site.
WEB-development was struck by a variety of approaches and methods of implementation. The stack of technologies is replete with diversity, the choice of tools determines the style of development, modularity or ossification of the project.
I will write about the phone platform next time. A strong bias in VoIP-specificity will distract from the main thing - the development methods of a modern SPA- application.
')
The article will describe the process of implementing a third-party service in an existing work environment.
Today we will play with Zabbix-API .
Live demo

Those who implemented WEB-interactive ten years ago using CGI-scripts on the server side and want to understand modern approaches. If you had to invent your own API-interfaces, deal with the documentation of what happened - the solution below.
The initial configuration of Zabbix is conducted through the built-in WEB-interface. Routine usually comes down to simply adding hosts to a group.
We keep records of the equipment (adding hosts) in our own system on the corporate website.
The development of the corporate system is usually engaged in a separate team.
User interactive is classically described by the MVC work scheme with its variations. Studying materiel appeared candidates Vue , Ember , Meteor , Angular , ReactJS .
It is understood that most of the frameworks / libraries are trying to implement a full MVC ecosystem with the implementation on both the front-end and back-end , call it "full stack".
React is only "V" from "MVC". I didn’t want to dive into a foreign ecosystem, but a simple drawing machine really liked it. I was pleased with the prospect of jumping into React Native over time: one code for the Web, iOS, Android. And having connected Redux , full stack has to turn out. Separately, pleased JSX, killer feature IMHO.
JSX is a child of React developers - a syntax add-on for JavaScript, visually simplifies working with DOM browser elements.
Dirty WEB developers scold him for mixing HTML markup and JavaScript code. I am not an experienced developer and I think JSX is a great solution.
At first it seemed convenient to write in “browser-based” JavaScript. True, it is inconvenient to break the project into modules and load the necessary ones. Problem solved package manager Bower . It has its own philosophy, Bower ensures that the module versions do not conflict with each other.
In practice, it turned out that all the necessary tools are available in the form of npm packages. If the module you need is not available as an npm package, Bower is a good addition.
Total. We write on Node, we use the package manager npm.
NodeJS is server-side JavaScript, not browser-based. Good people came up with the Browserify transpiler that translates the Node code into the browser version.
Browsers do not have a high update rate of the embedded JavaScript engine. I would like to use all the "sugar" of modern JavasScript, hence another tool - Babel . A transpiler that can work with the latest versions of ECMAScript . And also, it will recognize the JSX syntax.
In addition to working with JavaScript, the modern WEB-page tightly uses CSS , which has moved to a new level of SASS abstractions. Upload your own fonts and images. HTML text can be scattered across various files. As a result, the construction of the final project is reduced to a dozen actions on various files scattered across the file system in a diverse order.
Gulp is a collector. In fact, the usual Node script, which automates the processing of source files of the project.
I chose Gulp, at one time I liked the way it works: inline processing, it's fast. He won against Grunt , and also came across an Insayt article, on the basis of which I made my gulpfile.js .
Alternatively, it makes sense to consider a webpack , I haven't tried it.
It is worth noting here - we have listed the main development tools for the front end. Now it's the back end.
But first, we will formulate the principle of operation of our future React-component and Zabbix-API.
It would be possible to pile all the logic on the front end, but this is bad:
Total. We need a "smart" back end, which has its own API.
When integrated into the telephone platform, the first “rakes” were passed. An own API server was written. He worked. Successfully "taxied" softswitch, accepted REST-requests that in fact were not REST. There was no documentation on the format, methods and parameters of the requests.
This situation has generated interest, is it possible to somehow formalize the API interface so that the documentation is automatically generated? I liked the OpenAPI approach.
The essence boils down to the fact that you first need to write a specification file, in which all methods, fields, response formats, etc. will be described. Then, on the basis of this file, you can generate a ready-made API server. The list of languages is impressive, we will do at NodeJS.
So, as the specification file is standard, the tools for it have already been invented: Swagger , ReDoc , OA Viewer , ... more details here . The question of documentation is solved automatically - this is the specification file.
Very soon we will start writing executable code. The scripts will be in the language of NodeJS. Any language evolves, versions change, it would be nice to try the result on different versions of the language. In each language there are special tools for "juggling" versions.
I act more radically. There is a great LXC technology that offers very easy Linux kernel-level virtualization. Sin would not take advantage of her. In the case of other operating systems there is a specificity, the developers took into account the nuances and created the Docker product.
We will build the necessary development environment in the necessary Docker-container.
The project is available on Github
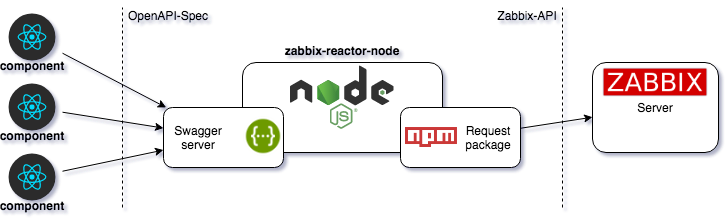
The back end server is called "zabbix-reactor-node". View the specification file. Check the "host" field.
If we deploy the server on our machine
The server is built using the swagger editor on the basis of "zabbix-api.yaml". The structure is as follows:
index.js - start script
Methods:
controllers / - scripts responsible for handling API requests
This is where we fill in the logic of our interactions with Zabbix-API.
The node-back directory will be thrown into the Docker container: go to it.
Run zabbix-reactor-node. We transfer environment variables ZX_URL, ZX_USER, ZX_PASS to the container - we drive our own if we have our own Zabbix. As an example, you can use my test Zabbix:
Older versions of zabbiks can receive requests at another URL. We look Zabbix doc.
Then all the actions inside the container.
Jump out of the container: Ctrl + P + Q
Checking available SwaggerUI - http: // localhost: 8002 / spec-ui /
Enter “test” in the “token” field. The authorization token will be here, the node-back / sub_modules / aaa_handle.js script will check it.
We want to open access only to certain Host groups on Zabbix. For this you need to create a separate user "react_user".
Building the development environment let's call it “zabbix-react-front”.
The “web-front” directory will be thrown into the Docker container: go to it.
Launch zabbix-react-front:
Then all the actions inside the container.
Components are in the web-front / src / js / components directory, they have their own dependencies.
Install:
Putting the project in the web-front / build directory
Jump out of the container: Ctrl + P + Q
We check the work of the component - http: // localhost: 8003 /
So we got to work with the components. Let's see what is running now.
We work with the following file structure:
web-front / src / index.jsx - JSX script with components
web-front / src / components / - directory with components
web-front / src / components / zabbix-react-component.js - exported classes. Available as npm package zabbix-react-component .
From this place you can safely sculpt your components, increase functionality.
As an example, I attached a tool that is in Nagios but not in Zabbix. Automatic construction of a network map based on the source-target meta-information in the description of network elements.
Look at the HostGraph component. To store information, I use the tab “Host inventory” in the Zabbix Host field “Notes”. There in a JSON-format we bring bunches of the source-target elements. For visualization I used the d3 project - Force-Directed Graph .
Now we have in our hands a development environment, a front-end and a back-end. Knowledge of JavaScript and specifics of NodeJS is enough for work.
API-documented and available for testing by third-party front-end developers. The API server is not tied to Zabbix, this is a general solution. Integration to any system is possible.
Collected ready React-components performing standard CRUD functions. Components are freed from the complexities of interaction with integrable systems, only the display.
WEB-development was struck by a variety of approaches and methods of implementation. The stack of technologies is replete with diversity, the choice of tools determines the style of development, modularity or ossification of the project.
I will write about the phone platform next time. A strong bias in VoIP-specificity will distract from the main thing - the development methods of a modern SPA- application.
')
The article will describe the process of implementing a third-party service in an existing work environment.
Today we will play with Zabbix-API .
Live demo
Who will be interested
Those who implemented WEB-interactive ten years ago using CGI-scripts on the server side and want to understand modern approaches. If you had to invent your own API-interfaces, deal with the documentation of what happened - the solution below.
Set the task
The initial configuration of Zabbix is conducted through the built-in WEB-interface. Routine usually comes down to simply adding hosts to a group.
We keep records of the equipment (adding hosts) in our own system on the corporate website.
- It would not be bad to integrate Zabbix routine tasks into the existing accounting environment. Minimize the number of parameters, ideally one button "add"
The development of the corporate system is usually engaged in a separate team.
- It would be nice to give them functionality in the form of a finished module. Ideally, a couple of lines of the "import ..." and "render ..." code
- Try to use a modern stack of technologies, preferably standard interfaces
Technology stack
ReactJS
User interactive is classically described by the MVC work scheme with its variations. Studying materiel appeared candidates Vue , Ember , Meteor , Angular , ReactJS .
It is understood that most of the frameworks / libraries are trying to implement a full MVC ecosystem with the implementation on both the front-end and back-end , call it "full stack".
React is only "V" from "MVC". I didn’t want to dive into a foreign ecosystem, but a simple drawing machine really liked it. I was pleased with the prospect of jumping into React Native over time: one code for the Web, iOS, Android. And having connected Redux , full stack has to turn out. Separately, pleased JSX, killer feature IMHO.
Jsx
JSX is a child of React developers - a syntax add-on for JavaScript, visually simplifies working with DOM browser elements.
Dirty WEB developers scold him for mixing HTML markup and JavaScript code. I am not an experienced developer and I think JSX is a great solution.
Nodejs
At first it seemed convenient to write in “browser-based” JavaScript. True, it is inconvenient to break the project into modules and load the necessary ones. Problem solved package manager Bower . It has its own philosophy, Bower ensures that the module versions do not conflict with each other.
In practice, it turned out that all the necessary tools are available in the form of npm packages. If the module you need is not available as an npm package, Bower is a good addition.
Total. We write on Node, we use the package manager npm.
Browserify
NodeJS is server-side JavaScript, not browser-based. Good people came up with the Browserify transpiler that translates the Node code into the browser version.
Babel
Browsers do not have a high update rate of the embedded JavaScript engine. I would like to use all the "sugar" of modern JavasScript, hence another tool - Babel . A transpiler that can work with the latest versions of ECMAScript . And also, it will recognize the JSX syntax.
Gulp
In addition to working with JavaScript, the modern WEB-page tightly uses CSS , which has moved to a new level of SASS abstractions. Upload your own fonts and images. HTML text can be scattered across various files. As a result, the construction of the final project is reduced to a dozen actions on various files scattered across the file system in a diverse order.
Gulp is a collector. In fact, the usual Node script, which automates the processing of source files of the project.
I chose Gulp, at one time I liked the way it works: inline processing, it's fast. He won against Grunt , and also came across an Insayt article, on the basis of which I made my gulpfile.js .
Alternatively, it makes sense to consider a webpack , I haven't tried it.
It is worth noting here - we have listed the main development tools for the front end. Now it's the back end.
But first, we will formulate the principle of operation of our future React-component and Zabbix-API.
purpose
- Front-Back interaction reduced to the simplest REST requests
- Focus all the logic of interaction with the Zabbix server on the back end
- Preferably standard interface + documentation
It would be possible to pile all the logic on the front end, but this is bad:
- Zabbix-API will have to open for all client browsers. It is safer to open a separate resource with a limited set of actions.
- We create a common solution that can work with carditally different systems: SNMP sensors, telnet sessions, OS resources of servers, and so on. (Zabbix is only one of the implementations). The browser simply does not have this functionality.
Total. We need a "smart" back end, which has its own API.
A little more technology
Openapi
When integrated into the telephone platform, the first “rakes” were passed. An own API server was written. He worked. Successfully "taxied" softswitch, accepted REST-requests that in fact were not REST. There was no documentation on the format, methods and parameters of the requests.
This situation has generated interest, is it possible to somehow formalize the API interface so that the documentation is automatically generated? I liked the OpenAPI approach.
The essence boils down to the fact that you first need to write a specification file, in which all methods, fields, response formats, etc. will be described. Then, on the basis of this file, you can generate a ready-made API server. The list of languages is impressive, we will do at NodeJS.
So, as the specification file is standard, the tools for it have already been invented: Swagger , ReDoc , OA Viewer , ... more details here . The question of documentation is solved automatically - this is the specification file.
Docker
Very soon we will start writing executable code. The scripts will be in the language of NodeJS. Any language evolves, versions change, it would be nice to try the result on different versions of the language. In each language there are special tools for "juggling" versions.
I act more radically. There is a great LXC technology that offers very easy Linux kernel-level virtualization. Sin would not take advantage of her. In the case of other operating systems there is a specificity, the developers took into account the nuances and created the Docker product.
We will build the necessary development environment in the necessary Docker-container.
Let's get started
The project is available on Github
git clone https://github.com/ars-anosov/zabbix-react.git zabbix-reactor-node
The back end server is called "zabbix-reactor-node". View the specification file. Check the "host" field.
less zabbix-react/node-back/api/zabbix-api.yaml If we deploy the server on our machine
host: 'localhost:8002' The server is built using the swagger editor on the basis of "zabbix-api.yaml". The structure is as follows:
index.js - start script
var app = require('connect')() var swaggerTools = require('swagger-tools') var http = require('http') - http - WEB-server
- connect using middleware swagger-tools - request processing
// Route validated requests to appropriate controller app.use(middleware.swaggerRouter(options)); // Serve the Swagger documents and Swagger UI app.use(middleware.swaggerUi({ apiDocs: '/spec/swagger.json', swaggerUi: '/spec-ui' Methods:
- middleware.swaggerRouter - a router that passes requests to the corresponding controller in the zabbix-react / node-back / controllers directory
- middleware.swaggerUi is a SwaggerUI tool. This is our API documentation, allows you to perform test REST requests
controllers / - scripts responsible for handling API requests
Configuration.js Data.js config_host_del.js config_host_get.js config_host_post.js config_host_put.js config_hostgroup_get.js data_hostlink_get.js This is where we fill in the logic of our interactions with Zabbix-API.
The node-back directory will be thrown into the Docker container: go to it.
cd zabbix-react/node-back/ Run zabbix-reactor-node. We transfer environment variables ZX_URL, ZX_USER, ZX_PASS to the container - we drive our own if we have our own Zabbix. As an example, you can use my test Zabbix:
docker run \ --name zabbix-reactor-node \ -v $PWD:/zabbix-reactor-node \ -w /zabbix-reactor-node \ --publish=8002:8002 \ --env="ZX_URL=http://zabbix-server.react.com.ru/api_jsonrpc.php" \ --env="ZX_USER=guest" \ --env="ZX_PASS=" \ -it \ node:8 bash Older versions of zabbiks can receive requests at another URL. We look Zabbix doc.
Then all the actions inside the container.
npm install node index.js $ZX_URL $ZX_USER $ZX_PASS Jump out of the container: Ctrl + P + Q
Checking available SwaggerUI - http: // localhost: 8002 / spec-ui /
Enter “test” in the “token” field. The authorization token will be here, the node-back / sub_modules / aaa_handle.js script will check it.
Zabbix settings
We want to open access only to certain Host groups on Zabbix. For this you need to create a separate user "react_user".
- Administration / User groups - add user group “react_user_group”
- Administration / User groups / Permissions - add Host groups with which “react_user” will be allowed to work. We expose Read-write.
- Administration / Users - add a user, include in the user group created in PP.1
- Administration / Users / Permissions - User type set “Zabbix Admin”
zabbix-react-front
Building the development environment let's call it “zabbix-react-front”.
The “web-front” directory will be thrown into the Docker container: go to it.
cd zabbix-react/web-front/ Launch zabbix-react-front:
docker run \ --name zabbix-react-front \ -v $PWD:/web-front \ -w /web-front \ --publish=8003:8003 \ -it \ node:8 bash Then all the actions inside the container.
# gulp-cli npm install -g gulp-cli # (, , ) npm install Components are in the web-front / src / js / components directory, they have their own dependencies.
Install:
npm run install-components Putting the project in the web-front / build directory
gulp Jump out of the container: Ctrl + P + Q
We check the work of the component - http: // localhost: 8003 /
zabbix-react-component
So we got to work with the components. Let's see what is running now.
- zabbix-reactor-node - OpenAPI server, open for receiving REST requests at http: // localhost: 8002 / ...
- zabbix-react-front - livereload-web-server to display the React-component, draws on http: // localhost: 8003 /
We work with the following file structure:
web-front / src / index.jsx - JSX script with components
import React from 'react'; import ReactDOM from 'react-dom' import { OpenApiSwagger, HostConfig, HostGraph } from './components/zabbix-react-component' window.localStorage.setItem('token', 'test') const specUrl = 'http://localhost:8002/spec/swagger.json' const swg = new OpenApiSwagger(specUrl) swg.connect((client, err) => { if (err) { ReactDOM.render( <div className='std-win'>no spec - <a href={specUrl}>{specUrl}</a> !</div>, document.getElementById('root') ) } else { ReactDOM.render( <div> <HostConfig swgClient={client} /> <HostGraph swgClient={client} /> </div>, document.getElementById('root') ) } }) - specUrl - the path to the specification file on the zabbix-reactor-node
web-front / src / components / - directory with components
web-front / src / components / zabbix-react-component.js - exported classes. Available as npm package zabbix-react-component .
export { OpenApiSwagger } from './OpenApiSwagger.js' export { HostConfig } from './HostConfig.jsx' export { HostGraph } from './HostGraph.jsx' From this place you can safely sculpt your components, increase functionality.
As an example, I attached a tool that is in Nagios but not in Zabbix. Automatic construction of a network map based on the source-target meta-information in the description of network elements.
Look at the HostGraph component. To store information, I use the tab “Host inventory” in the Zabbix Host field “Notes”. There in a JSON-format we bring bunches of the source-target elements. For visualization I used the d3 project - Force-Directed Graph .
Conclusion
Now we have in our hands a development environment, a front-end and a back-end. Knowledge of JavaScript and specifics of NodeJS is enough for work.
API-documented and available for testing by third-party front-end developers. The API server is not tied to Zabbix, this is a general solution. Integration to any system is possible.
Collected ready React-components performing standard CRUD functions. Components are freed from the complexities of interaction with integrable systems, only the display.
Source: https://habr.com/ru/post/344040/
All Articles