Twelve Linux Security Tips
 We live in a dangerous time: almost every day new vulnerabilities are discovered, exploits are created on their basis, a normal Linux home computer and a server on which a huge organization depends can be under attack.
Perhaps you pay attention to security and periodically update the system, but usually this is not enough. Therefore, today we will share twelve tips to improve the security of Linux-based systems on the example of CentOS 7.
Terminal security
In order to improve the security of the system, you can protect the console access to it by limiting the root user to the use of certain terminals. This can be done by specifying the terminals that the superuser can use in the
/etc/securetty .It is recommended, although not necessary, to allow the superuser to log in only from one terminal, leaving the rest to other users.
')
Password Reminders
Nowadays, a complex password is an absolutely necessary thing. However, it is even better when passwords are regularly changed. It is easy to forget about this, so it would be good to use some kind of system mechanism for reminding you about the age of a password, and when it should be changed.
We offer you two ways to organize such reminders. The first is to use the
chage command, the second is to set the required default values in /etc/login.defs .Calling
chage looks like this: $ chage -M 20 likegeeks Here we use the key
-M in order to set the expiration date of the password in days.You can use this command without keys, then it will prompt you to enter the required value:
$ chage likegeeks The second way is to modify the
/etc/login.defs file. Here is an example of what the values of interest may look like. You can change them to those you need: PASS_MAX_DAYS 10 PASS_MIN_DAYS 0 PASS_WARN_AGE 3 Remember that if you play the role of administrator, you should encourage users to use complex passwords. You can do this with pam_cracklib .
After installing this program, you can go to
/etc/pam.d/system-auth and enter something like this: password required pam_cracklib.so minlen=12 lcredit=-1 ucredit=-1 dcredit=-2 ocredit=-1 Sudo notifications
The
sudo , on the one hand, makes life easier, and on the other, it can cause Linux security problems that can lead to irreparable consequences. sudo settings are stored in the /etc/sudoers file. Using this file, you can prevent ordinary users from executing certain commands on behalf of the superuser. In addition, you can have sudo send an email when it is used by adding the following to the above file: mailto yourname@yourdomain.com You also need to set the
mail_always property to the value on : mail_always on SSH Security
If we are talking about Linux security, then we should remember about SSH. SSH is an important system service, it allows you to remotely connect to the system, and sometimes it is the only way to save the situation when something goes wrong, so we don’t talk about disabling SSH here.
Here we use CentOS 7, so the SSH configuration file can be found at
etc/ssh/sshd_config . Scanners or bots used by attackers attempt to connect to SSH using the default port 22.It is common practice to change the standard SSH port to another, unused port, for example,
5555 . The SSH port can be changed by setting the desired port number in the configuration file. For example: Port 5555 In addition, you can restrict SSH login for the root user by changing the value of the
PermitRootLogin parameter to no : PermitRootLogin no And, of course, you should disable password authentication and use public and private keys instead:
PasswordAuthentication no PermitEmptyPasswords no Now let's talk about SSH timeouts. The problem of timeouts can be solved by setting some parameters. For example, the following settings imply that packets supporting a connection will be automatically sent after a specified number of seconds:
ServerAliveInterval 15 ServerAliveCountMax 3 TCPKeepAlive yes By setting these parameters, you can increase the connection time:
ClientAliveInterval 30 ClientAliveCountMax 5 You can specify which users are allowed to use SSH:
AllowUsers user1 user2 Permissions can also be assigned at the group level:
AllowGroup group1 group2 SSH protection using Google Authenticator
For even more reliable SSH protection, you can use two-factor authentication, for example, by using Google Authenticator. To do this, you first need to install the appropriate program:
$ yum install google-authenticator Then run it to verify the installation:
$ google-authenticator You also need the Google Authenticator application installed on your phone.
Edit the
/etc/pam.d/sshd , adding the following to it: auth required pam_google_authenticator.so Now it remains to report all this SSH, adding the following line to the
/etc/ssh/sshd_config file: ChallengeResponseAuthentication yes Now restart ssh:
$ systemctl restart sshd When you try to log in using SSH, you will be prompted to enter a verification code. As a result, now SSH access to your system is much better protected than before.
File System Monitoring with Tripwire
Tripwire is a great tool for enhancing Linux security. This is an intrusion detection system (HIDS).
The task of Tripwire is to track file system actions, keep track of who changes files, and when these changes occur.
To install Tripwire, you need access to the EPEL repository. This is a simple task; you can solve it with the following commands:
wget http://dl.fedoraproject.org/pub/epel/7/x86_64/e/epel-release-7-9.noarch.rpm $ rpm -ivh epel-release-7-9.noarch.rpm After installing the EPEL repository, you can install Tripwire as well:
$ sudo yum install tripwire Now create the key file:
$ tripwire-setup-keyfiles You will be prompted to enter a complex password for the key file. You can then customize Tripwire by making changes to the
/etc/tripwire/twpol.txt file. Working with this file is easy, as each line is equipped with a meaningful comment.When setting up the program is completed, initialize it:
$ tripwire --init Initialization, during which the system scan is performed, will take some time, depending on the size of your files.
Any modifications of protected files are regarded as an intrusion, the administrator will be notified about this and he will need to restore the system using files whose origin he has no doubt.
For this reason, the necessary system changes must be confirmed via Tripwire. To do this, use the following command:
$ tripwire --check And here's another recommendation regarding Tripwire. Protect the
twpol.txt and twcfg.txt . This will increase the security of the system.Tripwire has many options and settings. You can view help on it like this:
man tripwire Using Firewalld
Firewalld is a replacement for
iptables , this program improves Linux network security. Firewalld allows you to make changes to settings without stopping current connections. The firewall works as a service that allows you to add and change rules without restarting and uses network zones.To find out if
firewalld is currently running, enter the following command: $ firewall-cmd --state 
You can view the predefined network zones as follows:
$ firewall-cmd --get-zones 
Each of these zones has a certain level of trust.
This value can be updated as follows:
$ firewall-cmd --set-default-zone=<new-name> You can get detailed information about a specific zone like this:
$ firewall-cmd --zone=<zone-name> --list-all You can view a list of all supported services with the following command:
$ firewall-cmd --get-services 
Then you can add new services to the zone or remove existing ones:
$ firewall-cmd --zone=<zone-name> --add-service=<service-name> $ firewall-cmd --zone=<zone-name> --remove-service=<service-name> You can display information about all open ports in any zone:
$ firewall-cmd --zone=<zone-name> --list-ports You can add ports to the zone and delete them from it as follows:
$ firewall-cmd --zone=<zone-name> --add-port=<port-number/protocol> $ firewall-cmd --zone=<zone-name> --remove-port=<port-number/protocol> You can configure and port forwarding:
$ firewall-cmd --zone=<zone-name> --add-forward-port=<port-number> $ firewall-cmd --zone=<zone-name> --remove-forward-port=<port-number> Firewalld is a very advanced tool. The most remarkable thing about him is that he can work normally, for example, when making changes to the settings, without restarting or stopping the service. This distinguishes it from the
iptables tool, when working with which the service in similar situations needs to be restarted.Switch from firewalld to iptables
Some prefer the
iptables firewall to the firewalld firewalld . If you are using firewalld , but want to go back to iptables , this is pretty easy to do.First, disable
firewalld : $ systemctl disable firewalld $ systemctl stop firewalld Then install
iptables : $ yum install iptables-services $ touch /etc/sysconfig/iptables $ touch /etc/sysconfig/ip6tables Now you can start the
iptables service: $ systemctl start iptables $ systemctl start ip6tables $ systemctl enable iptables $ systemctl enable ip6tables After all this, restart the computer.
Compiler Restriction
The attacker can compile the exploit on his computer and upload it to the server of interest. Naturally, with this approach, the presence of compilers on the server does not matter. However, it is better to limit compilers if you do not use them for work, as happens in most modern server management systems.
First, list all binary compilers from packages, and then set permissions for them:
$ rpm -q --filesbypkg gcc | grep 'bin' 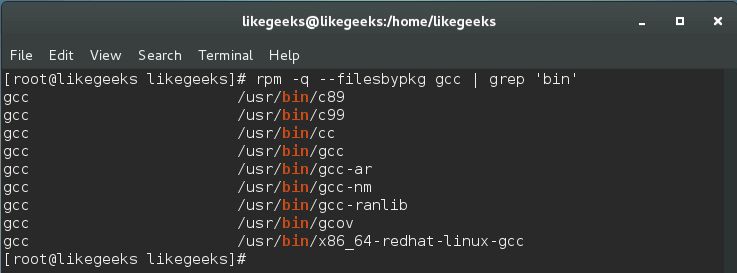
Create a new group:
$ groupadd compilerGroup Then change the compiler binary group:
$ chown root:compilerGroup /usr/bin/gcc And one more important thing. You need to change the permissions of these binary files:
$ chmod 0750 /usr/bin/gcc Now any user who tries to use
gcc will get an error message.Prevent File Modification
Immunity files can not be overwritten by any user, even with root-rights. A user cannot modify or delete such a file until the immunity flag is set, which can only be removed by the root user.
It is easy to see that this feature protects you, as a superuser, from errors that can disrupt the system. Using this approach, you can protect configuration files or any other files you wish.
To make any file immutable, use the
chattr command: $ chattr +i /myscript 
Immunity attribute can be removed with the following command:
$ chattr -i /myscript 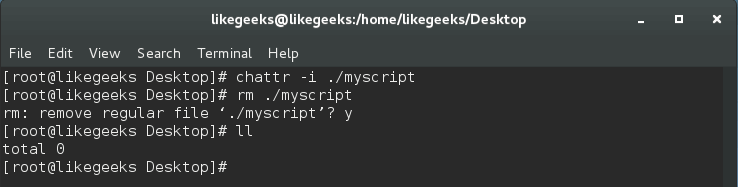
This way you can protect any files, but remember that if you have processed binary system files in this way, you will not be able to update them until you clear the immunity flag.
SELinux control with aureport
Often, the SELinux forced access control system turns out to be disabled by default. This does not affect the performance of the system, and working with SELinux is quite difficult. However, for the sake of increased security, SELinux can be enabled, and the management of this mechanism can be
aureport using aureport .The
aureport utility allows you to create reports based on audit log files . $ aureport --avc 
The list of executable files can be displayed with the following command:
$ aureport -x 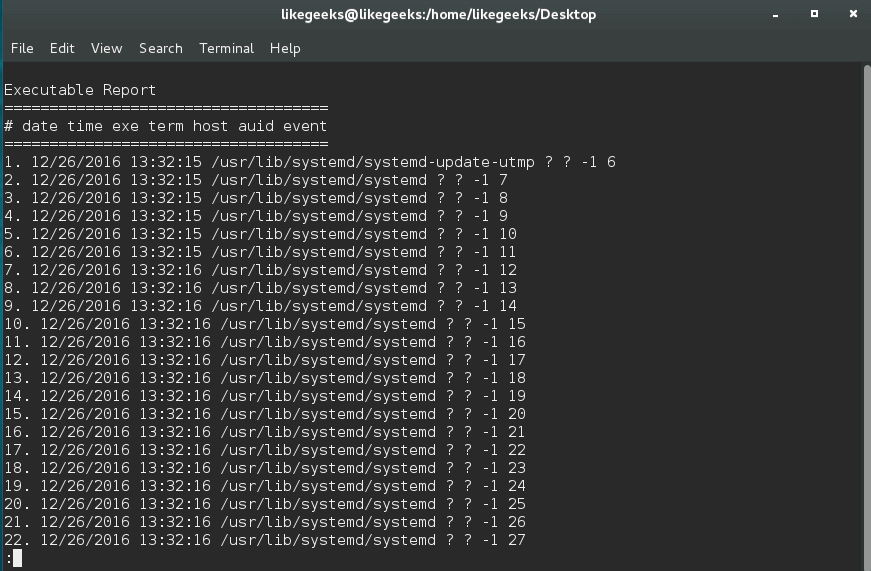
You can use
aureport to create a complete authentication report: $ aureport -au -i 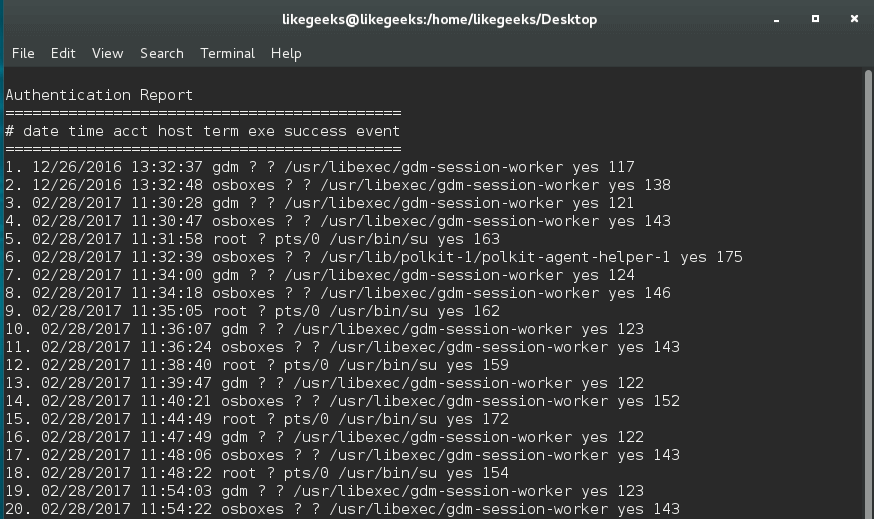
You can also display information about failed authentication attempts:
$ aureport -au --summary -i --failed 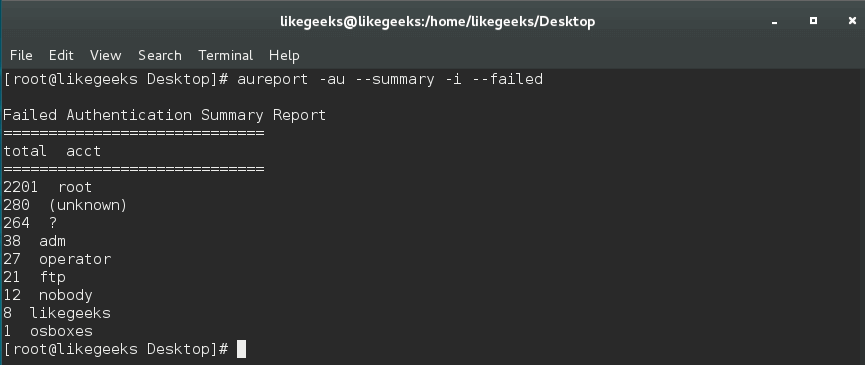
Or perhaps a summary of successful authentication attempts:
$ aureport -au --summary -i --success 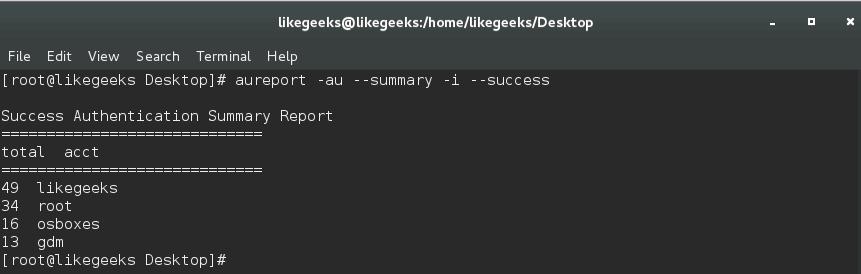
The
aureport utility makes working with SELinux much easier.Using sealert
In addition to
aureport you can use a good Linux security tool called sealert . You can install it like this: $ yum install setools Now we have a tool that will issue alerts from the
/var/log/audit/audit.log file and give us more information about the problems identified by SELinux.You can use it like this:
$ sealert -a /var/log/audit/audit.log 
The most interesting thing is that in the alerts you can find tips on how to solve the relevant problems.
Results
Hopefully the tips here will help you make your Linux installation safer. However, if we are talking about protecting information, it is impossible, by applying certain measures, to assume that nothing threatens you now. To any security software always add vigilance and caution.
Dear readers! Do you know any simple but non-obvious ways to improve Linux security?
Source: https://habr.com/ru/post/343892/
All Articles