How we made an application under Windows 10 with Fluent Design (UWP / C #)
We in ivi long ago were going to update our application under Windows 10 (which is for PC and tablets). We wanted to make it a kind of "cozy" area for recreation. And so the recently announced concept of fluent design by Microsoft came in very handy.
But I will not talk here about standard components, we offer Microsoft for fluent design ( Acrylic , Reveal , Connected-animation , etc.), although we, of course, use them too. Everything is simple and clear with them - take the documentation and use it.
But adventures usually begin when you leave the beaten track. Therefore, I'd rather tell you about how we did one custom control, which caused us a lot of trouble. Here is this:
')

The idea is that we use depth and motion from the fluent design system. The central element as if slightly rises above all others. This is achieved by animating its size and shadow during the scroll.
FlipView didn’t fit right away. he does not know how to show pieces of the next and previous elements (we call them "ears"). And we began to search for solutions.
The logical solution was to try using a GridView . To build elements into a horizontal line, set the ItemsPanel as the following:
To center the current element, use the ScrollViewer properties in the GridView template:
An example of such an implementation can be found, for example, here .
It seems everything is OK, but there are problems.
As planned by the designers, our control should go for the entire width of the window. This is not a problem in itself. But when changing the size of the control, the sizes of all its child elements (Items) should also change simultaneously:

Out of the box GridView is not able to. We spotted the solution in the implementation of AdaptiveGridView from UWPToolkit :
In more detail implementation can be looked in source codes of UWPToolkit .
It seems everything is OK, it works. But…
But as soon as we begin to dynamically change the width of the elements inside the GridView, we are faced with the following problem. At this moment, a completely different element begins to fall into the visible region. This is due to the fact that the ScrollViewer's HorizontalOffset inside the GridView remains unchanged. GridView does not involve such a trick from us.
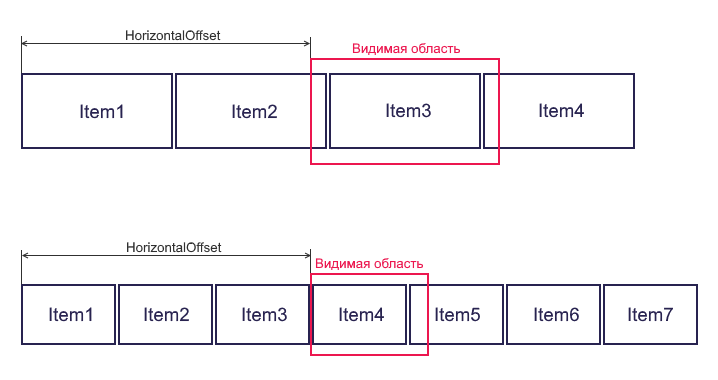
The effect is especially noticeable when the window is maximized (due to a sharp resizing). And even with just large values of HorizontalOffset.
It would seem that one could solve this problem by asking the GridView to scroll to the desired element:
But no:
It could also be solved by manually calculating and setting the new HorizontalOffset value of the ScrollViewer with each change in the size of our GridView:
But this only works with a gradual resizing of the window. When maximizing a window, it often gives the wrong result. Most likely, the reason is that the new HorizontalOffset value we calculated is too large and goes beyond the ExtentWidth (content widths inside the ScrollViewer). And since Since GridView uses UI virtualization , then automatically after changing the width of an Item, ExtentWidth may not be recalculated.
In general, an adequate solution to this problem was not found.
We could stop at this and start searching for the next solution. But I will describe another problem with this approach.
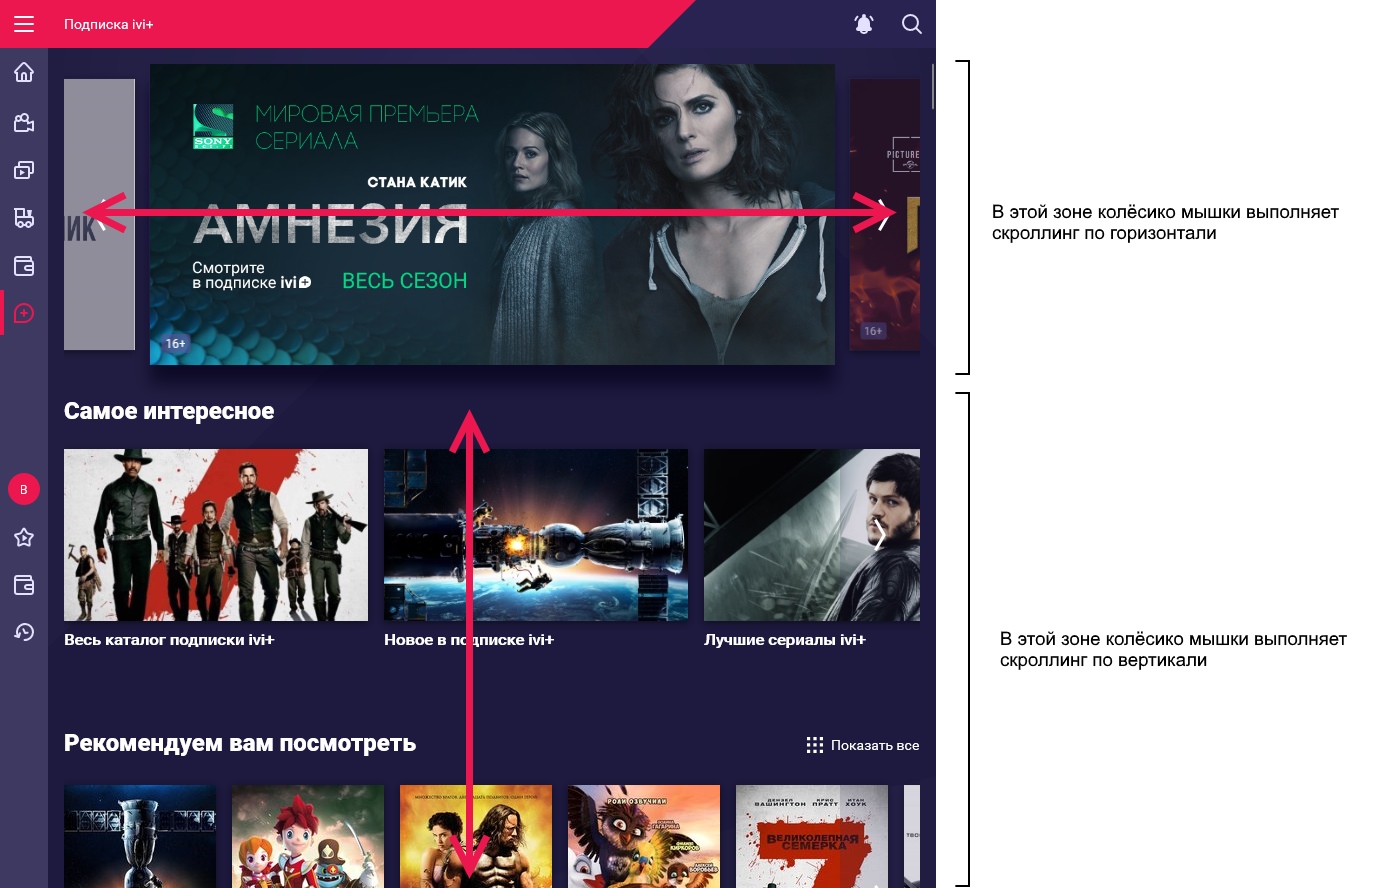
We want the mouse wheel to always scroll vertically. Is always. Vertically.
But if we put a horizontal scrolling GridView on the page, then the ScrollViewer located in its depths captures the mouse wheel events to itself and does not skip above. As a result, if the mouse cursor is over our control list, the mouse wheel makes a horizontal scroll in it. This is inconvenient and confuses users:
There are two solutions to this problem:
Touch screen did not want to lose and we continued to search for a better solution.
The next solution was the Carousel control from UWPToolkit . From all sides very interesting and informative control. I recommend everyone to study its implementation.
He pretty well covered our needs. But in the end, too, did not fit:
Those. it turns out that you need to spend quite a lot of time to refine this control for our needs (one UI virtualization is worth it). In this case, we will get a piece with potentially slowing down animations.
In general, we also decided to abandon this approach. If we are wasting time, we will do it by the mind.
Let me remind you that we do not want to use the standard ScrollViewer, because it captures all the events from the mouse wheel (see above the section "GridView. Problem 3").
We don’t like the implementation of Carousel because It uses animations on the UI stream, and the preferred way for UWP applications to create animations is Composition animations . Their difference from the more familiar Storyboards is that they work on a separate Composition stream and due to this provide 60 frames / sec even when the UI stream is busy with something.
To accomplish our task, we need InteractionTracker , a component that allows using touch input as a source for animations. Actually, the first thing we need to learn to do is to move the UI elements horizontally, depending on the movement of the finger on the screen. In fact, we have to start by implementing our custom ScrollViewer. So let's call it TouchOnlyScrollViewer:
Here, so far everything is strictly according to the dock from Mircosoft. Unless TryRedirectForManipulation had to be wrapped in try-catch because it sometimes throws sudden exceptions. This happens quite rarely (offhand, in about 2-5% of cases) and we could not find out the reason. Why this is not said in the documentation and official examples of Microsoft - we do not know;)
Once we make a similarity to the ScrollViewer, we will need the HorizontalOffset property and the ViewChanging and ViewChanged events. We will implement them through the processing of InteractionTracker callbacks. To get them, when you create an InteractionTracker, you need to specify an object that implements the IInteractionTrackerOwner, which will receive these callbacks:
For completeness, let me copy a picture from the documentation with the states and events of InteractionTracker:

The ViewChanged event will be thrown upon entering the Idle state.
The ViewChanging event will be thrown by triggering IInteractionTrackerOwner.ValuesChanged.
I’ll say right away that ValuesChanged can happen when InteractionTracker is in the Idle state. This happens after a call to InteractionTracker's TryUpdatePosition. And it looks like a bug in the UWP platform.
Well, this will have to be tolerated. Fortunately, it’s not difficult for us - in response to ValuesChanged, we will throw out either ViewChanging or ValuesChanged, depending on the current state:
For ensuring scrolling exactly on 1 element there is a remarkable decision - " snap points with inertia modifiers ".
The point is that we set the points at which the scrolling has the right to stop after performing the swipe on the touch screen. And the rest of the logic takes InteractionTracker. In fact, it modifies the deceleration rate so that the stop after the svayp occurs smoothly and at the same time exactly in the place where we need it.
Our implementation is slightly different from the one described in the example in the documentation . Because we don’t want to scroll more than one element at a time, even if the user “spun” our list too quickly.
Therefore, we add only three snap-points - “one step to the left”, “one step to the right” and “stay in the current position”. And after each scrolling, we will update them.
And in order not to recreate the snap points every time after scrolling, we will make them parameterized. To do this, we start a PropertySet with three properties:
And in the formulas for Condition and RestingValue we use the properties from this PropertySet:
Here:
At first we tried to put the border in Condition in the middle between the snap points, but users noticed that for some reason, not every svayp caused scrolling to the next element. Some svaypas were not fast enough and there was a rollback.
Therefore, in the formulas for Contition, we use the coefficients of 0.25 and 0.75 so that even the “slow” swipe scrolls to the neighboring element.
Well, after each scroll to the next element we will call this method to update the parameters of the snap points:
The next step we needed to build a full-fledged ItemsControl based on our TouchOnlyScrollerViewer.
For reference. UI virtualization is when a control list instead of, say, 1000 child elements creates only those that are visible on the screen. And reuse them as scrolling, binding to new data objects. This reduces the page load time with a large number of items in the list.
Since I really didn’t want to implement my UI virtualization, the first thing we tried to do, of course, was to use the standard ItemsStackPanel panel.
I wanted to make friends with our TouchOnlyScrollerViewer. Unfortunately, we could not find any documentation about its internal structure or source code. But a series of experiments suggested that ItemsStackPanel is looking for a ScrollViewer in the Visual Tree in the list of parent elements. And somehow to override this method, so that instead of the standard ScrollViewer, it would look for ours, we did not find.
Well. So the panel with UI-virtualization will still have to do it yourself. The best that was found on this topic is this series of articles already 11 years old: one , two , three , four . True, it is about WPF, and not about UWP, but it conveys the idea very well. We took advantage of it.
Actually, the idea is simple:
I will not show the implementation, because it turned out quite complicated. It is rather a topic for a separate article.
After we gathered it, another interesting problem came to light. Sometimes a user tapes on the elements inside our control in the process while touch input is redirected to InteractionTracker. This happens when scrolling occurs by inertia. In this case, the PointerPressed, PointerReleased, and Tapped events simply do not occur. And this is not an artificial problem, because The inertia of InteractionTracker is rather long. And even when visually scrolling is almost over, in fact it can happen that the last few pixels are slowly scrolling.
As a result, the user is upset - he expects that the page of the selected movie will open by tap. But this is not happening.
Therefore, we will identify tap by a pair of events from InteractionTracker:
It works. But, the truth, does not allow to know the element on which the tap was carried out. In our case, this is not critical, since our elements occupy almost the entire visible width of the TouchOnlyScrollViewer. Therefore, we simply choose the one that is closer to the center. In most cases - this is exactly what you need. So far, no one has even noticed that sometimes taping during scrolling can lead to the wrong place. It's not easy to catch, even if you know about it;)
Although in the general case, this is certainly not a complete solution. For a full-fledged implementation, I would have to fence my own hit testing. But it is not clear how to do it, because Tapa's coordinates are unknown ...
And finally, the cherry on the cake is what it was all about. As we scroll, we want to change the size, shadow, and transparency of the elements. To create the feeling that the one in the center is slightly raised.
To do this, we will use Expression animations . They are also part of the Composition subsystem, run on a separate thread and therefore do not slow down when the UI thread is busy.
They are created like this. For the property to be animated we set the formula (expression), which determines the dependence of this property on any other properties. The formula is defined as a text string.
Another of their charm is that they can be built in chains. We will take advantage of this:
The source for all animations will be the offset from InteractionTracker in pixels. UI- progress, 0 1. progress- .
, _progressExpression , :
Here:
Expression-:
PropertySet progress, _progressExpression. , :
progress «» ( Lerp ColorLerp). , Expression- .
:
:
:
.
That's all. , , , , . fluent design :)
→ , , .
But I will not talk here about standard components, we offer Microsoft for fluent design ( Acrylic , Reveal , Connected-animation , etc.), although we, of course, use them too. Everything is simple and clear with them - take the documentation and use it.
But adventures usually begin when you leave the beaten track. Therefore, I'd rather tell you about how we did one custom control, which caused us a lot of trouble. Here is this:
')
The idea is that we use depth and motion from the fluent design system. The central element as if slightly rises above all others. This is achieved by animating its size and shadow during the scroll.
FlipView didn’t fit right away. he does not know how to show pieces of the next and previous elements (we call them "ears"). And we began to search for solutions.
Path 1. Try using a GridView.
The logical solution was to try using a GridView . To build elements into a horizontal line, set the ItemsPanel as the following:
<ItemsStackPanel Orientation="Horizontal" /> To center the current element, use the ScrollViewer properties in the GridView template:
<ScrollViewer HorizontalSnapPointsType="MandatorySingle" HorizontalSnapPointsAlignment="Center" /> An example of such an implementation can be found, for example, here .
It seems everything is OK, but there are problems.
Gridview. Problem 1. scaling the control to the full width of the screen.
As planned by the designers, our control should go for the entire width of the window. This is not a problem in itself. But when changing the size of the control, the sizes of all its child elements (Items) should also change simultaneously:
- The width of the elements must be set to 90% of the width of the control (10% is left on the "ears");
- The height of the elements must be calculated based on the width and proportions of the image;
- At the same time on the small width of the screen you need to crop the image to the left and to the right so that it does not become too small after scaling.
Out of the box GridView is not able to. We spotted the solution in the implementation of AdaptiveGridView from UWPToolkit :
- Inherit from GridView and add two properties: ItemWidth and ItemHeight;
- In the event handler for the SizeChanged event, we calculate these properties depending on the width of the GridView;
- Override the PrepareContainerForItemOverride method of the GridView. It is called for each ItemContainer before it is displayed to the user. And we add for each item a binding on the ItemWidth and ItemHeight created by us:
protected override void PrepareContainerForItemOverride(DependencyObject obj, object item) { base.PrepareContainerForItemOverride(obj, item); if (obj is FrameworkElement element) { var heightBinding = new Binding() { Source = this, Path = new PropertyPath("ItemHeight"), Mode = BindingMode.TwoWay }; var widthBinding = new Binding() { Source = this, Path = new PropertyPath("ItemWidth"), Mode = BindingMode.TwoWay }; element.SetBinding(HeightProperty, heightBinding); element.SetBinding(WidthProperty, widthBinding); } } In more detail implementation can be looked in source codes of UWPToolkit .
It seems everything is OK, it works. But…
Gridview. Problem 2. When resizing item, the current item goes out of scope.
But as soon as we begin to dynamically change the width of the elements inside the GridView, we are faced with the following problem. At this moment, a completely different element begins to fall into the visible region. This is due to the fact that the ScrollViewer's HorizontalOffset inside the GridView remains unchanged. GridView does not involve such a trick from us.
The effect is especially noticeable when the window is maximized (due to a sharp resizing). And even with just large values of HorizontalOffset.
It would seem that one could solve this problem by asking the GridView to scroll to the desired element:
private async void OnSizeChanged(object sender, SizeChangedEventArgs e) { ... await Task.Yield(); this.ScrollIntoView(getCurrentItem(), ScrollIntoViewAlignment.Default); } But no:
- Without using Task.Yield () this does not work. And with it - leads to ugly visual twitching - because another element has time to be displayed before the ScrollIntoView runs.
- And with SnapPoints ScrollIntoView turned on for some reason, it basically does not work correctly. As if stuck on them.
It could also be solved by manually calculating and setting the new HorizontalOffset value of the ScrollViewer with each change in the size of our GridView:
private void OnSizeChanged(object sender, SizeChangedEventArgs e) { ... var scrollViewer = this.FindDescendant<ScrollViewer>(); scrollViewer.ChangeView(calculateNewHorizontalOffset(...), 0, 1, true); } But this only works with a gradual resizing of the window. When maximizing a window, it often gives the wrong result. Most likely, the reason is that the new HorizontalOffset value we calculated is too large and goes beyond the ExtentWidth (content widths inside the ScrollViewer). And since Since GridView uses UI virtualization , then automatically after changing the width of an Item, ExtentWidth may not be recalculated.
In general, an adequate solution to this problem was not found.
We could stop at this and start searching for the next solution. But I will describe another problem with this approach.
Gridview. Problem 3. Nested ScrollViewers break horizontal scrolling with the mouse
We want the mouse wheel to always scroll vertically. Is always. Vertically.
But if we put a horizontal scrolling GridView on the page, then the ScrollViewer located in its depths captures the mouse wheel events to itself and does not skip above. As a result, if the mouse cursor is over our control list, the mouse wheel makes a horizontal scroll in it. This is inconvenient and confuses users:
There are two solutions to this problem:
- Catch the PointerWheelChanged event before it hits the horizontal ScrollViewer and call ChangeView () on the vertical ScrollViewer in response. Peeped here . It works, but noticeably slows down when the mouse wheel is spinning fast. It didn’t suit us - spoiling the scroll with the mouse for the sake of rare users with a touch screen is not an option.
- Set
HorizontalScrollMode="Disabled". It helps, but it disables not only the mouse wheel, but scrolling through the touch screen.<GridView ScrollViewer.HorizontalScrollMode="Disabled" />
Touch screen did not want to lose and we continued to search for a better solution.
Path 2. Carousel from UWPToolkit
The next solution was the Carousel control from UWPToolkit . From all sides very interesting and informative control. I recommend everyone to study its implementation.
He pretty well covered our needs. But in the end, too, did not fit:
- There is no scaling of elements when changing width (see above):
- This is solved by the problem. Since he is open source. And adding scaling to it will not be difficult.
- And even the problem of maintaining the current element in scope after scaling is also solved, again thanks to the open source implementation.
- Missing UI Virtualization :
- Carousel uses its own implementation of ItemsPanel. And there is no support for UI virtualization;
- This is quite a critical thing for us, because We can have quite a lot of promotional materials in our list and this greatly affects the page load time;
- Yes, it is probably also realizable. But no longer looks simple.
- It uses animations on the UI stream (Storyboards and Manipulation events *), which, by definition, is not always smooth enough.
Those. it turns out that you need to spend quite a lot of time to refine this control for our needs (one UI virtualization is worth it). In this case, we will get a piece with potentially slowing down animations.
In general, we also decided to abandon this approach. If we are wasting time, we will do it by the mind.
Path 3. Our implementation
Making “TOUCH ONLY” ScrollViewer
Let me remind you that we do not want to use the standard ScrollViewer, because it captures all the events from the mouse wheel (see above the section "GridView. Problem 3").
We don’t like the implementation of Carousel because It uses animations on the UI stream, and the preferred way for UWP applications to create animations is Composition animations . Their difference from the more familiar Storyboards is that they work on a separate Composition stream and due to this provide 60 frames / sec even when the UI stream is busy with something.
To accomplish our task, we need InteractionTracker , a component that allows using touch input as a source for animations. Actually, the first thing we need to learn to do is to move the UI elements horizontally, depending on the movement of the finger on the screen. In fact, we have to start by implementing our custom ScrollViewer. So let's call it TouchOnlyScrollViewer:
public class TouchOnlyScrollerViewer : ContentControl { private Visual _thisVisual; private Compositor _compositor; private InteractionTracker _tracker; private VisualInteractionSource _interactionSource; private ExpressionAnimation _positionExpression; private InteractionTrackerOwner _interactionTrackerOwner; public double HorizontalOffset { get; private set; } public event Action<double> ViewChanging; public event Action<double> ViewChanged; public TouchOnlyScrollerViewer() { initInteractionTracker(); Loaded += onLoaded; PointerPressed += onPointerPressed; } private void initInteractionTracker() { // InteractionTracker VisualInteractionSource _thisVisual = ElementCompositionPreview.GetElementVisual(this); _compositor = _thisVisual.Compositor; _tracker = InteractionTracker.Create(_compositor); _interactionSource = VisualInteractionSource.Create(_thisVisual); _interactionSource.PositionXSourceMode = InteractionSourceMode.EnabledWithInertia; _tracker.InteractionSources.Add(_interactionSource); // Expression-, // touch- InteractionTracker _positionExpression = _compositor.CreateExpressionAnimation("-tracker.Position"); _positionExpression.SetReferenceParameter("tracker", _tracker); } private void onLoaded(object sender, RoutedEventArgs e) { // Offset UIElement- var visual = ElementCompositionPreview.GetElementVisual((UIElement)Content); visual.StartAnimation("Offset", _positionExpression); } private void onPointerPressed(object sender, PointerRoutedEventArgs e) { // touch- composition- if (e.Pointer.PointerDeviceType == PointerDeviceType.Touch) { try { _interactionSource.TryRedirectForManipulation(e.GetCurrentPoint(this)); } catch (Exception ex) { Debug.WriteLine("TryRedirectForManipulation: " + ex.ToString()); } } } } Here, so far everything is strictly according to the dock from Mircosoft. Unless TryRedirectForManipulation had to be wrapped in try-catch because it sometimes throws sudden exceptions. This happens quite rarely (offhand, in about 2-5% of cases) and we could not find out the reason. Why this is not said in the documentation and official examples of Microsoft - we do not know;)
TOUCH ONLY ScrollViewer. We form HorizontalOffset and ViewChanging and ViewChanged events
Once we make a similarity to the ScrollViewer, we will need the HorizontalOffset property and the ViewChanging and ViewChanged events. We will implement them through the processing of InteractionTracker callbacks. To get them, when you create an InteractionTracker, you need to specify an object that implements the IInteractionTrackerOwner, which will receive these callbacks:
_interactionTrackerOwner = new InteractionTrackerOwner(this); _tracker = InteractionTracker.CreateWithOwner(_compositor, _interactionTrackerOwner); For completeness, let me copy a picture from the documentation with the states and events of InteractionTracker:
The ViewChanged event will be thrown upon entering the Idle state.
The ViewChanging event will be thrown by triggering IInteractionTrackerOwner.ValuesChanged.
I’ll say right away that ValuesChanged can happen when InteractionTracker is in the Idle state. This happens after a call to InteractionTracker's TryUpdatePosition. And it looks like a bug in the UWP platform.
Well, this will have to be tolerated. Fortunately, it’s not difficult for us - in response to ValuesChanged, we will throw out either ViewChanging or ValuesChanged, depending on the current state:
private class InteractionTrackerOwner : IInteractionTrackerOwner { private readonly TouchOnlyScrollerViewer _scrollViewer; public void ValuesChanged(InteractionTracker sender, InteractionTrackerValuesChangedArgs args) { // . . _scrollViewer.HorizontalOffset = args.Position.X; if (_interactionTrackerState != InteractionTrackerState.Idle) { _scrollViewer.ViewChanging?.Invoke(args.Position.X); } else { _scrollViewer.ViewChanged?.Invoke(args.Position.X); } } public void IdleStateEntered(InteractionTracker sender, InteractionTrackerIdleStateEnteredArgs args) { // _scrollViewer._tracker.Position. // Windows 14393 (Anniversary Update) - 0 _scrollViewer.ViewChanged?.Invoke(_scrollViewer.HorizontalOffset, requestType); } } TOUCH ONLY ScrollViewer. Snap Points to flip through exactly 1 item
For ensuring scrolling exactly on 1 element there is a remarkable decision - " snap points with inertia modifiers ".
The point is that we set the points at which the scrolling has the right to stop after performing the swipe on the touch screen. And the rest of the logic takes InteractionTracker. In fact, it modifies the deceleration rate so that the stop after the svayp occurs smoothly and at the same time exactly in the place where we need it.
Our implementation is slightly different from the one described in the example in the documentation . Because we don’t want to scroll more than one element at a time, even if the user “spun” our list too quickly.
Therefore, we add only three snap-points - “one step to the left”, “one step to the right” and “stay in the current position”. And after each scrolling, we will update them.
And in order not to recreate the snap points every time after scrolling, we will make them parameterized. To do this, we start a PropertySet with three properties:
_snapPointProps = _compositor.CreatePropertySet(); _snapPointProps.InsertScalar("offsetLeft", 0); _snapPointProps.InsertScalar("offsetCurrent", 0); _snapPointProps.InsertScalar("offsetRight", 0); And in the formulas for Condition and RestingValue we use the properties from this PropertySet:
// « » var leftSnap = InteractionTrackerInertiaRestingValue.Create(_compositor); leftSnap.Condition = _compositor.CreateExpressionAnimation( "this.Target.NaturalRestingPosition.x < " + "props.offsetLeft * 0.25 + props.offsetCurrent * 0.75"); leftSnap.Condition.SetReferenceParameter("props", _snapPointProps); leftSnap.RestingValue = _compositor.CreateExpressionAnimation("props.offsetLeft"); leftSnap.RestingValue.SetReferenceParameter("props", _snapPointProps); // « » var currentSnap = InteractionTrackerInertiaRestingValue.Create(_compositor); currentSnap.Condition = _compositor.CreateExpressionAnimation( "this.Target.NaturalRestingPosition.x >= " + "props.offsetLeft * 0.25 + props.offsetCurrent * 0.75 && " + "this.Target.NaturalRestingPosition.x < " + "props.offsetCurrent * 0.75 + props.offsetRight * 0.25"); currentSnap.Condition.SetReferenceParameter("props", _snapPointProps); currentSnap.RestingValue = _compositor.CreateExpressionAnimation("props.offsetCurrent"); currentSnap.RestingValue.SetReferenceParameter("props", _snapPointProps); // « » var rightSnap = InteractionTrackerInertiaRestingValue.Create(_compositor); rightSnap.Condition = _compositor.CreateExpressionAnimation( "this.Target.NaturalRestingPosition.x >= " + "props.offsetCurrent * 0.75 + props.offsetRight * 0.25"); rightSnap.Condition.SetReferenceParameter("props", _snapPointProps); rightSnap.RestingValue = _compositor.CreateExpressionAnimation("props.offsetRight"); rightSnap.RestingValue.SetReferenceParameter("props", _snapPointProps); _tracker.ConfigurePositionXInertiaModifiers( new InteractionTrackerInertiaModifier[] { leftSnap, currentSnap, rightSnap }); } Here:
- NaturalRestingPosition.X is the offset at which the inertia would have ended if there were no snap points;
- SnapPoint.RestingValue is the offset at which a stop is allowed when the condition of SnapPoint.Condition is met.
At first we tried to put the border in Condition in the middle between the snap points, but users noticed that for some reason, not every svayp caused scrolling to the next element. Some svaypas were not fast enough and there was a rollback.
Therefore, in the formulas for Contition, we use the coefficients of 0.25 and 0.75 so that even the “slow” swipe scrolls to the neighboring element.
Well, after each scroll to the next element we will call this method to update the parameters of the snap points:
public void SetSnapPoints(double left, double current, double right) { _snapPointProps.InsertScalar("offsetLeft", (float)Math.Max(left, 0)); _snapPointProps.InsertScalar("offsetCurrent", (float)current); _snapPointProps.InsertScalar("offsetRight", (float)Math.Min(right, _tracker.MaxPosition.X)); } UI Virtualization Panel
The next step we needed to build a full-fledged ItemsControl based on our TouchOnlyScrollerViewer.
For reference. UI virtualization is when a control list instead of, say, 1000 child elements creates only those that are visible on the screen. And reuse them as scrolling, binding to new data objects. This reduces the page load time with a large number of items in the list.
Since I really didn’t want to implement my UI virtualization, the first thing we tried to do, of course, was to use the standard ItemsStackPanel panel.
I wanted to make friends with our TouchOnlyScrollerViewer. Unfortunately, we could not find any documentation about its internal structure or source code. But a series of experiments suggested that ItemsStackPanel is looking for a ScrollViewer in the Visual Tree in the list of parent elements. And somehow to override this method, so that instead of the standard ScrollViewer, it would look for ours, we did not find.
Well. So the panel with UI-virtualization will still have to do it yourself. The best that was found on this topic is this series of articles already 11 years old: one , two , three , four . True, it is about WPF, and not about UWP, but it conveys the idea very well. We took advantage of it.
Actually, the idea is simple:
- Such a panel is embedded inside our TouchOnlyScrollerViewer and subscribes to its ViewChanging and ViewChanged events;
- The panel creates a limited number of child UI elements. In our case, it is 5 (one in the center, two - on the “ears” sticking to the left and right, and another 2 - for the cache of the elements following the “ears”);
- UI elements are positioned based on TouchOnlyScrollerViewer.HorizontalOffset and re-attached to the desired date objects as they scroll.
I will not show the implementation, because it turned out quite complicated. It is rather a topic for a separate article.
We are looking for Tapped events that are lost after redirecting the touch input to the composition stream.
After we gathered it, another interesting problem came to light. Sometimes a user tapes on the elements inside our control in the process while touch input is redirected to InteractionTracker. This happens when scrolling occurs by inertia. In this case, the PointerPressed, PointerReleased, and Tapped events simply do not occur. And this is not an artificial problem, because The inertia of InteractionTracker is rather long. And even when visually scrolling is almost over, in fact it can happen that the last few pixels are slowly scrolling.
As a result, the user is upset - he expects that the page of the selected movie will open by tap. But this is not happening.
Therefore, we will identify tap by a pair of events from InteractionTracker:
- Transition to Interacting state (finger touched the screen);
- Then immediately (less than 150ms), the transition to the state of Inertia (finger released the screen). And while the scrolling speed should be zero (otherwise it is no longer a tap, but a swipe):
public void InertiaStateEntered(InteractionTracker sender, InteractionTrackerInertiaStateEnteredArgs args) { if (_interactionTrackerState == InteractionTrackerState.Interacting && (DateTime.Now - _lastStateTime) < TimeSpan.FromMilliseconds(150) && Math.Abs(args.PositionVelocityInPixelsPerSecond.X) < 1 /* 1px/sec */) { _scrollViewer.TappedCustom?.Invoke(_scrollViewer.HorizontalOffset); } _interactionTrackerState = InteractionTrackerState.Inertia; _lastStateTime = DateTime.Now; } It works. But, the truth, does not allow to know the element on which the tap was carried out. In our case, this is not critical, since our elements occupy almost the entire visible width of the TouchOnlyScrollViewer. Therefore, we simply choose the one that is closer to the center. In most cases - this is exactly what you need. So far, no one has even noticed that sometimes taping during scrolling can lead to the wrong place. It's not easy to catch, even if you know about it;)
Although in the general case, this is certainly not a complete solution. For a full-fledged implementation, I would have to fence my own hit testing. But it is not clear how to do it, because Tapa's coordinates are unknown ...
Bonus Expression animations for opacity, scale and shadows. To make it finally beautiful
And finally, the cherry on the cake is what it was all about. As we scroll, we want to change the size, shadow, and transparency of the elements. To create the feeling that the one in the center is slightly raised.
To do this, we will use Expression animations . They are also part of the Composition subsystem, run on a separate thread and therefore do not slow down when the UI thread is busy.
They are created like this. For the property to be animated we set the formula (expression), which determines the dependence of this property on any other properties. The formula is defined as a text string.
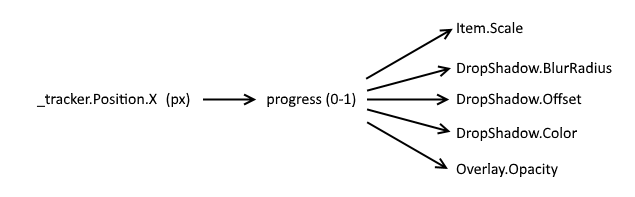
Another of their charm is that they can be built in chains. We will take advantage of this:
The source for all animations will be the offset from InteractionTracker in pixels. UI- progress, 0 1. progress- .
, _progressExpression , :
- 0 — ;
- 1 — , , , :
_progressExpression = _compositor.CreateExpressionAnimation( "1 - " + "Clamp(Abs(tracker.Position.X - props.offsetWhenSelected), 0, props.maxDistance)" + " / props.maxDistance"); Here:
- Clamp(val, min, max) — . val min/max, min/max. — val.
- offsetWhenSelected — InteractionTracker-, ;
- maxDistance — , ;
- tracker — InteractionTracker.
Expression-:
_progressExpression.SetReferenceParameter("tracker", tracker); _props = _compositor.CreatePropertySet(); _props.InsertScalar("offsetWhenSelected", (float)offsetWhenSelected); _props.InsertScalar("maxDistance", getMaxDistanceParam()); _progressExpression.SetReferenceParameter("props", _props); PropertySet progress, _progressExpression. , :
_progressProps = _compositor.CreatePropertySet(); _progressProps.InsertScalar("progress", 0f); _progressProps.StartAnimation("progress", _progressExpression); progress «» ( Lerp ColorLerp). , Expression- .
:
_scaleExpression = _compositor.CreateExpressionAnimation( "Vector3(Lerp(earUnfocusScale, 1, props.progress), " + "Lerp(earUnfocusScale, 1, props.progress), 1)"); _scaleExpression.SetScalarParameter("earUnfocusScale", (float)_earUnfocusScale); _scaleExpression.SetReferenceParameter("props", _progressProps); _thisVisual.StartAnimation("Scale", _scaleExpression); :
_shadowBlurRadiusExpression = _compositor.CreateExpressionAnimation( "Lerp(blur1, blur2, props.progress)"); _shadowBlurRadiusExpression.SetScalarParameter("blur1", ShadowBlurRadius1); _shadowBlurRadiusExpression.SetScalarParameter("blur2", ShadowBlurRadius2); _shadowBlurRadiusExpression.SetReferenceParameter("props", _progressProps); _dropShadow.StartAnimation("BlurRadius", _shadowBlurRadiusExpression); :
_shadowColorExpression = _compositor.CreateExpressionAnimation( "ColorLerp(color1, color2, props.progress)")) _shadowColorExpression.SetColorParameter("color1", ShadowColor1); _shadowColorExpression.SetColorParameter("color2", ShadowColor2); _shadowColorExpression.SetReferenceParameter("props", _progressProps); _dropShadow.StartAnimation("Color", _shadowColorExpression); .
That's all. , , , , . fluent design :)
→ , , .
Source: https://habr.com/ru/post/343880/
All Articles