.Net Core bots for Telegram, Slack and Facebook
Recently, one of the bank’s projects posed the task of writing a bot. The result of this experience was this text, which is intended primarily for novice developers.

Practically everyone who uses modern messaging tools has come across bots. One of the definitions of a bot is a program that performs automatically and / or on a predetermined schedule any actions through interfaces designed for people.
')
Bots can be used to inform, to automate processes (for example, to automatically generate a task in TFS based on the user's letter) and for many other purposes, but since one article is not enough to consider all the options, then the story will go only about how to create a bot for processing commands.
The easiest development platform is Telegram. The process begins with a call to a special bot BotFather.
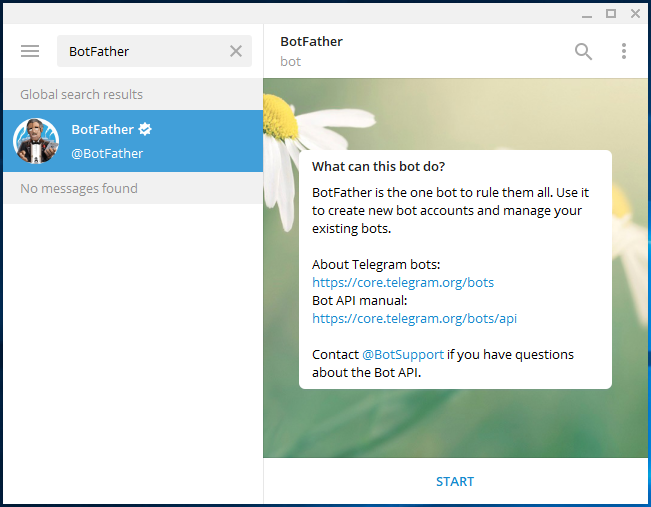
It's very simple, in the search bar, type BotFather, press the start button, choose the \ newbot command, and then, consistently answering questions, enter the name of the bot and its user name. In the final, Telegram will inform you that the bot has been successfully created, will provide its key and will offer to provide an additional description and / or enter command names.
Technically, you have two ways to process messages and bot commands. The first is that your service periodically polls the Telegram server for changes. For the demonstration, we will use the Telegram.Bot API (the package is available via nuget).
In the example above, each incoming message is resent to the user. Immediately, I note that in the Telegram the team is also a message, only with the “/” sign.
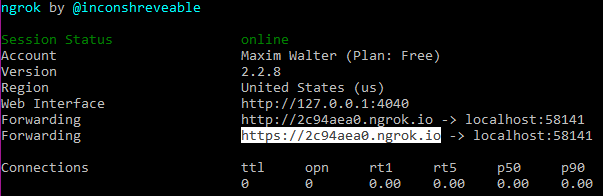
The second method requires a webhook setting, i.e. a service hosted at an https address that will handle the changes. This method loads the Telegram server less, but requires a certificate. However, the problem with the certificate is easily solved thanks to the Ngrok service (https://ngrok.com/), which can tunnel requests from the https address to the application address on your machine.
To use Ngrok, you must:
After launch, a window will appear with the generated addresses. Information about all tunneling events will also be displayed here.
The HTTPS address that Ngrok returns will change each time tunneling starts, but you do not need to do this all the time when debugging the application. Configure tunneling for a specific port once and stop (start) your service as many times as you like.
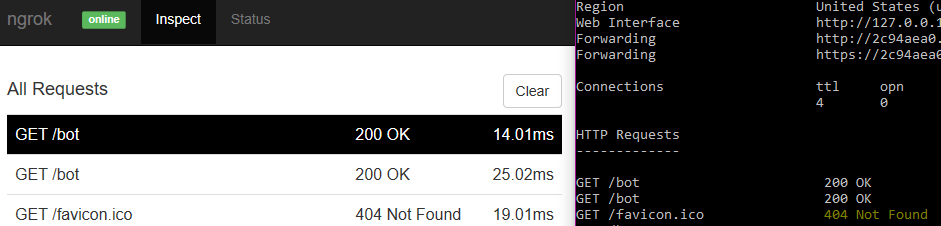
Ngrok has an administrative page, available at 127.0.0.1 : 4040, where you can view user request parameters.
Let's return to our previous example with a re-sending of the message and create an ASP.NET Core project with the following WebAPI controller.
In order to tell Telegram where the service is located, you can write the following simple console application.
Consider another popular messaging service. Creating a bot in Slack starts with a simple form ( https://api.slack.com/apps/new ), where you need to fill in the name of the application and specify the workspace.
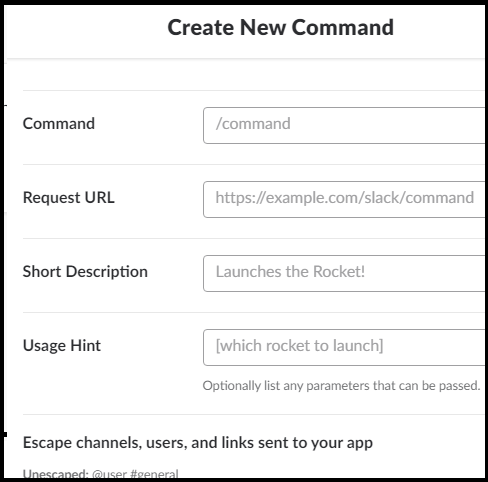
After clicking the Create App button, a settings page will appear, where in the Add features and functionality subsection you need to select the Slash Commands item in order to proceed to creating bot commands. On the form that appears, you will need to enter:
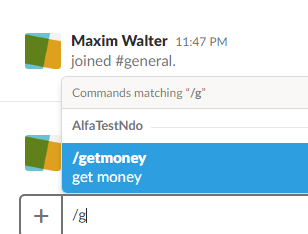
In the figure, an example of how a chat from the getmoney command of the AlfaTestNdo bot looks like in a chat.
After selecting the Slack command, the following message is sent to the specified https address
Now let's see how our service code will look like, sending a “hello” message in response.
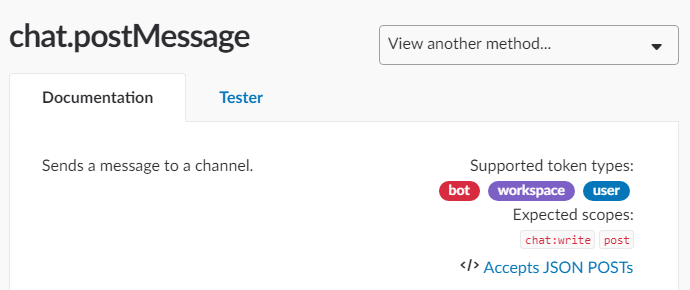
The service calls the chat.postMessage method with the token key and the channel identifier message.channel_id.
Slack defines the following types of keys:
All Slack API methods are well documented, contain information about supported keys. The method description page also has a Tester tab for testing.
https://api.slack.com/methods/chat.postMessage
At the end of the Slack theme, I’ll add that, like in Telegram, you can create not only text messages, but also various interactive components: buttons, menus, and so on.
Creating a bot on Facebook is more complicated in my opinion than in Telegram and Slack, but on the whole almost the same. You need to go to the developers.facebook.com/apps page, click the “Add a new application” button and enter a name, as well as an email address for feedback.
After clicking the “Create application ID” button, a settings page will open, where you need to specify the bot's personal page (you need to create it) in order to get the access key to the API methods.
In the Webhook section, you will need to specify the https address of your service, come up with verification keys and enter it in the “Confirm token” field, as well as select the information to which you subscribe.
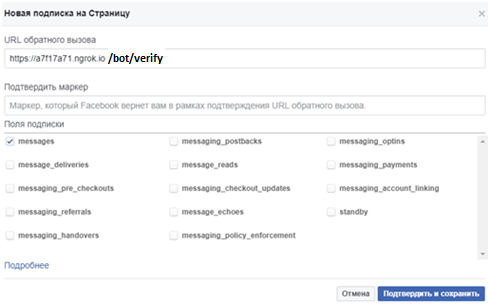
Here it is important to know the following, when you click “Confirm and Save”, Facebook will send a verification message with the fields hub.mode, hub.challenge plus hub.verify_token, which will contain your personal key. Your service should be able to accept this message and return the hub.challenge as a success if your key was actually transferred to the hub.verify_token field.
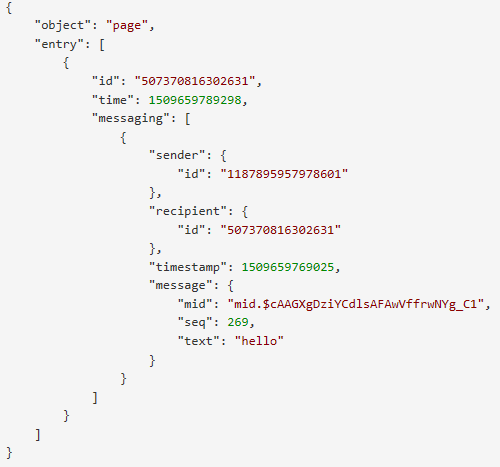
Suppose you subscribed only to the messages and sent the bot the message “hello”. In this case, to the https address you specified, Facebook will send a message of the following type.
Now what the code for processing incoming messages looks like. In the example, the message is re-sent back to the user.
Our review will be incomplete if we don’t touch such a wonderful tool as the Bot Framework from Microsoft.
First, the Bot Framework provides a unified API for working with different channels: Bing, Cortana, Email, Facebook, GroupMe, Kik, Skype, Skype for Business, Slack, SMS, Microsoft Teams.
Secondly, you get an emulator (https://github.com/Microsoft/BotFramework-Emulator) to test your service, which does not require the https-address setting. The emulator also allows you to check the already placed service at dev.botframework.com/bots , although in this case you will need to specify the application ID and password.

There are, however, a number of unpleasant moments. In particular, there is no support for .Net Core. More about this is written here.
github.com/Microsoft/BotBuilder/issues/572
designprincipia.com/microsoft-bot-framework-on-asp-net-core
Let's return to our example with the re-sending of the message. You will need to install the Bot Framework template.
In this example, in response to a text message from the user (type ActivityTypes.Message) an instance of the class supporting the IDialog interface is created.
In our case, this is the RootDialog class with the StartAsync method, which organizes the task of sending an incoming message.
In my opinion, the most interesting feature of the Bot Framework is the Connector. This is an API that allows you to organize communication between different channels. More details can be found here: docs.microsoft.com/en-us/bot-framework/dotnet/bot-builder-dotnet-connector
If we compare the development of a bot and a web application, we can note the following: in both cases, the middle-layer query processing is equally required, but as far as the front-part is concerned, the difference is significant. When you make a bot, you do not need to search for resources in order to develop an interface that can work in different browsers and operating systems, since the interface is the responsibility of the messaging service developer. And although you have no control over the API, in many cases the implementation of user interaction through a bot instead of a site may be more promising and save a lot of resources.
Practically everyone who uses modern messaging tools has come across bots. One of the definitions of a bot is a program that performs automatically and / or on a predetermined schedule any actions through interfaces designed for people.
')
Bots can be used to inform, to automate processes (for example, to automatically generate a task in TFS based on the user's letter) and for many other purposes, but since one article is not enough to consider all the options, then the story will go only about how to create a bot for processing commands.
Bot for Telegram
The easiest development platform is Telegram. The process begins with a call to a special bot BotFather.
It's very simple, in the search bar, type BotFather, press the start button, choose the \ newbot command, and then, consistently answering questions, enter the name of the bot and its user name. In the final, Telegram will inform you that the bot has been successfully created, will provide its key and will offer to provide an additional description and / or enter command names.
Technically, you have two ways to process messages and bot commands. The first is that your service periodically polls the Telegram server for changes. For the demonstration, we will use the Telegram.Bot API (the package is available via nuget).
using Telegram.Bot; using Telegram.Bot.Args; using Telegram.Bot.Types; using Telegram.Bot.Types.Enums; class Program { private static TelegramBotClient client; static void Main(string[] args) { // token, BotFather client = new TelegramBotClient(token); client.OnMessage += BotOnMessageReceived; client.OnMessageEdited += BotOnMessageReceived; client.StartReceiving(); Console.ReadLine(); client.StopReceiving(); } private async void BotOnMessageReceived(object sender, MessageEventArgs messageEventArgs) { var message = messageEventArgs.Message; if (message?.Type == MessageType.TextMessage) { await client.SendTextMessageAsync(message.Chat.Id, message.Text); } } } In the example above, each incoming message is resent to the user. Immediately, I note that in the Telegram the team is also a message, only with the “/” sign.
The second method requires a webhook setting, i.e. a service hosted at an https address that will handle the changes. This method loads the Telegram server less, but requires a certificate. However, the problem with the certificate is easily solved thanks to the Ngrok service (https://ngrok.com/), which can tunnel requests from the https address to the application address on your machine.
To use Ngrok, you must:
- register on the site and get a personal key;
- install ngrok.exe and in the command line enter the ngrok authtoken key Ngrok;
- execute the ngrok http portservice command;
- In Visual Studio, you can install the Ngrok plugin and use the command from the Tools -> Start Ngrok tunnel menu.
After launch, a window will appear with the generated addresses. Information about all tunneling events will also be displayed here.
The HTTPS address that Ngrok returns will change each time tunneling starts, but you do not need to do this all the time when debugging the application. Configure tunneling for a specific port once and stop (start) your service as many times as you like.
Ngrok has an administrative page, available at 127.0.0.1 : 4040, where you can view user request parameters.
Let's return to our previous example with a re-sending of the message and create an ASP.NET Core project with the following WebAPI controller.
[Route("bot")] public class BotController : Controller { // token, BotFather private readonly TelegramBotClient client = new TelegramBotClient(token); [HttpPost] public async void Post([FromBody]Update update) { if (update == null) return; var message = update.Message; if (message?.Type == MessageType.TextMessage) { await client.SendTextMessageAsync(message.Chat.Id, message.Text); } } } In order to tell Telegram where the service is located, you can write the following simple console application.
using Telegram.Bot; using Telegram.Bot.Args; using Telegram.Bot.Types; using Telegram.Bot.Types.Enums; class Program { static void Main(string[] args) { // token, BotFather var client = new TelegramBotClient(token); client.SetWebhookAsync("https Ngrok ").Wait(); Console.ReadLine(); client.SetWebhookAsync().Wait(); } } Slack bot
Consider another popular messaging service. Creating a bot in Slack starts with a simple form ( https://api.slack.com/apps/new ), where you need to fill in the name of the application and specify the workspace.
After clicking the Create App button, a settings page will appear, where in the Add features and functionality subsection you need to select the Slash Commands item in order to proceed to creating bot commands. On the form that appears, you will need to enter:
- In the Command field - the name of the command.
- In the Request URL field - https-address of our service
- In the Short Description field - command assignment
In the figure, an example of how a chat from the getmoney command of the AlfaTestNdo bot looks like in a chat.
After selecting the Slack command, the following message is sent to the specified https address
public class Message { public string channel_id { get; set; } public string channel_name { get; set; } public string command { get; set; } public string response_url { get; set; } public string team_domain { get; set; } public string team_id { get; set; } public string text { get; set; } public string token { get; set; } public string trigger_id { get; set; } public string user_id { get; set; } public string user_name { get; set; } } Now let's see how our service code will look like, sending a “hello” message in response.
[Route("bot")] public class BotController : Controller { [HttpPost] public async void Post(Message message) { var uri = new Uri("https://slack.com/api/chat.postMessage?token=" + token + "&channel=“ + message.channel_id + "&text=hello"); var httpClient = new HttpClient(); await httpClient.GetAsync(uri).ConfigureAwait(false); } } The service calls the chat.postMessage method with the token key and the channel identifier message.channel_id.
Slack defines the following types of keys:
- User token is the key of the user who installed the application, and authorization through Oauth is applied. It has the prefix xoxp. Read more about it here https://api.slack.com/docs/oauth
- Bot user token - key, technical virtual user. It has the prefix xoxb. Read more about them here https://api.slack.com/bot-users .
- Workspace token - the key of the workspace. It has the prefix xoxa.
- Legacy token - key authorized user. It has the prefix xoxp. More about them here https://api.slack.com/custom-integrations/legacy-tokens . It is not recommended to use them.
- Verification token - this slack key is sent when accessing your service. With it, you can verify that it is your application that accesses the service. Never used to call API methods.
All Slack API methods are well documented, contain information about supported keys. The method description page also has a Tester tab for testing.
https://api.slack.com/methods/chat.postMessage
At the end of the Slack theme, I’ll add that, like in Telegram, you can create not only text messages, but also various interactive components: buttons, menus, and so on.
Bot for facebook
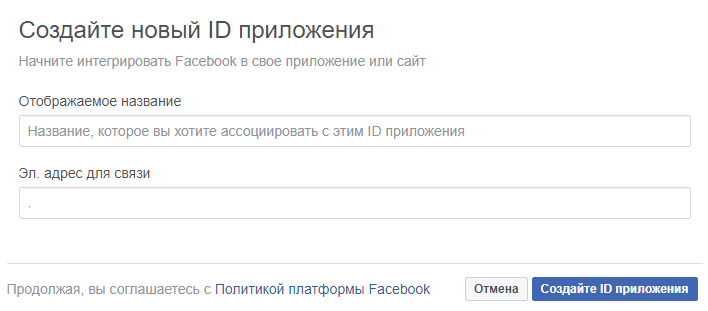
Creating a bot on Facebook is more complicated in my opinion than in Telegram and Slack, but on the whole almost the same. You need to go to the developers.facebook.com/apps page, click the “Add a new application” button and enter a name, as well as an email address for feedback.
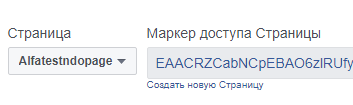
After clicking the “Create application ID” button, a settings page will open, where you need to specify the bot's personal page (you need to create it) in order to get the access key to the API methods.
In the Webhook section, you will need to specify the https address of your service, come up with verification keys and enter it in the “Confirm token” field, as well as select the information to which you subscribe.
Here it is important to know the following, when you click “Confirm and Save”, Facebook will send a verification message with the fields hub.mode, hub.challenge plus hub.verify_token, which will contain your personal key. Your service should be able to accept this message and return the hub.challenge as a success if your key was actually transferred to the hub.verify_token field.
[Route("bot")] public class BotController : Controller { [HttpGet] public string Verify() { var mode = Request.Query["hub.mode"].FirstOrDefault(); var challenge = Request.Query["hub.challenge"].FirstOrDefault(); var token = Request.Query["hub.verify_token"].FirstOrDefault(); return challenge ?? string.Empty; } } Suppose you subscribed only to the messages and sent the bot the message “hello”. In this case, to the https address you specified, Facebook will send a message of the following type.
Now what the code for processing incoming messages looks like. In the example, the message is re-sent back to the user.
[Route("bot")] public class BotController : Controller { [HttpPost] public void Post([FromBody] Letter letter) { var content = letter.entry[0].messaging[0]; const string token = “ , "; var uri = new Uri("https://graph.facebook.com/v2.6/me/messages?access_token=" + token); var request = (HttpWebRequest)WebRequest.Create(uri); request.ContentType = "application/json"; request.Method = "POST"; using (var requestWriter = new StreamWriter(request.GetRequestStream())) { requestWriter.Write($@" {{recipient: {{ id: {content.sender.id}}},message: {{text: ""{content.message.text}"" }}}}"); } var response = (HttpWebResponse)request.GetResponse(); } } Bot framework
Our review will be incomplete if we don’t touch such a wonderful tool as the Bot Framework from Microsoft.
First, the Bot Framework provides a unified API for working with different channels: Bing, Cortana, Email, Facebook, GroupMe, Kik, Skype, Skype for Business, Slack, SMS, Microsoft Teams.
Secondly, you get an emulator (https://github.com/Microsoft/BotFramework-Emulator) to test your service, which does not require the https-address setting. The emulator also allows you to check the already placed service at dev.botframework.com/bots , although in this case you will need to specify the application ID and password.
There are, however, a number of unpleasant moments. In particular, there is no support for .Net Core. More about this is written here.
github.com/Microsoft/BotBuilder/issues/572
designprincipia.com/microsoft-bot-framework-on-asp-net-core
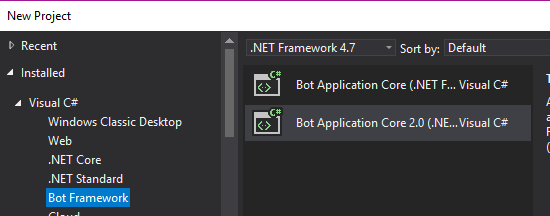
Let's return to our example with the re-sending of the message. You will need to install the Bot Framework template.
In this example, in response to a text message from the user (type ActivityTypes.Message) an instance of the class supporting the IDialog interface is created.
[Route("api/[controller]")] [BotAuthentication] public class MessagesController : Controller { [HttpPost] public async Task<HttpResponseMessage> Post([FromBody]Activity activity) { if (activity?.Type == ActivityTypes.Message) { await Conversation.SendAsync(activity, () => new Dialogs.RootDialog()); } return new HttpResponseMessage(HttpStatusCode.OK); } } In our case, this is the RootDialog class with the StartAsync method, which organizes the task of sending an incoming message.
[Serializable] public class RootDialog : IDialog<object> { public Task StartAsync(IDialogContext context) { context.Wait(MessageReceivedAsync); return Task.CompletedTask; } private async Task MessageReceivedAsync(IDialogContext context, IAwaitable<object> result) { var activity = await result as Activity; await context.PostAsync(activity.Text); context.Wait(MessageReceivedAsync); } } In my opinion, the most interesting feature of the Bot Framework is the Connector. This is an API that allows you to organize communication between different channels. More details can be found here: docs.microsoft.com/en-us/bot-framework/dotnet/bot-builder-dotnet-connector
Conclusion
If we compare the development of a bot and a web application, we can note the following: in both cases, the middle-layer query processing is equally required, but as far as the front-part is concerned, the difference is significant. When you make a bot, you do not need to search for resources in order to develop an interface that can work in different browsers and operating systems, since the interface is the responsibility of the messaging service developer. And although you have no control over the API, in many cases the implementation of user interaction through a bot instead of a site may be more promising and save a lot of resources.
useful links
Official instructions
- Information on creating bots in Telegram
- Information on bots in Slack
- Instructions for creating a bot on Facebook
- Bot Framework Documentation
- Information on Viber bots
- vk.com/dev/bots and vk.com/dev/bots_docs "- information on VK bots
Sdk
- Telegram API on .Net (Telegram.Bot nuget package)
- API examples telegram.bot
- Official page on API implementations in various languages, including C #
Additional instructions
Source: https://habr.com/ru/post/343846/
All Articles