Entity-Component-System Design Pattern - implementation and sample game
In this article I want to discuss the entity-component-system design pattern (Entity-Component-System, ECS ). On this topic, you can find a lot of information on the Internet, so I will not go deep into the explanations, but I’ll tell you more about my own implementation.
Part 1: Implementing the C ++ Entity-Component-System Template
Start over. The complete source code for my ECS implementation can be found in the github repository.
')
The Entity-Component-System, mainly used in games, is a design pattern that provides tremendous flexibility in designing a common software architecture [1] . Large companies such as Unity, Epic or Crytek use this template in their frameworks to provide developers with a very rich tool with which they can develop their own software. You can read a wider discussion on this topic in these posts [2,3,4,5] .
If you study these articles, you will notice that they all have a common goal: the distribution of various problems and tasks between entities (Entities), components (Components) and systems (Systems). These are the three basic concepts of this pattern, and they are connected quite loosely among themselves. Entities are typically used to create a unique identifier, to provide the environment with information about the existence of a single element and function as a kind of root object that combines many components. Components are nothing but container objects that have no complicated logic. Ideally, they are objects with a simple data structure (plain old data objects, POD). Each type of component can be attached to an entity to give it something like a property. Suppose you can attach an “Health Component” to an entity, which will make it mortal, giving it health , which is the usual integer or fractional value in memory.
Most of the articles that I came across are consistent with each other regarding the use of entities and components, but opinions on systems differ. Some people think that only components are known. Moreover, some say that for each type of component there must be its own system, for example, for “Collision-Components” there should be a “Collision-System”, for “Health-Components” - “Health-System”, etc. This approach is quite strict and does not take into account the interaction of various components. A less rigorous approach is that different systems deal with components that they should be aware of. For example, Physics-Systems should know about Collision-Components and Rigidbody-Components, because both of them most likely contain the information necessary for the simulation of physics. In my humble opinion, systems are “closed environments”. That is, they do not own any entities or components. They have access to them through independent dispatcher objects, which in turn control the life cycle of entities and components.
This poses an interesting question for us: how do entities, components and systems exchange information if they are more or less independent of each other? The answer may be different and depends on the implementation. In my implementation, the answer is event sourcing [6] . Events are distributed through an “event manager” (“Event-Manager”) and anyone who is interested in events can receive information transmitted by the dispatcher. If an entity, system, or even a component has an important state change that needs to be reported, for example, “the position has changed” or “the player has died”, they can transmit information to the “event dispatcher”. He will transmit the event and all those who are subscribed to this event will learn about it. In this way everything can be tied together.
It seems that the introduction was longer than I had planned, well, what can you do. Before we delve into the study of code , which, by the way, is written in C ++ 11, I will tell you in general about the main characteristics of my architecture:
- memory efficiency — to quickly create and delete entities, components, and systems, as well as events, I cannot rely on standard dynamic memory management. The solution in this case, of course, is its own memory allocator.
- logging - to keep track of what is happening, I used log4cplus for logging [7] .
- scalability - convenient implementation of new types of entities, components, systems and events is possible without any specified upper limits, with the exception of system memory
- flexibility - between entities, components and systems there are no dependencies (of course, entities and components have a kind of dependency, but they do not contain logic of pointers on each other)
- simple object search / access to them - simple retrieval of entity objects and their components via an EntityId or component iterator for iterating all components of a certain type
- performance monitoring - systems have priorities and can depend on each other, so you can set the topological order of the implementation
- ease of use - the library can easily be used with other software, just one include.
The image below shows the general architecture of my Entity-Component-System implementation:

Figure 01: ECS architecture diagram ( ECS.dll ).
As you can see, this diagram has four areas of different colors. Each area denotes a modular part of the architecture. At the very bottom - in fact, on the diagram at the very top, it is turned upside down - we have memory management and journaling (the yellow area). These first-level modules work with very low-level tasks. They use second-level modules in the Entity-Component-System (blue area) and event sourcing (red area). These modules mainly deal with object management tasks. Above them is the third level module ECS_Engine (green area). This global top-level engine object controls all second-level modules and is engaged in initialization and destruction. Well, it was a brief and very abstract review, now let's look at the architecture in more detail.
Memory manager
Let's start with the Memory-Manager . Its implementation is based on article [8] , which I found on gamedev.net . The idea is to reduce to the absolute minimum the allocation and release of dynamic memory. Therefore, only when starting the application using malloc is allocated a large area of memory. This memory will now be controlled by one or more distributors. There are many types of distributors [9] (linear, stack, free list) and each of them has its own pros and cons (here I will not consider them). But despite the fact that inside they work differently, they all have a common open interface:
class Allocator { public: virtual void* allocate(size_t size) = 0; virtual void free(void* p) = 0; }; The above code snippet is incomplete, but it shows two basic general methods that each distributor must provide:
- allocate - allocates a certain number of bytes and returns the memory address of this area.
- free - frees a previously allocated area of memory with the specified address.
With that said, we can do interesting things, for example, chain up several distributors, like this:
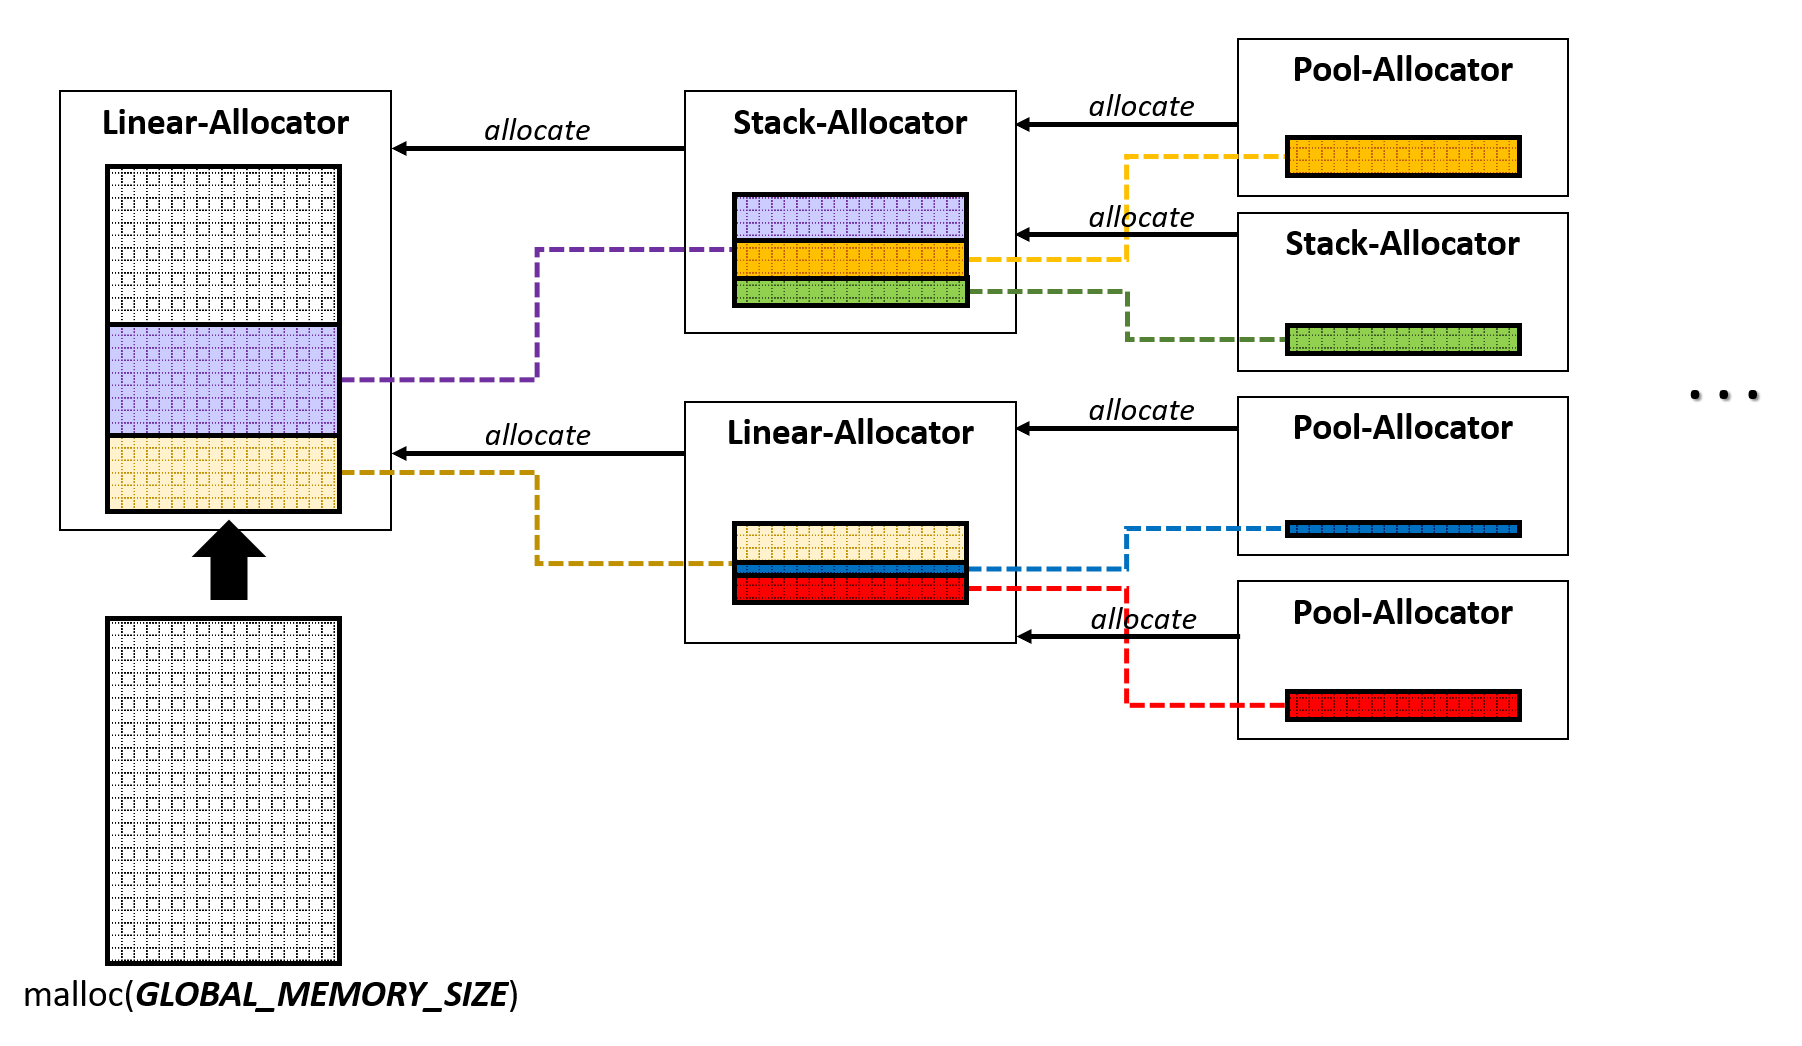
Figure 02: Span-Managed Memory.
As you can see, one allocator can get its memory, which it will manage, from another (parent) allocator, which, in turn, can get its memory from another allocator, and so on. In this way, various memory management strategies can be built.
To implement my ECS, I created a root stack allocator that receives an initial selection of 1 GB of system memory. Modules of the second level allocate the necessary amount of memory from the root allocator, and release it only after the application is completed.
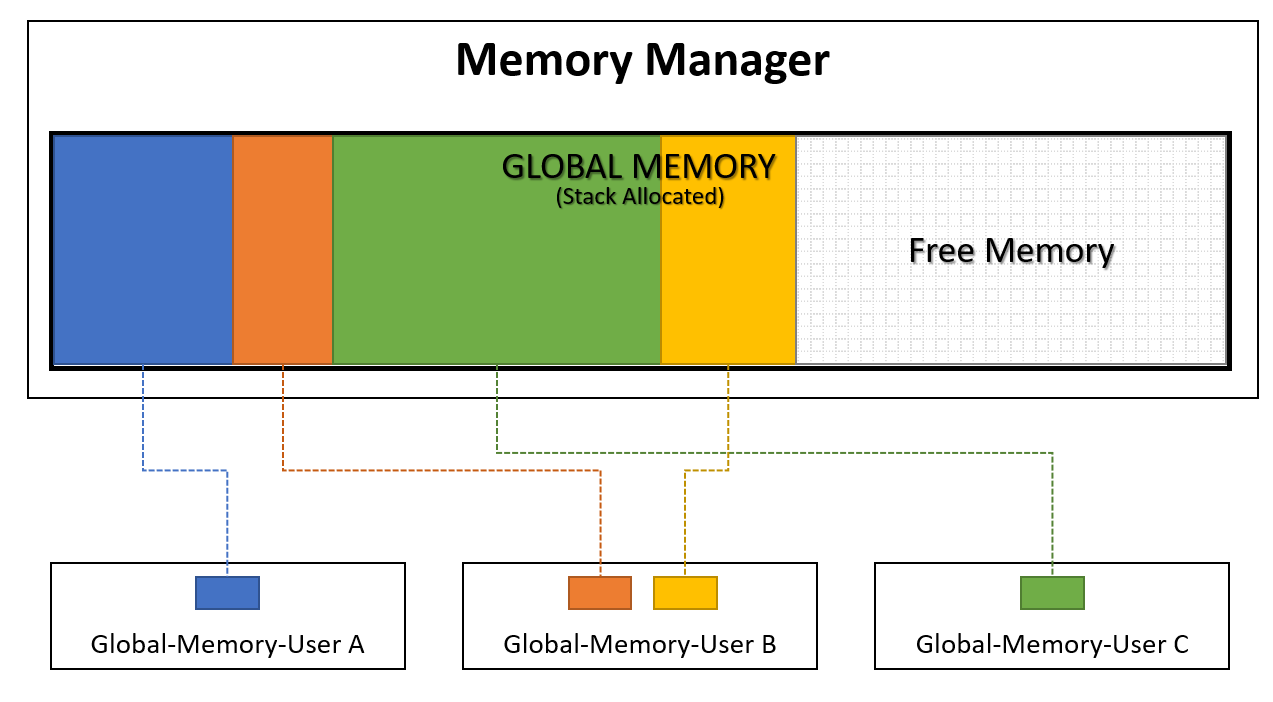
Figure 03: Possible global memory allocation.
Figure 03 shows how memory can be distributed between second-level modules: “Global-Memory-User A” can be an entity manager, “Global-Memory-User B” can be a component manager, and Global-Memory-User C can be a manager. systems.
Journaling
I won't talk much about logging, because I just used log4cplus [7] , which does all the work for me. All I did was set the base class Logger , which defines the object log4cplus :: Logger and several wrapper methods that transmit simple logging calls like “LogInfo ()”, “LogWarning ()”, etc.
Entity-Manager, IEntity, Entity <T>
Ok, now let's talk about the very “meat” of architecture: the blue area in Figure 01. You might have noticed a similar structure of all dispatcher objects and their corresponding classes. For example, take a look at the EntityManager , IEntity, and Entity <T> classes. The EntityManger class must manage all entity objects at run time. Its tasks include creating, deleting, and accessing existing entity objects. IEntity is an interface class that provides the simplest characteristics of an entity object, such as an object identifier and an (static) type identifier. It is static because it does not change after initializing the program. This class identifier is constant each time you start the application and can change only when the source code changes.
class IEntity { // ! EntityId m_Id; public: IEntity(); virtual ~IEntity(); virtual const EntityTypeId GetStaticEntityTypeID() const = 0; inline const EntityId GetEntityID() const { return this->m_Id; } }; A type identifier is an integer value that varies for each particular class of entity. This allows you to check the type of an IEntity object at run time. Last but not least, is the Entity <T> template class.
template<class T> class Entity : public IEntity { // ! void operator delete(void*) = delete; void operator delete[](void*) = delete; public: static const EntityTypeId STATIC_ENTITY_TYPE_ID; Entity() {} virtual ~Entity() {} virtual const EntityTypeId GetStaticEntityTypeID() const override { return STATIC_ENTITY_TYPE_ID; } }; // template const EntityTypeId Entity::STATIC_ENTITY_TYPE_ID = util::Internal::FamilyTypeID::Get(); The main purpose of this class is to initialize the unique identifier of the type of a particular entity class. Here I used two facts: first, the initialization of the constant [10] of static variables; secondly, the nature of the work of template classes. Each version of the Entity <T> template class will have its own static variable STATIC_ENTITY_TYPE_ID . It, in turn, guaranteed to be initialized to perform all dynamic initializations. The fragment " util :: Internal :: FamilyTypeID :: Get () " is used to implement something like a type counter mechanism. It increments the counter every time it is called with another T , but it always returns one value when called again with one T. Not sure if such a template has its name, but it is quite convenient. At this stage, I also got rid of the operator delete and delete []. So I made it impossible for them to randomly call. In addition, because of this (if your compiler is smart enough), you will get a warning when you try to use the new or new [] operator for entity objects, because there is no longer any opposite operator. These operators should not be used, because the EntityManager class will be responsible for all of their tasks. So let's summarize what we have already learned. The dispatcher class provides the simplest functions, such as creating, deleting, and accessing objects. The class-interface is used as the most root base class and provides a unique identifier of the object and a type identifier. The template class ensures the correct initialization of the type identifier and eliminates the delete / delete [] operator. The same template classes dispatcher, interface and template are used for components, systems and events. The only, but important, difference between these groups is how the dispatcher classes store their objects and access them.
Let's first take a look at the EntityManager class. Figure 04 shows the overall storage structure of the elements.
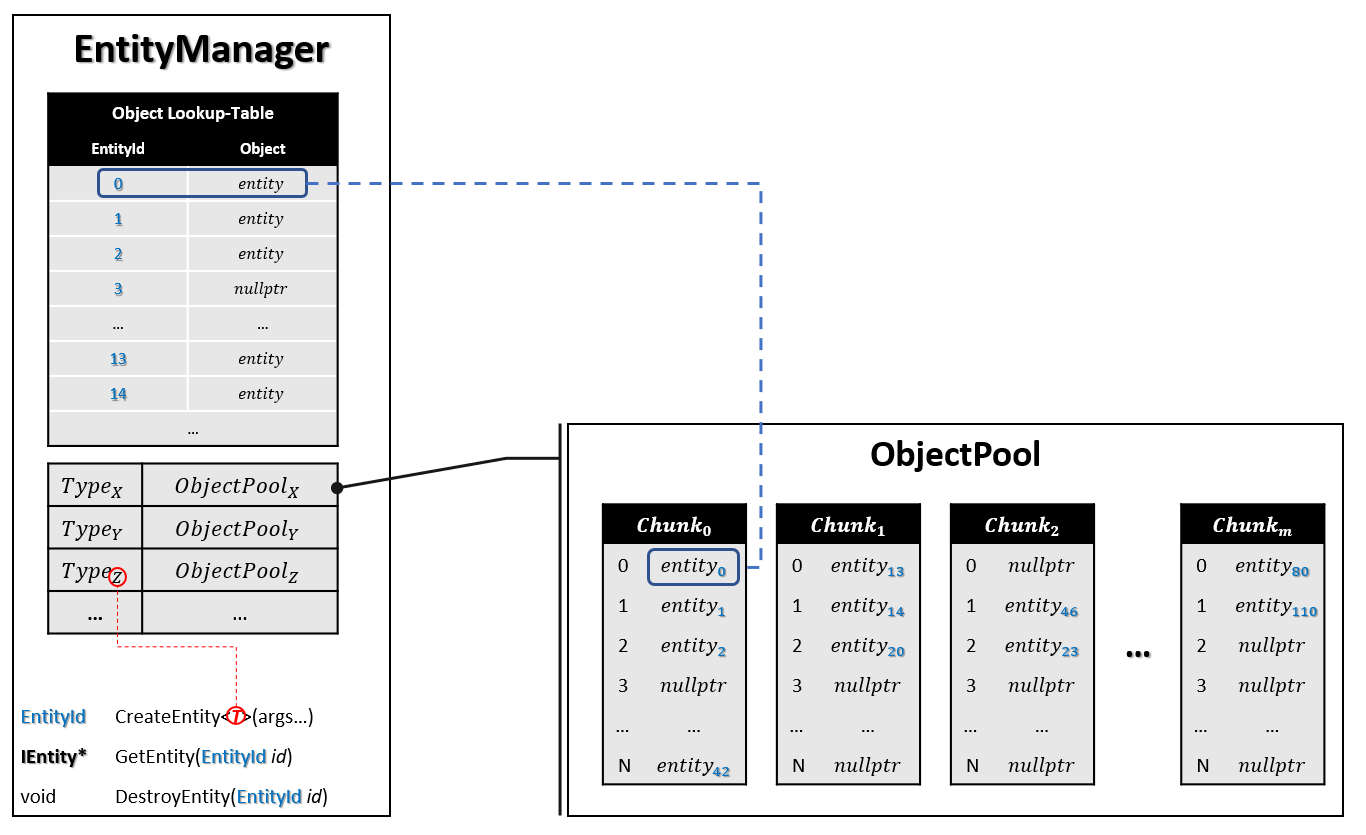
Figure 04: Abstract scheme of the class EntityManager and storage of its objects.
When creating a new entity object, use the EntityManager :: CreateEntity < T > method (arguments ...) . This generic method first gets the template parameter, which is the type of the particular entity being created. Then this method gets optional parameters (they may not be), which are passed to the constructor T. These parameters are passed through a template with a variable number of arguments [11] . During creation, the following actions occur inside:
- Obtained ObjectPool [12] for entity objects of type T ; if this pool does not exist, then a new one is created
- Memory is allocated from this pool; exactly as needed to store the object T
- Before calling the constructor T from the dispatcher, a new EntityId is obtained . This identifier with previously allocated memory will be saved to the lookup table; this way we can search for an instance of the entity with the desired identifier
- Then the replacement of the C ++ new operator [13] with the arguments passed as input is called to create a new instance of T
- finally, the method returns the identity of the entity.
After creating a new instance of an entity object, you can access it using its unique object identifier ( EntityId ) and EntityManager :: GetEntity (EntityId id) . To destroy an instance of an entity object, call the EntityManager :: DestroyEntity (EntityId id) method.
The ComponentManager class works in the same way, plus another extension. In addition to the pools of objects for storing all sorts of objects, it must provide an additional mechanism for linking components to the entities objects that own them. This restriction leads to the second stage of the search: first we check whether an entity exists with a given EntityId , and if so, we check whether a particular type of component is attached to this entity by performing a search in the list of its components.
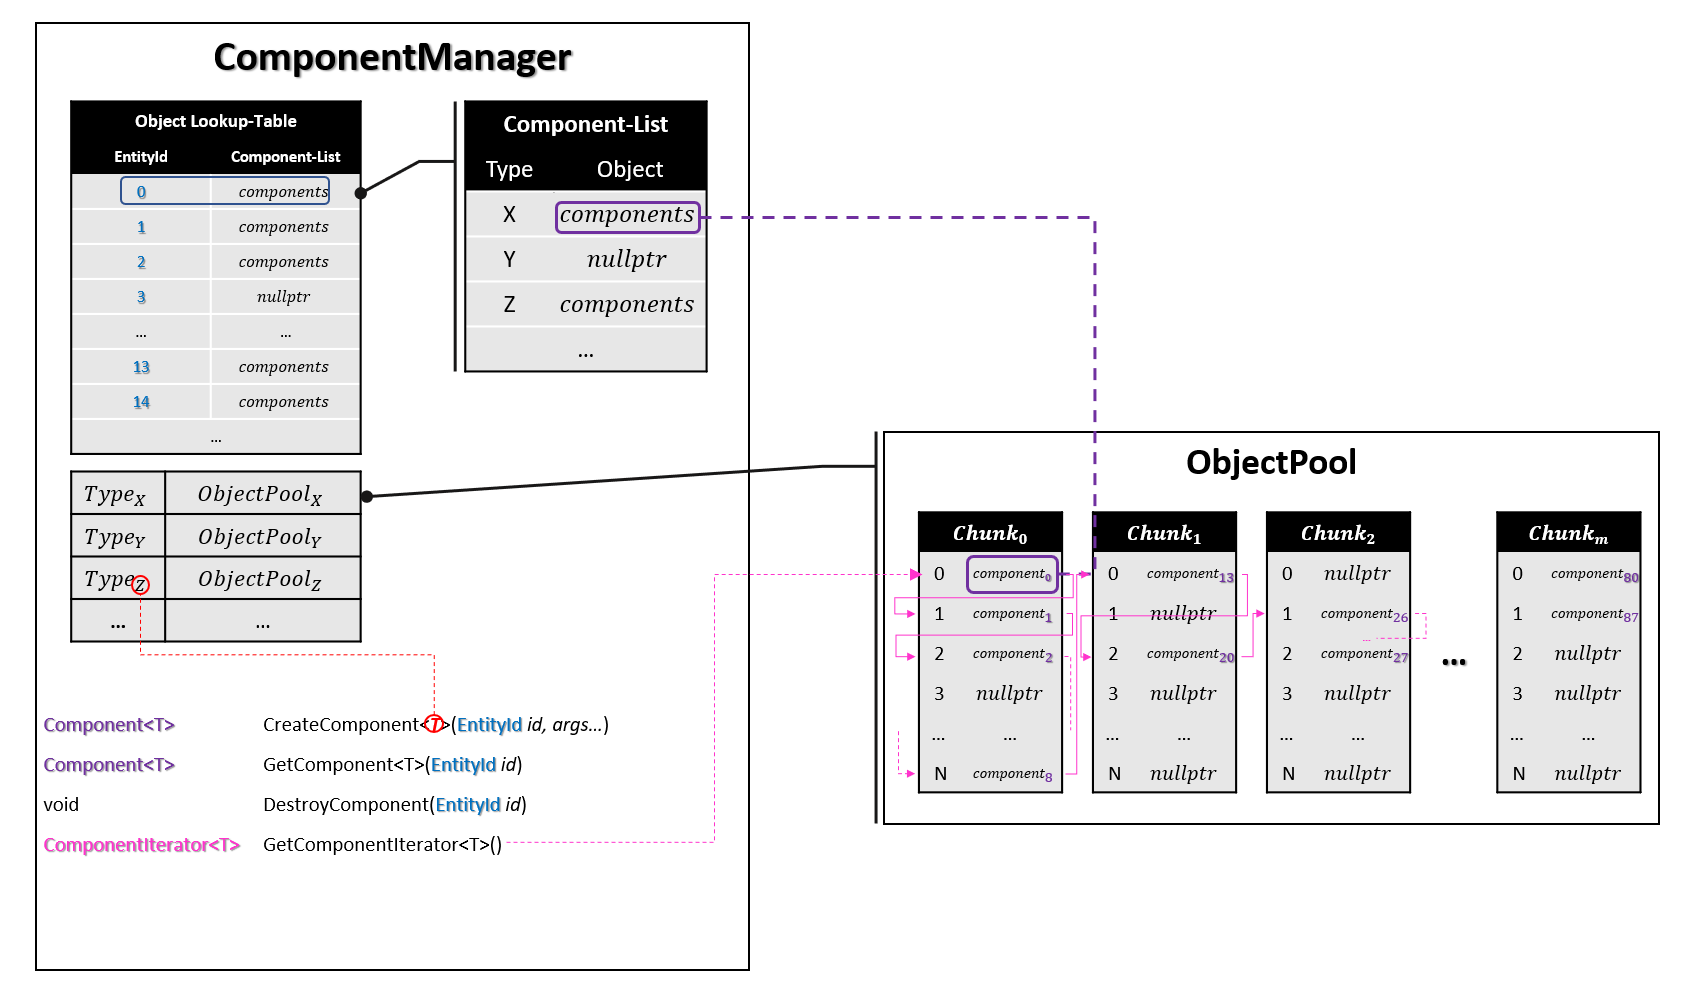
Figure 05: Storage scheme of the Component-Manager object.
The ComponentManager :: CreateComponent <T> method (EntityId id, arguments ...) allows us to add a specific component to the entity. With the help of ComponentManager :: GetComponent <T> (EntityId id), we can access the components of an entity, where T defines the type of component we want to access. If the component is missing, then nullptr is returned. To remove a component from an entity, use the ComponentManager :: RemoveComponent <T> (EntityId id) method . But wait, there's more. Another way to access components is to use ComponentIterator <T> . In this way, it is possible to iterate over all existing components of a certain type T. This can be convenient, for example, if a system such as the “Physics-System” has to apply gravity to all components of solids.
The SystemManager class does not have any special add-ons for storing systems and accessing them. To store the system, a simple memory allocation is used with the type identifier as the key.
The EventManager class uses a linear allocator that manages the memory region. This memory is used as an event buffer. Events are stored in this buffer and later transmitted. When an event is transmitted, the buffer is cleared and new events can be stored in it. This happens at least once per frame.
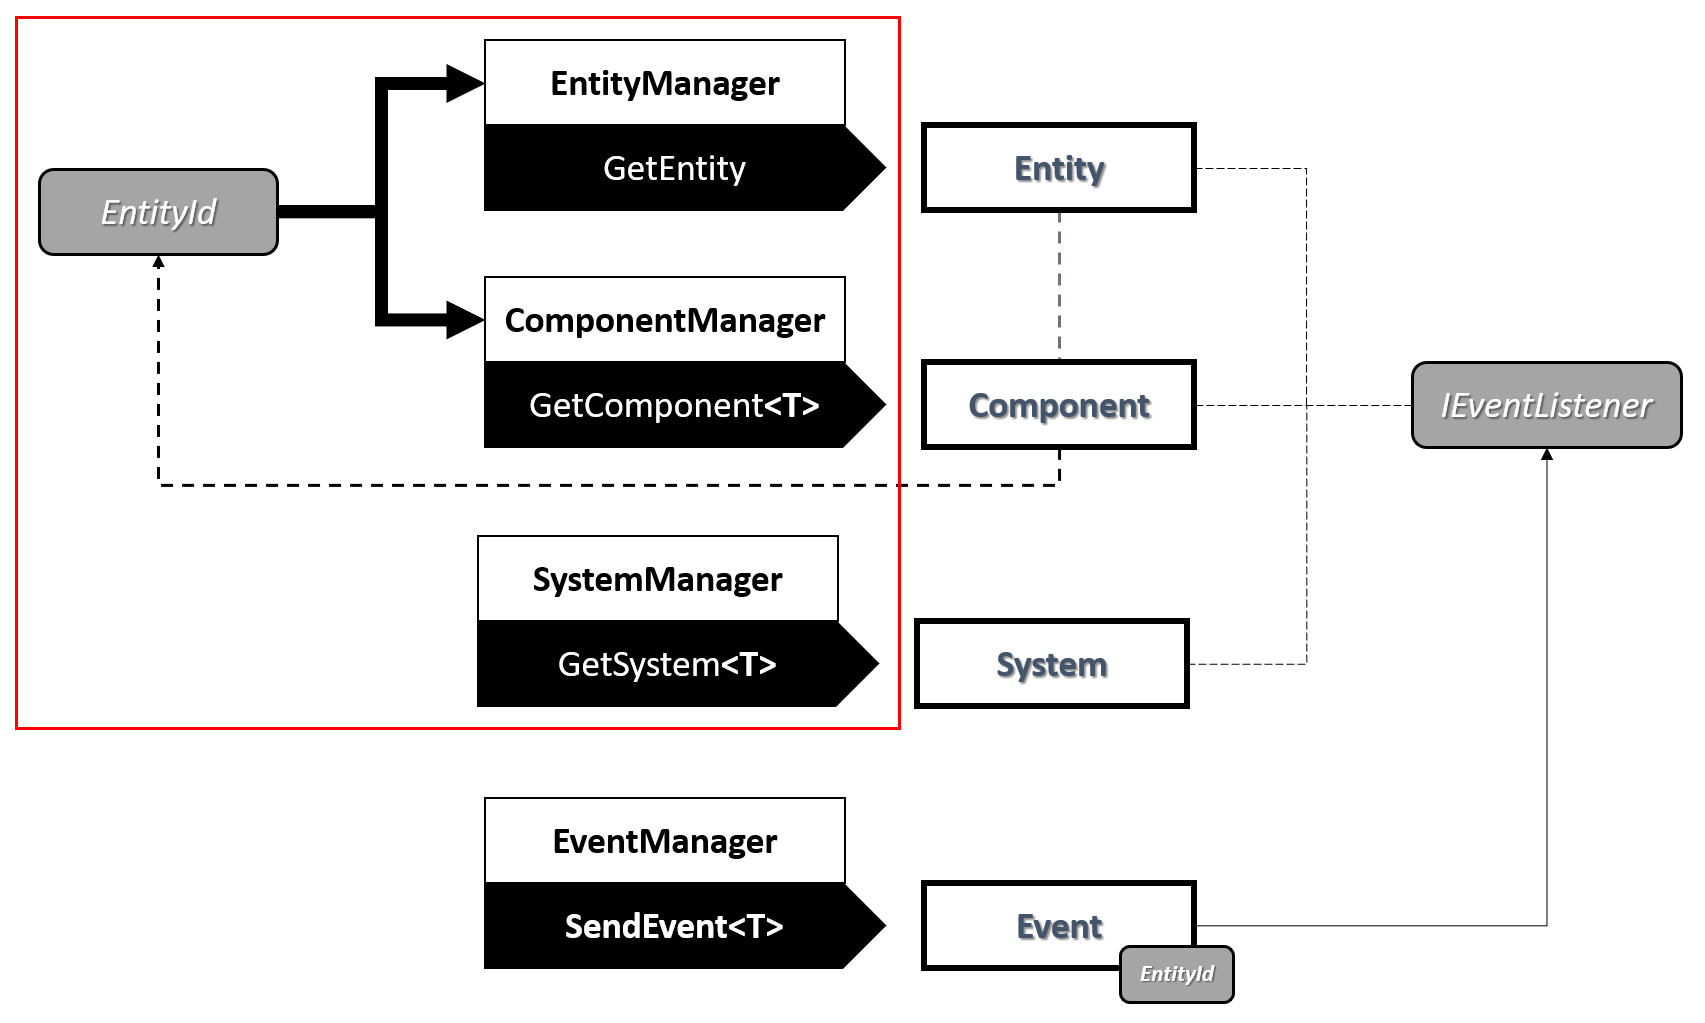
Figure 06: Revised ECS Architecture Diagram
I hope you now have some idea of how the structure of my ECS works. If not, then do not worry, look at Figure 06 and briefly repeat it. As you can see, EntityId is quite important, because we will use it to access a specific instance of an entity object and all its components. All components know their owner, that is, having a component object, you can easily get an entity by querying the EntityManager class with the specified identifier of the owner of this component. To pass an entity, we never pass a pointer directly, but use events in conjunction with an EntityId . You can create a specific event, say EntityDied , and this event (which should be an object with a simple data structure) has an element of type EntityId . Now to notify all event recipients ( IEventListener ), which can be entities, components, or systems, we use EventManager :: SendEvent <EntityDied> (entityId) . An event receiver on the other hand can now use the passed EntityId and query the EntityManager class to get an entity object or the ComponentManager class to get a specific component of that entity. The reason for this circumferential path is simple — at any point in the execution of an application, you can, by any logic, delete an entity or one of its components. Since we will not clutter up the code with additional cleanup actions, we will use EntityId . If the dispatcher returns a nullptr for this EntityId , then we will know that the entity or component no longer exists. By the way, the red square corresponds to the same in Figure 01 and denotes the boundaries of ECS.
Engine object
To make everything a little more convenient, I created an engine object. The object engine provides easy integration and use of client software. On the client side, it is enough to add the header file "ECS / ECS.h" and call the ECS :: Initialize () method. Now the static global engine object will be initialized ( ECS :: ECS_Engine ) and can be used on the client side to gain access to the dispatcher classes. Moreover, it provides the SendEvent <T> method for sending messages and the Update method, which automatically transmits all events and updates all systems. ECS :: Terminate () must be called before exiting the main program. This ensures that all received resources will be released. The following code snippet demonstrates the simplest use of a global engine object.
#include <ECS/ECS.h> int main(int argc,char* argv[]) { // 'ECS_Engine' ECS::Initialize(); const float DELTA_TIME_STEP = 1.0f / 60.0f; // 60 bool bQuit = false; // while(bQuit == false) { // , , // ... ECS::ECS_Engine->(DELTA_TIME_STEP); /* ECS::ECS_Engine->GetEntityManager()->...; ECS::ECS_Engine->GetComponentManager()->...; ECS::ECS_Engine->GetSystemManager()->...; ECS::ECS_Engine->SendEvent<T>(...); */ // ... } // 'ECS_Engine' ECS::Terminate(); return 0; } Conclusion
The “entity-component-system” architecture described in this part of the article is fully functional and ready for use. But as usual, there are always ideas for improvement. Here are just some of the ideas that came to my mind:
- Make the architecture thread safe
- Execute each system or group of systems in streams, taking into account their topological order,
- Perform event-sourcing and memory management refactoring to use as modules,
- Serialization
- Profiling
- ...
I prepared a demo so you can see my ECS in action:
The BountyHunter demo makes extensive use of ECS and demonstrates the power of this template. In the second part of the post I will talk about it.
Reference materials
[1] https://en.wikipedia.org/wiki/Entity-component-system
[2] http://gameprogrammingpatterns.com/component.html
[3] https://www.gamedev.net/articles/programming/general-and-gameplay-programming/understanding-component-entity-systems-r3013/
[4] https://github.com/junkdog/artemis-odb/wiki/Introduction-to-Entity-Systems
[5] http://scottbilas.com/files/2002/gdc_san_jose/game_objects_slides.pdf
[6] https://docs.microsoft.com/en-us/azure/architecture/patterns/event-sourcing
[7] https://sourceforge.net/p/log4cplus/wiki/Home/
[8] https://www.gamedev.net/articles/programming/general-and-gameplay-programming/c-custom-memory-allocation-r3010/
[9] https://github.com/mtrebi/memory-allocatorshttps://www.gamedev.net/articles/programming/general-and-gameplay-programming/c-custom-memory-allocation-r3010/
[10] http://en.cppreference.com/w/cpp/language/constant_initialization
[11] https://en.wikipedia.org/wiki/Variadic_template
[12] http://gameprogrammingpatterns.com/object-pool.html
[13] http://en.cppreference.com/w/cpp/language/new
Part 2: BountyHunter Game
Now I want to show you how to actually use architecture to create games on it. I admit that my game does not look very complicated, but if you decide to use my implementation to create your own game instead of a large and complex game engine like Unity or Unreal , you can mention my authorship. To demonstrate the capabilities of my ECS, this game was enough for me. If you do not understand its rules, the following picture will help you:
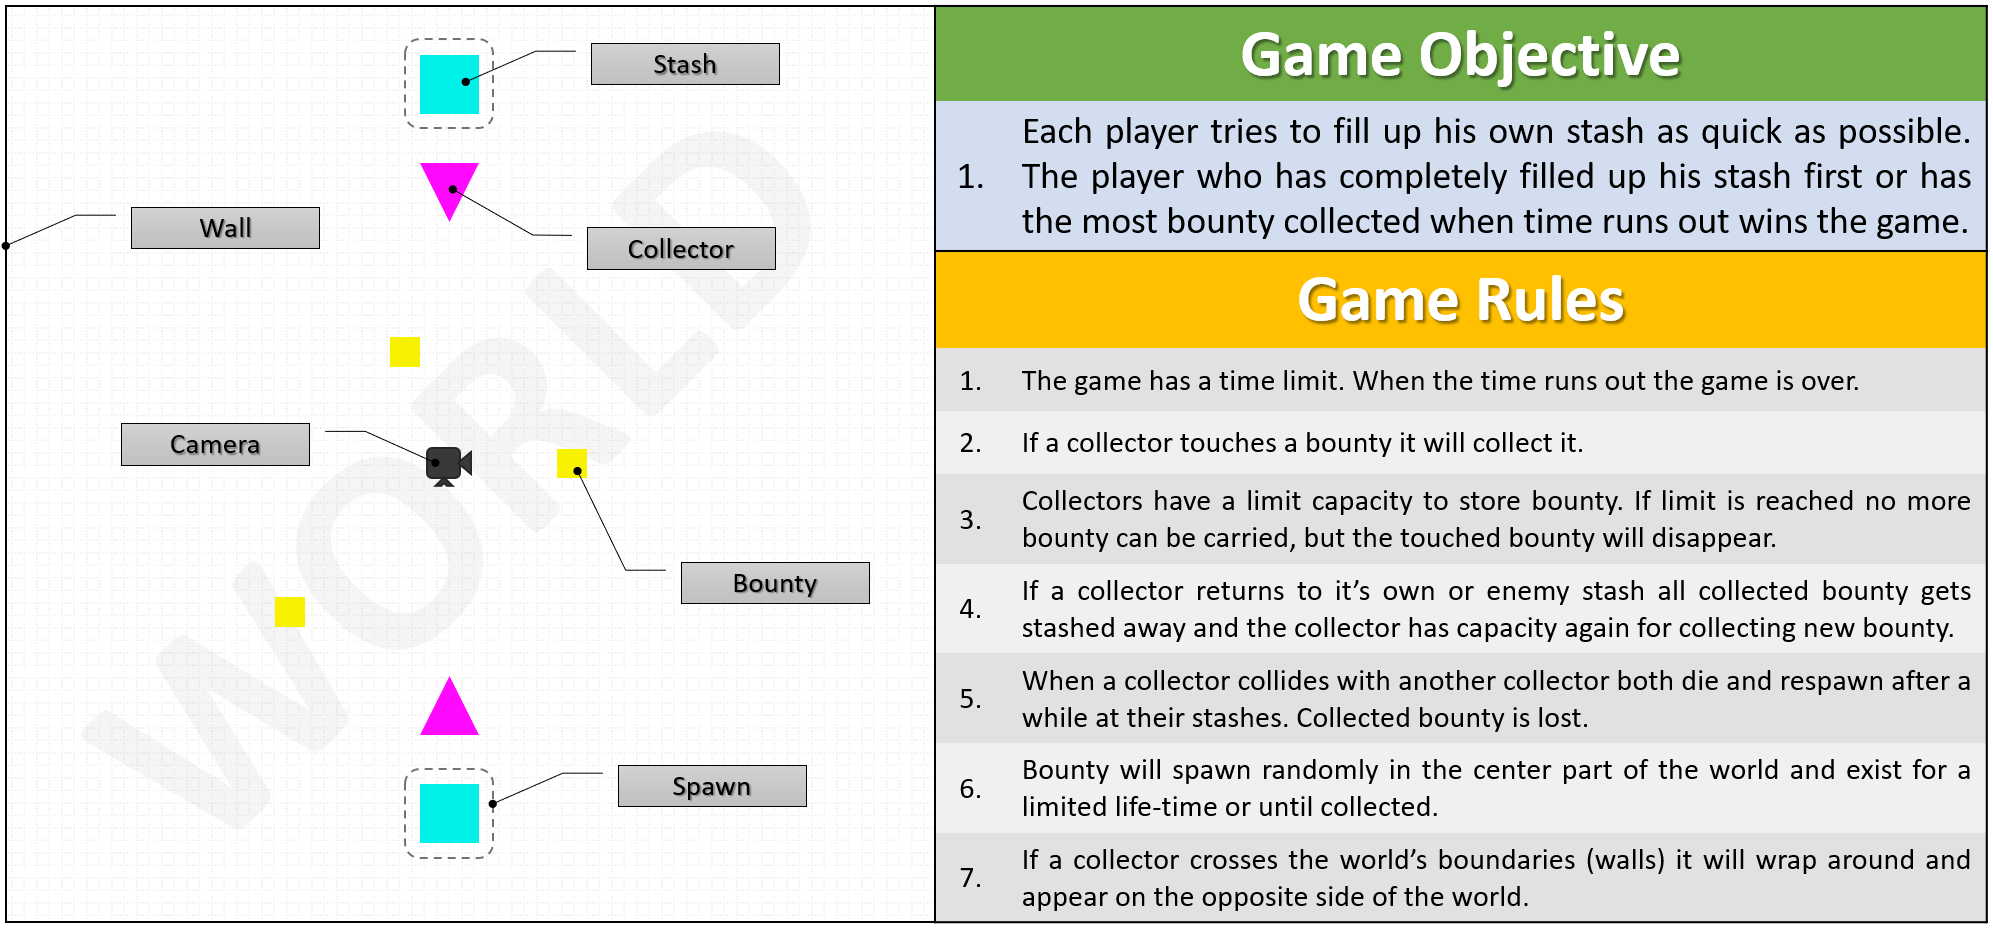
Figure 01: Purpose and rules of the game BountyHunter. Purpose: each player seeks to replenish their own supplies as quickly as possible. Rules: 1. The game has a time limit. After the time the game ends. 2. Touching the loot, the picker picks it up. 3. Pickers can carry a limited amount of loot. If the limit is reached, the collector can no longer collect the prey, and when it touches the prey, it is destroyed. 4. If the picker touches his own or enemy supplies, then all the collected booty is dumped into the supplies and the picker can pick up the booty again. 5. When a collector collides, they are destroyed and after some time they are revived at the point of their supplies. Collected loot is lost. 6. Mining appears at a random point in the central part of the world and exists during its lifespan, or until it is collected. 7. When the collector crosses the borders of the world, it appears from the other edge of the screen.
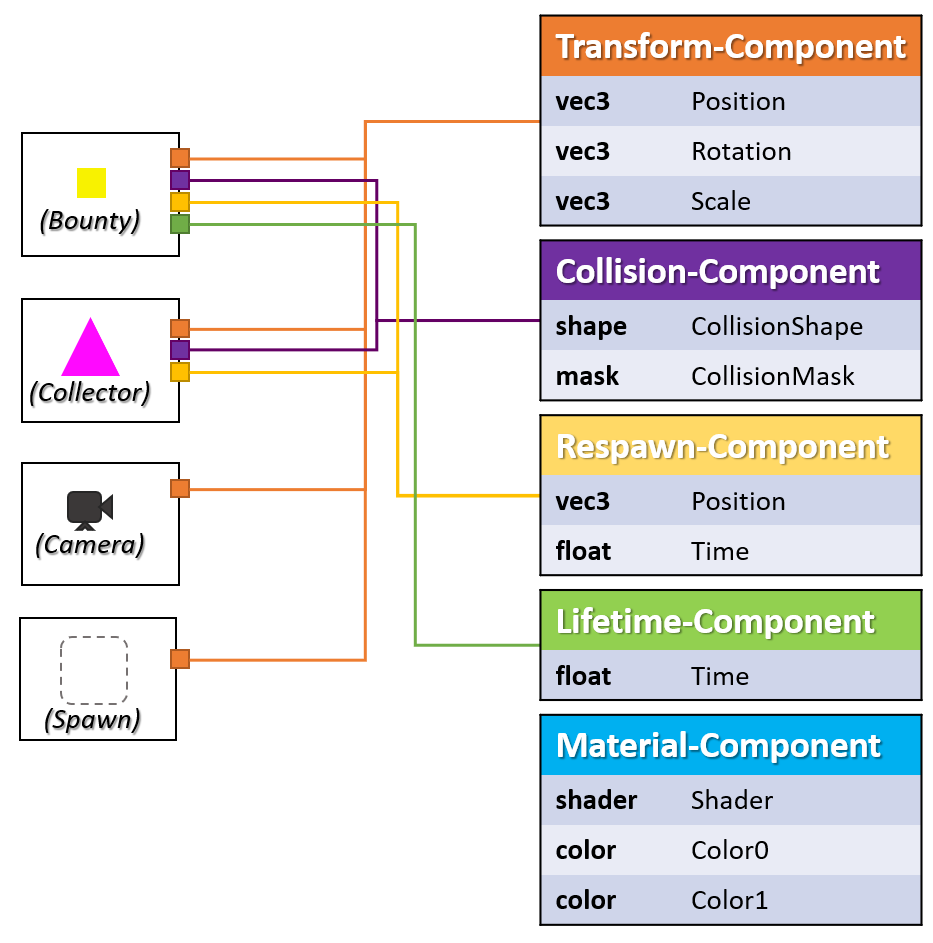
The image on the left looks familiar, because it is a more abstract scheme of the game that you saw in the video. The rules are clear enough and speak for themselves. As you can see, we have many types of entities living in the game world. You might be wondering what they are actually made of? Of the components, of course. Some types of components are common to all entities, while others are unique to others. Look at the picture below.
Figure 02: Essence and its components.
Looking at this picture, you can easily see the relationship between the entities and their components (not everything is reflected in the picture!). All game entities have Transform-Component . Since the game entities must be located somewhere in the world, they have a transform that describes the position, rotation, and scale of the entities. This may be the only component attached to the entity. For example, the camera object requires more components, but it does not need the Material Component , because it will never be visible to the player (which may be wrong if you use post-effects). On the other hand, the objects of the Bounty (mining) and Collector (collection) entities must be visible, so they need a Material-Component to display. They can also collide with other objects of the game, and therefore the Collision-Component is attached to them, which describes their physical form. Another component is attached to the Bounty entity - Lifetime-Component . This component determines the remaining life of the Bounty object, when its life ends, then the prey is destroyed.
So what next? Having created all these different entities with their own sets of components, we did not complete the game itself. We also need someone who knows how to manage each of them. Of course, I'm talking about systems. Systems are a great thing, they can be used to divide the whole logic of the game into smaller elements. Each element works with its own aspect of the game. We can have, or even should have, an Input-System that processes all data entered by the player. Render-System , carrying all shapes and colors on the screen. Respawn-System for the revival of the dead objects of the game. Well, I think you get the idea. The figure below shows the complete diagram of the classes of all specific types of entities, components and systems in BountyHunter .
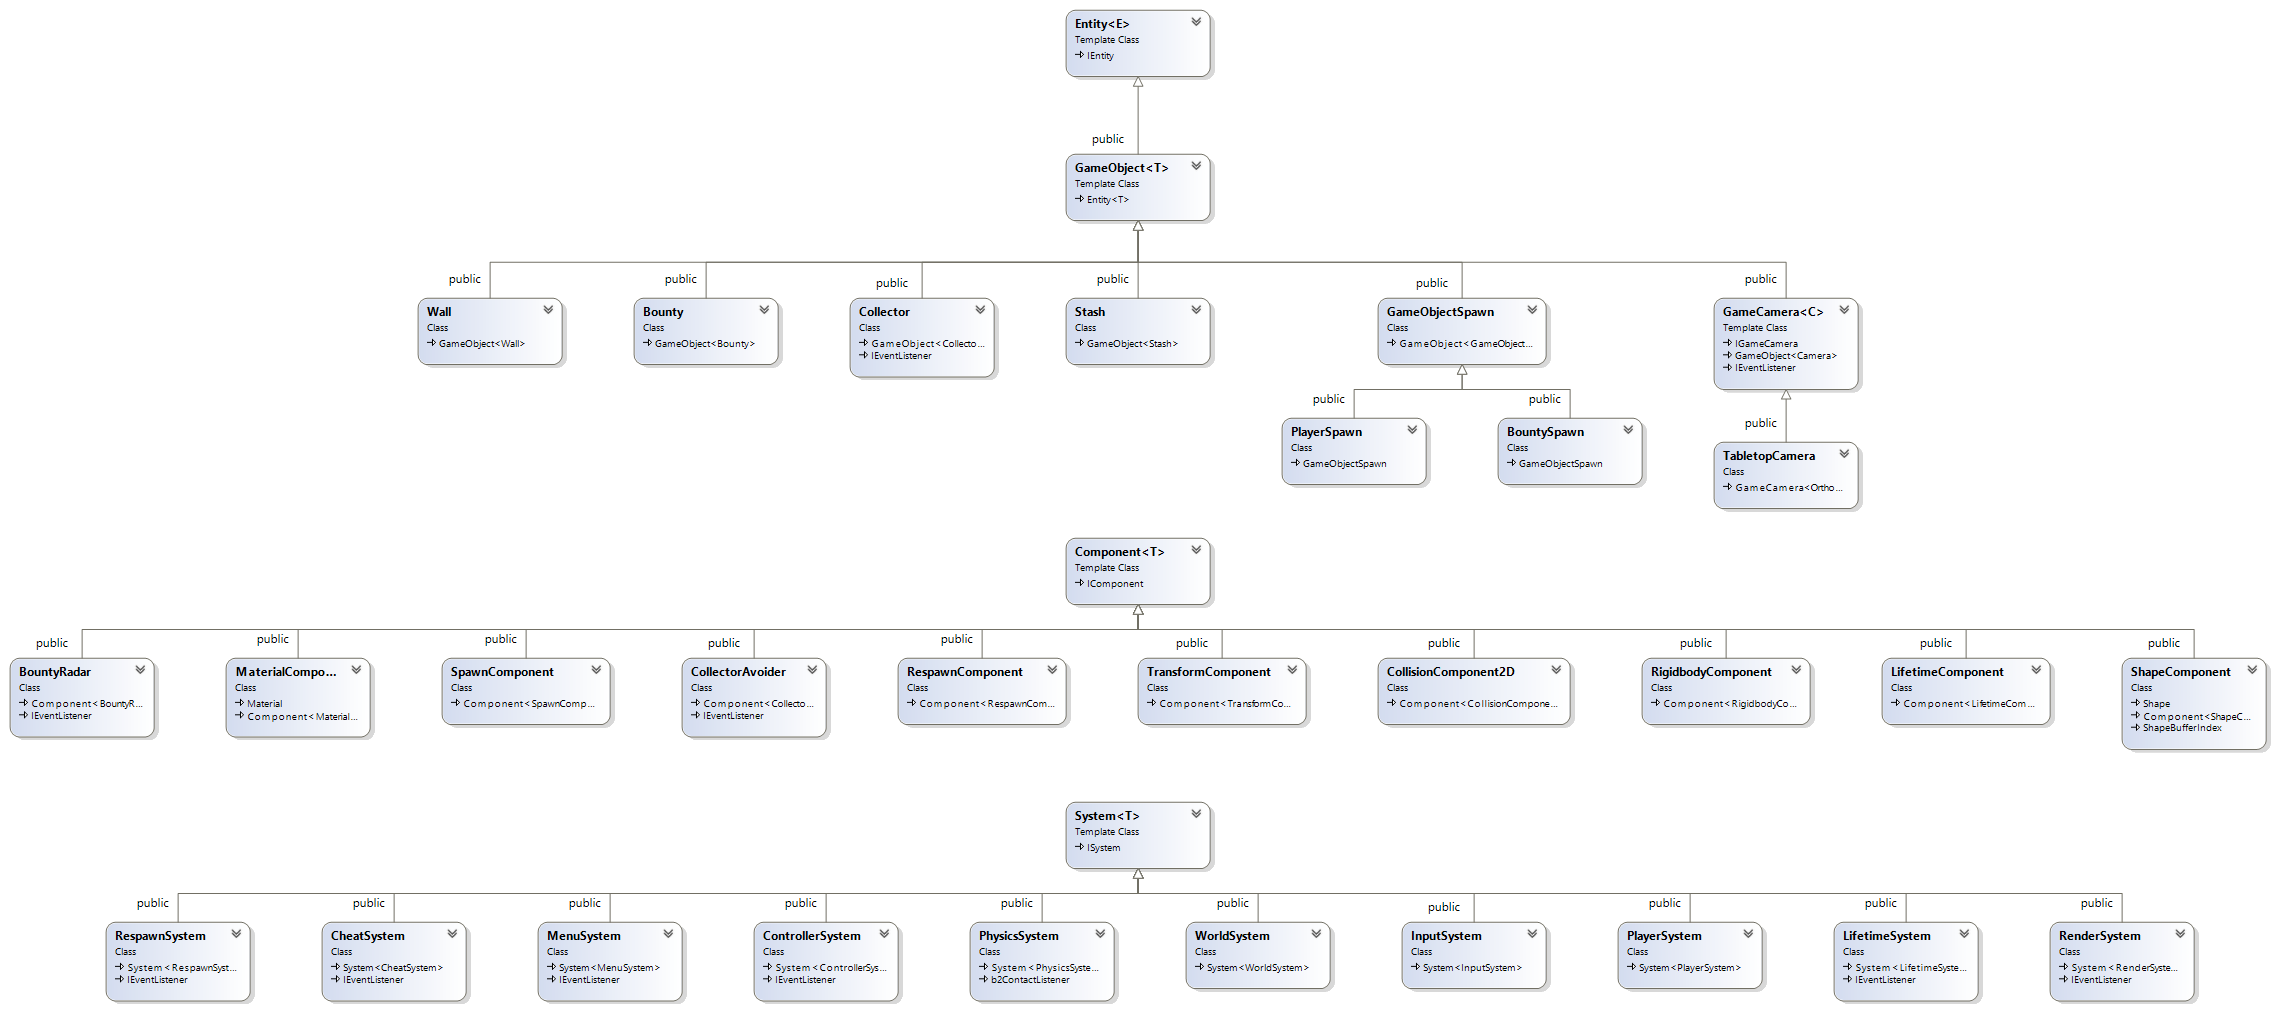
Figure 03: ECS BountyHunter Class Diagram (click on image to enlarge).
Now we have entities, components and a system (ECS), but we lack ... events! So that systems and entities can exchange data, I created a collection of 38 events:
  GameInitializedEvent GameRestartedEvent GameStartedEvent
 GamePausedEvent GameResumedEvent GameoverEvent GameQuitEvent
 PauseGameEvent ResumeGameEvent RestartGameEvent QuitGameEvent
 LeftButtonDownEvent LeftButtonUpEvent LeftButtonPressedEvent
 RightButtonDownEvent RightButtonUpEvent RightButtonPressedEvent
 KeyDownEvent KeyUpEvent KeyPressedEvent ToggleFullscreenEvent
 EnterFullscreenModeEvent StashFull EnterWindowModeEvent
 GameObjectCreated GameObjectDestroyed PlayerLeft GameObjectSpawned
 GameObjectKilled CameraCreated, CameraDestroyed ToggleDebugDrawEvent
 WindowMinimizedEvent WindowRestoredEvent WindowResizedEvent
 PlayerJoined CollisionBeginEvent CollisionEndEvent
And there is still a lot that I needed to implement BountyHunter :
- general application framework - SDL2 for receiving player input and setting up the main application window.
- graphics - I used my own OpenGL renderer so that I could render to this application window.
- math - for linear algebra I used glm .
- collision detection - for it I used box2d physics.
- State machine - used for simple AI and game states.
Of course, I will not consider all these mechanics, because they deserve their own article, which I may write later.But if you still want to know about them, then I will not bother you and give this link . After reviewing all the characteristics I mentioned, you can decide that this can be a good start for your own game engine. There are a few more items on my list that I actually didn’t realize, simply because I wanted to complete the prototype.
- Editor for managing entities, components, systems and more.
- Saving the game - saving entities and their components to the database using some ORM library (for example, codesynthesis )
- Replay playback - recording events at runtime and replaying them later
- GUI — GUI- (, librocket )
- — (, , ..)
- —
I will leave these points as a task for you so that you can prove how cool you are a programmer.
I also need to show you the code that demonstrates the use of my ECS. Remember the essence of the game Bounty ? Mining is small yellow, large red and intermediate squares randomly created in the center of the world. The following is a code snippet for the definition of the Bounty entity class .
// Bounty.h class Bounty : public GameObject<Bounty> { private: // TransformComponent* m_ThisTransform; RigidbodyComponent* m_ThisRigidbody; CollisionComponent2D* m_ThisCollision; MaterialComponent* m_ThisMaterial; LifetimeComponent* m_ThisLifetime; // bounty float m_Value; public: Bounty(GameObjectId spawnId); virtual ~Bounty(); virtual void OnEnable() override; virtual void OnDisable() override; inline float GetBounty() const { return this->m_Value; } // OnEnable, void ShuffleBounty(); }; . , GameObject< T > ( ECS::Entity< T >) ( Bounty ) T . ECS () . AddComponent< U > , GetComponent< U > , RemoveComponent< U >. In addition to the components that I will show soon, there is another property - the value of production. I don’t remember exactly why I didn’t select this property in a separate component, for example, in BountyComponent , because it would be so. Instead, I made the value property of a booty a member of the Bounty class , sprinkling my head with ashes. But in fact it only shows the enormous flexibility of this template, doesn’t it? More precisely, its components ...
// Bounty.cpp Bounty::Bounty(GameObjectId spawnId) { Shape shape = ShapeGenerator::CreateShape<QuadShape>(); AddComponent<ShapeComponent>(shape); AddComponent<RespawnComponent>(BOUNTY_RESPAWNTIME, spawnId, true); // this->m_ThisTransform = GetComponent<TransformComponent>(); this->m_ThisMaterial = AddComponent<MaterialComponent>(MaterialGenerator::CreateMaterial<defaultmaterial>()); this->m_ThisRigidbody = AddComponent<RigidbodyComponent>(0.0f, 0.0f, 0.0f, 0.0f, 0.0001f); this->m_ThisCollision = AddComponent<CollisionComponent2d>(shape, this->m_ThisTransform->AsTransform()->GetScale(), CollisionCategory::Bounty_Category, CollisionMask::Bounty_Collision); this->m_ThisLifetime = AddComponent<LifetimeComponent>(BOUNTY_MIN_LIFETIME, BOUNTY_MAX_LIFETIME); } // ... I used the designer to connect all the components necessary essence Bounty . Notice that with this approach, an object blank is created and it is not flexible, that is, you always get a Bounty object with the same components attached to it. Although this is a fairly good solution for my game, for more complex it may be erroneous. In this case, you need to implement a “factory” template that creates mutable entity objects.
As can be seen from the code above, quite a few components are attached to the Bounty entity . We have a ShapeComponent and MaterialComponent for visual display. RigidbodyComponent and CollisionComponent2Dfor physical behavior and reaction to collisions. RespawnComponent , so that the Bounty has the opportunity to be reborn after death. Last but not least , LifetimeComponent binds the existence of an entity to a specific period of time. TransformComponent automatically binds to any entity derived from GameObject < T > . That's all.We just added a new entity to the game.
Now you may want to know how to use all these components. Let me give you two examples. The first is RigidbodyComponent . This component contains information about physical characteristics, such as friction, density, and linear attenuation. Moreover, it is used as an adapter class used for embedding box2d physics into the game. RigidbodyComponent is quite important because it is used to synchronize the transform of a physically simulated body (owned by box2d) and TransformComponent entities (owned by the game). This synchronization process is performed by the PhysicsSystem .
// PhysicsEngine.h class PhysicsSystem : public ECS::System<PhysicsSystem>, public b2ContactListener { public: PhysicsSystem(); virtual ~PhysicsSystem(); virtual void PreUpdate(float dt) override; virtual void Update(float dt) override; virtual void PostUpdate(float dt) override; // box2d virtual void BeginContact(b2Contact* contact) override; virtual void EndContact(b2Contact* contact) override; }; // class PhysicsSystem // PhysicsEngine.cpp void PhysicsSystem::PreUpdate(float dt) { // TransformComponent for (auto RB = ECS::ECS_Engine->GetComponentManager()->begin<RigidbodyComponent>(); RB != ECS::ECS_Engine->GetComponentManager()->end<RigidbodyComponent>(); ++RB) { if ((RB->m_Box2DBody->IsAwake() == true) && (RB->m_Box2DBody->IsActive() == true)) { TransformComponent* TFC = ECS::ECS_Engine->GetComponentManager()->GetComponent<TransformComponent>(RB->GetOwner()); const b2Vec2& pos = RB->m_Box2DBody->GetPosition(); const float rot = RB->m_Box2DBody->GetAngle(); TFC->SetTransform(glm::translate(glm::mat4(1.0f), Position(pos.x, pos.y, 0.0f)) * glm::yawPitchRoll(0.0f, 0.0f, rot) * glm::scale(TFC->AsTransform()->GetScale())); } } } // ... From the above implementation, you can see three different update functions. When updating systems, all PreUpdate methods of all systems are called first , then Update , and PostUpdate methods after them . Since the PhysicsSystem is called before all TransformComponent system-related, the above code provides transform synchronization. Here you can also see the ComponentIterator action . Instead of asking every entity in the world whether it has a RigidbodyComponent , we ask the ComponentManager to provide us with a ComponentIterator for the RigidbodyComponent type. Having received RigidbodyComponent , we can easily get the entity identifier and once again ask the ComponentManager to give us the TransformComponent for this identifier.
As I promised, let's consider the second example. RespawnComponent is used for entities that must be regenerated after death. This component provides five properties that you can use to customize the rebirth behavior of an entity. You can choose an automatic revival of the entity after death, set the time after which it will be revived, as well as the position and orientation of the revival. The rebirth logic itself is implemented in the RespawnSystem .
// RespawnSystem.h class RespawnSystem : public ECS::System<RespawnSystem>, protected ECS::Event::IEventListener { private: // ... Spawns m_Spawns; RespawnQueue m_RespawnQueue; // void OnGameObjectKilled(const GameObjectKilled* event); public: RespawnSystem(); virtual ~RespawnSystem(); virtual void Update(float dt) override; // ... }; // class RespawnSystem // RespawnSystem.cpp // : ! voidRespawnSystem::OnGameObjectKilled(const GameObjectKilled * event) { // , RespawnComponent* entityRespawnComponent = ECS::ECS_Engine->GetComponentManager()->GetComponent<RespawnComponent>(event->m_EntityID); if(entityRespawnComponent == nullptr || (entityRespawnComponent->IsActive() == false) || (entityRespawnComponent->m_AutoRespawn == false)) return; AddToRespawnQeueue(event->m_EntityID, entityRespawnComponent); } void RespawnSystem::Update(float dt) { foreach(spawnable in this->m_RespawnQueue) { spawnable.m_RemainingDeathTime -= dt; if(spawnable.m_RemainingDeathTime <= 0.0f) { DoSpawn(spawnable); RemoveFromSpawnQueue(spawnable); } } } The above code is incomplete, but gives an idea of the important lines of code. RespawnSystem contains and updates the EntityId queue along with their RespawnComponent . New entities are queued when systems receive a GameObjectKilled event . The system checks whether the killed entity has a revival capability, that is, if the RespawnComponent is attached to it . If so, then the entity is queued for revival, otherwise ignored. In the update method RespawnSystem , which is called every frame, the system reduces the initial recovery time RespawnComponentqueued entities. If the revival time is reduced to zero, then the entity is revived and removed from the revival queue.
I know the article was rather short. but I hope she gave you a rough idea of how everything works in the ECS world. Before you finish the post, I want to share with you my own experience. Working with ECS is a great pleasure. It's amazing to just add new features to the game even with the help of third-party libraries. I just added new components and systems that connect new features with the game, and I never had the feeling that I was stumped. Dividing the entire game logic into several systems is intuitive and does not cause any difficulties when working with ECS. The code looks much clearer and becomes more convenient in support, because we got rid of all the “spaghetti dependencies” of pointers. Event sourcing is a very powerful and useful data exchange technique between systems / entities, but it is a double-edged blade,and may cause problems over time. I'm talking about the conditions of the call event. If you have ever worked with Unity or Unreal Engine, then you will be satisfied with the implementation of such an editor. These editors greatly increase productivity, because it takes much less time to create new ECS objects than to write all these lines of code manually. But when you create a powerful foundation of entity objects, components, systems, and events, then combining them and creating something qualitative based on them will be a simple task.than writing all these lines of code manually. But when you create a powerful foundation of entity objects, components, systems, and events, then combining them and creating something qualitative based on them will be a simple task.than writing all these lines of code manually. But when you create a powerful foundation of entity objects, components, systems, and events, then combining them and creating something qualitative based on them will be a simple task.
Source: https://habr.com/ru/post/343778/
All Articles