We integrate smartcontract into the web application on Nodejs
If you are interested in the topic of developing products using smart contracts, but you want to understand the full cycle of creating such applications, then this lesson is for you (hopefully). From it, you will learn how to develop, test, upload to the network and integrate the smart contract for the Ethereum blockchain into your application.
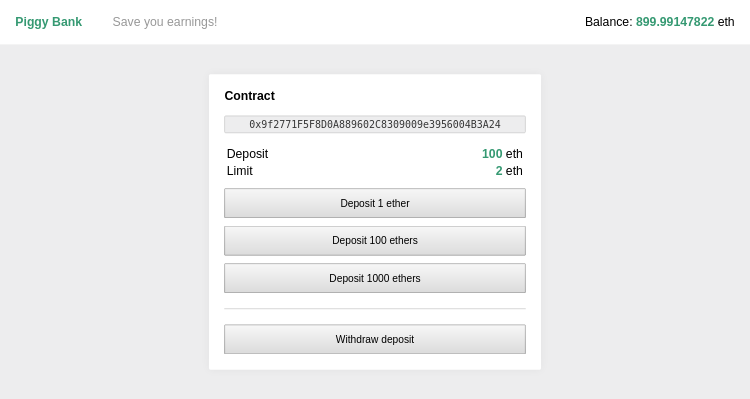
For example, I took a financial instrument familiar to everyone since childhood - the piggy bank. In order to demonstrate the full power of smart contracts, I added the ability to specify a limit that will not allow you to withdraw money until a certain amount accumulates on the account. All the lesson materials can be found in the PiggyBank repository , which contains scripts and UI to run the example.
The purpose of the lesson is to show the full development cycle, so the code is simplified in some places. In daily development, I advise you to use tools like Truffle .
Attention! To start, you must call npm install to install the libraries ethereumjs-testrpc, web3 and others.Steps
In addition to writing the smart contract itself, you need to do the following steps:
- Programmatically create an account
- Compile contract
- Deposit contract in blockchain
- To test
- Create an application that interacts with the contract.
To run the application you will need to run a test network. You can do this with the node bin/testnet.js .
Tip : To start the application, you can skip steps to the third, since all the data obtained in steps 1 and 2 are added to the repository as a finished product.
the contract
To begin, write a contract. The algorithm of the contract is as follows:
- The user creates a contract and specifies an unchangeable limit on the payout (
PiggyBankmethod). - The user sends coins to the purse of the contract (
depositmethod). - The user checks whether the operation of debiting funds is available (method
canWithdraw). - User debits funds to his account (
withdrawmethod).
I will give the contract code from the file contract.sol :
pragma solidity ^0.4.0; contract PiggyBank { // address public owner; // uint public limit; // ether wei uint decimals = (10 ** 18); // . // . modifier isOwner() { require(msg.sender == owner); _; } // . event Deposit(address indexed from, uint value); // , // ether. function PiggyBank(uint _limit) public { require(_limit > 0); owner = msg.sender; limit = _limit * decimals; } // . payable, // . function deposit() public payable { Deposit(msg.sender, msg.value); } // . // constant function canWithdraw() public constant returns (bool) { return this.balance >= limit; } // . // isOwner // . function withdraw() public isOwner { require(canWithdraw()); // owner msg.sender, : // owner. owner.transfer(this.balance); } // , , . function kill() public isOwner { require(this.balance == 0); selfdestruct(owner); } } Online IDE will help you to quickly develop a contract.
Once the contract is created, you can begin to solve infrastructure problems.
Account creation
File 1-account.js .
This script creates a test account with a certain balance. When you call from the console file 0-account.js, you will be prompted to enter the password and the amount in ether on your account. After successful execution, the secret key and the amount will be recorded in the account.json file.
Theaccount.jsonfile is used in the testnet. Therefore, if the test is running (bin/testnet.js), restart it.
I'll tell you more about the keys. To create an account, you must create a secret key. From the secret key, the wallet address and the public key will be further obtained. The secret key is a 256-bit hexadecimal number, represented as a 64-character string containing the prefix 0x .
It is best to get a similar value using a random number generator:
const crypto = require('crypto'); const key = '0x' + crypto.randomBytes(32).toString('hex'); But for test needs, we will get the sha3-hash from the password entered by the user:
const privateKey = Web3.utils.soliditySha3({ type: 'string', value: '******' }); What the output will give us:
0xc774c26b6185ccacd0ea11d1e5f03b5bac7d8171911d1861b8b7c1ab123ec94a To work with a manually created wallet, you will need to add it through the web3 API. And although in this lesson you don’t need it, I’ll show you how to do it:
// const address = web3.eth.accounts.privateKeyToAccount(privateKey); // web3.accounts.wallets.add({ privateKey, address, }); You can then send transactions using the key you generated. This may be necessary if your application creates its own accounts, especially if there are many of them. The standard web3.eth.personal.newAccount method will write keys to disk in the ~/.ethereum/keystore , which may not be desirable for some reason.
Attention! It is highly recommended to store private keys in encrypted form.
About the management of keys and the use of own keys, I will try to tell separately.
Contract compilation
File 2-compile.js .
This script compiles the source code from the contract.sol file and stores the result in code.json , which will be used later for deployment and interaction with the contract.
Contacts in the Ethereum network are stored in a binary representation, so before using the contract we need to compile the source code. This is done using the solc tool and in the case of the nodejs solc package (this is compiled using emscripten solc).
After compilation we will get the binary code bytecode , as well as the description of the contract interface. Here is how the withdraw method will be presented in the interface:
{ "interface": [ { "constant": false, "inputs": [], "name": "withdraw", "outputs": [], "payable": false, "stateMutability": "nonpayable", "type": "function" }, ... At the output, solc returns all contracts that it finds in the source code. We will need to choose one, in our case it is PiggyBank :
const compiled = result.contracts[':PiggyBank']; Depla
3-deploy.js
The script takes the compiled code from code.json . And then creates a contract and pours the code into the testnet on behalf of the user. The resulting address and contract interface are written to the file contract.json .
First, an empty instance is created with the interface and default settings ( from and gas ).
const PiggyBank = new web3.eth.Contract(code.interface, { from: coinbase, gas: 5000000, // }); From - the address on behalf of which the contract methods will be called.
Gas or gasoline is the fuel for the contract, which is spent in the process of the application. It is needed in order to avoid endless cycles that can stop the network.
And so, everything is ready to fill the contract:
const contract = await PiggyBank.deploy({ // data: code.bytecode, // arguments: [1], }) .send(); The constructor is called at the time of deployment, so we immediately pass arguments to it. In the case of PiggyBank, the constructor contains one argument uint _limit . After executing this code, we were charged off funds separately for conducting the transaction and separately for executing the designer code.
Everything is ready for launch, it remains only to save the address of the contract:
contract.options.address; Launch
File 4-run.js . Start npm start .
The script runs a web server on the $PORT or 8080 port with a simple interface for interacting with the contract. Opening http://localhost:8080 in the browser you can transfer money to the account ( deposit ) or transfer to the account of the owner ( withdraw ).
Consider what happens in a little more detail. To begin with, we create an instance of the contract referring to the one we have previously dealt with:
const piggy = new web3.eth.Contract(contract.interface, contract.address, { from: coinbase, gas: 5000000, }); One more argument was added to the constructor call - address , which indicates that this is a valid contract. Let's see what we can do with it. As you remember, we have methods deposit , canWithdraw and withdraw . To replenish the account, we need to call the deposit method and send a few coins to the piggy bank.
piggy.methods.deposit().send({ // ether wei value: web3.utils.toWei('1', 'ether'), }); Ethereum uses 18 decimal places in calculations and does not support floating point types. Calculations are made in the air, and then converted into Esers. To do this, before sending, we convert ether to wei using the web3.utils.toWei method. Which in turn uses the BigNumber.js library, for
calculations with values exceeding the maximum valid for the type Number.
Calling the canWithdraw method will be different, since this method does not make any changes ( constant ), then call is used instead of send . Such an operation will not cause the withdrawal of funds and the consumption of gasoline:
piggy.methods.canWithdraw().call(); The method for sending coins to the piggy bank may look like this:
router.use(async ({res}) => { await piggy.methods.deposit().send({ value: web3.utils.toWei('1', 'ether'), }); res.json(true); }); Contract destruction
File 5-destroy.js .
The script destroys the contract and deletes the contract data from the block. Despite the fact that you can still transfer money to the contract, you will not be able to perform other operations.
Testing
File test/test.spec.js Run npm test .
For testing, the mocha library is used. Before we run the tests, we need to run an isolated testnet with the preinstalled data. For this you need:
- Create a new test network with users.
- Seal the contract into the test network.
This is how initialization of a new network might look like:
const Web3 = require('web3'); const TestRpc = require('ethereumjs-testrpc'); const web3 = new Web3( TestRpc.provider({ accounts: [ { secretKey: Web3.utils.soliditySha3('password1'), balance: Web3.utils.toWei(String(10), 'ether'), }, { secretKey: Web3.utils.soliditySha3('password2'), balance: Web3.utils.toWei(String(10), 'ether'), }, ], }), ); We create a testnet with two users, and then initialize the web3 instance. Testnet ready. You can start testing. For example, test the constructor:
describe('PiggyBank()', function() { it('Should instantiate contract', async function() { await PiggyBank.deploy({ data: code.bytecode, arguments: [2], }) .send(); const limit = await PiggyBank.methods().limit().call(); should(web3.utils.fromWei(limit, 'ether')).be.equal('2'); }); }); Conclusion
In this example, we have written a very simple application that does not possess supercomplex behavior, but clearly illustrates the life cycle of a contract. I hope this will be useful to those who are just starting to master the development for Ethereum.
')
Source: https://habr.com/ru/post/343744/
All Articles