Must-have documentation for a mobile developer. Part 2

This is a series of articles “Must-have documentation for a mobile developer”: Part 1 and Part 2 .
I give the floor to Vyacheslav Chernikov.
This article is an abbreviated version of the manual, available by reference at the end of the article.
Styles and resources
In modern user interface applications, style sheets are widely used. In development tools (both native and cross-platform), this mechanism is also implemented, so before starting the coding it is better to make a single style sheet, because otherwise there is a high risk of an explosive increase in their number. When each developer comes up with their own names for seemingly identical user interface elements. To avoid this, it is necessary to prepare in advance if not descriptions, then at least the names of styles with reference to the design.

By itself, information on the style should come from the designer (for example, through the service Zeplin.io or Sketch). For us, at the current stage, it’s important not just a set of properties for each type of object (the font color of the text, the background of the page, and so on), but their connection with the pages. It is necessary for all objects on the screen to specify the names of the associated styles.

On the basis of this table, you can immediately describe the necessary styles in the early stages of the project, which will allow you to focus on the layout, rather than styling, of the interface elements during the design phase.
The next step is to look at the functionality that can be hidden from the user.
Hidden functionality
Separately, at the stage of technical design, it is necessary to allocate background (hidden) functionality such as mechanisms for working with a DBMS, a cache, a push notification handler, background synchronization, or a basket management service. This functionality simply should not slip away at the start of the work, so it is better to describe it separately.
How to describe all this is up to you, but this does not prevent us from specifying the names of the background services (implementing the necessary functionality), which we will use in the code in the future. For example:
BL \ Services \ CartService
Background singleton basket synchronization service. Runs when the application starts. Must support work in a multi-threaded environment with a queue of messages about changing the basket.
BL \ Services \ CatalogCacheService
Implement table storage as a Singleton-service for temporary caching of the list of goods and information about the seller between the screens.
DAL \ DataServices \ SyncDataService
Implements a phased data synchronization mechanisms. Must support work in the limited environment of the native background run.
Custom Scripts
As we noted in article 1, all applications are created to solve specific user tasks. That is, in fact, it is a set of transitions between screens and user actions (pressing a button, selecting an item, etc.) on them. Therefore, we will also link our scenarios to screens and user interface elements.
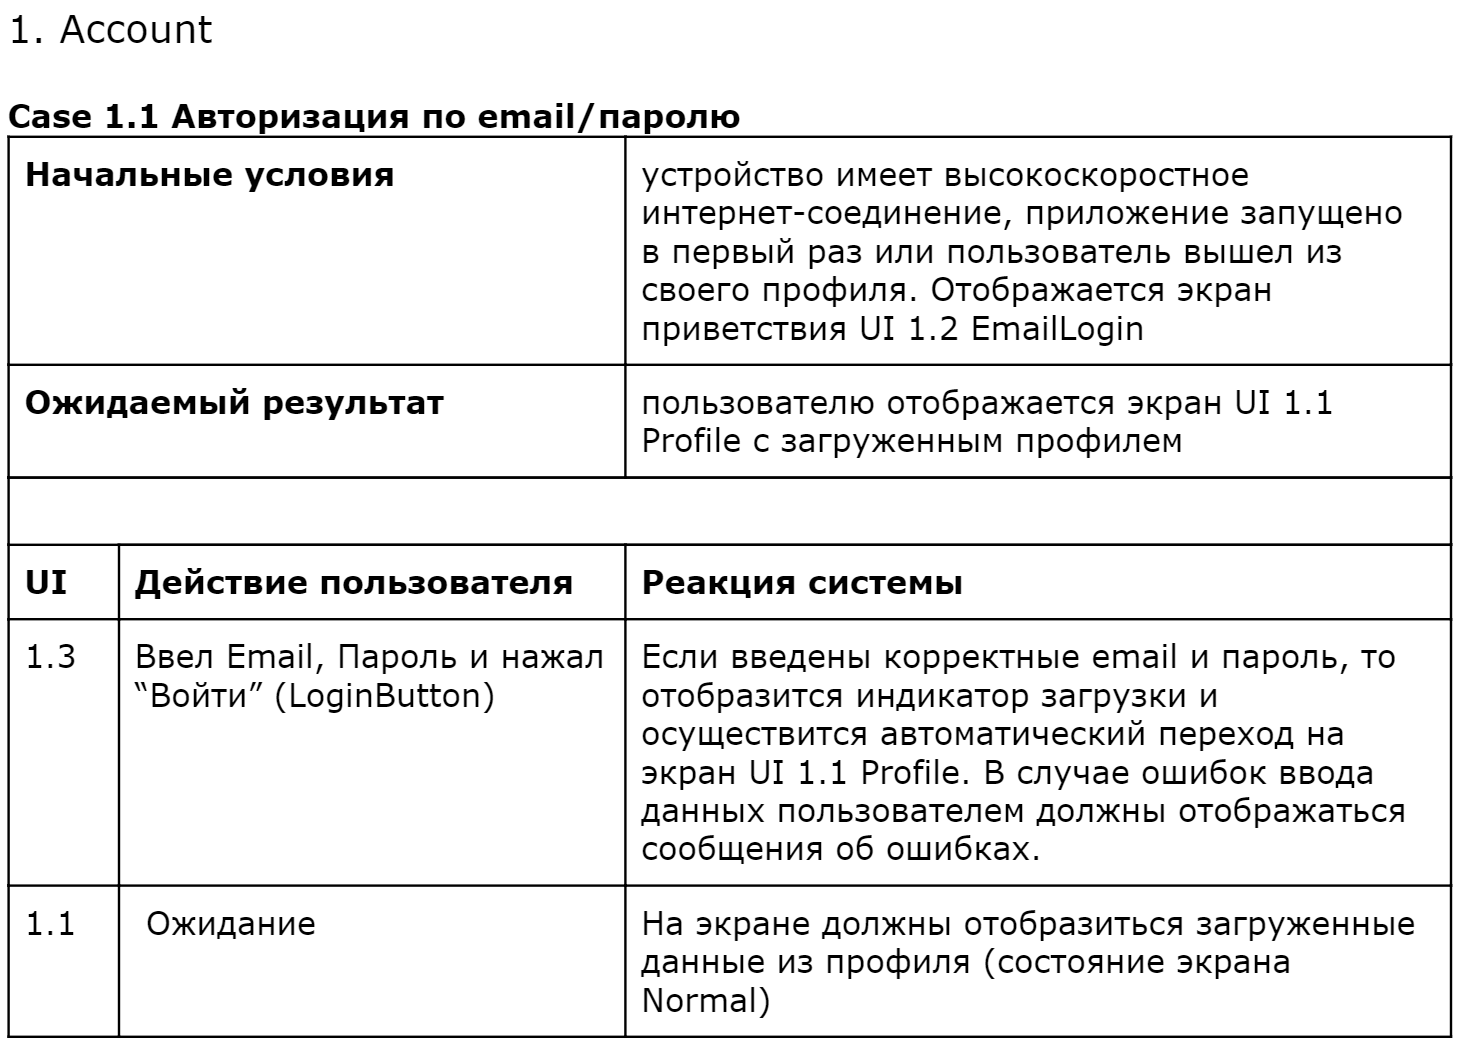
As you can see, the script contains elements of the user interface, which will make it easier in the future to shift them to automated UI testing.
Now we have all the necessary information for both development and testing (manual and automated).
The final set of artifacts and their update
So, in addition to the original TK and design, we also received a set of additional artifacts.
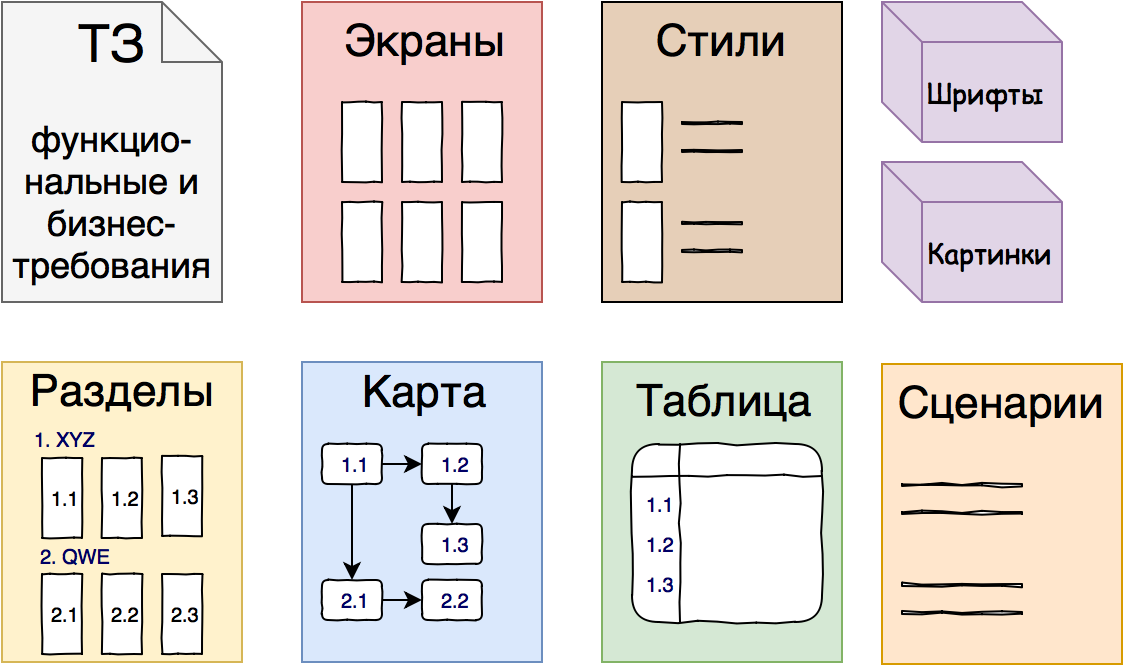
Each of the artifacts requires relatively little time to create and does not require complex knowledge and experience. Together, they fully describe the application interface and the entire user experience. These documents can be created even by specialists of average qualification, and their use greatly simplifies and structures further development.
Regardless of whether you use simple online documents or a special requirements management system, you should update the documentation with every major release. It is worth controlling that the names indicated in the document are used by the whole team when writing code, scripts and work planning (for example, split up tasks into sections).
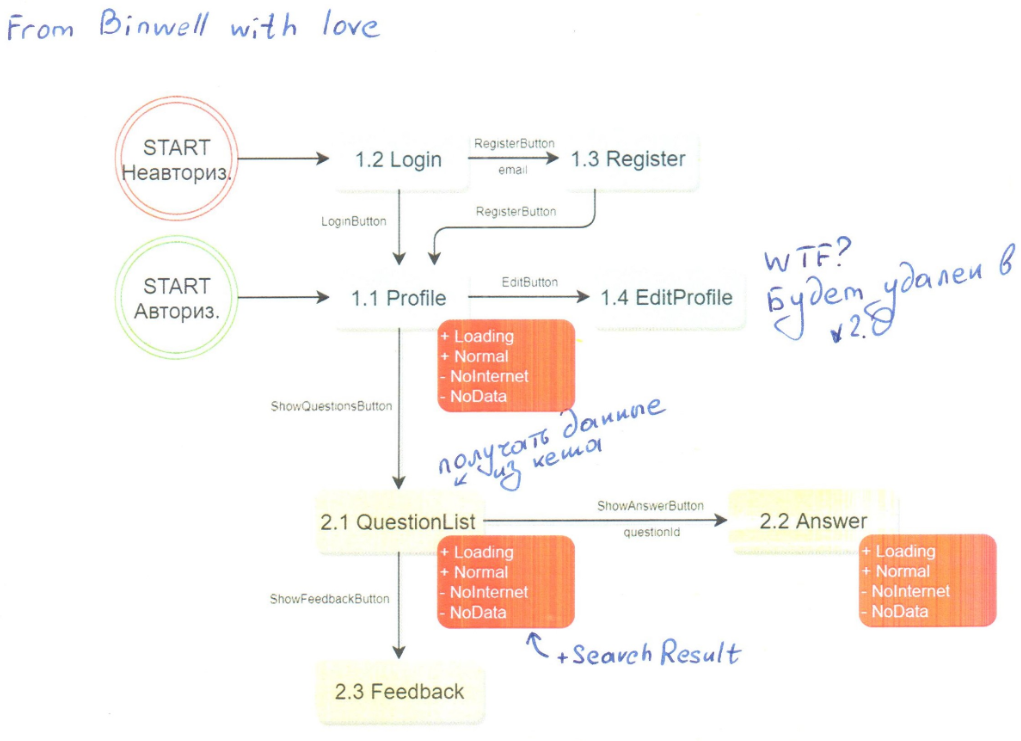
A small amount (few letters) of documentation allows using it as a checklist during development. The map of transitions and states turns out to be very useful for understanding the project, so you can print it in paper form and make notes directly on the sheet.

Create a new project or update an existing one.
When you create a new application, it is assumed that you already have base classes and infrastructure (service for navigation, mechanisms for working with the DBMS and the REST API) that you will use when creating the project skeleton:
Step 1. Create an empty application, create infrastructure folders and classes in it.
Step 2. Add subfolders for each section for ViewModels, Pages. Add empty ViewModels and Pages classes.
Step 3. Add transitions between screens and their state based on the transition map.
Step 4. Add empty DataServices and DataObjects based on the table of screens.
Step 5. Add and implement all styles.
Step 6. Implement DataServices, possibly for starters, and with Mock data (test data from local JSON / CSV files).
Step 7. We implement plugs for background functionality.
All skeleton is ready! These preparatory work will take the team 1-2 days, but will allow you to get a fully working skeleton of the project, which already corresponds to the documentation, your architecture and navigation model. Further it will remain to divide the work into modules, sections and screens, and in each specific case to keep in mind only that information (several paragraphs of text, screenshot, notation from code), which is needed at the moment. Recall that this scenario is effective only if you already have the basic infrastructure.
When refactoring a project, you can restrict yourself to the preparation of documentation and easy cosmetic renaming. This will allow the team to get uniform artifacts and ensure the continuity of specialists.
Conclusion
When starting long-term projects, it is necessary to pay attention to the preparation of technical documentation for the whole team, and not just the customer. In our guide, we described a simple set of artifacts, which, on the one hand, allows you to look at the whole project (transition map), and on the other, to get only the most necessary information on each screen or module (table).
So, a brief description of each artifact:
- List of screens by sections . Used for naming and numbering screens. Allows you to find a screenshot by number or title. Will be used by developers and testers.
- Table of screens. Allows you to get a brief information on each screen, including a description of its behavior and appearance. The designations in the table will correspond to the designations in the code. Will be used by developers and testers.
- Map transitions. Allows you to see all possible user scripts and the entire user interface scheme. Will be used by developers and testers.
- Custom scripts. Describes user interaction in “user action” - “system response” mode with reference to screens. Only testers will be needed.
We hope that the described approach will simplify the work of your team with the documentation and allow you to quickly create high-quality mobile applications.
You can find the full version of the manual on the Medium "Technical Design of Mobile Applications" . You can talk directly with the author and the Xamarin-developer community in our cozy chat in Telegram .
')
PS I express my sincere thanks to Roman Zdebsky and Ahmed Sheriev for valuable comments, and to Elizaveta Shvets for assistance in publishing.
about the author
 Vyacheslav Chernikov - head of development at Binwell , Microsoft MVP and Xamarin Certified Developer. In the past, he was one of the Nokia Champion and Qt Certified Specialists, currently he is the Xamarin and Azure platform specialist. He came to the sphere of mobile in 2005, since 2008 he has been developing mobile applications: he started with Symbian, Maemo, Meego, Windows Mobile, then switched to iOS, Android and Windows Phone. Articles Vyacheslav you can also read the blog on Medium .
Other articles of the author can be found in our column #xamarincolumn .
Source: https://habr.com/ru/post/343666/
All Articles