How to make remote access more secure with a token?

In 2016, Avast decided to experiment with exhibitors at the Mobile World Congress. Employees of the company created three open Wi-Fi points at the airport near the booth for registering visitors to the exhibition and called them the standard names “Starbucks”, “MWC Free WiFi” and “Airport_Free_Wifi_AENA”. In 4 hours, 2000 people connected to these points.
As a result of the experiment, a report was compiled, in which Avast employees analyzed the traffic of all people connected to open Wi-Fi points. Personal information was also disclosed to 63% of those who connected: logins, passwords, email addresses, etc. If the report that was not presented at the exhibition, the participants in the experiment would never have understood that someone had access to their data.
We are connecting to the network of our company from home, hotel or cafe and we do not even understand how much damage we can cause.
According to statistical studies, more than 40 percent of company employees work remotely at least one day a week.
But it turns out that an employee working remotely via the Internet is much more vulnerable than a local user and poses a potential threat to the company. Therefore, the security of remote users should be given special attention.
Threat factors
A remote user workstation generates, in comparison with a local office workstation, three additional threat factors:
- Remote user is outside the physical control of the organization. Proof is required that it is an employee of the company that connects to the corporate resource, and not an attacker.
- Remote user data is distributed through channels that are outside the control area of the organization. This data is subject to interception, unauthorized alteration and “mixing” of extraneous traffic.
- For a remote workplace, the company itself cannot provide physical security. Also, the computer used may not meet configuration requirements.
Therefore, when organizing remote access, three basic principles of information security should be observed:
- confidentiality (important information should be available only to a limited circle of people);
- integrity (changes of information leading to its loss or distortion should be prohibited);
- availability (information should be available to authorized users when they need it).
How to protect remote access?
To organize the work of remote employees, you can use the following protection mechanisms:
- reliable user authentication tool (passwords, hardware, biometric data, etc.);
- access control system (centralized access control to the company's IT resources);
- VPN organization tool (hardware, software, firewall extensions, etc.);
- means of resisting attacks (protection of the internal network and employees from attacks).
We will talk about one of the protection mechanisms - this is VPN.
Why do I need a VPN?
A VPN connection provides a more secure connection to the corporate network and the Internet.
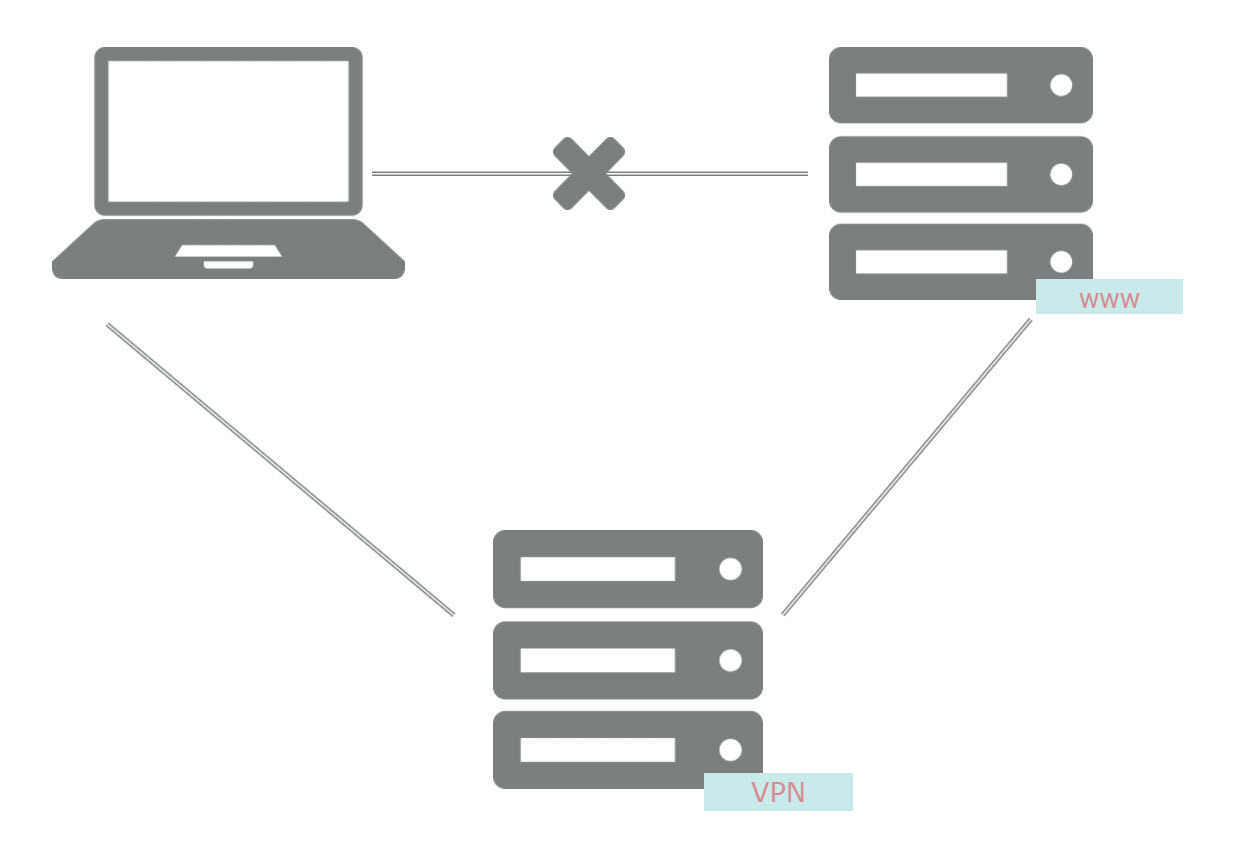
VPN applications:
- Internet access;
- access to the corporate network from the outside;
- integration of corporate network components.
Your company's network infrastructure can be prepared to use a VPN using software or hardware.
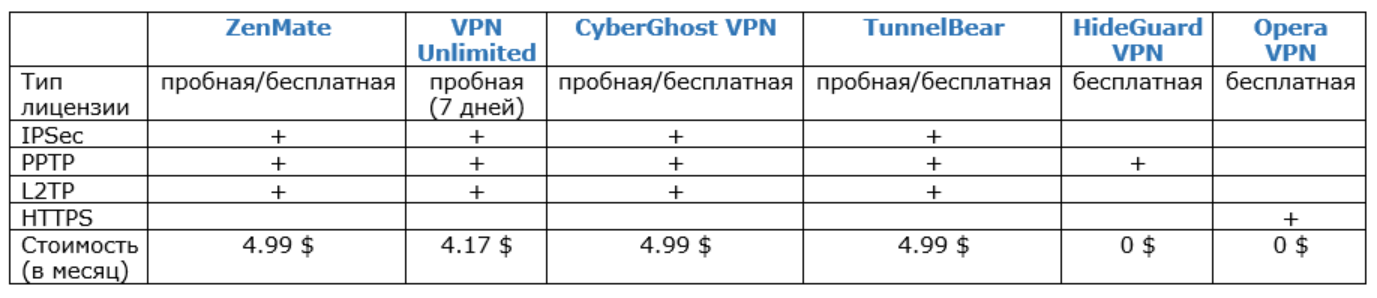
There are a large number of paid and free VPN services.
Such services mainly work on 4 protocols:
- IPSec , operating in transport and tunnel modes. Encrypting messages in a data packet using transport mode is called the payload, and encrypting the entire packet is called tunneling.
- PPTP is a point-to-point tunnel protocol that uses a tunnel method in which data is stored as PPP packets. They, in turn, are placed in IP packets and transmitted to the destination.
- L2TP is a second-level tunneling protocol that runs on two primary nodes: the L2TP access concentrator (LAC), the L2TP network server (LNS). LAC is a device that terminates a call, while LNS authenticates PPP packets.
- TLS and SSL are cryptographic protocols that use a combination of authentication and encryption to communicate between a server and a client.
There are also VPN services for corporate use. One of the most famous is OpenVPN. It is a safe and inexpensive service.
Its advantages are:
- Security. The use of several cryptographic protocols (HMAC, 3DES, AES, RSA) and a 2048-bit key enable reliable encryption of all data.
- The flexible features of OpenVPN allow you to run a connection through Proxy / Socks, using various protocols and with the forced blocking of the DHCP protocol, as well as through firewalls.
- Supported by most devices, including Apple iOS and Google Android.
Can I make a VPN connection without using third-party programs?
Sometimes it makes no sense to use third-party services if similar capabilities are built into the operating system.
We want to demonstrate how to set up a secure SSTP VPN connection using standard Windows features.
The VPN connection is secured in such a case through traffic encryption mechanisms using a digital certificate (SSL) provided by the VPN server. During the installation of the VPN connection, the client operating system software verifies the certificate of the VPN server, in particular, checks whether the server certificate has been revoked, and whether it is worth checking whether the root certificate of the Certificate Authority that issued the certificate for the VPN server is trusted. That is why one of the requirements for successful SSTP VPN connections is the ability to automatically update the list of root certificates over the Internet.
SSTP is a modern and secure protocol. An additional advantage is its ability to work through the universally accessible HTTPS protocol port (TCP 443), which is used for ordinary web browsing, that is, the SSTP VPN connection will work through almost any Internet connection.
VPN and two-factor authentication
By itself, the VPN connection is encrypted. But using a login and password for authentication in a VPN is completely insecure. But there is a way out - this is two-factor authentication. It allows the user to verify his identity in two ways. It is desirable to use a hardware tool (a token or a smart card) to configure it. Then, when establishing a VPN connection, the user does not need a password, but the device itself and its PIN code.
The main advantage of a hardware device when using a VPN is the uniqueness of the private key. It is caused by the fact that the private key from the device cannot be copied and reproduced. After all, if the authentication tool does not have uniqueness, then it is impossible to be sure that the user who received access is the very user to whom this access was assigned.
In the case of using a password, the situation is quite different. Anyone who specifically or accidentally recognized your password can use it without your knowledge. This means that he can do whatever he wants on behalf of the password owner. It is rather difficult to track this situation, especially if the attacker is technically savvy.
Configure the VPN server
We will begin setting up a VPN connection by deploying a simple VPN server based on Windows Server 2012 R2.
Such a server installed on standard equipment can be used for a small office network with the need for remote connection organization for several dozen employees (30-50 people).
VPN server configuration
Open the Server Manager and click the Add Roles and Components link.
Choose the role of Remote Access .

Choose the DirectAccess and VPN role service (RAS) .
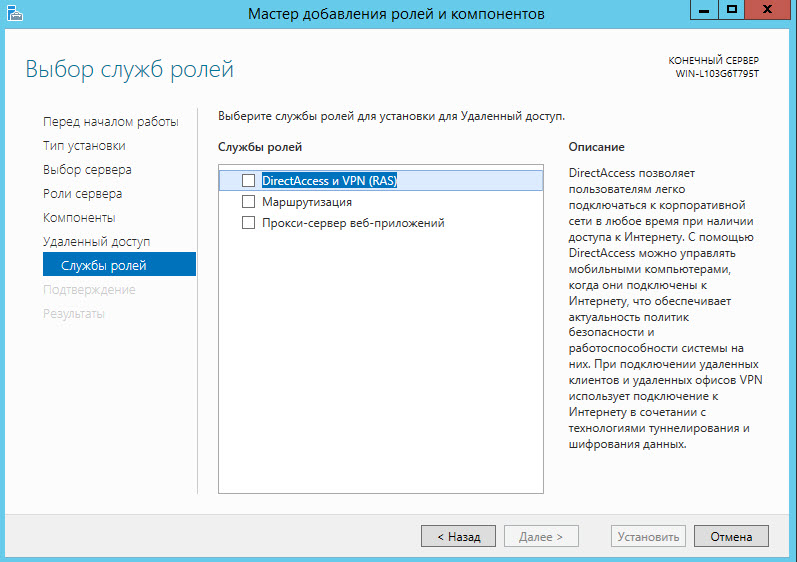
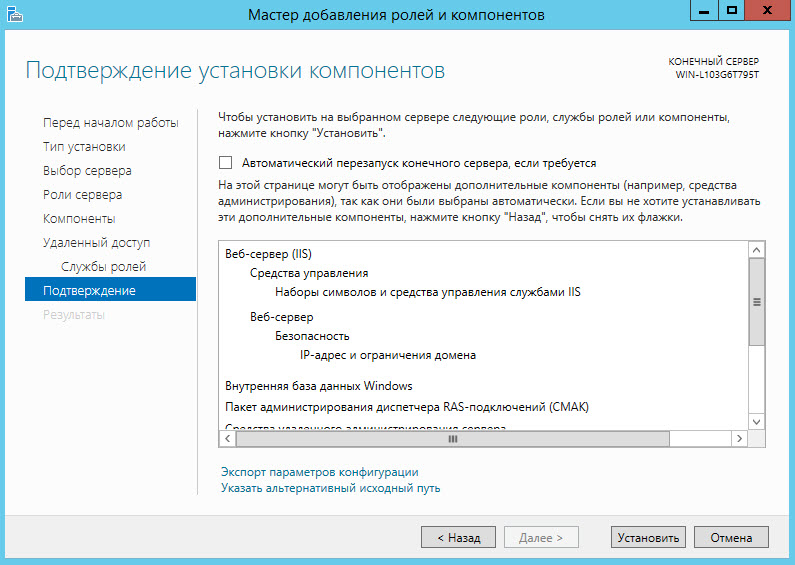
Click the [Install] button. As a result, the installation process of the remote access role will start.
')
In the Initial Remote Access Setup Wizard, select Deploy VPN Only .
After that we will add the server. In the Routing and Remote Access window, select the Action menu item and the Add server sub-item. Next, we confirm the addition.
Click on the name of the added server with the right mouse button and select Configure and enable routing and remote access .

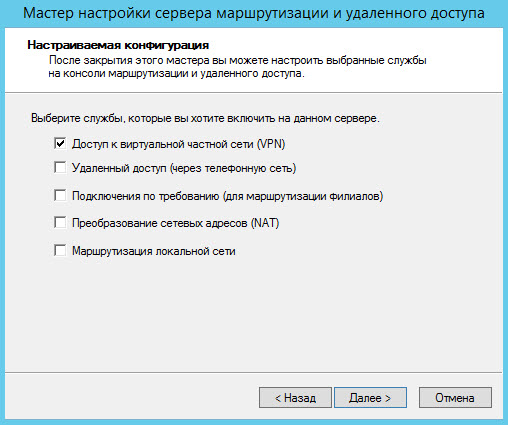
Select the item Special configuration .

As a custom configuration, select Access to a virtual private network (VPN) .
We will start the service, for this we will click on the [Start the service] button.
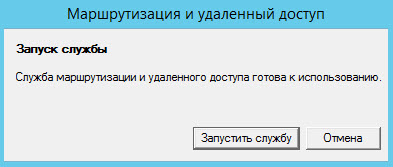
The server is almost ready.
For example, we use the simplest and most obvious way - we will set a statistical pool of addresses for 5 users.
Open the properties of the added server.

Select the Statistical Address Pool item and click the [Add] button.
In the New IPv4 Address Range window, specify the starting and ending IP address.
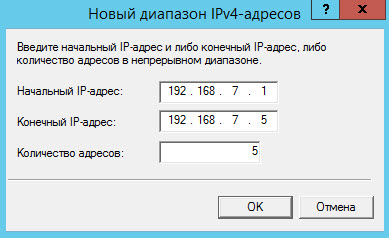
Click the [Apply] button

The role of remote access is configured, now we will open ports in the firewall.
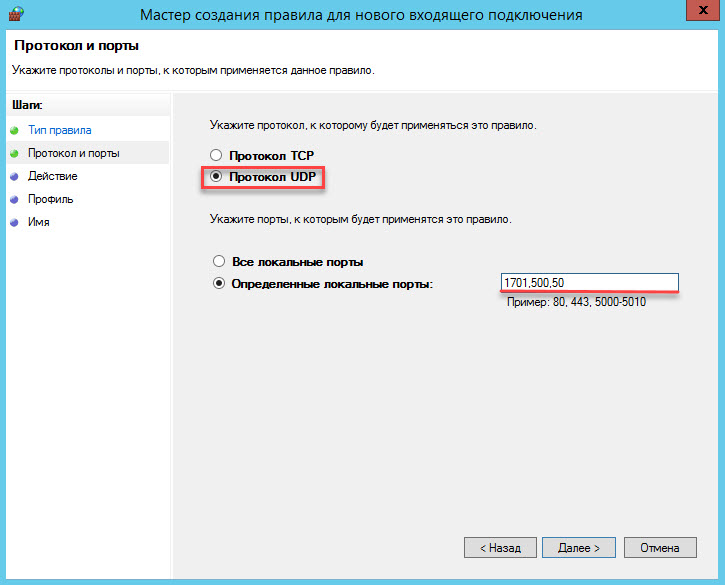
Opening Firewall Ports
For the TCP protocol, open ports 1723 and 443 .
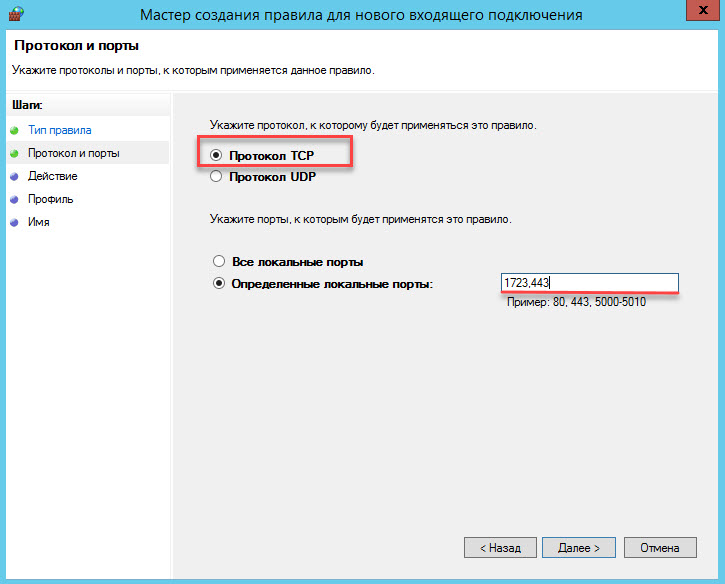
For the UDP protocol, open ports 1701 , 500 and 50 .
In the next step, we configure the local security policy.
Setting local security policy
Open the list of local security policies and select the Assign user rights item.
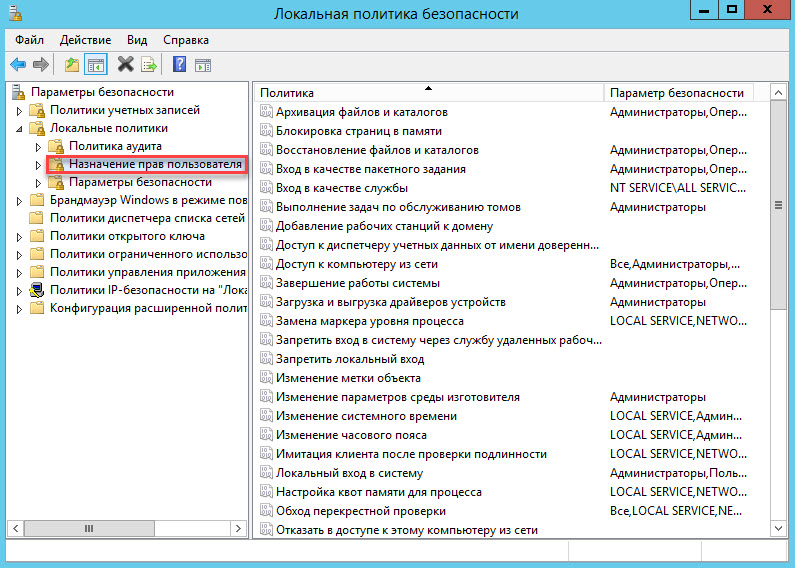
Select the policy Allow logon through Remote Desktop Services .
Click the [Add user or group] button.

Find the name of the Subdivision Domain Users and add it.
Well, the penultimate step will be setting up access for specific users.
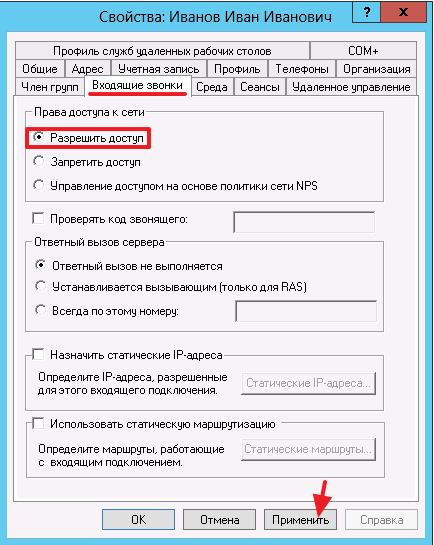
Setting access for a specific user
Open Server Manager , select Tools, and select Active Directory Users and Computers .
Find the name of the user you need, go to his Properties , on the Incoming Calls tab, select the Allow Access option . Click the [Apply] button.
And finally, let us check whether remote access is allowed in the system properties.
To do this, open the properties of the system, select the Configure Remote Access option and select the Allow remote connections to this computer check box.

That's it, the server setup is now complete. Now we will configure the VPN connection on the computer that will be used for remote access.
Configure VPN Connection
Setting up a VPN on a computer with Windows 10 is extremely simple. To implement it, you will need account information (login, password), server IP address and Internet connection. To organize the hardware two-factor authentication, you will need a token.
No additional programs need to be installed, Windows itself already has everything.
Let's get down to setting it up. As an example of hardware, I will use the device for secure storage of keys and certificates Rutoken EDS PKI .

To configure the connection, we need a certificate that contains policies Smart Card Logon and Client Authentication.
The process of creating such a certificate, we have previously described. Link to the description here .
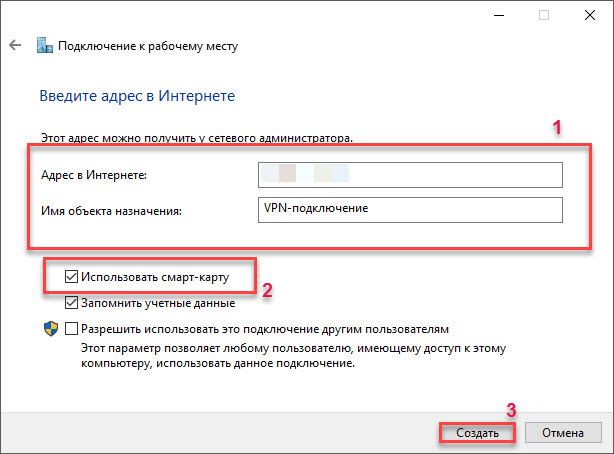
Open the Network and Sharing Center . Click the link Create and configure a new connection or network .

The Configure Connection or Network window opens. Select the Connection to the workplace item and click on the [Next] button.
Click the link Use my Internet connection (VPN) .

In the field Internet address we indicate the data of the VPN server.
In the Name field of the target object we specify the name of the VPN connection.
Select the Use smart card checkbox and click on the Create button.
VPN connection created. But we need to change its parameters.
Open the Network and Sharing Center window again and click on the Change adapter settings link.

In the Network Connections window, right-click on the name of the created VPN connection and select Properties .

Go to the Security tab and select the following options.

Such VPN connection settings are enough to successfully connect via a secure VPN protocol to the specified network. However, after the VPN connection is made, all network traffic from the computer will by default be directed to the gateway of the specified network. This can lead to the fact that during connection to a VPN, working with Internet resources will not be possible. In order to eliminate this problem, go to the Network tab, click on the IP version 4 line (TCP / IPv4) and click on the Properties button.
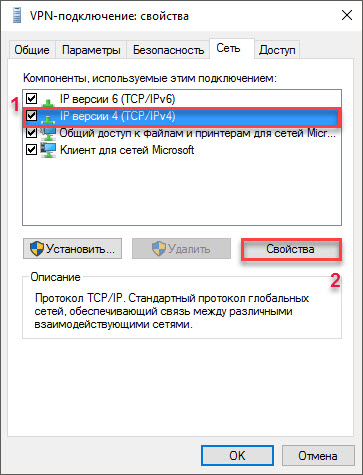
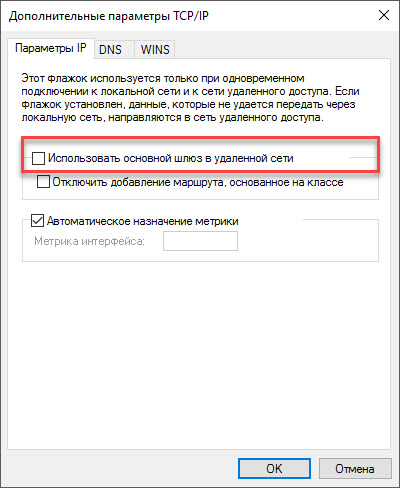
On the IP version 4 properties page, click the [Advanced] button.
Clear the Use default gateway on remote network box.
Confirm all changes made. The configuration process is complete.
Now let's check the connection.
In the taskbar on the desktop, click on the icon Access to the Internet and select the VPN connection created. The Settings window opens.
Click on the name of the VPN connection and click on the Connect button.

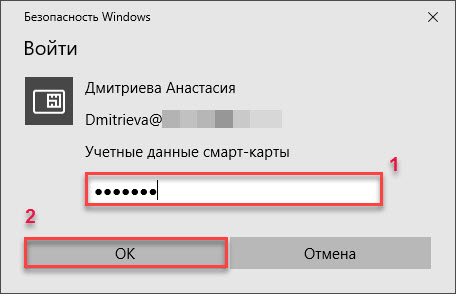
Enter the PIN of the token and click the [OK] button .
As a result, the created VPN connection will be established.
To check the status of the VPN connection, open the Network Connections window, find the name of the created connection. Its status must be “Connected”.

To break a VPN connection in the same window, find the created connection, right-click on its name and select Connect / Disconnect .
We summarize
When a VPN connection is established, all traffic begins to pass through the VPN server.
The reliability of protecting VPN traffic lies in the fact that even if an attacker somehow intercepts the transmitted data, they will still not be able to use it, since the data is encrypted.
And if you install special traffic control applications and configure them, you can successfully filter traffic. For example, automatically check it for viruses.
Hopefully we managed to convince you that VPN is easy, affordable, and most importantly safe!
Source: https://habr.com/ru/post/343638/
All Articles