Setting up Sublime Text 3, SW4 and STM32CubeMX for developing STM32 for Linux
There are a lot of similar articles on the Internet, but I would like to write a current variation. Personally, I suffered for a long time in a bundle: Ubuntu is the main system, development under STM32 in the Windows 7 virtual machine. But one day I was very tired and I decided to spend several days searching for a solution and licking a complete environment for Linux Ubuntu. I’ll run ahead and say that I haven’t achieved the ideal, I couldn’t manage to make a realtime debug like in Keil. Otherwise, everything is very decent.
Attention, a lot of text and pictures!
What I ended up with:
- Sublime Text 3 with autocompletions and highlighting of all functions, including HAL and other project libraries;
- AC6 System Workbench for STM32 with customized perspectives and other goodies;
- Of course I use version control in Git.
Steps to complete:
- Add required PPAs to apt;
- Install the necessary libraries;
- Install software;
- Make edits to configuration files;
- Finish all sorts of buns in the form of beautiful icons, search from the menu, etc.
The instructions are given for an absolutely clean machine based on Ubuntu 16.04, in your case some components may already be installed. In this article and in the subsequent I will give examples for the debug board STM32F3DISCOVERY . It is based on the MK STM32F303VCT6 with 256-Kbyte Flash and 48-Kbyte RAM in the LQFP100 package. You can adapt the settings to your MK very easily thanks to STM32CubeMX.
Everything is indicated to the user named bulkin , do not forget to change it when setting up.
Pre-install the necessary software
sudo apt install git clang cmake python-pip sudo pip install --upgrade pip Create the necessary directories for installing programs and storing libraries.
I prefer to install non-PPA programs in a separate folder in the ~ / Programs home directory. First, I install with local user rights. Secondly, the folder is named in English, because Some programs do not like the Cyrillic alphabet on the way.
Libraries I prefer to store in / opt / libs .
Yes, / opt is OPTIONAL APPLICATIONS. But I have a separate partition with btrfs with compression mounted on / opt . On all my machines, I configured the paths to my libraries in / opt / libs . Fool around and do everything according to the canons (use / usr / local / lib and / usr / local / share ) I see no reason, it is easy to get confused.
mkdir ~/Programs sudo mkdir /opt/libs sudo chown bulkin:bulkin /opt/libs For STM32CubeMX and Eclipse, we will need:
- Since STM32CubeMX 32-bit application, you need the necessary libraries, if you have a 64-bit OS.
- Java Run Time Environment (we will use OpenJRE 8).
Installing 32-bit libraries
sudo apt install lib32ncurses5 Install the Open JDK 8 JRE
sudo apt install default-jre Install STM32CubeMX
We act according to the instructions of the ST .
Download the distribution from the site ST (registration is required), unzip and run the file with the .linux extension. If the installer does not start, most likely the 32-bit libraries are not installed. The installation path is changed to / home / bulkin / Programs / STM32CubeMX , set.

Create a beautiful label and add a search in Dash
touch ~/.local/share/applications/CubeMX.desktop chmod ug+x ~/.local/share/applications/CubeMX.desktop nano ~/.local/share/applications/CubeMX.desktop Insert the following content:
[Desktop Entry] Version=1.0 Name=CubeMX Comment=STM32 CubeMX Exec=/home/bulkin/Programs/STM32CubeMX/STM32CubeMX Icon=/home/bulkin/Programs/STM32CubeMX/help/STM32CubeMX.ico Terminal=false Type=Application Categories=Utility;Application; Now in dash, the icon will appear in the Applications section, the dash search will work after re-logging.
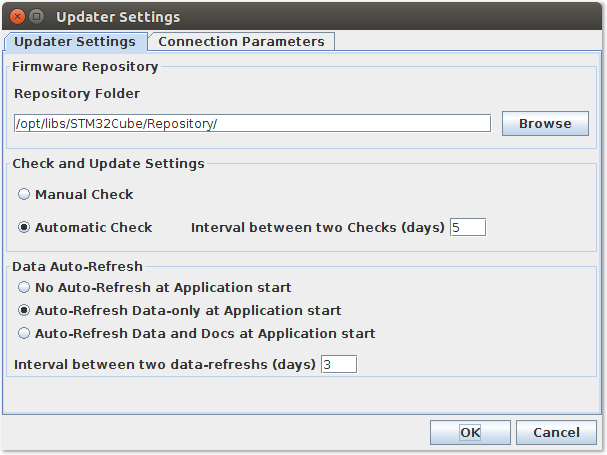
Run STM32CubeMX, go to Help-> Updater Settings settings and change the path for storing libraries to / opt / libs / STM32Cube / Repository /
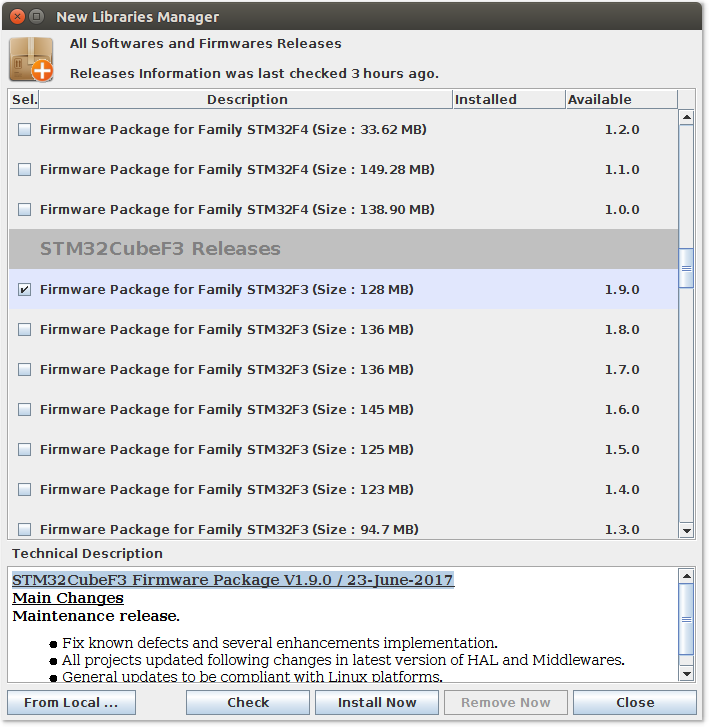
Install the library for STM32F3. Open Help-> Install New Libriaries , put the STM32F3 checkbox Firmware Package , click Install Now
Install Sublime Text 3
In general, SW4 is quite self-sufficient IDE. But I love to code it in ST3, and compilation and debug in SW4. Installation instructions for ST3 for any distributions is here .
wget -qO - https://download.sublimetext.com/sublimehq-pub.gpg | sudo apt-key add - sudo apt install apt-transport-https echo "deb https://download.sublimetext.com/ apt/stable/" | sudo tee /etc/apt/sources.list.d/sublime-text.list sudo apt update sudo apt install sublime-text cppcheck python-configparser sudo pip install --upgrade cmake sudo pip install cmakelint sudo pip install cubemx2cmake After that, it is worth rewriting.
Setting Sublime Text 3
First, install Package Control.
Run ST3 and press CTRL + ` , insert the code into the command line and press ENTER:
import urllib.request,os,hashlib; h = '6f4c264a24d933ce70df5dedcf1dcaee' + 'ebe013ee18cced0ef93d5f746d80ef60'; pf = 'Package Control.sublime-package'; ipp = sublime.installed_packages_path(); urllib.request.install_opener( urllib.request.build_opener( urllib.request.ProxyHandler()) ); by = urllib.request.urlopen( 'http://packagecontrol.io/' + pf.replace(' ', '%20')).read(); dh = hashlib.sha256(by).hexdigest(); print('Error validating download (got %s instead of %s), please try manual install' % (dh, h)) if dh != h else open(os.path.join( ipp, pf), 'wb' ).write(by) 
To complete the work we need these packages:
- ARM Assembly (Backlight Assembler in the code)
- C Improved (Backlight C)
- CMakeEditor (Cmake Backlight)
- DocBlokr (Formatting Comments)
- EasyClangComplete (autocompletion of functions)
- Hex to Int preview (shows HEX value)
- SublimeAStyleFormatter (formats code by pressing CTRL + SHIFT + A)
- Sublimelinter
- Sublimelinter-contrib-cmakelint (cmake backlight)
- Sublimelinter-cppcheck (checks code for errors using cppcheck)
- Sublimelinter-annotations (Highlights FIXME, NOTE, TODO, etc.)
Install the necessary packages from the Preferences menu -> Package Control -> Install Package .
Configure ST3
Open Preferences -> Settings and paste into the right half:
{ "always_show_minimap_viewport": true, "drag_text": false, "ensure_newline_at_eof_on_save": true, "fallback_encoding": "Cyrillic (Windows 1251)", "font_size": 10, "highlight_modified_tabs": true, "ignored_packages": [ "Vintage" ], "index_exclude_patterns": [ "*.log", "*.bak" ], "show_encoding": true, "translate_tabs_to_spaces": true, "trim_trailing_white_space_on_save": true } Configure ST3 packages
EasyClangComplete
We configure clang on C99 and we specify directories with basic libraries like StdLib .
Open Preferences -> EasyClangComplete -> Settings and paste into the right half:
{ "common_flags" : [ "-I/usr/include", "-I/usr/lib/clang/$clang_version/include", ], "c_flags" : [ "-std=c99" ], "clang_binary" : "clang", "verbose" : false, "use_libclang_caching": true, } Sublimelinter
- Linter works only when loading / saving
- FIXME annotations are circled as an error, the rest as a warning
- CppCheck checks only the rules of Warning, Style, Performance and Portability, and also specify the standards C99 and C ++ 11
- Do not show errors in a separate window when saving
Open Preferences -> Sublimelinter -> Settings and paste into the right half:
{ "user": { "debug": false, "delay": 0.25, "error_color": "D02000", "gutter_theme": "Packages/SublimeLinter/gutter-themes/Default/Default.gutter-theme", "gutter_theme_excludes": [], "lint_mode": "load/save", "linters": { "annotations": { "@disable": false, "args": [], "errors": [ "FIXME" ], "excludes": [], "warnings": [ "NOTE", "README", "TODO", "@todo", "XXX", "WIP" ] }, "clang": { "@disable": false, "args": [], "excludes": [], "extra_flags": "", "include_dirs": [] }, "cmakelint": { "@disable": false, "args": [], "excludes": [] }, "cppcheck": { "@disable": false, "args": [], "enable": [ "warning", "style", "performance", "portability" ], "excludes": [], "std": [ "c99", "c++11" ] }, }, "mark_style": "outline", "no_column_highlights_line": false, "passive_warnings": false, "paths": { "linux": [], "osx": [], "windows": [] }, "python_paths": { "linux": [], "osx": [], "windows": [] }, "rc_search_limit": 3, "shell_timeout": 10, "show_errors_on_save": false, "show_marks_in_minimap": true, "tooltip_fontsize": "1rem", "tooltip_theme": "Packages/SublimeLinter/tooltip-themes/Default/Default.tooltip-theme", "tooltip_theme_excludes": [], "tooltips": false, "warning_color": "DDB700", "wrap_find": true } } SublimeAStyleFormatter
Formatting is customized to my taste. A detailed description of all the items is in Preferences -> SublimeAStyleFormatter -> Settings - Default
Open Preferences -> SublimeAStyleFormatter -> Settings - User and paste:
{ "options_default": { "style": "google", "indent": "spaces", "indent-spaces": 4, "indent-col1-comments": true, "indent-switches": true, "indent-cases": true, "break-blocks": "default", "attach-namespaces": true, "break-blocks": "default", "add-brackets": true, "lineend": "linux" } } Install AC6 System Workbench for STM32 (SW4STM32)
The entire installation process is described on the OpenSTM32.org site.
We register on www.openstm32.org and download the installer .
Go to the download folder and enter
bash install_sw4stm32_linux_64bits-latest.run If you have gksudo installed, the installer will start in graphical mode. I have not installed, because everything is in the terminal.
Several times we enter 1 as an agreement with any nonsense. Specify the installation path:
/home/bulkin/Programs/SystemWorkbench Again, we agree with everything, like a virgin for the first time, and wait for the end of the installation.
Add SW4 Search to Dash
chmod +x "/home/bulkin/ /sw4stm32_shortcut.desktop" cp "/home/bulkin/ /sw4stm32_shortcut.desktop" ~/.local/share/applications/sw4stm32_shortcut.desktop SW4 setting
We start SW4, agree with the creation of the workspace, click on the workbench . When you first start it will be installed ARM Toolchain.
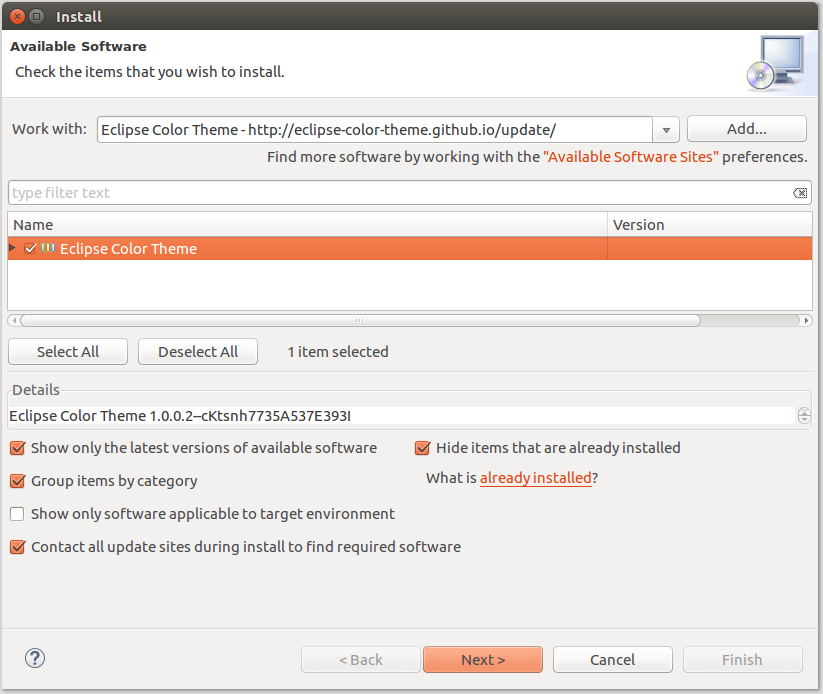
First, install a convenient topic. Open Help-> Install New Software, click Add .. and enter:
Eclipse Color Theme http://eclipse-color-theme.imtqy.com/update/ Click OK, select Eclipse Color Theme and click Next> and then everything is done.
Include the theme: Window -> Preferences -> Appearance -> Color Theme . I love Monokai, and you can later pick the one you like.
Well, it's time to start our first project and test the development environment in operation.
Testing a customized environment and minor tweaks
I repeat, I will give examples for the STM32F3DISCOVERY debug board. I do everything as simple as possible, we need to check the settings of the development environment.
Run STM32CubeMX, select New Project in the main window. Open the Board Selector tab. Choose our fee:
- Type of board: Discovery
- MCU Series: STM32F3
- From the list below, select STM32F3DISCOVERY
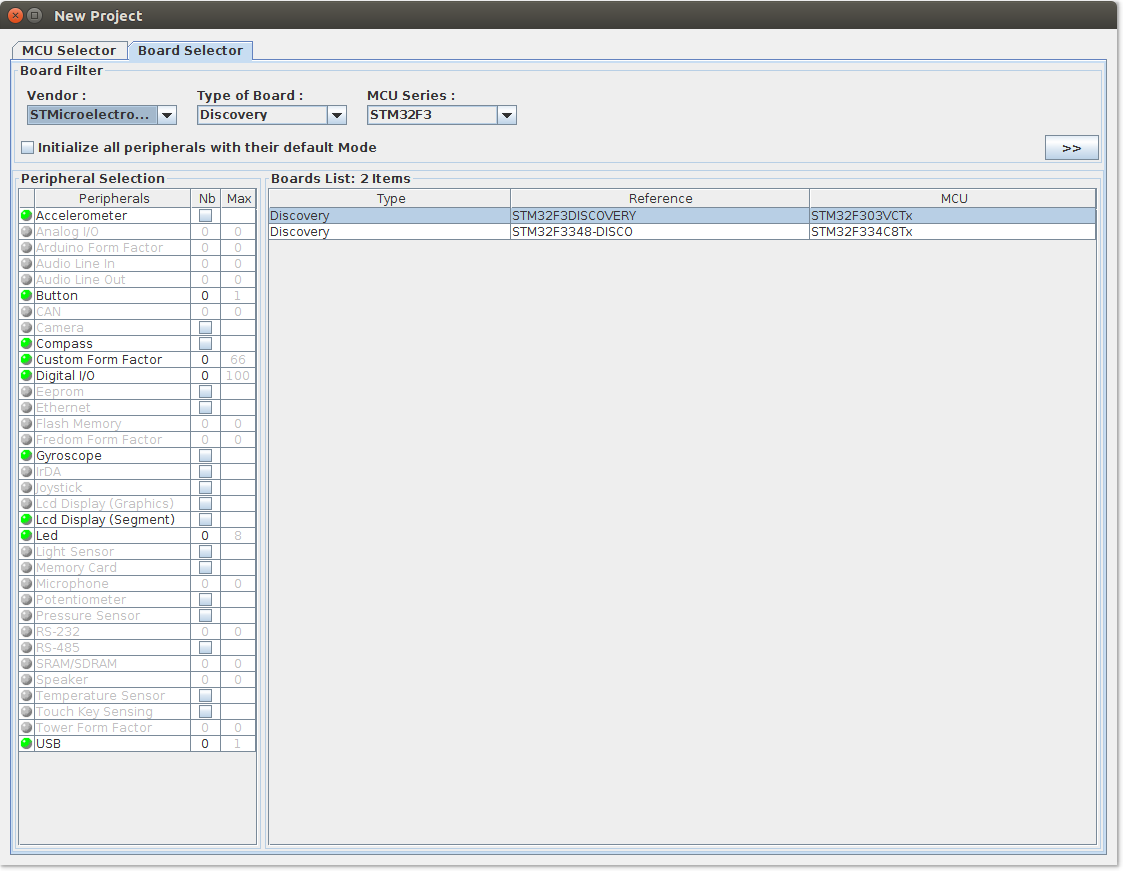
And two clicks on our board.
Make the minimum setting MK
In the left menu, turn on:
- FreeRTOS: checkbox Enabled
- SYS: Trace Asynchronous Sw
- Timebase Source: TIM17 (you can choose any at the current stage)
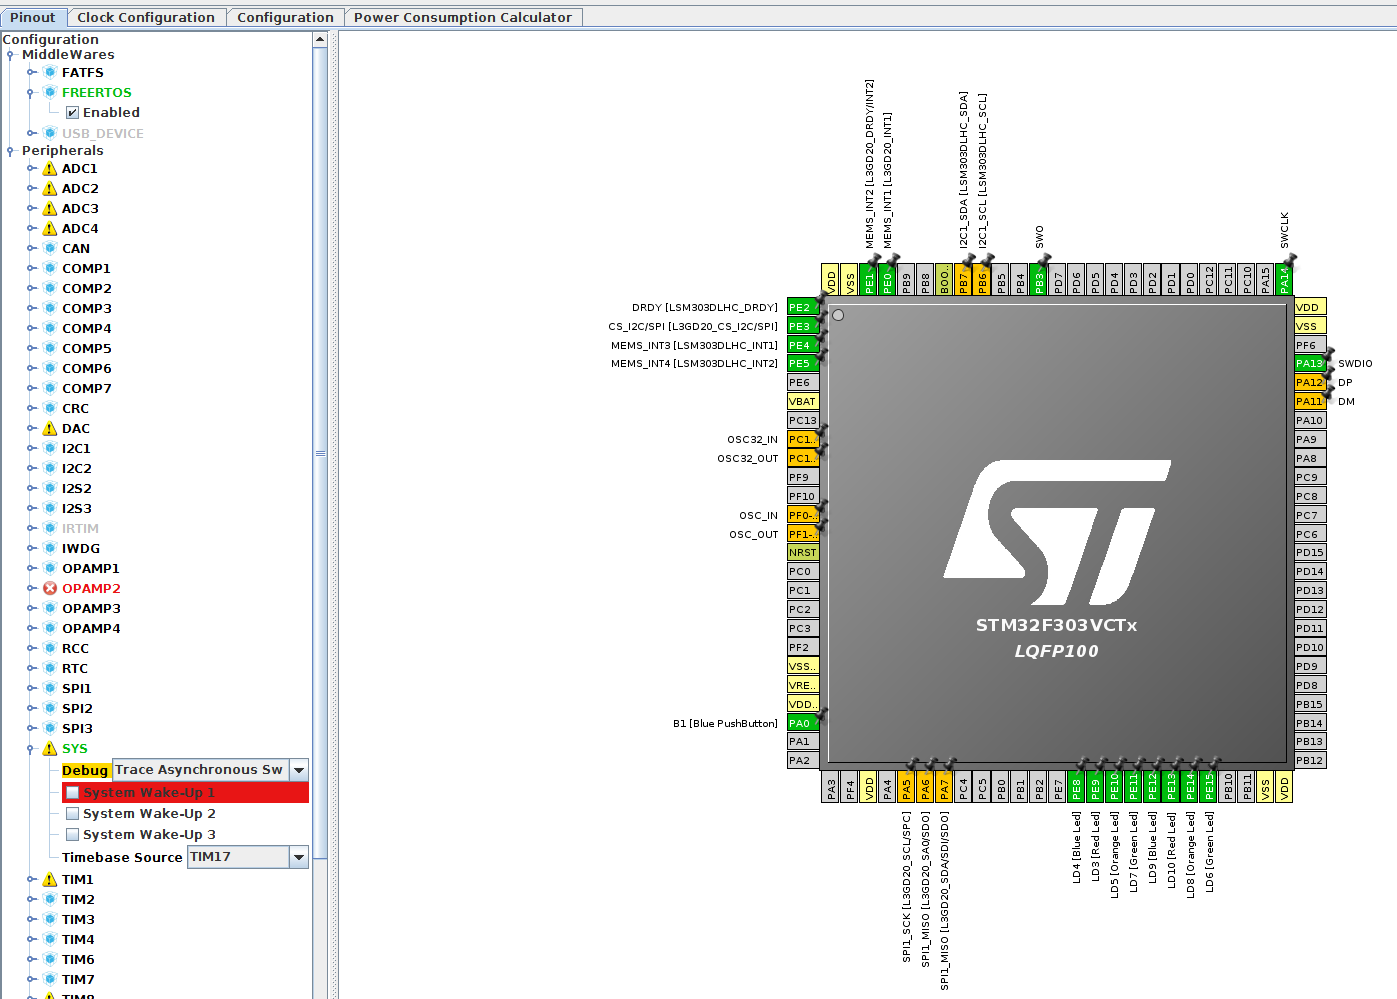
Go to the Clock Configuration tab:
- Enter 64 MHz in the HCLK field (maximum frequency on the built-in oscillator)
Set up the project itself
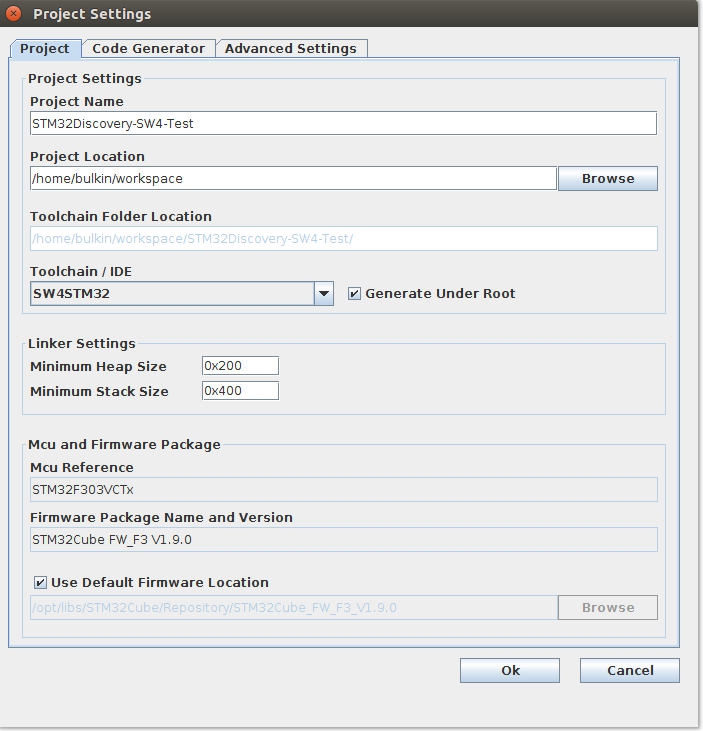
Open Project-> Settings from the top menu.
- Specify the project name in the Project Name field: STM32Discovery-SW4-Test
- Specify the path in the field Project Location : / home / bulkin / workspace
- Select Toolchain: SW4STM32
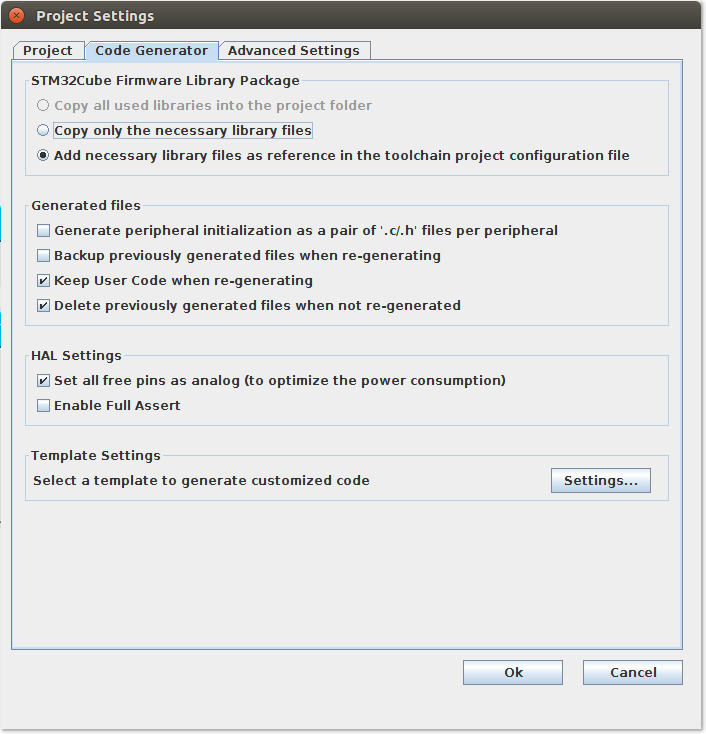
Open the Code Generator tab and turn on the "add necessary project configuration file"
We press OK and now we are ready to create a project. Click Generate Source Code in the top menu: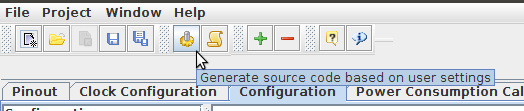
Check Sublime Text 3
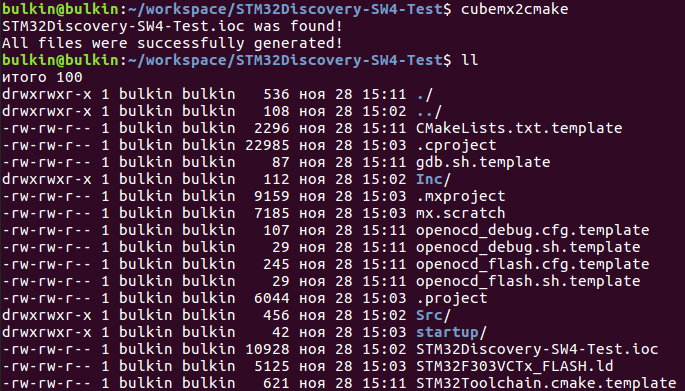
First you need to create CMakeList.txt. To do this, open the console in the root of our project and enter:
cubemx2cmake From our STM32Discovery-SW4-Test.ioc will be created the necessary files to compile from the command line. But we are only interested in CMakeLists.txt.template . Rename it to CMakeLists.txt .
Project-> Add folder to Project ... and select the folder of our new project.
First you need to add the missing paths to the libraries in CMakeList.txt . This is necessary for the correct operation of the EasyClangComplete . Left click on CMakeList.txt and make changes:
Above the line set(USER_INCLUDE Inc) add:
set(STM32CUBEREPO /opt/libs/STM32Cube/Repository/STM32Cube_FW_F3_V1.9.0) All subsequent set up to file change to:
set(USER_INCLUDE Inc) set(CMSIS_DEVICE_INCLUDE ${STM32CUBEREPO}/Drivers/CMSIS/Device/ST/STM32F3xx/Include) set(CMSIS_INCLUDE ${STM32CUBEREPO}/Drivers/CMSIS/Include) set(CMSIS_RTOS_INCLUDE ${STM32CUBEREPO}/Middlewares/Third_Party/FreeRTOS/Source/CMSIS_RTOS) set(HAL_INCLUDE ${STM32CUBEREPO}/Drivers/STM32F3xx_HAL_Driver/Inc) set(FREERTOS_INCLUDE ${STM32CUBEREPO}/Middlewares/Third_Party/FreeRTOS/Source/include) Well, in the include_directories section, at the very end, add ${FREERTOS_INCLUDE} ${CMSIS_DEVICE_INCLUDE} .
include_directories(${USER_INCLUDE} ${CMSIS_DEVICE_INCLUDE} ${CMSIS_INCLUDE} ${HAL_INCLUDE} ${CMSIS_RTOS_INCLUDE} ${FREERTOS_INCLUDE}) set(MCU_FAMILY STM32F3xx) cmake_minimum_required(VERSION 3.6) project(STM32Discovery-SW4-Test C ASM) add_definitions(-DSTM32F303xC) add_definitions(-DUSE_HAL_LIBRARY) set(STM32CUBEREPO /opt/libs/STM32Cube/Repository/STM32Cube_FW_F3_V1.9.0) set(USER_INCLUDE Inc) set(CMSIS_DEVICE_INCLUDE ${STM32CUBEREPO}/Drivers/CMSIS/Device/ST/STM32F3xx/Include) set(CMSIS_INCLUDE ${STM32CUBEREPO}/Drivers/CMSIS/Include) set(CMSIS_RTOS_INCLUDE ${STM32CUBEREPO}/Middlewares/Third_Party/FreeRTOS/Source/CMSIS_RTOS) set(HAL_INCLUDE ${STM32CUBEREPO}/Drivers/STM32F3xx_HAL_Driver/Inc) set(FREERTOS_INCLUDE ${STM32CUBEREPO}/Middlewares/Third_Party/FreeRTOS/Source/include) file(GLOB_RECURSE USER_INCLUDE_F ${USER_INCLUDE}/*.h) file(GLOB_RECURSE CMSIS_DEVICE_INCLUDE_F ${CMSIS_DEVICE_INCLUDE}/*.h) file(GLOB_RECURSE CMSIS_INCLUDE_F ${CMSIS_INCLUDE}/*.h) file(GLOB_RECURSE HAL_INCLUDE_F ${HAL_INCLUDE}/*.h) file(GLOB_RECURSE USER_SOURCES Src/*.c) file(GLOB_RECURSE HAL_SOURCES ${STM32CUBEREPO}/Drivers/STM32F3xx_HAL_DRIVER/Src/*.c) file(GLOB_RECURSE CMSIS_SYSTEM ${STM32CUBEREPO}/Drivers/CMSIS/Device/ST/STM32F3xx/Source/Templates/system_STM32F3xx.c) file(GLOB_RECURSE CMSIS_STARTUP ${STM32CUBEREPO}/Drivers/CMSIS/Device/ST/STM32F3xx/Source/Templates/gcc/startup_STM32F303xC.s) set(SOURCE_FILES ${USER_SOURCES} ${HAL_SOURCES} ${CMSIS_SYSTEM} ${CMSIS_STARTUP} STM32F303VCTx_FLASH.ld ${USER_INCLUDE_F} ${CMSIS_DEVICE_INCLUDE_F} ${CMSIS_INCLUDE_F} ${HAL_INCLUDE_F}) include_directories(${USER_INCLUDE} ${CMSIS_DEVICE_INCLUDE} ${CMSIS_INCLUDE} ${HAL_INCLUDE} ${CMSIS_RTOS_INCLUDE} ${FREERTOS_INCLUDE}) add_executable(${PROJECT_NAME}.elf ${SOURCE_FILES}) set(CMAKE_EXE_LINKER_FLAGS "${CMAKE_EXE_LINKER_FLAGS} -Wl,-Map=${PROJECT_SOURCE_DIR}/build/${PROJECT_NAME}.map") set(HEX_FILE ${PROJECT_SOURCE_DIR}/build/${PROJECT_NAME}.hex) set(BIN_FILE ${PROJECT_SOURCE_DIR}/build/${PROJECT_NAME}.bin) add_custom_command(TARGET ${PROJECT_NAME}.elf PRE_BUILD COMMAND ${CMAKE_COMMAND} -E make_directory ${PROJECT_SOURCE_DIR}/build COMMENT "Creating build directory") add_custom_command(TARGET ${PROJECT_NAME}.elf POST_BUILD COMMAND ${CMAKE_OBJCOPY} -Oihex $<TARGET_FILE:${PROJECT_NAME}.elf> ${HEX_FILE} COMMAND ${CMAKE_OBJCOPY} -Obinary $<TARGET_FILE:${PROJECT_NAME}.elf> ${BIN_FILE} COMMENT "Building ${HEX_FILE} Building ${BIN_FILE}") add_custom_target(flash WORKING_DIRECTORY ${PROJECT_SOURCE_DIR} COMMAND openocd -f openocd_flash.cfg COMMENT "Flashing the target processor..." DEPENDS ${PROJECT_NAME}.elf) add_custom_command(TARGET flash POST_BUILD COMMENT "Flashing finished!") It is worth explaining why we need these dances with a tambourine. The fact is that during the creation of the project we chose the option "add libraries as links in the toolchain". But cubemx2cmake indicates the relative path to the HAL libraries, and also does not add a couple of paths to the CMSIS and FreeRTOS libraries. This will probably be fixed in future versions, but so far.
Now you need to reset the cache. Cmake: CTRL-SHIFT-P -> EasyClangComplete: Clean current cmake cache
Open Src / main.c Move the cursor to a function and rejoice in the pop-up windows with its description. More information about the operation of EasyClangComplete can be found here .
Let's try to format the code: press CTRL + ALT + F and enjoy how everything has changed. If you prefer a different style, no problem, the settings in Preferences -> SublimeAStyleFormatter .
Let's compile the project and see debug
Run SW4 and import the project:
- File -> Import ... -> General -> Existing projects into workspace
- Select root directory: / home / bulkin / workspace / STM32Discovery-SW4-Test
- Do not put the checkbox Copy projects into workspace
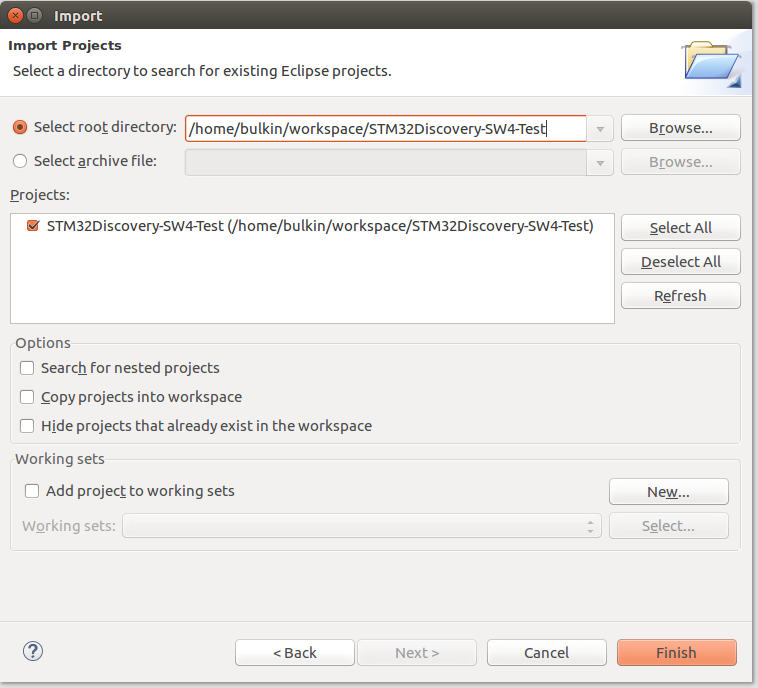
Click Finish.
We select the project in Project explorer . Compile Project -> Build Project . If everything was done without errors earlier, the project will be compiled in a few seconds. And in the console at the bottom will be something like this:
Generating binary and Printing size information: arm-none-eabi-objcopy -O binary "STM32Discovery-SW4-Test.elf" "STM32Discovery-SW4-Test.bin" arm-none-eabi-size "STM32Discovery-SW4-Test.elf" text data bss dec hex filename 8724 16 5040 13780 35d4 STM32Discovery-SW4-Test.elf 16:42:41 Build Finished (took 6s.173ms) We connect our board to the computer and try to download the firmware: Run -> Run as Ac6 STM32 C / C ++ Application . If all goes well, at the end of the console output will be:
wrote 10240 bytes from file Debug/STM32Discovery-SW4-Test.elf in 0.513113s (19.489 KiB/s) ** Programming Finished ** ** Verify Started ** STM32F303VCTx.cpu: target state: halted target halted due to breakpoint, current mode: Thread xPSR: 0x61000000 pc: 0x2000002e msp: 0x2000a000 verified 8748 bytes in 0.104648s (81.635 KiB/s) ** Verified OK ** ** Resetting Target ** Well, the most delicious. Run the debugger. Run -> Debug (or just press F11). SW4 will download the firmware and offer to open a separate perspective for the debugger. I advise you to agree.
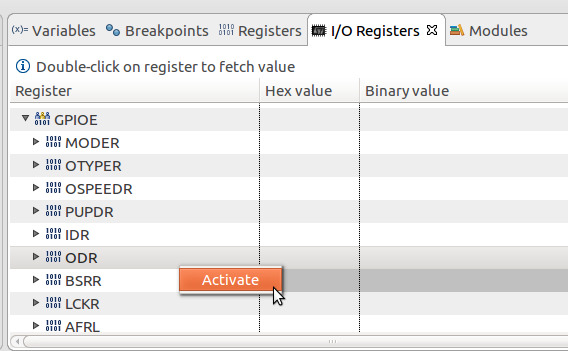
Initially, our program will be stopped at int main(void) {} , this is the default breakpoint. Run the program by pressing F8 to initialize all the settings of the MC, then stop by pressing the Suspend button in the top panel. Let's try to light the LEDs. In the upper right part of the perspective, open the I / O Registers tab, expand GPIO and right-click on GPIOE -> ODR -> Activate
Now let's look at STM32CubeMX in our project that the LEDs are on the legs of PE8 - PE15: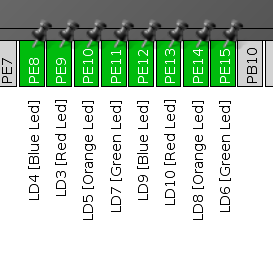
In the HEX Value column in the lines c GPIOE -> ODR -> ODR15 by GPIOE -> ODR -> ODR8, set 1 and enjoy the magic of how the LEDs on the board light up. Put 0 - go out.
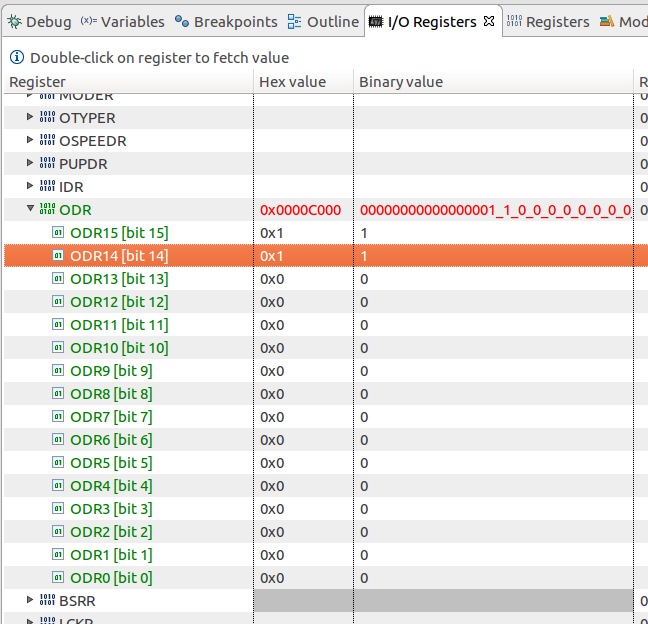
Unfortunately, such magic is possible only in the stopped state, unlike Keil uVision, there is no real-time here. (sad smiley)
It remains only to configure Git
Git setup
Go through the terminal in the directory with our project and initialize Git, including the input of personal data:
cd ~/workspace/STM32Discovery-SW4-Test git init git config --global user.email "nb******@yandex.ru" git config --global user.name "Nikita Bulaev" Create a .gitignore and add to it:
/Debug/ .metadata bin/ tmp/ *.tmp *.bak *.swp *~.nib local.properties .settings/ .loadpath .recommenders # External tool builders .externalToolBuilders/ # Locally stored "Eclipse launch configurations" *.launch # CDT-specific (C/C++ Development Tooling) .cproject # sbteclipse plugin .target # Tern plugin .tern-project # TeXlipse plugin .texlipse # STS (Spring Tool Suite) .springBeans # Code Recommenders .recommenders/ # Scala IDE specific (Scala & Java development for Eclipse) .cache-main .scala_dependencies .worksheet Well, let's make a commit:
git add * git commit -a -m "Initial commit" In general, further things go beyond the article on setting up the development environment. This is a complete description of debugging, and all sorts of hotkeys ST3. I would like to talk about this another time. I hope this article will be useful, although now setting up the environment has become much easier than a year ago. Good luck!
')
Source: https://habr.com/ru/post/343456/
All Articles