Internet of things: Arduino in conjunction with the cloud
In our century, many thought about creating their own startup. But to develop some interesting and useful product in-house is often difficult. Partly to save power, you can use the cloud. In particular, for projects of the Internet of things in the cloud, you can find a sufficient number of services. What is the “Internet of Things” and how can it be used productively? Read all about it under the cut.

Note: we continue the series of publications of the full versions of articles from the magazine Hacker. Spelling and punctuation of the author saved.
')
The Internet of Things is not just a smart home or a smart enterprise. Experts predict that in the near future, billions of devices will solve a variety of tasks in a wide variety of areas. Yes, they already solve many problems.
Let's take the most stereotypical task for example: a device equipped with a sensor sends data taken from this sensor to the cloud. The simplest example of a device that removes data from a light sensor (photoresistor) can be seen in the following photo:

You can power this device from the micro USB connector. Onboard the Genuino MKR1000 board is an integrated Wi-Fi module. The cost of the fee is about 35 USD. Replacing one sensor with another does not usually complicate the circuit. In it, as you can see, a resistor is used that stabilizes the captured signal and does not allow various interferences to affect it. But there are quite a lot of specialized literature about this. Now about the other.
Let's look at the following functional diagram of the device operation with the Azure cloud, which can be called typical:

On it, the device interacts with the IoT hub. IoT hub is translated into Russian as the Center for the Internet of Things. This name completely conveys its essence, since this service is used, as a rule, for interaction with devices. He can both receive data from devices and send them messages / commands.
In addition to the center, the Internet of things can interact with devices by another service called Event Hub. The biggest difference in these services is that IoT Hub can work with millions of devices, while the Event Hub works with thousands of devices, but it can receive millions of messages per second. The second big difference is that the IoT hub can send a command to the device, while the Event hub is not. In general, the IoT hub features more. But the event hub is early to retire. As already written, it has a very high throughput. Often, Event hubs are used in projects not to interact with devices, but as intermediate services.
A detailed comparison of the Azure IoT Center and Azure Event Hubs is available here .
IoT hub supports protocols such as MQTT, MQTT via WebSocket, AMQP, AMQP via WebSocket and HTTP. Event hub supports AMQP, AMQP via WebSocket and HTTP.
You can write code that generates a message according to the rules of the protocol and sends it, but it is better to use the SDK. Formation of a message using the HTTP protocol from the Arduino board I already discussed in this article .
This code works, but is far from ideal. In the same article, IoT hub configuration and device pairing were considered.
Now there are new features and let me consider using the SDK and re-examine the configuration of the hub in a slightly different way. In addition, consider the configuration of other Azure IoT services.
We create IoT hub on one device. When using a single device, the IoT hub can be used for free. Name hubu invent any arbitrary.
Hint: IoT hub has the ability to receive files from the device. This feature is sometimes used as a legal hack. Data from multiple devices is transferred to one master device, which already saves it to a text file of a specific format and sends it to the cloud.

Now we need to create a virtual device in the Azure cloud that will fit our real device. In English, this device is called a device-twin, which means a device twin.
Previously, it was possible to create such a device using the Windows desktop utility Device Explorer. You can download it via the following link , finding the most recent SetupDeviceExplorer.msi
Now you do not need to bother and you can create a device twin directly on the Azure portal by finding the Device Explorer hub settings.

By clicking on the created device in Device Explorer, you can open device information. From them it is necessary to take the connection string - the primary key. We will use it in the Arduino code.
The Azure IoT hub uses two options as an authentication: SSL + SAS or SSL + X.509 certificate. But Arduino resources are only enough for the first option. Still, this device with low power consumption and does not have large enough computational capabilities.
It turns out that in any case we need to flash our board with an SSL certificate.
You can do this with the help of the cross-platform utility WiFi101 Firmware Updater or with the help of the functionality built into the Arduino IDE.
But before that, you need to make several preparatory activities in the Arduino IDE.
Install the WiFi101 library


After its installation, the IDE will show examples of using this library. One of these examples, called FirmwareUpdater, needs to be opened and written to the board. First, open:

Then we install and select our board (boards for IoT are not included in the IDE package by default).
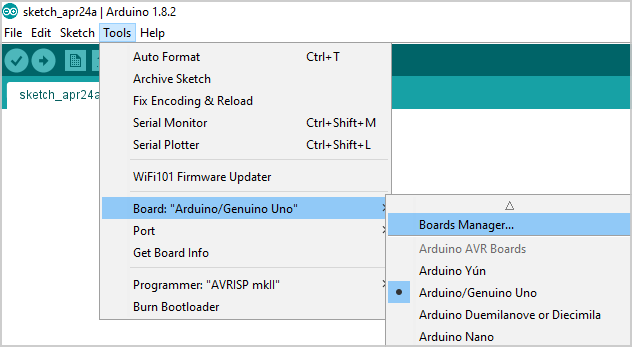
Open the board manager and look for the necessary board. In my case, this is the MKR1000.

After installation in the same menu item, you must mark the card used.
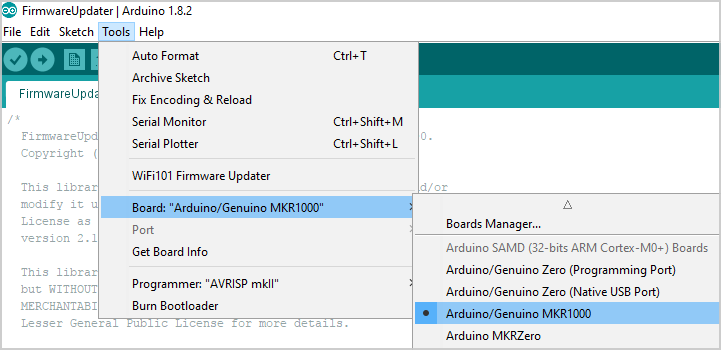
And choose the port on which it is located:

Consecutive clicks on the Sketch - Upload menu will upload a sketch to the board. Now you can flash.
The first option is to open the Tools menu in IDE - WiFi101 FirmwareUpdater, click Add domain and add the hub IoT URL.

After that click "Upload Certificates to WiFi module".
Or open a separate utility, WiFi101 Firmware Updater, enter the address of the hub (in my case, ArduinoAzureHub.azure-devices.net) in the upper text field and click the Fetch button.
The certificate will be downloaded to the computer. After that, you need to select the COM port to which the device is connected and click the Upload certificates button that appears.

We install the following libraries in the same way as we recently installed the WiFi101 library:
Download the source code and in the
In the file
The sketch code becomes working and can be loaded into the Arduino.
The following code describes the model:
An example is, of course, only the starting point for your project. Template that can be changed to your requirements. I prefer to delete the created Actions and create my own. My gist stub is posted on github .
I have a model with two fields that store the device name and a number taken from the sensor and one event:
The action code in my case is:
It enables or disables the LED, depending on whether the value of the light parameter is an integer 1 or 0.
Triggers an event if you send the following JSON to the board:
If you find the following variable in the code:
In the
Here, with analog pin number 1 connected to the Arduino every second data is taken. This data is sent to the cloud as a string deviceId (device name) and the data itself as an integer iotdata.
Let us, for example, save the data in the SQL Server database. Azure supports many data formats, but I think that SQL Server is the most popular format. Although for storage of JSON data in large volumes, the NOSQL format would be more suitable. SQL Server database prices start at $ 5 per month. That is, for this money you can get quite a functional cloud base of 2 Gb in size.
Since the database creation manual is quite voluminous, but there are no special nuances, I’ll leave a link to the official manuals: creating an Azure SQL database on the Azure portal and creating a table in the database using SQL Server Data Tools .
Often, if you already have Visual Studio installed, then nothing else needs to be installed.
The easiest way to open a database for editing is to select View - Server Explorer in the Visual Studio menu. Here you can connect to your Azure subscription and open the database in the SQL Server Object Explorer.

Well, already in this window you can create a table.

One point that must be mentioned. By default, access to SQL Servery in Azure and, accordingly, its database is closed from all IP addresses for security reasons. That is, even knowing the username and password to the database can not connect. You need to go to the Azure portal and add the current IP to the list of allowed.

The joke about the fact that in the IoT letter S is responsible for Security, in this case does not work.
The second most popular Azure service for the Internet of Things is Stream Analytics. If we want to save data from the IoT hub to the database, then we need this service.
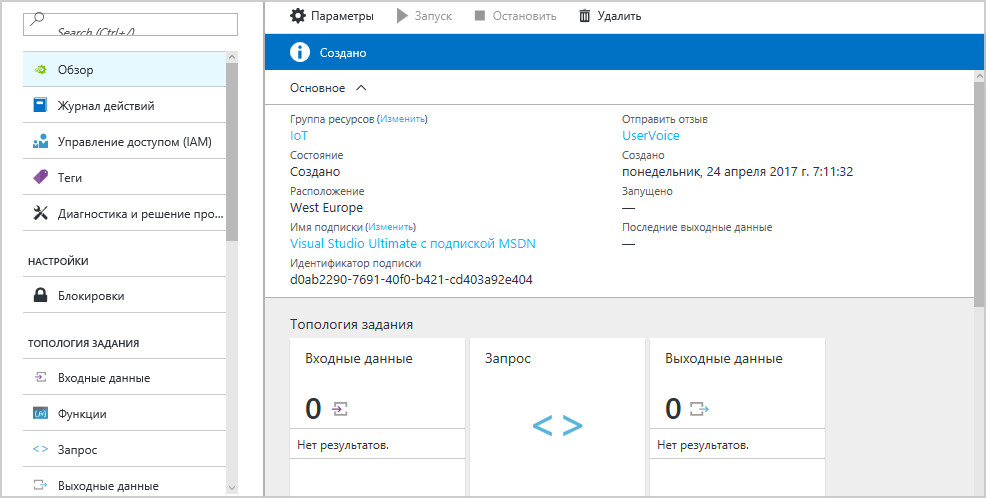
It is created very simply. It is enough to come up with a name and select a resource group with a region.
The result is a window like this:
Clicking on the square with the input data we can come up with an alias for the input data and fill in the questionnaire in which we specify our IoT hub as a source.

And you need to similarly adjust the output by clicking on the box with them:

Now you can create a request that will transfer data from the IoT hub to the database. This is the box between the input and output data. In my example, the query is quite simple:
SELECT
iotdata, deviceId, System.Timestamp as eventtime
INTO dataout
FROM
indata
As you can see, the query language is quite similar to SQL. In this case, both in the database and in the Arduino code there are fields iotdata (integer) and deviceId (string). In addition, a datetime eventtime field has been created in the database. And this field records the time at the time of the move from the incoming source to the receiver.
By downloading and installing the free Power BI utility, you can connect to the SQL Server database and get a presentation of this data as a graph or diagram. The utility itself is no more complicated than Excel. Although the title and contains serious words. BI stands for Business Intelligence.
Next, a small manual in the explanations and screenshots.
“Receive data” button - “Additional details ...”


Enter the address of our server and the name of the database. This data is set when creating a SQL Server database.

As well as the username and password to access the database.

Select the required table.

And as a result, we can get a similar schedule.

As a result, we got an example of how you can get access to data taken from the board while at the same time anywhere in the world. If you wish, you can not only receive data from the device, but also send data / commands to it.
IoT cloud technologies allow you to create projects with a minimum of programming. Most of the time it takes administration and configuration.
There are a lot of different examples of local projects created on the Arduino platform, and on other platforms. But if the device is available only via wi-fi or Bluetooth, then this rather limits the tasks performed. The future is the Internet of things.
We remind you that this is the full version of an article from Hacker magazine . Its author is Alexey Sommer .
Note: we continue the series of publications of the full versions of articles from the magazine Hacker. Spelling and punctuation of the author saved.
')
The Internet of Things is not just a smart home or a smart enterprise. Experts predict that in the near future, billions of devices will solve a variety of tasks in a wide variety of areas. Yes, they already solve many problems.
Let's take the most stereotypical task for example: a device equipped with a sensor sends data taken from this sensor to the cloud. The simplest example of a device that removes data from a light sensor (photoresistor) can be seen in the following photo:
You can power this device from the micro USB connector. Onboard the Genuino MKR1000 board is an integrated Wi-Fi module. The cost of the fee is about 35 USD. Replacing one sensor with another does not usually complicate the circuit. In it, as you can see, a resistor is used that stabilizes the captured signal and does not allow various interferences to affect it. But there are quite a lot of specialized literature about this. Now about the other.
Let's look at the following functional diagram of the device operation with the Azure cloud, which can be called typical:
On it, the device interacts with the IoT hub. IoT hub is translated into Russian as the Center for the Internet of Things. This name completely conveys its essence, since this service is used, as a rule, for interaction with devices. He can both receive data from devices and send them messages / commands.
In addition to the center, the Internet of things can interact with devices by another service called Event Hub. The biggest difference in these services is that IoT Hub can work with millions of devices, while the Event Hub works with thousands of devices, but it can receive millions of messages per second. The second big difference is that the IoT hub can send a command to the device, while the Event hub is not. In general, the IoT hub features more. But the event hub is early to retire. As already written, it has a very high throughput. Often, Event hubs are used in projects not to interact with devices, but as intermediate services.
A detailed comparison of the Azure IoT Center and Azure Event Hubs is available here .
IoT hub supports protocols such as MQTT, MQTT via WebSocket, AMQP, AMQP via WebSocket and HTTP. Event hub supports AMQP, AMQP via WebSocket and HTTP.
You can write code that generates a message according to the rules of the protocol and sends it, but it is better to use the SDK. Formation of a message using the HTTP protocol from the Arduino board I already discussed in this article .
This code works, but is far from ideal. In the same article, IoT hub configuration and device pairing were considered.
Now there are new features and let me consider using the SDK and re-examine the configuration of the hub in a slightly different way. In addition, consider the configuration of other Azure IoT services.
Creating an IoT hub
We create IoT hub on one device. When using a single device, the IoT hub can be used for free. Name hubu invent any arbitrary.
Hint: IoT hub has the ability to receive files from the device. This feature is sometimes used as a legal hack. Data from multiple devices is transferred to one master device, which already saves it to a text file of a specific format and sends it to the cloud.
Creating a device-twin and getting SAS
Now we need to create a virtual device in the Azure cloud that will fit our real device. In English, this device is called a device-twin, which means a device twin.
Previously, it was possible to create such a device using the Windows desktop utility Device Explorer. You can download it via the following link , finding the most recent SetupDeviceExplorer.msi
SetupDeviceExplorer.msi or using the iothub-explorer cross-platform utility, which can be installed using NPM (Node.js Package Manager).Now you do not need to bother and you can create a device twin directly on the Azure portal by finding the Device Explorer hub settings.
By clicking on the created device in Device Explorer, you can open device information. From them it is necessary to take the connection string - the primary key. We will use it in the Arduino code.
Firmware Arduino SSL certificate
The Azure IoT hub uses two options as an authentication: SSL + SAS or SSL + X.509 certificate. But Arduino resources are only enough for the first option. Still, this device with low power consumption and does not have large enough computational capabilities.
It turns out that in any case we need to flash our board with an SSL certificate.
You can do this with the help of the cross-platform utility WiFi101 Firmware Updater or with the help of the functionality built into the Arduino IDE.
But before that, you need to make several preparatory activities in the Arduino IDE.
Install the WiFi101 library
After its installation, the IDE will show examples of using this library. One of these examples, called FirmwareUpdater, needs to be opened and written to the board. First, open:
Then we install and select our board (boards for IoT are not included in the IDE package by default).
Open the board manager and look for the necessary board. In my case, this is the MKR1000.
After installation in the same menu item, you must mark the card used.
And choose the port on which it is located:
Consecutive clicks on the Sketch - Upload menu will upload a sketch to the board. Now you can flash.
The first option is to open the Tools menu in IDE - WiFi101 FirmwareUpdater, click Add domain and add the hub IoT URL.
After that click "Upload Certificates to WiFi module".
Or open a separate utility, WiFi101 Firmware Updater, enter the address of the hub (in my case, ArduinoAzureHub.azure-devices.net) in the upper text field and click the Fetch button.
The certificate will be downloaded to the computer. After that, you need to select the COM port to which the device is connected and click the Upload certificates button that appears.
Writing a sketch and using the Azure IoT library for the Arduino
We install the following libraries in the same way as we recently installed the WiFi101 library:
- AzureIoTHub
- AzureIoTUtility
- AzureIoTProtocol_HTTP
- RTCZero
Download the source code and in the
examples folder we find the project simplesample_http , in which you can find the code for samd (Atmel SAMD Based boards).In the file
iot_configs.h c, we assign to the value IOT_CONFIG_CONNECTION_STRING value of the connection string that we received in the Azure portal. Fill in the values IOT_CONFIG_WIFI_SSID and IOT_CONFIG_WIFI_PASSWORD respectively with the name of your Wi-Fi access point and its password.The sketch code becomes working and can be loaded into the Arduino.
The following code describes the model:
DECLARE_MODEL(ContosoAnemometer, WITH_DATA(ascii_char_ptr, DeviceId), WITH_DATA(int, WindSpeed), WITH_DATA(float, Temperature), WITH_DATA(float, Humidity), WITH_ACTION(TurnFanOn), WITH_ACTION(TurnFanOff), WITH_ACTION(SetAirResistance, int, Position) ); WITH_DATA describes the data that can be sent from the device. WITH_ACTION describes events that can occur when a device WITH_ACTION some commands.An example is, of course, only the starting point for your project. Template that can be changed to your requirements. I prefer to delete the created Actions and create my own. My gist stub is posted on github .
I have a model with two fields that store the device name and a number taken from the sensor and one event:
BEGIN_NAMESPACE(IoTSample); DECLARE_MODEL (LightSensorDataModel, WITH_DATA(ascii_char_ptr, deviceId), WITH_DATA(int, iotdata), WITH_ACTION(DuckAction, int, light) ); END_NAMESPACE(IoTSample); The action code in my case is:
EXECUTE_COMMAND_RESULT DuckAction(LightSensorDataModel* device, int light) { digitalWrite(2, light); return EXECUTE_COMMAND_SUCCESS; } It enables or disables the LED, depending on whether the value of the light parameter is an integer 1 or 0.
Triggers an event if you send the following JSON to the board:
{"Name" : "DuckAction", "Parameters" : {"light":1}} If you find the following variable in the code:
unsigned int minimumPollingTime = 9; , then you can change the delay for polling new messages. In other words, how often the device checks for new messages for it. The value is in seconds.In the
void simplesample_http_run(void) code, I add the following code: while (1) { myIoTdata->deviceId = "ArduinoAzureTwin"; myIoTdata->iotdata = analogRead(1); unsigned char* destination; size_t destinationSize; if (SERIALIZE(&destination, &destinationSize, myIoTdata->deviceId, myIoTdata->iotdata) != CODEFIRST_OK) { (void)printf("Failed to serializern"); } else { sendMessage(iotHubClientHandle, destination, destinationSize); } IoTHubClient_LL_DoWork(iotHubClientHandle); ThreadAPI_Sleep(1000); } DESTROY_MODEL_INSTANCE(myIoTdata); Here, with analog pin number 1 connected to the Arduino every second data is taken. This data is sent to the cloud as a string deviceId (device name) and the data itself as an integer iotdata.
Connect other Azure services
Let us, for example, save the data in the SQL Server database. Azure supports many data formats, but I think that SQL Server is the most popular format. Although for storage of JSON data in large volumes, the NOSQL format would be more suitable. SQL Server database prices start at $ 5 per month. That is, for this money you can get quite a functional cloud base of 2 Gb in size.
Since the database creation manual is quite voluminous, but there are no special nuances, I’ll leave a link to the official manuals: creating an Azure SQL database on the Azure portal and creating a table in the database using SQL Server Data Tools .
Often, if you already have Visual Studio installed, then nothing else needs to be installed.
The easiest way to open a database for editing is to select View - Server Explorer in the Visual Studio menu. Here you can connect to your Azure subscription and open the database in the SQL Server Object Explorer.
Well, already in this window you can create a table.
One point that must be mentioned. By default, access to SQL Servery in Azure and, accordingly, its database is closed from all IP addresses for security reasons. That is, even knowing the username and password to the database can not connect. You need to go to the Azure portal and add the current IP to the list of allowed.
The joke about the fact that in the IoT letter S is responsible for Security, in this case does not work.
Stream analytics
The second most popular Azure service for the Internet of Things is Stream Analytics. If we want to save data from the IoT hub to the database, then we need this service.
It is created very simply. It is enough to come up with a name and select a resource group with a region.
The result is a window like this:
Clicking on the square with the input data we can come up with an alias for the input data and fill in the questionnaire in which we specify our IoT hub as a source.
And you need to similarly adjust the output by clicking on the box with them:
Now you can create a request that will transfer data from the IoT hub to the database. This is the box between the input and output data. In my example, the query is quite simple:
SELECT
iotdata, deviceId, System.Timestamp as eventtime
INTO dataout
FROM
indata
As you can see, the query language is quite similar to SQL. In this case, both in the database and in the Arduino code there are fields iotdata (integer) and deviceId (string). In addition, a datetime eventtime field has been created in the database. And this field records the time at the time of the move from the incoming source to the receiver.
Power BI
By downloading and installing the free Power BI utility, you can connect to the SQL Server database and get a presentation of this data as a graph or diagram. The utility itself is no more complicated than Excel. Although the title and contains serious words. BI stands for Business Intelligence.
Next, a small manual in the explanations and screenshots.
“Receive data” button - “Additional details ...”
Enter the address of our server and the name of the database. This data is set when creating a SQL Server database.
As well as the username and password to access the database.
Select the required table.
And as a result, we can get a similar schedule.
Conclusion
As a result, we got an example of how you can get access to data taken from the board while at the same time anywhere in the world. If you wish, you can not only receive data from the device, but also send data / commands to it.
IoT cloud technologies allow you to create projects with a minimum of programming. Most of the time it takes administration and configuration.
There are a lot of different examples of local projects created on the Arduino platform, and on other platforms. But if the device is available only via wi-fi or Bluetooth, then this rather limits the tasks performed. The future is the Internet of things.
We remind you that this is the full version of an article from Hacker magazine . Its author is Alexey Sommer .
Source: https://habr.com/ru/post/343450/
All Articles