Tutorial: create a simple application for watchOS 4
In this tutorial, we will create a simple, but full-featured application under watchOS 4. More specifically, we will work on an application created by Air Aber for Apple Watch.
From this tutorial you will learn:
- How to add a watchOS 4 target assembly to an iOS application.
- How to exchange data between two target assemblies.
- How to add a watchOS interface controller to Storyboard and arrange interface objects.
- How to create a subclass of
WKInterfaceControllerand put everything together. - How to add a new interface controller, add a table to it and create a prototype of the rows.
- How to create a subclass of the
WKInterfaceControllerclass to populate a table, customize rows, and handle choices. - How to make an interface controller modal and pass it data for display.
- How to create animations based on images.
- How to use watchOS 4 animation animation.
Part 1: getting started
From this part you will learn:
')
- How to add a watchOS 4 target assembly to an iOS application.
- How to exchange data between two target assemblies.
- How to add a watchOS interface controller to Storyboard and arrange interface objects.
- How to create a subclass of
WKInterfaceControllerand put everything together.
Getting started
We'll start by downloading the initial project for this tutorial.
Open it in Xcode, build and run. You should see a blank white screen:
As you can see, so far there is quite a few things in this project: there are several necessary auxiliary files in it, and that's it. We will solve this problem soon!
Add the WatchKit app
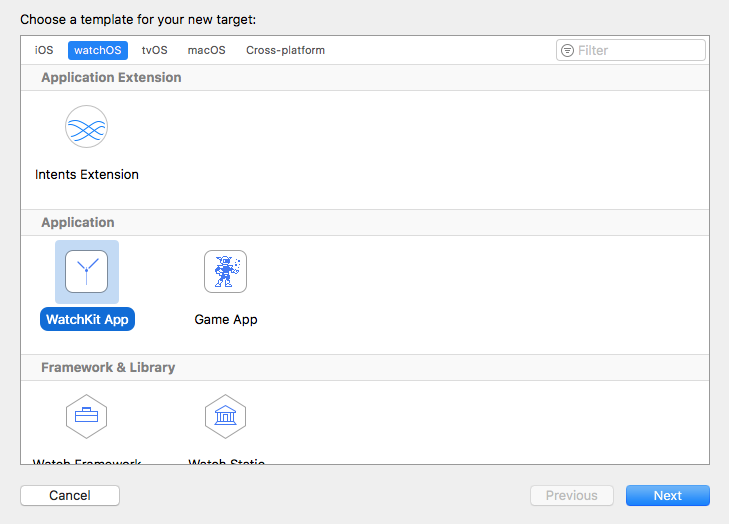
Select File \ New \ Target .... In the dialog that opens, select watchOS \ Application \ WatchKit App , then click Next :
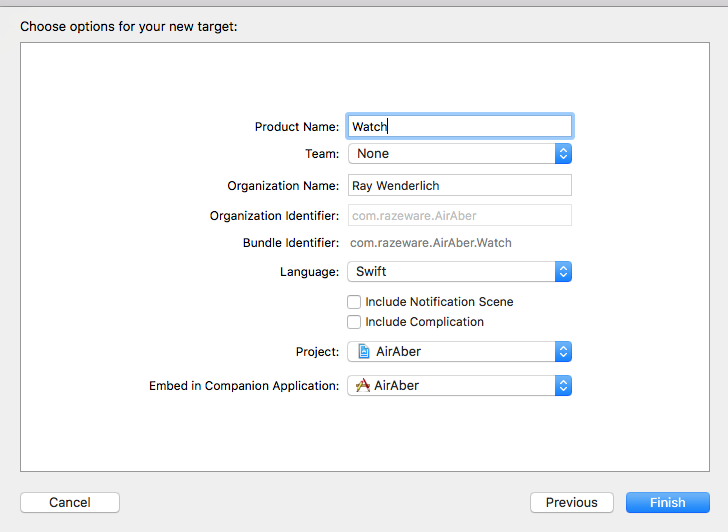
On the next screen, enter the word Watch as the Product Name , make sure that Swift is selected in the Language field and uncheck all the checked boxes. Click Finish :
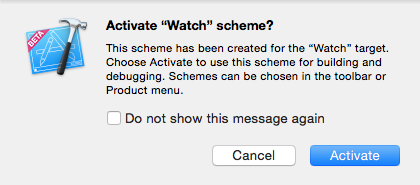
The system will ask if you need to activate the “watch” scheme - we will need it, so select Activate :
Congratulations, you have just created your first Watch! Everything is really that simple.
You may notice that this action actually created two target assemblies, rather than one, and two corresponding groups in the Project navigator. This happened because the Watch app code is actually executed as the Extension enclosed within the Watch app, much like the Today Extension works in iOS.
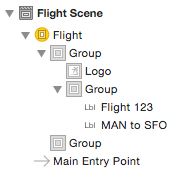
Expand the Watch and Watch Extension groups in the Project navigator, and you will see that the storyboard is in the Watch group, and the classes created by the target assembly template are in the Watch Extension group:

This is what order we will follow in our work: any added code must be stored within the Watch Extension group , and added to the Watch Watch target assembly, while any resources or storyboard should be added to the Watch group.
Tidy up a bit
Before proceeding, we need to remove a couple of elements added by the target assembly template that we are going to replace.
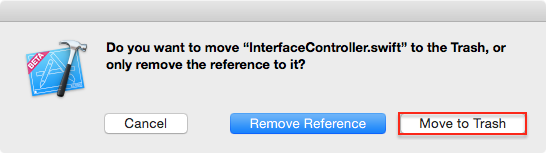
Right-click on InterfaceController.swift in the Project navigator and select Delete . In the dialog box, select Move to Trash so that the file is actually removed from the project:
Next, open Interface.storyboard , select the only interface controller there and click delete . As a result, you should have an empty storyboard, or, as I prefer to perceive it, an empty canvas.
General data and code
In the initial project, there is a JSON file containing all information about Air Aber flights, and a model class representing this data. This is what should be common between target assemblies, because there is a high probability that the iOS application and the Watch application will use the same class of models and data - remember the DRY principle?
Expand the Shared group in the Project navigator and select Flights.json . Then find the Target Membership section in File inspector and check the Watch Extension box:
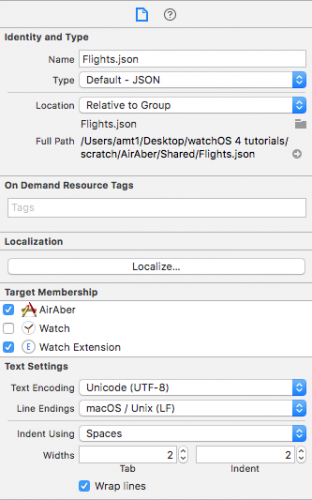
The file will now be included in both AirAber and Watch Extension .
Repeat the process for another file in the Shared group - Flight.swift .
And having finished with this, we can finally start creating the flight information interface!
Interface creation
Open Watch \ Interface.storyboard and drag the interface controller from the Object Library onto the storyboard canvas. With the interface controller selected, open Attributes inspector, set the Identifier to Flight and select the Is Initial Controller check box. Deselect the Activity Indicator On Load check box:
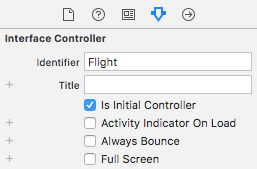
So we set the identifier so that you can access the interface controller in the code. By ticking the Is Initial Controller checkbox, we just let WatchKit know that this interface controller needs to be displayed when the Watch application is launched for the first time. This interface does not download any data, so it does not need to show an activity indicator.
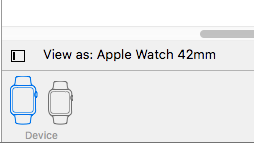
To simplify this tutorial, we will create an interface circuit only for 42 mm watches. In your own applications you will need to check whether it is displayed correctly on all sizes of watches. In the lower left corner of the storyboard panel should be selected View as: Apple Watch 42mm .
The layout of the Watch app is completely different from the iOS layout. The first thing you'll notice: you can move or modify UI objects by dragging and dropping them in the interface controller. When you drag an object to the controller, it is located under the previous objects and the screen fills up pretty quickly. To arrange objects in a row, you need to use groups that are in many ways similar to the Stack View in iOS and macOS.
So, first, drag the group from the Object Library to the interface controller:
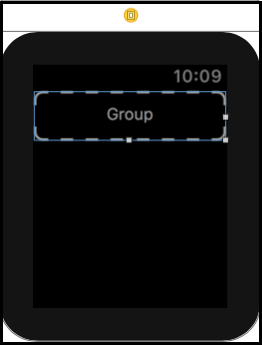
Although this does not look very impressive so far, this group will contain the Air Aber logo, flight number and flight route in the future.
Select a new group, go to Attributes inspector and change Insets to Custom . Four text fields appear in which you can manually set the indents of the group.
Change the Top value to 6 :
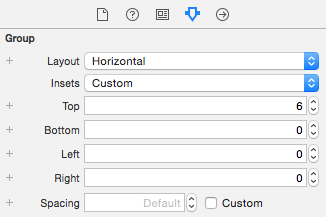
So we just add a little more padding from the top.
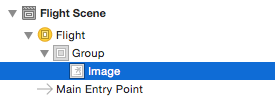
Next, drag to the image group. If the group responds to changing the top indent by folding ( thanks, Xcode! ), Then drag the image directly into the Document Outline and make sure that it becomes a child of the group, not the next:
Now we need a displayed image. Download this logo and drag it into Watch \ Assets.xcassets . In this case, a new set of images will be created, in which our picture will occupy the 2x slot:
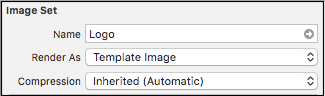
I want to give this image a tint of Air Aber's corporate color, so we’ll select an image, then change the Render As value to Template Image .
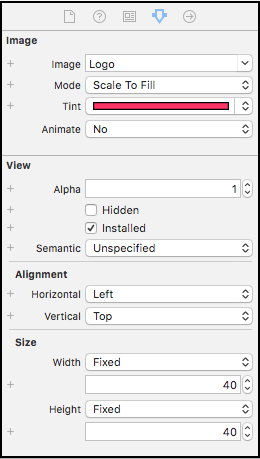
Open Watch \ Interface.storyboard again and select image . Using the Attributes inspector, make the following changes:
- Change the Image value to Logo - if it is not displayed in the drop-down menu, just type it from the keyboard.
- Change the Tint value to # FA114F (you can enter it in the Color RGB Sliders panel).
- Change the Width parameter to Fixed with a value of 40 .
- Change the Height parameter to Fixed with a value of 40 .
Attributes inspector should look like this:
Don't worry if you don’t see the logo: it looks like Xcode doesn’t change the hue of the image templates during development! Believe me, it will be bright pink after building and running the application.
Next, drag another group to the created group and check that it appears to the right of the image, and then use the Attributes inspector to change its Layout to Vertical . Also, change Spacing to Custom \ 0 , and Width to Size to Fit Content .
Then drag two labels to the new group. We set the vertical position, so the labels will appear one above the other:

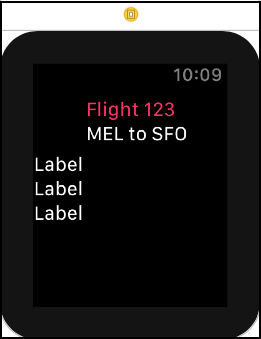
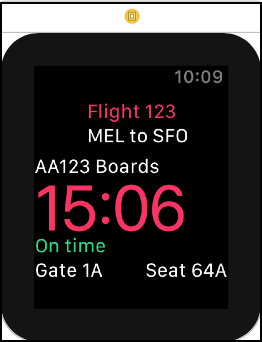
Select the top label and use Attributes inspector to enter the Flight 123 value in the Text field and change the Text Color to # FA114F (instead of re-entering the RGB panel, you can choose a pink color from the Recently Used Colors list of the Color menu).
Then select the bottom label and enter the text MEL to SFO in the Text field. Now the interface controller should look like this:
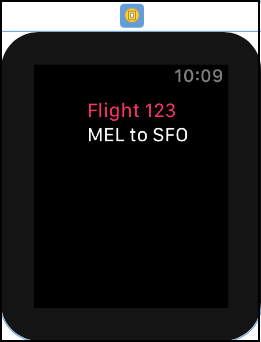
This text is temporary, it will be replaced when we connect the interface to the controller class.
Next, drag another group onto the interface controller, but this time make sure to add it as a neighboring element of the very first group. If you are unable to correctly arrange the group in the hierarchy, then use Document outline.
By selecting this new group, set the Layout to Vertical , and the Spacing to Custom \ 0 .
Then drag three labels to this new group:
Check in Document outline that all three labels are inside the group, not next to it!
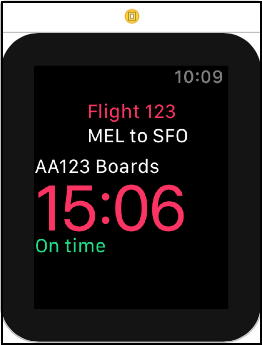
Select the top label and change the Text value in the Attributes inspector to AA123 Boards .
Then select the middle label and replace it with Text at 15:06 . Next, change the Text Color to # FA114F , and Font - to System , setting the Style to Regular , and selecting Size equal to 54 . Finally, change Height to Fixed with a value of 44 .
Select the bottom label and replace it with Text for On time , and Text Color with # 04DE71 .
Now the interface controller should look like this:
Now we just need to add another group, and then proceed to create the Outlet class fields so that this interface displays real data.
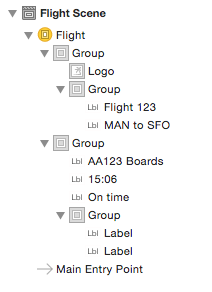
Drag the new group from the Object Library to the lower group, this time it should be a child and be at the very bottom of the containing group. Next, add two labels to it . Now the complete hierarchy of interface objects should look like this:
In the Attributes inspector for the Text of the left label, set the value to Gate 1A . For the right label, set Text to Seat 64A and select the Right option for Horizontal Alignment .
Now the finished interface should look like this:
Congratulations, you’ve finished creating the interface layout for your first Watch! Now you need to fill it with real data and run the application in the simulator.
Creating a controller
Right-click on the Watch Extension group in the Project navigator and select New File .... In the dialog that opens, select watchOS \ Source \ WatchKit Class and click Next . Name the new class FlightInterfaceController and check that it is a subclass of
WKInterfaceController , and Language is set to Swift :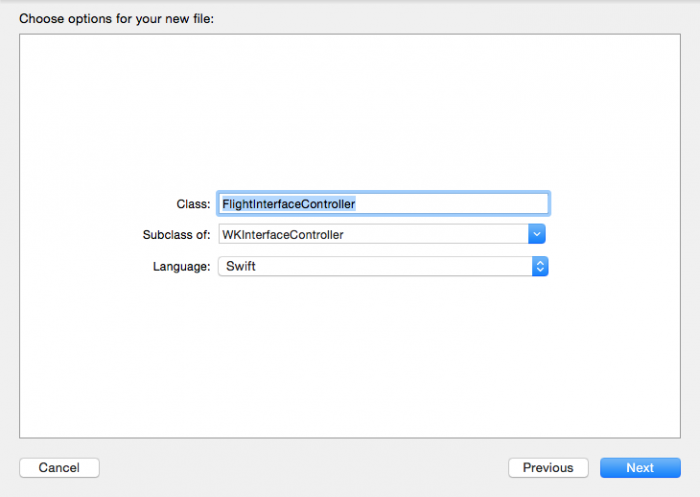
Click Next and then Create .
When the new file opens in the code editor, remove the three empty method stubs, and all you need is the import statement and the class definition.
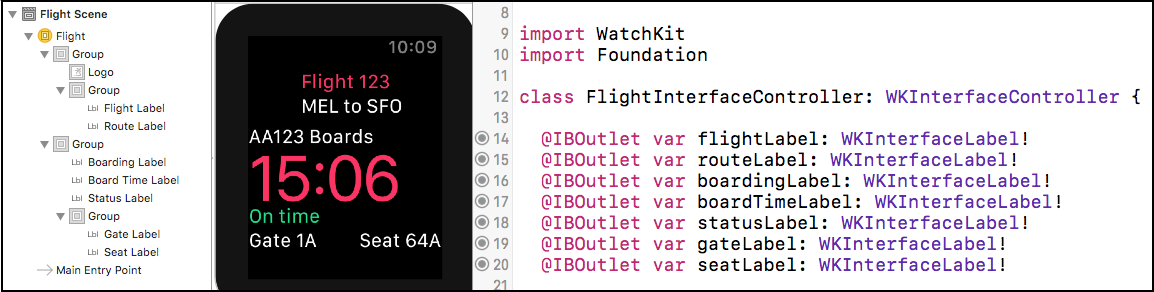
Add the following Outlet fields to the
FlightInterfaceController above: @IBOutlet var flightLabel: WKInterfaceLabel! @IBOutlet var routeLabel: WKInterfaceLabel! @IBOutlet var boardingLabel: WKInterfaceLabel! @IBOutlet var boardTimeLabel: WKInterfaceLabel! @IBOutlet var statusLabel: WKInterfaceLabel! @IBOutlet var gateLabel: WKInterfaceLabel! @IBOutlet var seatLabel: WKInterfaceLabel! Here we just added an outlet for each label we previously placed on the interface. Soon we will connect them.
Then add the following property and Property observer under the outlet fields:
// 1 var flight: Flight? { // 2 didSet { // 3 guard let flight = flight else { return } // 4 flightLabel.setText("Flight \(flight.shortNumber)") routeLabel.setText(flight.route) boardingLabel.setText("\(flight.number) Boards") boardTimeLabel.setText(flight.boardsAt) // 5 if flight.onSchedule { statusLabel.setText("On Time") } else { statusLabel.setText("Delayed") statusLabel.setTextColor(.red) } gateLabel.setText("Gate \(flight.gate)") seatLabel.setText("Seat \(flight.seat)") } } Here is what happens at each stage:
- We declared a helper property of type
Flight. This class is declared in Flight.swift , which is part of a common code previously added to the Watch Watch target configuration. - We added Property observer, which is performed when setting the property.
- We verify that the auxiliary property actually contains the flight, not
nil. We can continue to configure labels only if we know that we have the correct instance ofFlight. - We configure tags using the appropriate
flightproperties. - If the flight is delayed, then we change the text color in the label to red.
Now we need to set the
flight when the controller is first displayed. Add the following lines below the declaration of the flight : override func awake(withContext context: Any?) { super.awake(withContext: context) flight = Flight.allFlights().first } In the next section, we will modify this implementation to use the context passed to it, but for now we just load all the flights from the common JSON file, and then take the first one from the array.
Note :
awake(withContext:) is called after the controller is loaded from the storyboard and all its Outlet fields are configured, so this is a great place to set the flight .There is only one last step left before we can build and run the application, and this step is connecting the Outlet fields.
Connecting Outlet Fields
Open Watch \ Interface.storyboard and select an interface controller. Using the Identity inspector, set the Custom Class \ Class value to FlightInterfaceController .
Then connect the Outlet fields according to the list below:
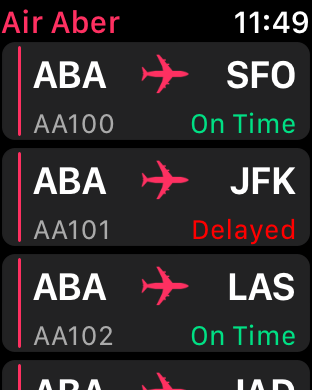
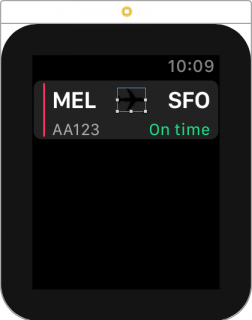
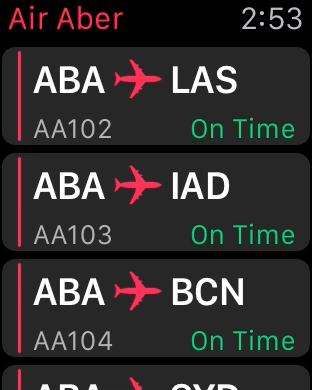
flightLabel: Flight 123routeLabel: MEL to SFOboardingLabel: AA123 BoardsboardTimeLabel: 15:06statusLabel: On timegateLabel: Gate 1AseatLabel: Seat 64A
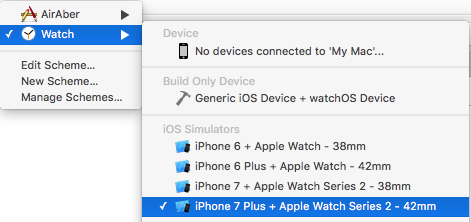
Before you start the application, we have only one thing left to do. An example of the application that we developed in this tutorial was created for the 42-millimeter Apple Watch, so you need to make sure that the correct simulator is configured, otherwise the interface may look a bit distorted. In these applications, developers test the operation of the interfaces on all sizes of clocks, but this does not apply to the topic of this tutorial.
Open the Watch schematic menu and select one of the simulators of the 42-millimeter clock:
Build and run the application. After the simulator download is completed, you should see the correct location of the interface and the pink Air Aber logo. The
Flight object generates random values for landing times and seat numbers, so here you will see other values:
Note : If you receive a message about the installation failure, you can either try to repeat the process in Xcode, or manually install the application in the clock simulator. To do this, open the Watch app in the iOS simulator, touch AirAber , and then switch Show App on Apple Watch to On . After that, you can return to the clock simulator, touch the Digital Crown to go to the main screen, and then touch the AirAber icon to launch the application.
Congratulations! You have completed the implementation of your first WatchKit interface, and it works with real data in the clock simulator - great job!
Here is a ready-made example of what we did in this part of the tutorial.
Part 2: Tables
In the first part of the tutorial, we learned about the fundamentals of development for watchOS 4, creating our first interface controller.
In the second part of the series, we will add a table so that the application can display the list of flights.
In the process, you will learn:
- How to add a new interface controller, add a table to it and create a prototype of the rows.
- How to create a subclass of the
WKInterfaceControllerclass to populate a table, customize rows, and handle choices. - How to make an interface controller modal and pass it data for display.
Getting Started
Open Watch \ Interface.storyboard and drag another interface controller from the Object Library onto the storyboard, to the left of the Flight controller that is already in place.
With the new interface controller selected, open the Attributes inspector and make the following changes:
- Set the Identifier to Schedule .
- In Title, enter Air Aber .
- Check the Is Initial Controller checkbox.
- Make sure the checkbox for Activity Indicator On Load is checked.
As in the Flight controller, we specify an identifier so that you can access this interface controller in code. This is the real starting controller for the Watch application, so you need to set a title for it and check the box. This controller loads a table from some data source, so we show an activity indicator.
Now go to the interface: drag the table from the Object Library to the new interface controller:
Select Table Row Controller in Document outline:

Use the Attributes inspector to set the Identifier to a FlightRow value. The identifier is also the type of the string, when we inform the table which instances of the rows need to be created, so it is important to give it a name.
Creating a string interface
The row of the table is actually a group, so you can give it a configuration of any complexity.
Our first task is to make two changes to the default configuration group. In Document outline, select a group within the table row, then use the Attributes inspector to set Spacing to 6 , and Height to Size To Fit Content .
By default, table rows have a standard fixed height. However, most often we need the strings to display all the interface objects added to them, so you should always change the Height attribute this way.
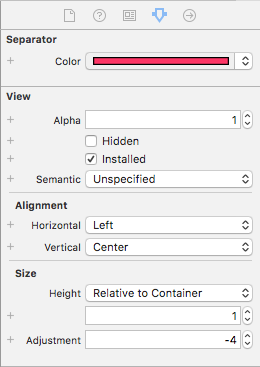
Then drag separator from the Object Library into the group row of the table. In fact, we will not divide anything, but simply give the row to the table a small visual touch. With the separator selected, use the Attributes inspector to make the following changes:
- Set the Color value to # FA114F (the previously used pink color Air Aber).
- Set the Vertical Alignment to Center .
- Set the Height to Relative to Container .
- Set the Adjustment to –4 .
The inspector should now look like this:
The row of the table suddenly grew and filled the entire screen! But we will fix this in the configuration process of the string.
Drag the group from the Object Library onto the table row to the right of the separator. With the group selected, change the following attributes in the Attributes inspector:
- Set the Layout value to Vertical .
- Set Spacing to 0 .
- Set the Width to Size To Fit Content .
You may have noticed that we often manipulate the Spacing attribute; it simply narrows the space between the group's interface objects, and makes everything a little clearer on a small screen.
Drag another group to the newly added group and make the following changes:
- Set Spacing to 4.
- Select for Height the option Fixed with value 32 .
Now the table line has returned to normal height!
Then add label and image to this new group. We will configure the label, and then copy and update it to display the starting and ending points of each flight.
Now we need to put something in the image. Download this image and add it to Watch \ Assets.xcassets . This will create a new set of Plane images in which the current image will occupy the 2x slot:

We want to give this image a pink Air Aber hue, so we’ll select an image, then use the Attributes inspector to set the Render As value to Template Image .
Re-open the Watch \ Interface.storyboard and select the image in the Document outline. With the Attributes inspector we will make the following changes:
- Set the Image value to Plane .
- Set the Tint value to # FA114F .
- Set the Horizontal and Vertical Alignment values to Center .
- For the Width, select the Fixed option with a value of 24 .
- For Height, select the option Fixed with a value of 20 .
Select the label and set its Text field to the value MEL . Then change its Font to System with a Semibold style and size of 20 . Finally, set the Vertical Alignment to Center .
Copy the label, and then paste it to the right of the image. Change its text to SFO , and Horizontal Alignment to Right . The table row should now look like this:
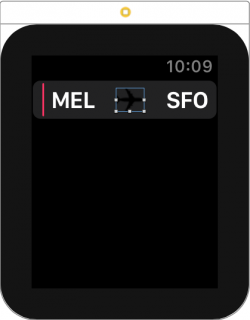
Note : when inserting a copy of a label, it can stubbornly stick to the left side of the image, regardless of its position in the Document outline. But if you set the horizontal alignment to the right , it will move into place.
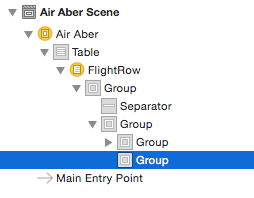
The hierarchy of interface objects should now be like this:
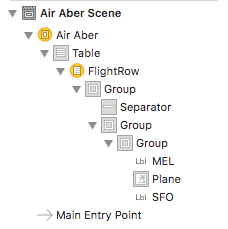
We are almost done with the interface of the table row, it remains to add only the number and status of the flight.
Drag another group from the Object Library into the row of the table so that it is next to the group containing the departure and arrival labels:
Continuing to create this interface, you will see other examples of how you can use the built-in groups with mixed configurations to create complex configurations. Who needs this Auto Layout ?!
Drag two labels to this new horizontal group. Use the Attributes inspector to make changes to the left label:
- Set the Text to AA123 .
- Set Text Color to Light Gray Color .
- Set the Font value to Caption 2 .
- Set the Vertical Alignment value to Bottom .
Next, make changes to the right label:
- Set the Text value to On time .
- Set the Text Color to # 04DE71 .
- Set the Font value to Caption 2 .
- Set the Horizontal Alignment to Right .
- Set the Vertical Alignment value to Bottom .
After making these last changes, the complete table row should look like this:
Having set up the table in Interface Builder, we can start filling it with some data.
Filling the table
The first thing to do is create a subclass of the class
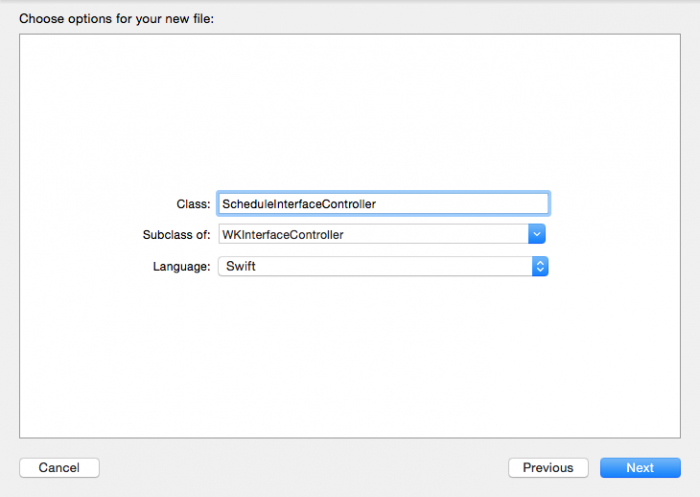
WKInterfaceControllerto manage the table.Right-click the group Watch Extension in the Project navigator and select the New ... the File . In the dialog box that appears, select watchOS \ Source \ WatchKit Class and click Next . Name the new class ScheduleInterfaceController . Ensure that it is a subclass of WKInterfaceController , and that Language is set to Swift :
Click Next , then Create .
When the new file opens in the code editor, remove the three empty method blanks so that only the import statements and the class definition remain.
Reopen Watch \ Interface.storyboard and select the new interface controller. In the Identity inspector, replace the Custom Class \ Class with the ScheduleInterfaceController :

Leaving the interface controller selected, open the Assistant editor and verify that it appears there
ScheduleInterfaceController. Next, hold down Control and drag from Table to Document outline inside the class definition ScheduleInterfaceControllerto create the Outlet field: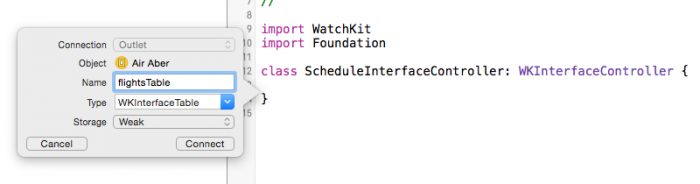
Call Outlet flightsTable , make sure it is set to WKInterfaceTable and click Connect .
Now that we have set our own class and created an Outlet into the table, it is time to fill it in!
Close the Assistant editor, open ScheduleInterfaceController.swift and add the following line right after the Outlet:
var flights = Flight.allFlights() Here we simply add a property containing all flight information as an array of instances
Flight.Then add the following implementation
awake(withContext:): override func awake(withContext context: Any?) { super.awake(withContext: context) flightsTable.setNumberOfRows(flights.count, withRowType: "FlightRow") } Here we tell the table to create an instance of the string we just created in Interface Builder for each flight in
flights. The number of lines is equal to the size of the array, and the type of the line is the identifier that we specified in the storyboard.Build the application and run it. You will see a table filled with several lines, next to each of which is a pink image of an Air Aber aircraft:

But wait!The heading has a dark gray color instead of hot pink corporate color Air Aber. Now we fix it.
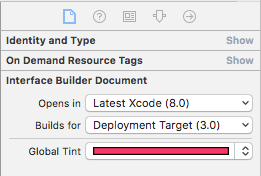
Open the Watch \ Interface.storyboard , select the controller interface Air Aber . In the File inspector, change the Global Tint to # FA114F .
Build and run the application. That's much better!
But now you will notice that all the lines display the placeholder text that we specified in Interface Builder. Now we will fix this by adding a row controller that customizes labels for each row.
Add row controller
WatchKit tables are much simpler than iOS tables: there are no data sources and delegate! Simply create a string controller class which, despite its name, is a subclass of the class
NSObject.Right-click the group Watch Extension in the Project navigator and select the New ... the File . In the dialog that opens, select watchOS \ Source \ WatchKit Class and click Next . Name the new class FlightRowController . Make sure that it is a subclass of NSObject - and not WKInterfaceController ! - and that Language has a Swift value :
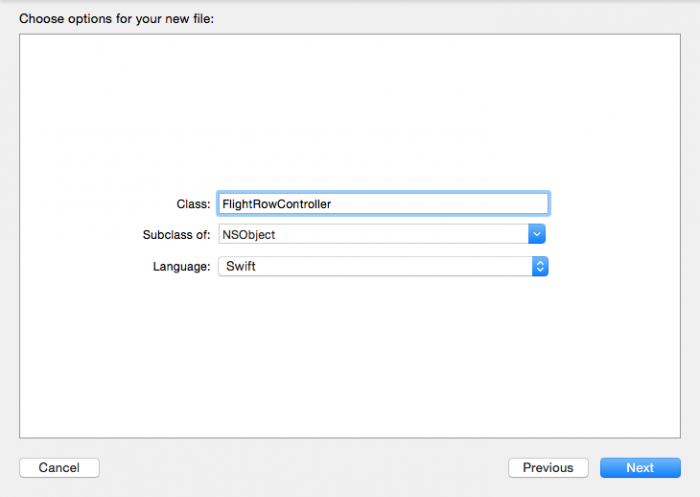
Click Next and then Create .
When a new file opens in the code editor, add the following lines on top of the class:
@IBOutlet var separator: WKInterfaceSeparator! @IBOutlet var originLabel: WKInterfaceLabel! @IBOutlet var destinationLabel: WKInterfaceLabel! @IBOutlet var flightNumberLabel: WKInterfaceLabel! @IBOutlet var statusLabel: WKInterfaceLabel! @IBOutlet var planeImage: WKInterfaceImage! Here we simply add an Outlet for each of the tags added to the table row. Soon we will connect them.
Then add the following property and Property observer, right below the Outlet fields:
// 1 var flight: Flight? { // 2 didSet { // 3 guard let flight = flight else { return } // 4 originLabel.setText(flight.origin) destinationLabel.setText(flight.destination) flightNumberLabel.setText(flight.number) // 5 if flight.onSchedule { statusLabel.setText("On Time") } else { statusLabel.setText("Delayed") statusLabel.setTextColor(.red) } } } Here is what happens at each of the stages:
- We declare an auxiliary type property
Flight. Remember that this class is declared in Flight.swift , which is part of the general code added to Watch Extension in the previous part of the tutorial. - Add the Property observer, which is performed when setting the property.
- ,
flightnil: ,Flight. flight.- , .
Having completed the setting of the row controller, we need to update the row of the table to use it.
Open Watch \ Interface.storyboard and select FlightRow in the Document outline. Using the Identity inspector, set the Custom Class \ Class value to FlightRowController .
In Document outline, open all groups in FlightRow , then right-click on FlightRow to bring up the Outlet fields and actions pop-up window:
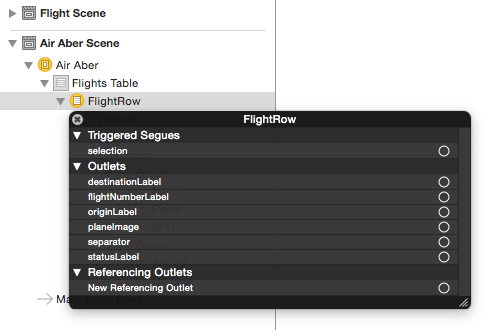
You can drag this pop-up window to the right to see all the objects in the FlightRow .
First we connect
planeImageto the image in the row of the table, and separatorto the separator. Then we connect the remaining Outlet fields in accordance with the following list:destinationLabel: SFOflightNumberLabel: AA123originLabel: MELstatusLabel: On time
The last step is an update
ScheduleInterfaceControllerso that it passes the instance to Flighteach row controller in the table.Open ScheduleInterfaceController.swift and add the following lines below
awakeWithContext(_:): for index in 0..<flightsTable.numberOfRows { guard let controller = flightsTable.rowController(at: index) as? FlightRowController else { continue } controller.flight = flights[index] } Here we loop
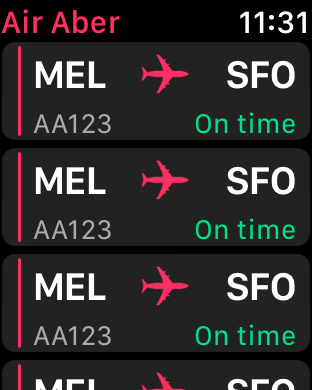
forthrough each row in the table and request the row controller with the corresponding index from the table. If we request the controller correctly, we get an instance FlightRowController. Then we set the controller.flightcorresponding element flightin the array flights. This leads to the implementation of the observer didSetin FlightRowControllerand configures all the labels in a table row.It is time to see the results of our labors: run the build and run the application. You will see that the rows of the tables are now filled with the correct flight details:
And now the last task in this part of the tutorial: when the user taps the table row, he
ScheduleInterfaceControllermust transfer the corresponding flight as context to the flight information interface that we created in the previous part of the tutorial and display it.Match selected string
The first thing to do is to override the method
WKInterfaceTablethat performs the selection processing of a row in a table.Add to the
ScheduleInterfaceControllerfollowing lines: override func table(_ table: WKInterfaceTable, didSelectRowAt rowIndex: Int) { let flight = flights[rowIndex] presentController(withName: "Flight", context: flight) } Here we get the
flightscorresponding flight using the string index passed to this method. Then we display the flight information interface, as contextpassing flight. Remember that the name passed to presentController(withName:context:)is the identifier we specified in the storyboard in the previous part of the tutorial.Now, as promised in the first part, we will change
FlightInterfaceControllerit to use contextto customize its interface.Open FlightInterfaceController.swift and find
awake(withContext:). Find this line: flight = Flight.allFlights().first Replace it with the following lines:
if let flight = context as? Flight { self.flight = flight } Here we are trying to convert
contextas an instance Flight. If this succeeds, we use it for the task self.flight, which in turn leads to the execution of Property observer and configures the interface.For the last time in this part we will run the build and run the application. Touch the row of the table and you will see how the flight information interface modally displays information about the selected flight:

Congratulations! You have completed the implementation of your first table and filled it with real data. Great job!
Here is a complete example of a project that we have done so far in this tutorial.
Part 3: Animations
In the third part of the tutorial, we will learn how to use watchOS 4 animations using the example of a new flight check-in interface in our application.
In the process, you will learn:
- How to create animations based on images.
- How to use watchOS 4 animation animation.
Getting Started
Open Watch \ Interface.storyboard and drag the interface controller from the Object Library onto the storyboard canvas. After selecting the controller interface, open the Attributes inspector and enter for the Identifier value CheckIn . We did this in order to be able to define an interface controller from
ScheduleInterfaceController.Then drag from the Object Library group to the new interface controller. In the Attributes inspector, make the following changes:
- Set the Layout value to Vertical .
- Set the Mode to Center .
- Set the Horizontal Alignment to Center .
- Set the Height to Relative to Container .
Now the interface controller should look like this:

Now we will create the same group from the label-image-label that we created for the row of the table.
Drag another group onto the created group and make the following changes to the Attributes inspector:
- Set Spacing to 4 .
- Set the Horizontal Alignment to Center .
- Set the Width to Size To Fit Content .
- Select the Height option Fixed with a value of 30 (slightly shorter than the row of the table).
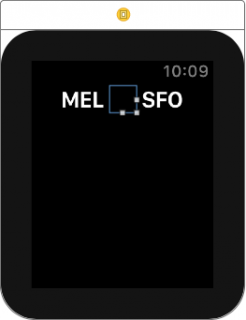
Add label and image to this new group . We will configure the label, and then copy and update it to display the starting and ending point of each flight.
Select an image, either in the storyboard, or in the Document outline. In the Attributes inspector, make the following changes:
- Set the Image value to Plane .
- Set the Tint value to # FA114F (our pink color again!).
- Set the Vertical Alignment to Center .
- Select the Width option Fixed with a value of 24 .
- Height Fixed 20 .
As before, the image does not change the shade, so it is not visible on the black background of the interface controller. But we know that it is there.
Select a label and set the Text to MEL . Then change its Font to System with a Semibold style and size of 20 . Finally, set the Vertical alignment value to Center , and check that Width and Height are Size To Fit Content .
Copy the label and paste it next to the image. Change its text to SFO , and its Horizontal Alignment toRight . Now the interface controller should look like this:
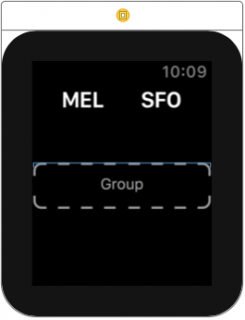
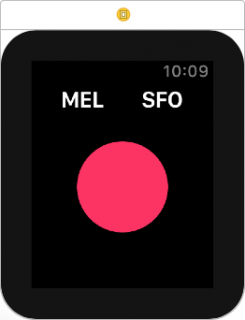
Now it's time to add a huge registration button!
Add registration button
Drag a button from the Object Library onto the interface controller and make sure that it is a neighbor with a group containing the labels of the starting and ending points of the voyage:

The buttons in WatchKit are incredibly flexible: you can use them with the default appearance (such as the one added by us now looks), or turn them into a layout group and add other interface objects to customize their appearance. This is what we are going to do.
Select the button and make the following changes to the Attributes inspector:
- Set Content to Group .
- Set the Horizontal Alignment to Center .
- Set the Vertical Alignment to Center .
Now the interface controller should look like this:
You probably noticed that when we changed the Content attribute of the button, a new group appeared in the Document outline :
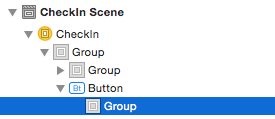
That is what we will use as the background of our own registration button. Select this group and make the following changes to the Attributes inspector:
- Set the Color value to # FA114F .
- Set the Radius to 39 .
- Select the Width option Fixed with a value of 78 .
- Choose a Height value of Fixed with a value of 78 .
The interface controller should now look like this:
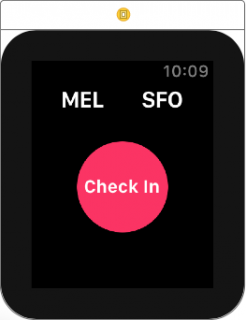
Our registration button is already beginning to take its form. What is missing is a label, so now we will add it.
Drag the label from the Object Library into the button group, and then select it. Again, make the Attributes inspector in the following changes:
- Set the Text Check In value .
- Set the Font value to System with the Semibold style and size 16 .
- Set the Horizontal Alignment to Center .
- Set the Vertical Alignment to Center .
A ready registration interface controller should look like this:
Having finished with the interface, we can go on to create a subclass
WKInterfaceControllerthat controls this controller and change ScheduleInterfaceControllerit to display it.Creating a controller
Right-click the group Watch Extension in the Project navigator and select the New ... the File . In the dialog box that appears, select watchOS \ Source \ WatchKit Class and click Next . Name the new class CheckInInterterController and make sure that it is a subclass of WKInterfaceController and that Swift is selected for Language :

Click Next and then Create .
When a new file opens in the code editor, remove the three empty method stubs so that you only have the import statements and the class definition.
Then add the following lines on top of the class:
@IBOutlet var backgroundGroup: WKInterfaceGroup! @IBOutlet var originLabel: WKInterfaceLabel! @IBOutlet var destinationLabel: WKInterfaceLabel! Here we simply add the Outlet fields for the outermost group and the two interface labels we just created. Soon we will connect them all.
Then add the following under the Outlet fields:
var flight: Flight? { didSet { guard let flight = flight else { return } originLabel.setText(flight.origin) destinationLabel.setText(flight.destination) } } Here we added an auxiliary type property
Flightthat includes the Property observer. When performing an observer, he tries to remove the wrapper from flight, and if it succeeds, he uses flighttwo tags to tune. All this is already familiar to us.Now we just need to set
flightif there is a controller. Add to the CheckInInterfaceControllerfollowing lines: override func awake(withContext context: Any?) { super.awake(withContext: context) if let flight = context as? Flight { self.flight = flight } } You are also familiar with this. We are trying to remove the wrapper and convert it
contextto an instance Flight. If this succeeds, then we use it for the task self.flight, which in turn is performed by the Property observer, the tuning interface.Finally, add directly under the
awake(withContext:)following action: @IBAction func checkInButtonTapped() { // 1 let duration = 0.35 let delay = DispatchTime.now() + (duration + 0.15) // 2 backgroundGroup.setBackgroundImageNamed("Progress") // 3 backgroundGroup.startAnimatingWithImages(in: NSRange(location: 0, length: 10), duration: duration, repeatCount: 1) // 4 DispatchQueue.main.asyncAfter(deadline: delay) { [weak self] in // 5 self?.flight?.checkedIn = true self?.dismiss() } } Here is what happens at each stage:
- We create two constants: one for the duration of the animation, the other for the delay, after which the controller will be disabled.
delay- this is notDouble, but an instanceDispatchTime, because we will use it with the Grand Central Dispatch. - Progress
backgroundGroup.WKImageAnimatable, . - . ,
repeatCount, 1, , . - WatchKit , Grand Central Dispatch .
- ,
flight, .
Now we just need to add images to the project and connect the Outlet and one action.
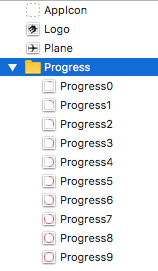
Download this zip file , unzip it and drag the folder to Watch \ Assets.xcassets .
Drag the folder, not its contents. This will create a group in the resource directory called Progress , containing several sets of images:
By adding images, we can assign Outlet fields and button actions.
Open Watch \ Interface.storyboard and select our new interface controller. In the Identity inspector, replace the Custom Class \ Class with CheckInInterfaceController :

Then in Document outline, right-click on CheckIn for a pop-up window of the Outlet fields and actions. Connect
backgroundGroupto the outermost group in the interface controller:
On the storyboard canvas, connect
destinationLabelto the label containing SFO and connect originLabelto the label containing MEL .Then connect
checkInButtonTappedto the big round pink button: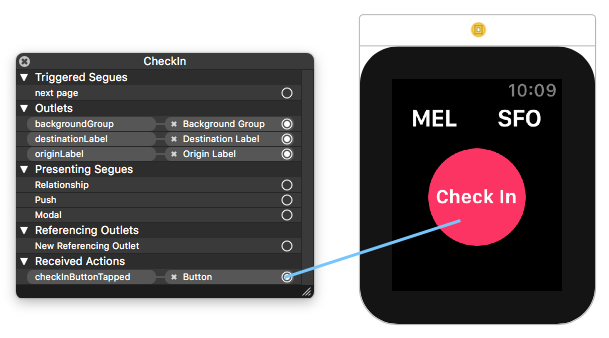
Before you build and run the application, we need to make the last change - to display the interface controller.
Controller mapping
Open ScheduleInterfaceController.swift , find
table(_:didSelectRowAt:)and replace its contents with the following lines: let flight = flights[rowIndex] let controllers = ["Flight", "CheckIn"] presentController(withNames: controllers, contexts: [flight, flight]) Here we get the corresponding flight from
flightswith the index rowIndex, create an array containing the identifiers of the two interface controllers that we want to display, and then display them, passing both flightas context.Build and run the application. Touch the flight and you will see a pair of interface controllers displayed. Swipe left to open the registration controller, and then touch the button to start the animation and pass the registration:

It looks great in itself, but it is better that flights that are checked in are highlighted in the controller of the schedule interface. This we will do in the next, last section.
Flight highlighting
Open FlightRowController.swift and add the following method to it:
func updateForCheckIn() { let color = UIColor(red: 90/255, green: 200/255, blue: 250/255, alpha: 1) planeImage.setTintColor(color) separator.setColor(color) } Here we create an instance
UIColor, then use it to set the hue color and color, respectively, planeImageand separator. This method will be called when closing the animation, so the color change will be beautifully animated.Then open ScheduleInterfaceController.swift and add under the
flightsfollowing property: var selectedIndex = 0 We use it to remember which row of the table is selected when displaying two interface controllers. Now it is enough to set it when selecting the row of the table. Add the following line just above the call
presentController(withNames:contexts:)to table(_:didSelectRowAt:): selectedIndex = rowIndex This row sets
selectedIndexthe index value of the selected row in the table.Finally, add the following lines in
ScheduleInterfaceController, right below awake(withContext:): override func didAppear() { super.didAppear() // 1 guard flights[selectedIndex].checkedIn, let controller = flightsTable.rowController(at: selectedIndex) as? FlightRowController else { return } // 2 animate(withDuration: 0.35) { // 3 controller.updateForCheckIn() } } Here is what happens at each stage:
- We check whether the registration for the selected flight. If so, then we are trying to convert the controller row with the corresponding index in the table into an instance
FlightRowController. - If this succeeds, we use the animation API
WKInterfaceControllerto perform the closure after 0.35 seconds. - When closing, we call the method that was just added to
FlightRowController, which changes the color of the image and the separator in this row of the table, and provides users with visual feedback indicating that the registration has been completed.
Build and run the application. Perform the same steps as before to check-in, and you will see that you returned to the time schedule interface controller, and the colors of the image and the separator in the corresponding row of the table gradually changed to a new color:
Congratulations!You have completed the implementation of your very first set of WatchKit animations.
Here is a complete example of a project that we did in this tutorial.
In this section, we learned how to create two different types of WatchKit animations. The first used an animated image sequence, and the second
WKInterfaceControllerused an animation API.Source: https://habr.com/ru/post/343432/
All Articles