Authorization through Network Policy Server (NPS) for MikroTik
How to quickly and easily set up authorization via Microsoft RADIUS? I think this will help those who want to be able to access MikroTik devices via a friendly WinBox and simple SSH.
Add RADIUS client;
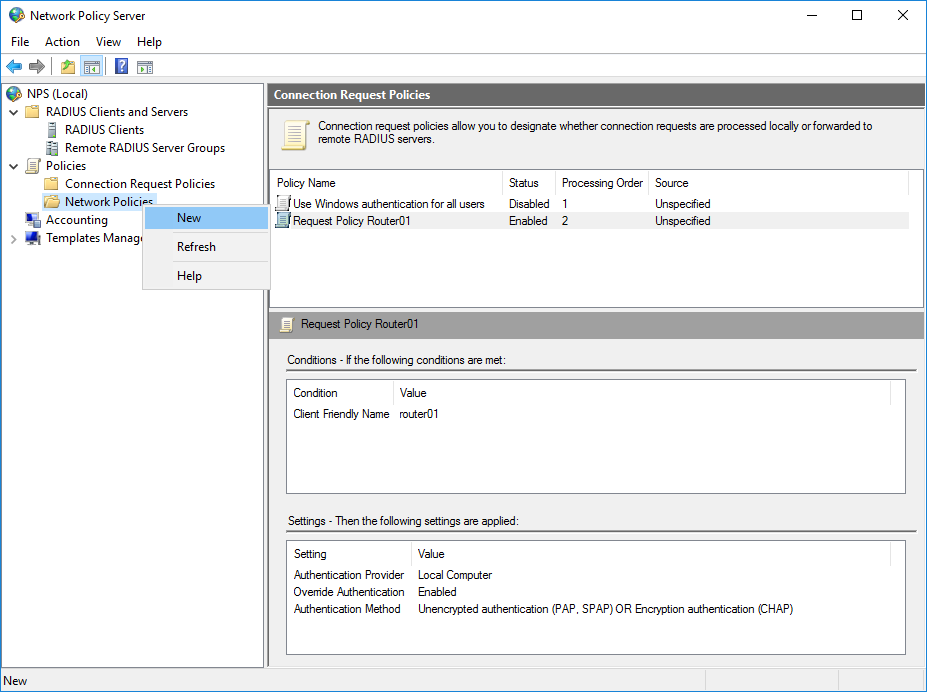
Creating a connection policy;
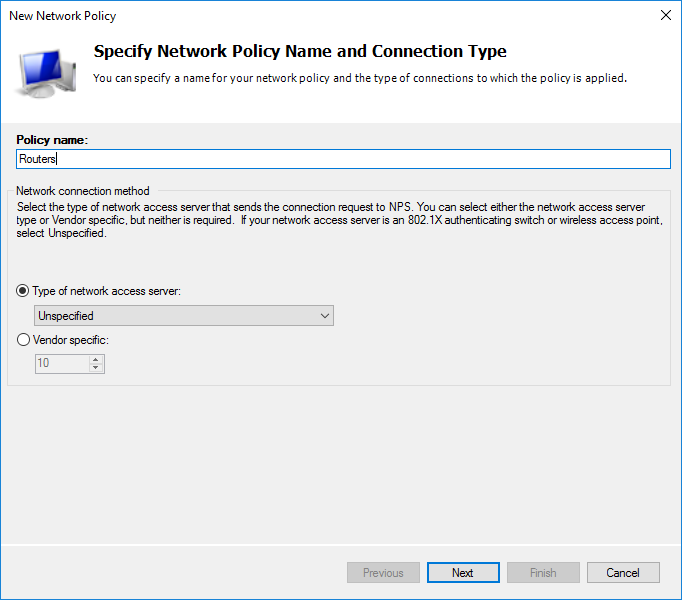
Creating a network policy;
Add authorization server to MikroTik;
Check through SSH and WinBox.
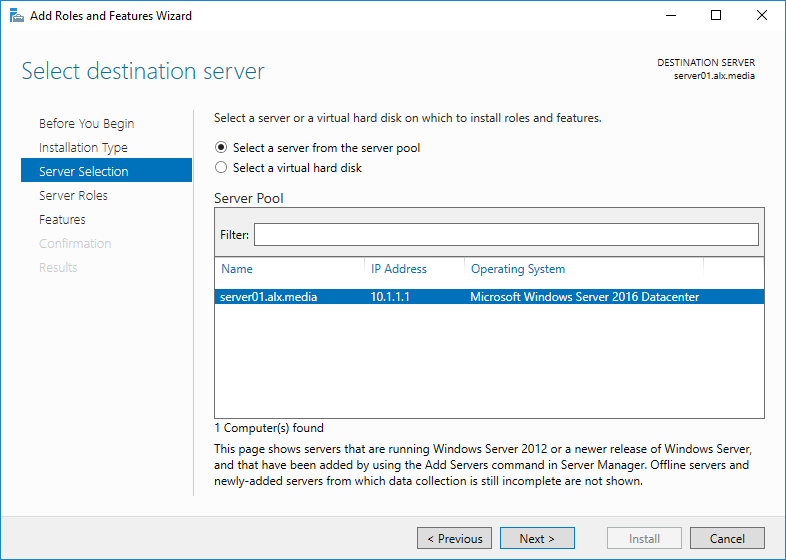
We have Windows Server 2016 Datacenter with an already established domain.

')
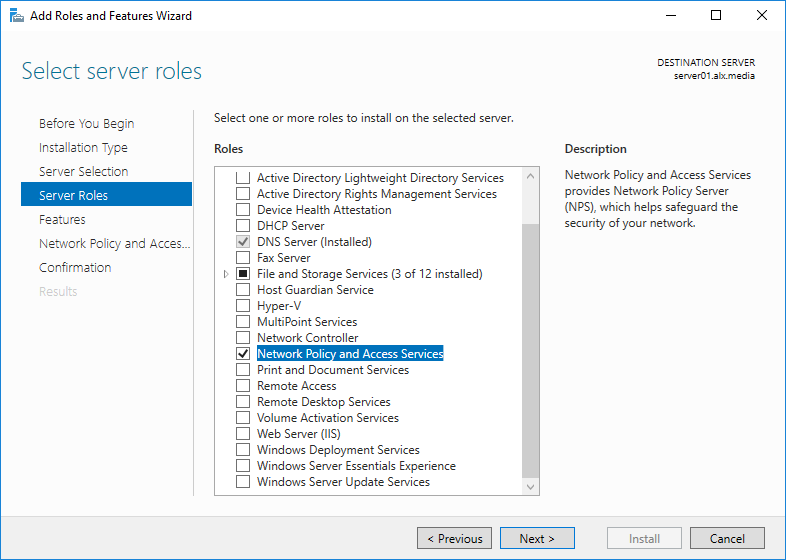
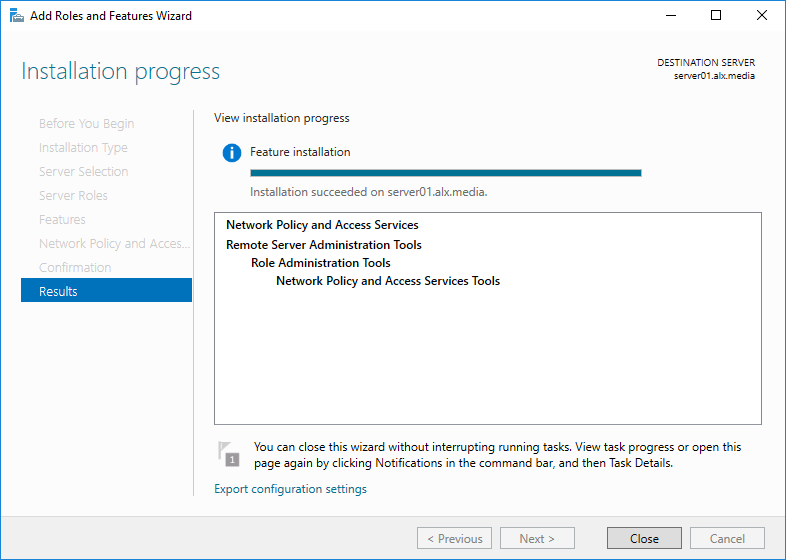
Select the server on which the role will unfold. Microsoft does not recommend doing this on a domain controller, but in some best practices, to reduce delays, they give advice to put it on him. Add the role of the Network Policy and Access Server along with management tools for configuration.

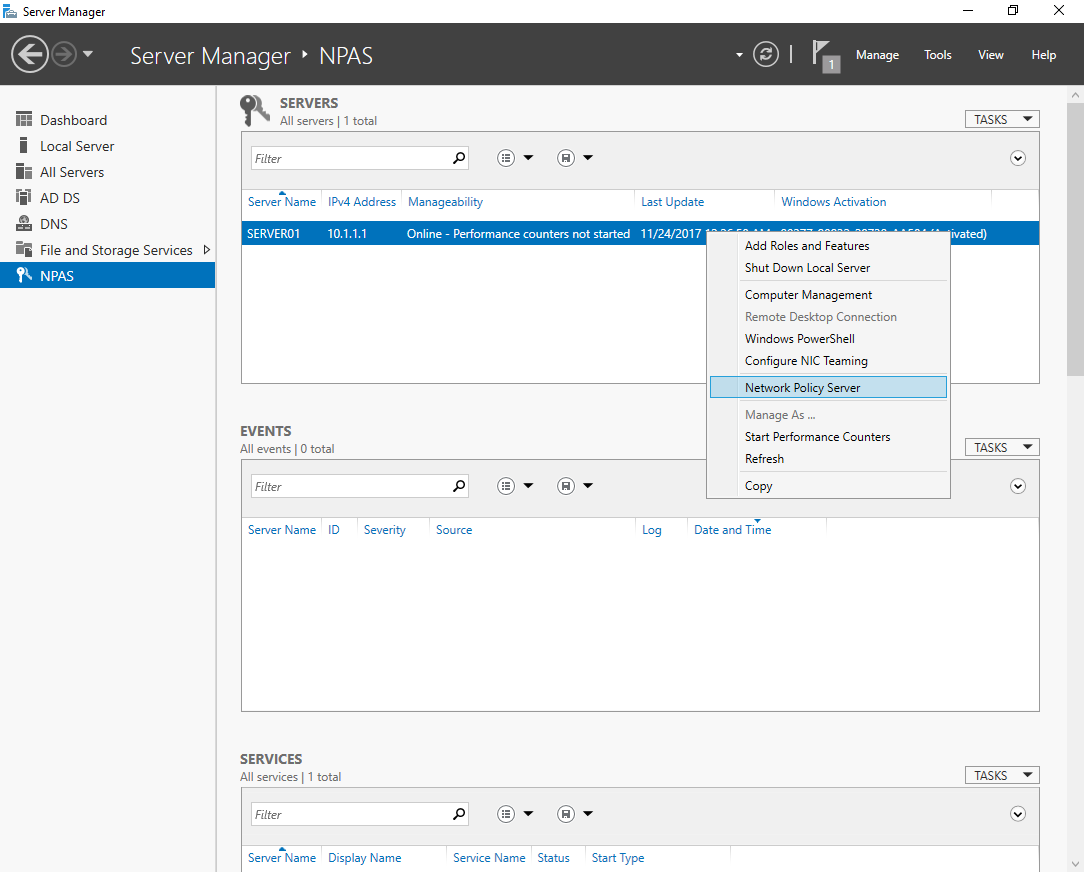
Run the NPS admin panel in any convenient way. For example, through the server manager.
Register the NPS server in AD.


For example, I add my MikroTik wAP. Friendly name installed both the Identity on the device and the IP specified on its only wired interface. In order for the device to authenticate on the server, you must enter the key. It is created on the server either manually or automatically generated. I preferred the second option.
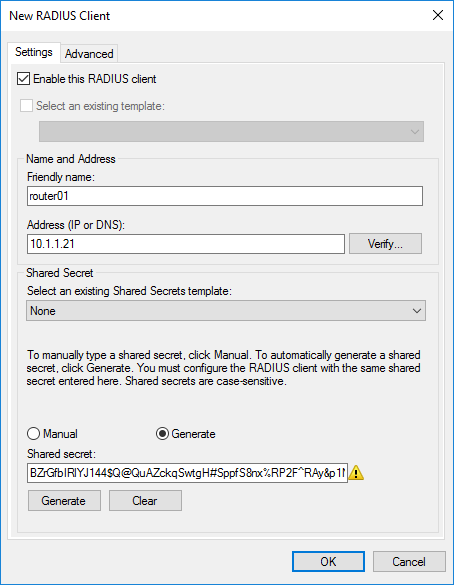
Vendor name we will stop on standard RADIUS.

Device added.
We select the appropriate name for the policy.

We define our device with which the server will work.
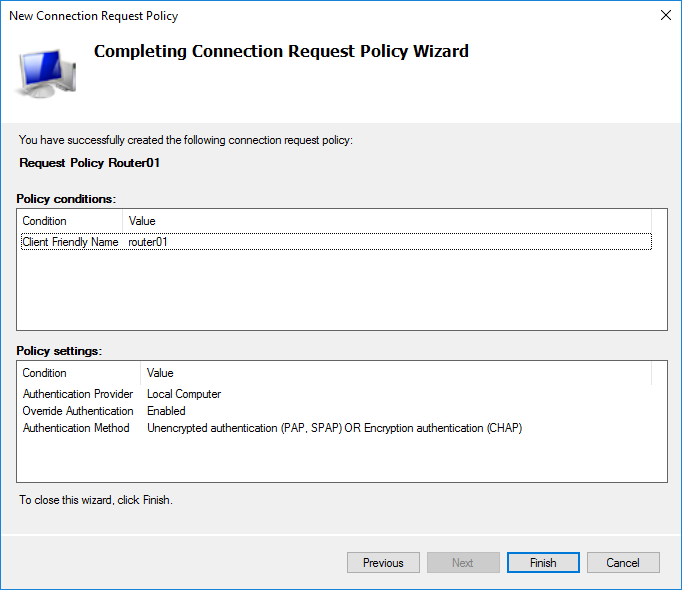
I selected only the Client Friendly Name with the value Router01. This clearly binds this policy item to the device through the created client. You can identify a Mikrotik device by Identity by selecting NAS Identifier.
Without prior configuration of the device Identity = MikroTik.
Further policy setting.
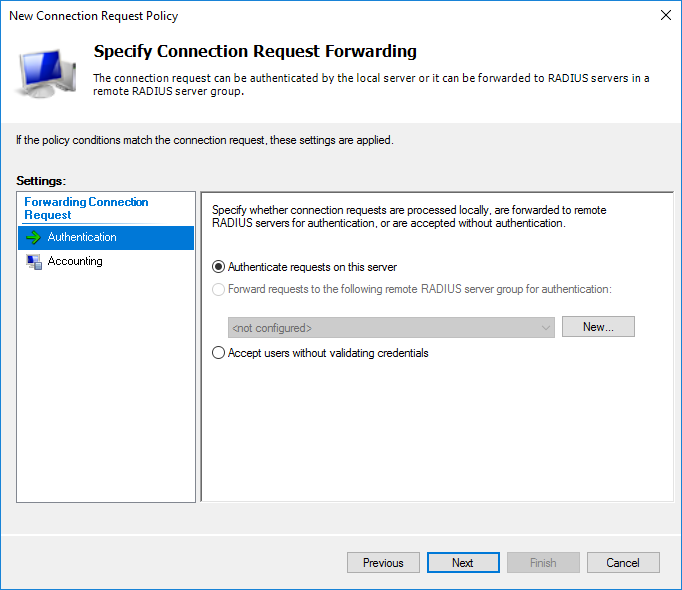
At the authentication protocol selection stage, it suffices to select an unencrypted (which you will receive a warning about) PAP for SSH or encrypted CHAP for WinBox. I chose both. If there is a need to use the web version, then it is enough to enable MS-CHAPv2, otherwise everything is the same.

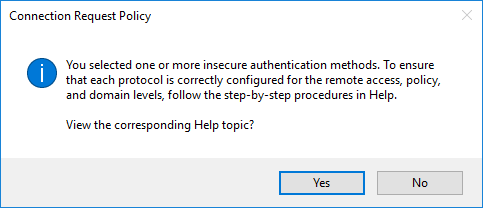
Actually, a warning about choosing an unsafe way. They suggest reading step-by-step reference material.
At this stage, I did not touch anything.

Summary policy settings.
I could not reproduce it through PowerShell, even the standard example with technet 'a. I would be grateful if you tell me why.
Select the desired priority by moving the item above or below the policy.
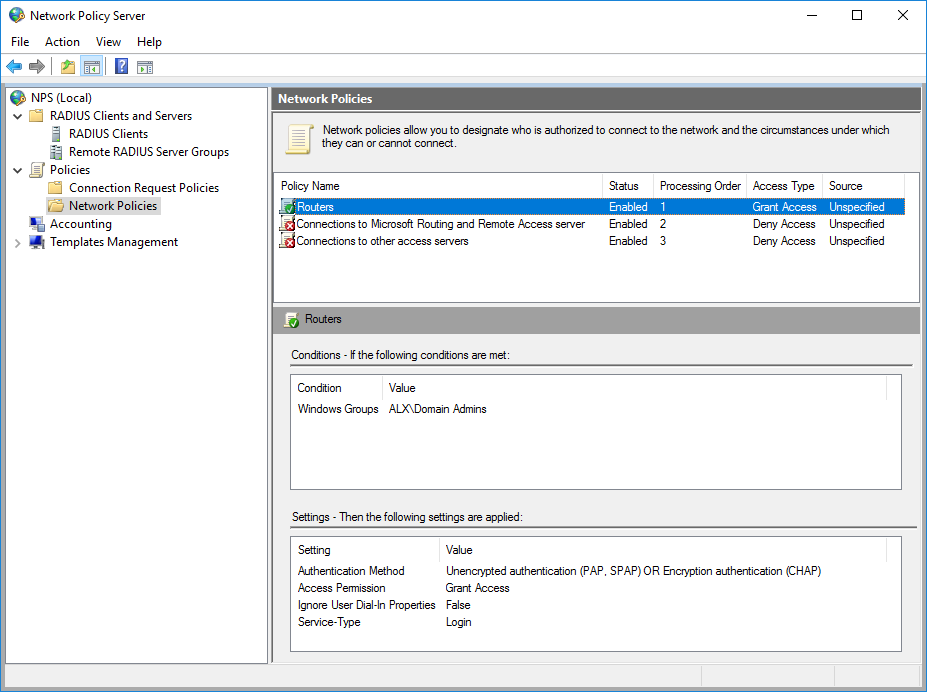
Let's call it Routers.
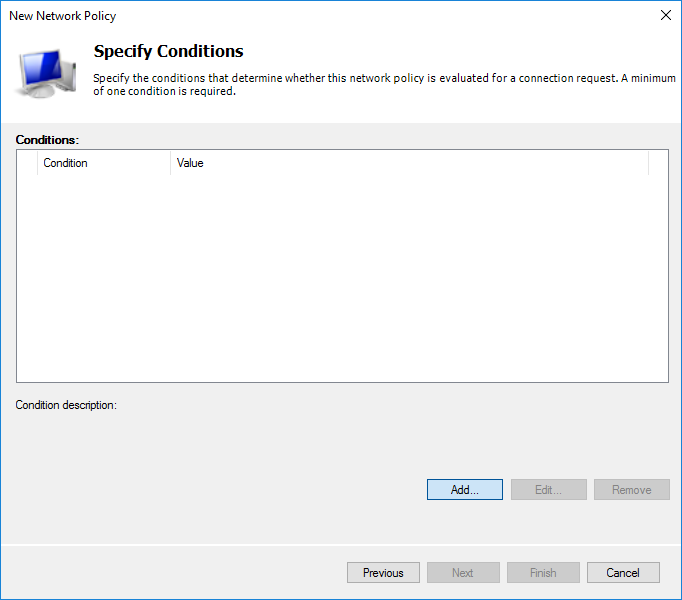
As before, you need to define the conditions.
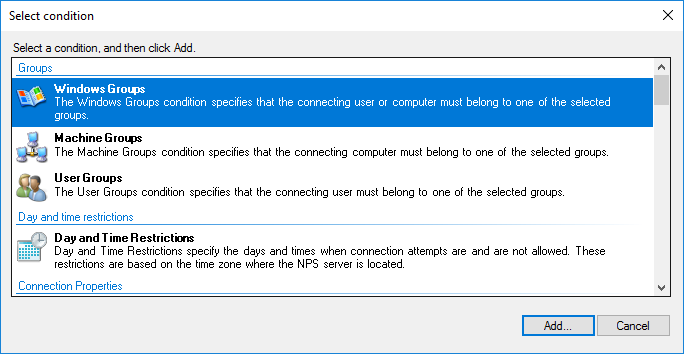
In AD, I have created an additional user in the Domain Admins group. I choose the condition of the Windows Group based on the fact that all domain administrators can get access to MikroTik.
Permissive or restrictive rule. We will allow anyone who has fallen under the condition.
The way of authentication is chosen similar to the previous policy.
Based on the need, you can configure additional settings. I left unchanged.

Next, you need to choose what will be sent to the server.

Final network policy settings.
We select the necessary priority among other policies, if necessary.
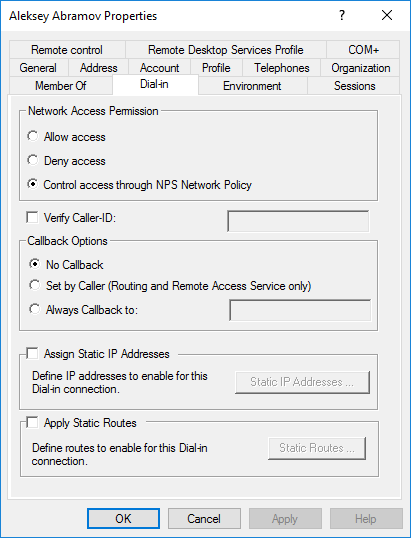
In order for an account to be verified via NPS in AD for this user, on the Dial-in tab in the Network Access Permission section, the item Control access through NPS Network Policy should be marked.
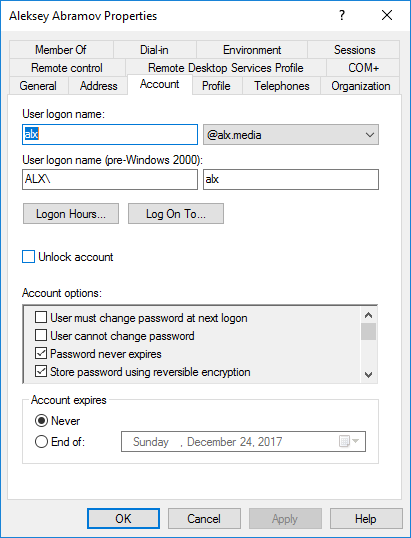
To be able to log in through WinBox, you need to enable reversible encryption in the user profile.
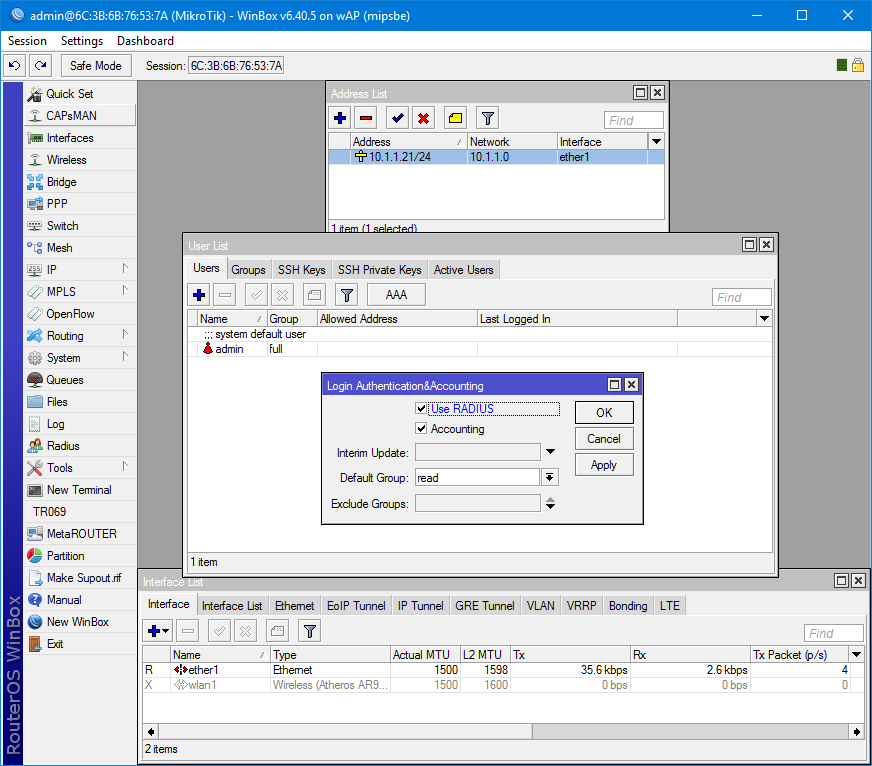
In System / Users and on the Users tab, we enable the Use RADIUS option. By default, read-only access is selected.
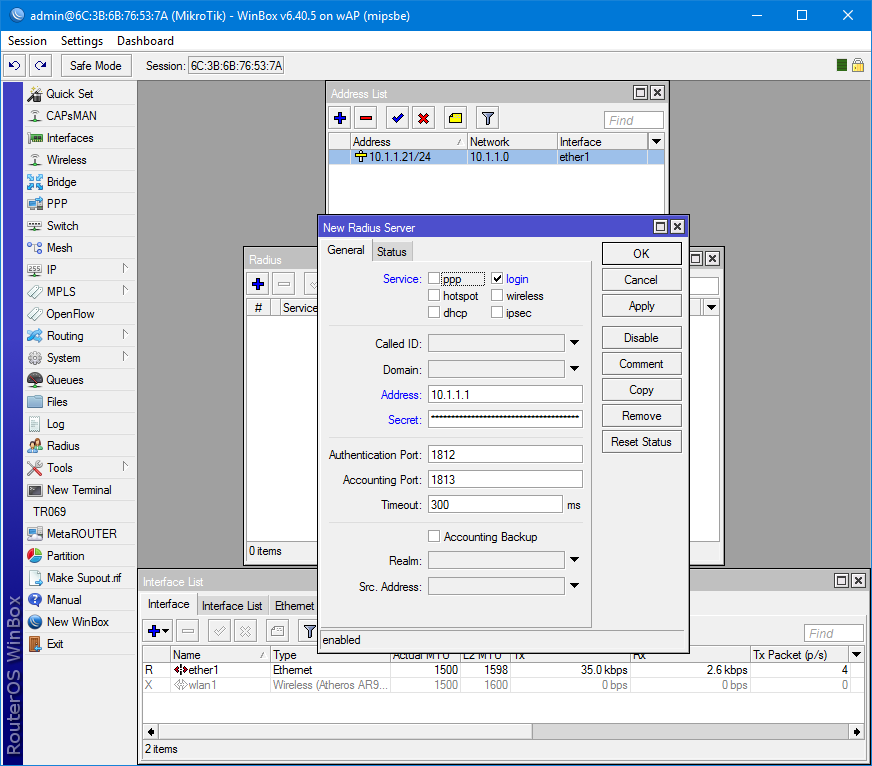
Open the Radius settings and add a new server. Service is selected on the basis of destination. Better, of course, to share access between them. Address - the address of the server on which the NSP is installed.
Secret is the key that was generated at the stage of adding a client to the server.
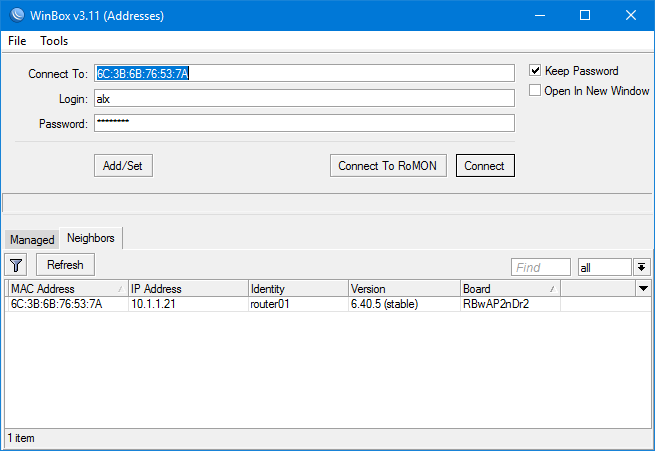
And check the authorization in Winbox.
As you can see, the system admin and both connections of the domain user with read access via SSH and Winbox are hanging in the active users.

Everything is working.
Thanks for attention.
Plan:
Installing the NPS role;Add RADIUS client;
Creating a connection policy;
Creating a network policy;
Add authorization server to MikroTik;
Check through SSH and WinBox.
Installing the NPS Role
We have Windows Server 2016 Datacenter with an already established domain.
')
Select the server on which the role will unfold. Microsoft does not recommend doing this on a domain controller, but in some best practices, to reduce delays, they give advice to put it on him. Add the role of the Network Policy and Access Server along with management tools for configuration.
Install-WindowsFeature NPAS -IncludeManagementTools Run the NPS admin panel in any convenient way. For example, through the server manager.
Register the NPS server in AD.
netsh ras add registeredserver Add RADIUS client
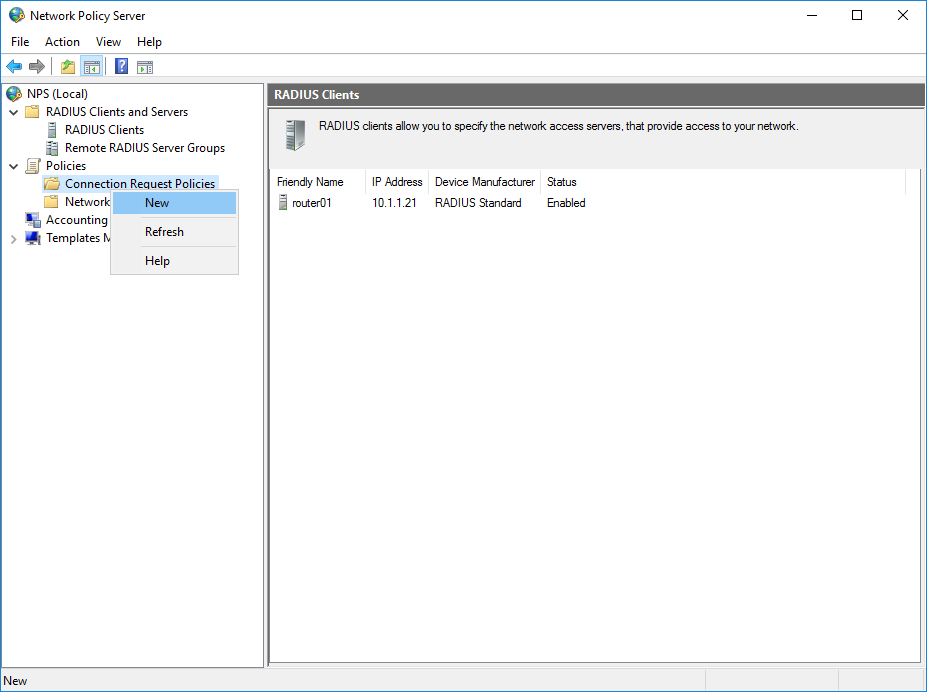
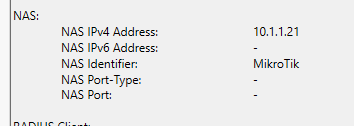
In order for the server to know which devices to communicate with, you need to add them to RADIUS Clients.For example, I add my MikroTik wAP. Friendly name installed both the Identity on the device and the IP specified on its only wired interface. In order for the device to authenticate on the server, you must enter the key. It is created on the server either manually or automatically generated. I preferred the second option.
New-NpsRadiusClient –Address "10.1.1.21" –Name "router01" –SharedSecret "egEcM4myJCptphGlZ1UymS#qLh^urp@fJ1hF8dE6dwb27NI^oIJtTWKKp^MEsU6p" Vendor name we will stop on standard RADIUS.
Device added.
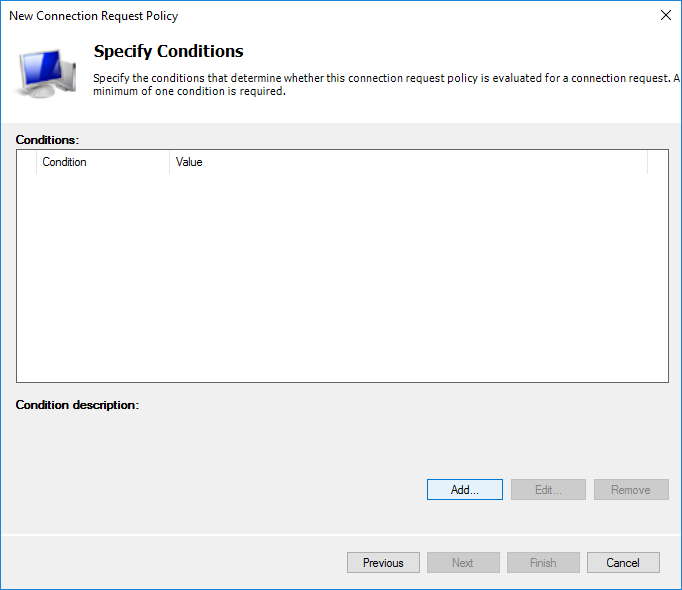
Create Connection Policy
We select the appropriate name for the policy.
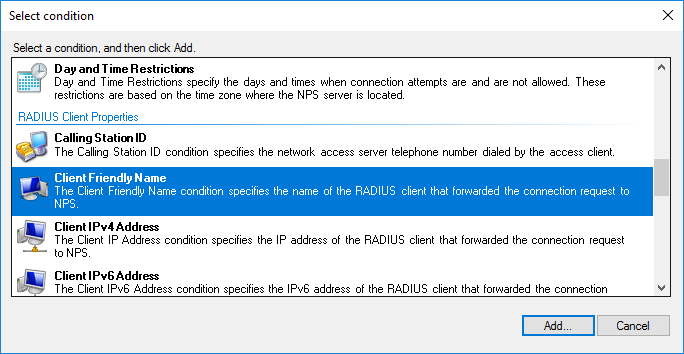
We define our device with which the server will work.
I selected only the Client Friendly Name with the value Router01. This clearly binds this policy item to the device through the created client. You can identify a Mikrotik device by Identity by selecting NAS Identifier.
Without prior configuration of the device Identity = MikroTik.
Further policy setting.
At the authentication protocol selection stage, it suffices to select an unencrypted (which you will receive a warning about) PAP for SSH or encrypted CHAP for WinBox. I chose both. If there is a need to use the web version, then it is enough to enable MS-CHAPv2, otherwise everything is the same.
Actually, a warning about choosing an unsafe way. They suggest reading step-by-step reference material.
At this stage, I did not touch anything.
Summary policy settings.
I could not reproduce it through PowerShell, even the standard example with technet 'a. I would be grateful if you tell me why.
netsh nps add crp name = "Request Policy Router01" state = "ENABLE" processingorder = "1" policysource = "0" conditionid ="0x1020" conditiondata = "router01" profileid = "0x1025" profiledata = "0x1" profileid = "0x1009" profiledata = "0x1" "0x2" profileid = "0x1fb0" profiledata = "TRUE" Select the desired priority by moving the item above or below the policy.
Creating network policy
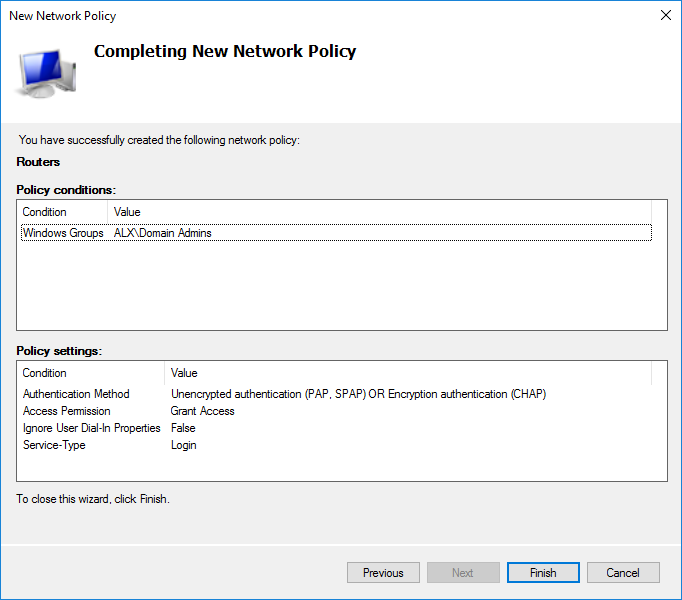
Let's call it Routers.
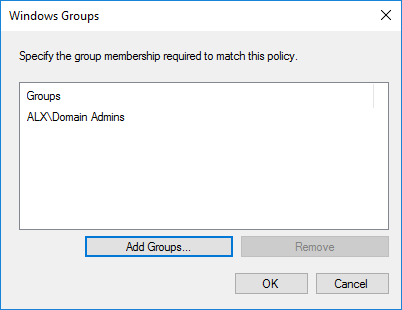
As before, you need to define the conditions.
In AD, I have created an additional user in the Domain Admins group. I choose the condition of the Windows Group based on the fact that all domain administrators can get access to MikroTik.
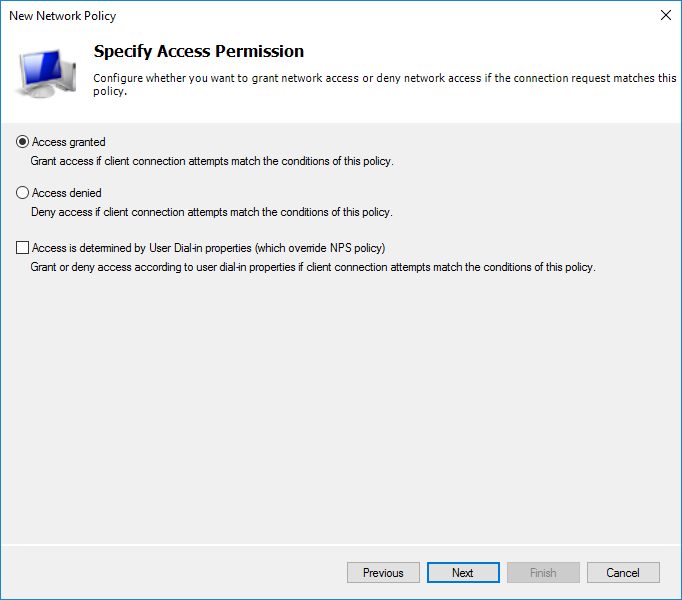
Permissive or restrictive rule. We will allow anyone who has fallen under the condition.
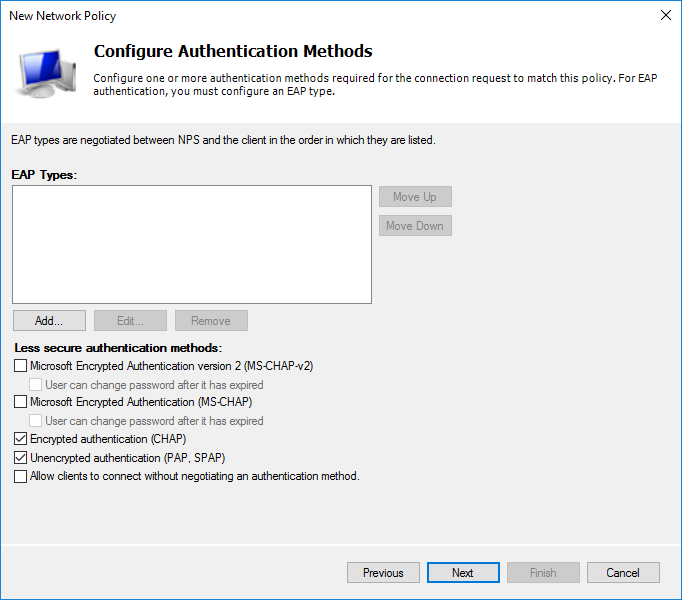
The way of authentication is chosen similar to the previous policy.
Based on the need, you can configure additional settings. I left unchanged.
Next, you need to choose what will be sent to the server.
Final network policy settings.
We select the necessary priority among other policies, if necessary.
In order for an account to be verified via NPS in AD for this user, on the Dial-in tab in the Network Access Permission section, the item Control access through NPS Network Policy should be marked.
To be able to log in through WinBox, you need to enable reversible encryption in the user profile.
Adding an authorization server to MikroTik
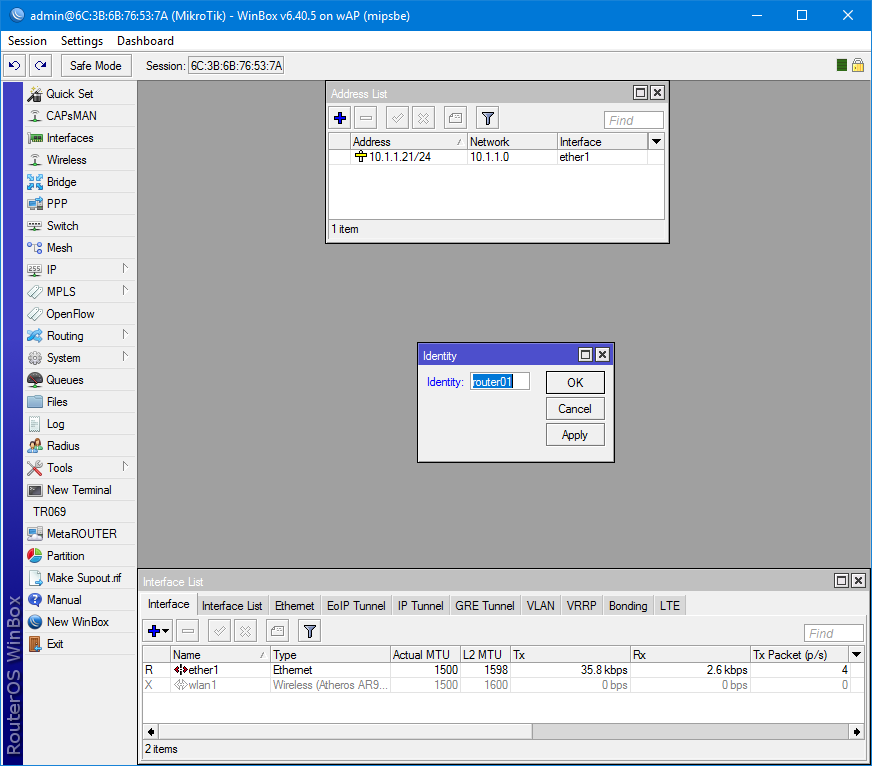
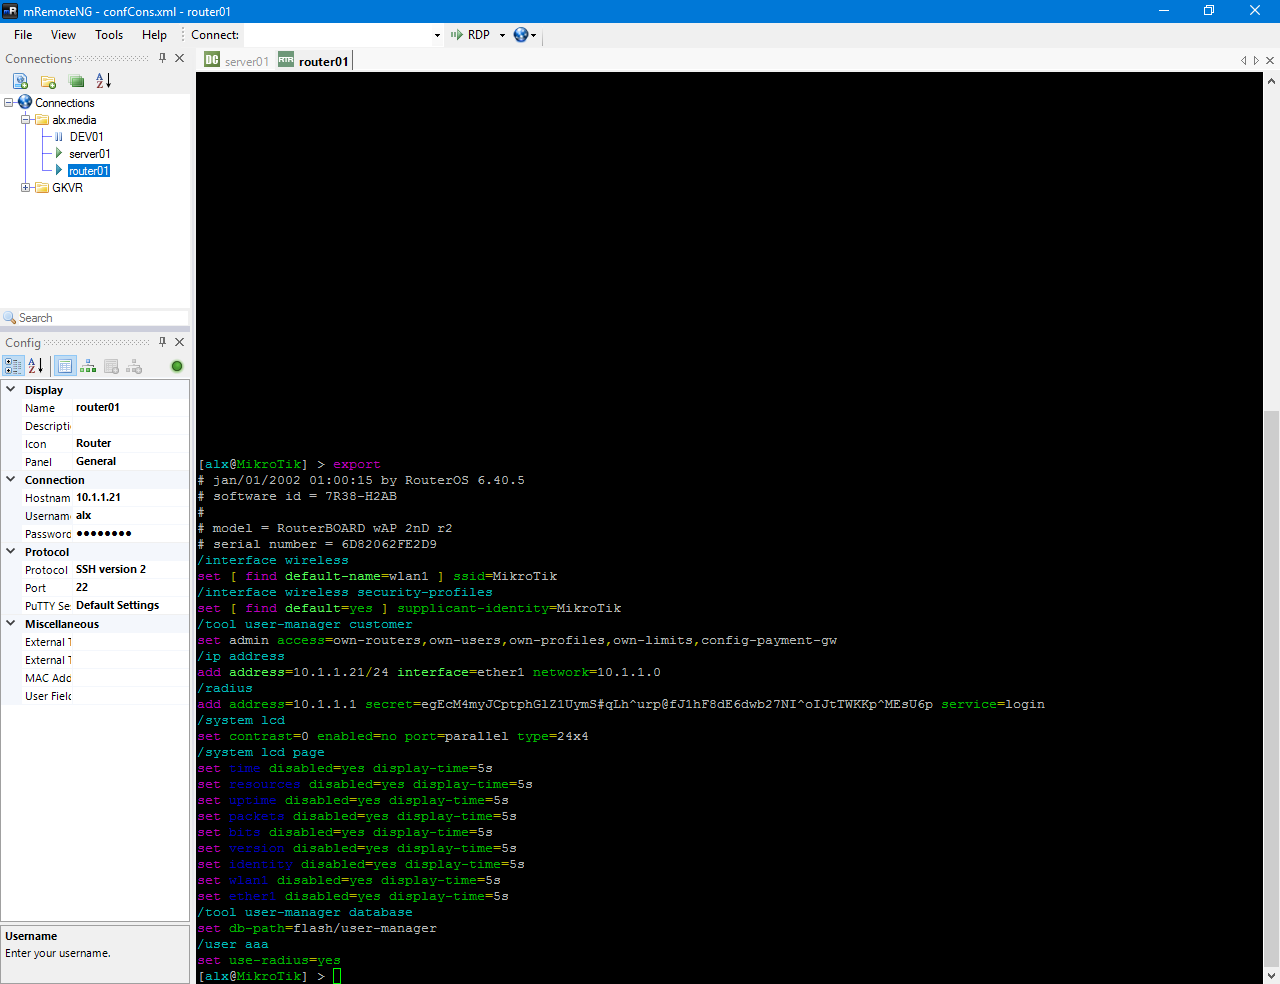
First, assign System / Identity equal to router01 and IP with a mask for the interface. /system identity set name=router01 /ip address add address=10.1.1.21/24 interface=ether1 network=10.1.1.0 In System / Users and on the Users tab, we enable the Use RADIUS option. By default, read-only access is selected.
/user aaa set use-radius=yes Open the Radius settings and add a new server. Service is selected on the basis of destination. Better, of course, to share access between them. Address - the address of the server on which the NSP is installed.
Secret is the key that was generated at the stage of adding a client to the server.
/radius add address=10.1.1.1 secret=egEcM4myJCptphGlZ1UymS#qLh^urp@fJ1hF8dE6dwb27NI^oIJtTWKKp^MEsU6p service=login Check through SSH and WinBox
Verify connectivity via SSH and export configuration.And check the authorization in Winbox.
As you can see, the system admin and both connections of the domain user with read access via SSH and Winbox are hanging in the active users.
Everything is working.
Thanks for attention.
Source: https://habr.com/ru/post/343174/
All Articles