NRF51822 in brief: Quick start
1. Introduction
Good day.
A huge number of programming lessons for various unpretentious (and not so) platforms are walking around the net. Every year, the same type of tutorials of different degrees of depth on the same microcontroller are stamped in dozens. And this is wonderful, since the abundance of articles leads to a lower threshold for entering the topic and allows mature programmers not to waste time searching for reads up and down the datasheet, but simply use the working piece of the peripheral initialization code and move on to problems more seriously.
However, there is a nuance - a step to the right, a step to the left from the standard selection of STM32 / 8, AVR and others like them or a dimple into more complex interfaces of the same STM32 / 8, and silence. Only occasionally in a distant, distant forum, someone asks a question that ultimately remains unanswered ...
')
What I, in fact, lead. Not so long ago, it became necessary to use the Nordic Semiconductor nRF51822 chip with the currently popular Bluetooth low energy theme (hereinafter - BLE) on board.
The chip turned out to be so popular on the information component that Google, with a grief in half, issued 2-3 links describing the BLE stack itself and a couple of abstract articles on the implementation of the stack in Nordic and Texas instruments (CC2640) chips . Experienced programmers will say: "Take examples from the Nordic company (and there they are, by the way, in abundance) and sort it out." And this is the right approach, if not for one thing, but, for the most part, novice programmers and those who want to get quick results: an abundance of structures, multi-level libraries - all this is fine and logical, but redundant for a quick start or a small project. All this increases the threshold of entry to unjustified heights.
In view of the foregoing, I propose to consider a simple version of the implementation of the exchange application using the NRF51822 chip, which makes it possible in general to understand the main aspects of the development of such systems. And it will be ... Naturally, the LED. Running a remote smartphone.
2. Required software and hardware
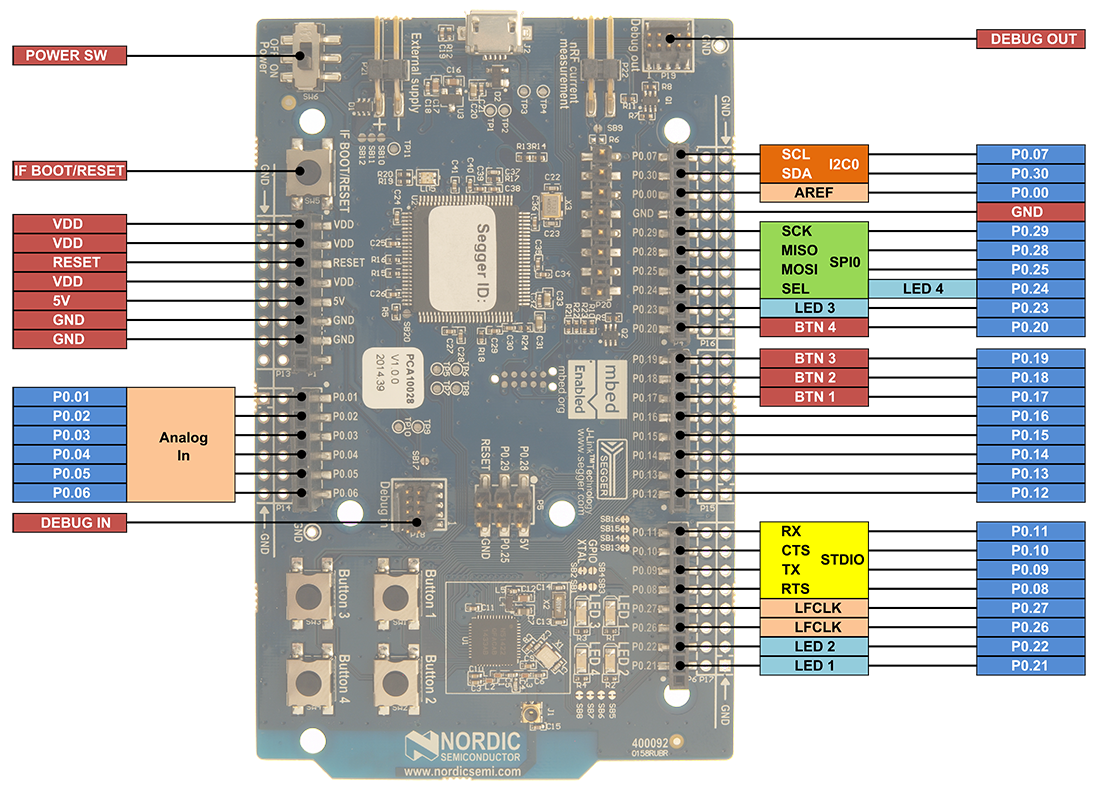
- NRF51 debug board (I use NRF51 DK);
- smartphone running the Android operating system;
- Keil uVision programming environment;
- 15 minutes of free time.
You can use a USB dongle instead of a smartphone, but its price ($ 77) , compared to the price of the NRF51 DK debugging board ($ 49) , pushes a little away. In this example, its presence is optional, but still do not underestimate its importance.
3. Creating a template
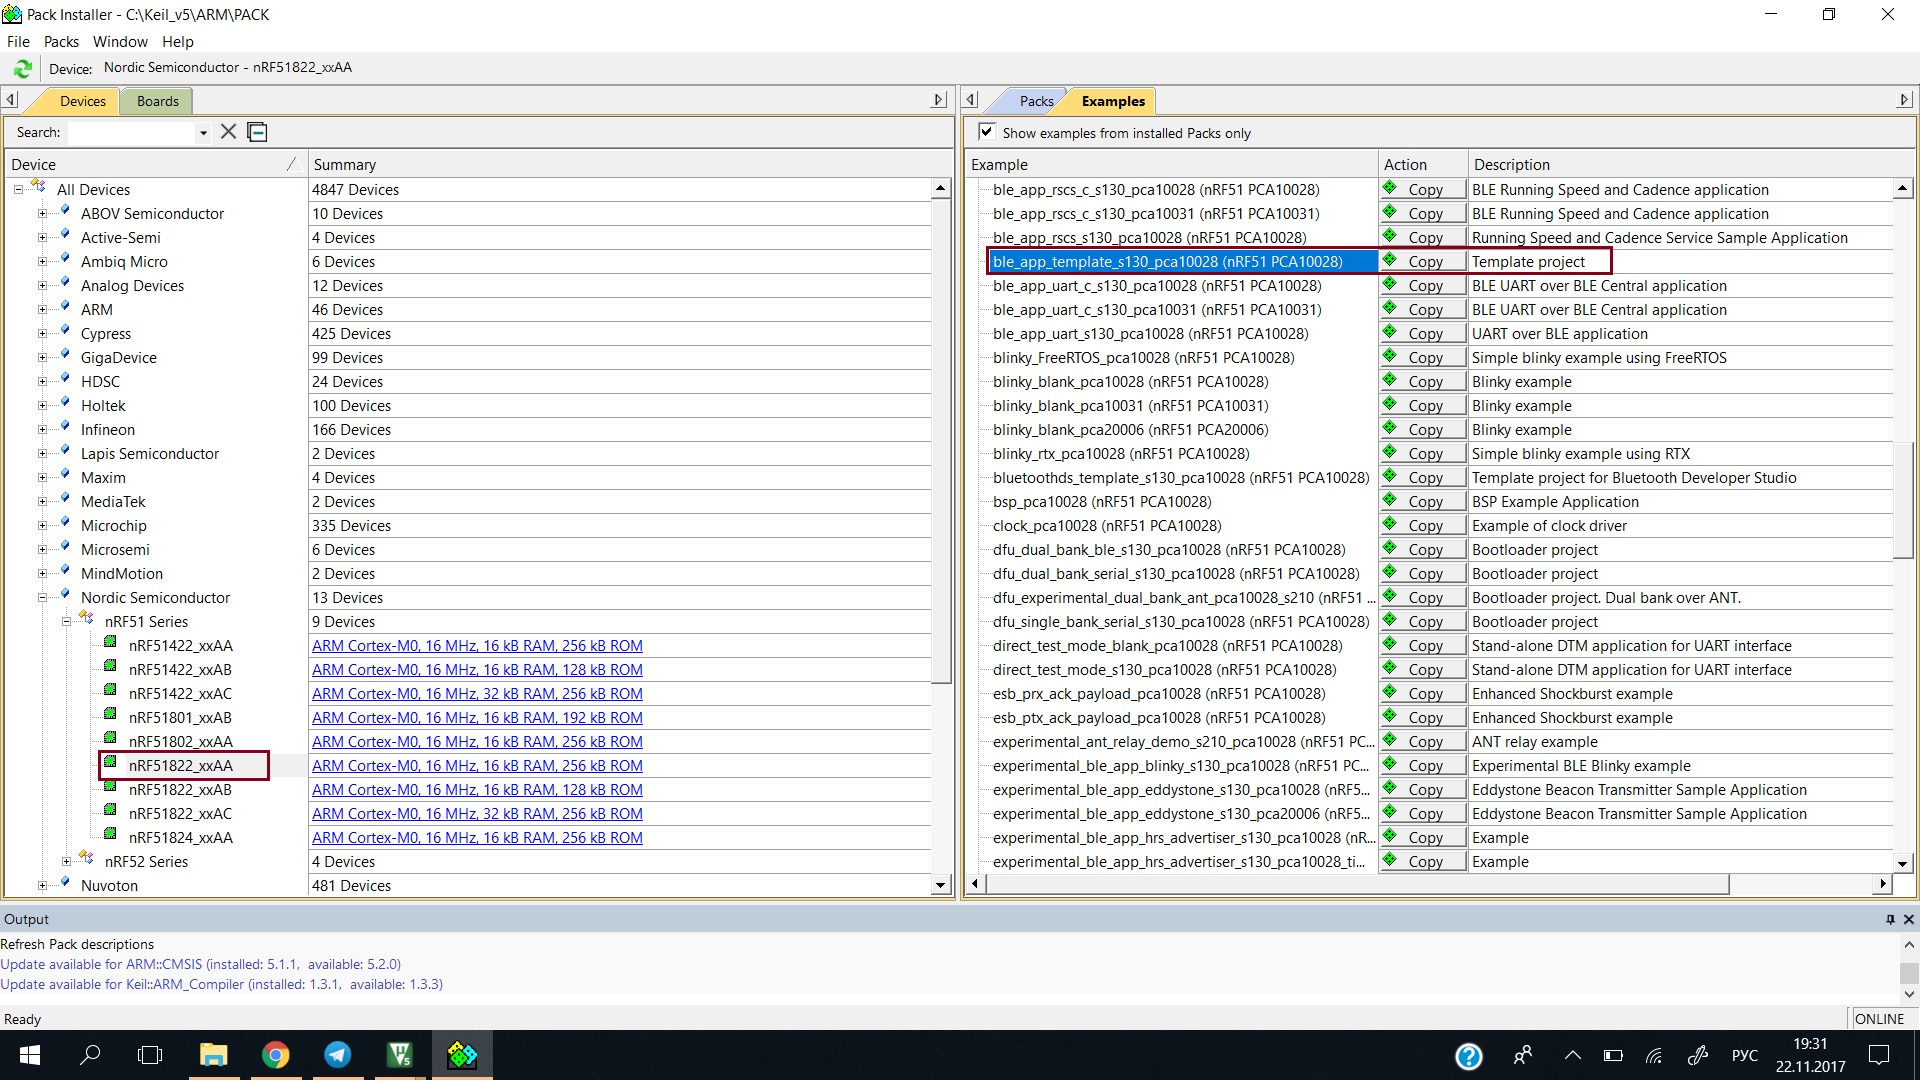
The primary task is to create a template in Keil and connect all the necessary library files to use the BLE stack. The process itself from scratch is quite time consuming, so we will use the standard template that can be found among the many examples that Keil kindly hides in the Pack Installer .
The functions implemented in the example are, for the most part, necessary for creating a connection and organizing the reaction of the BLE stack to events that occur (connection, disconnection, etc.). At the moment, I don’t see any reason to dwell on them in order not to overload with information, and don’t touch them yet, as long as there is no common understanding about the process of using the stack (In the draft attached to the article, all functions are uncommented in Russian). More information about the stack itself can be found at the link . You can experiment with the connection settings in the future as well as with stack events, but this is not a topic for this article.
4. Stack firmware and applications
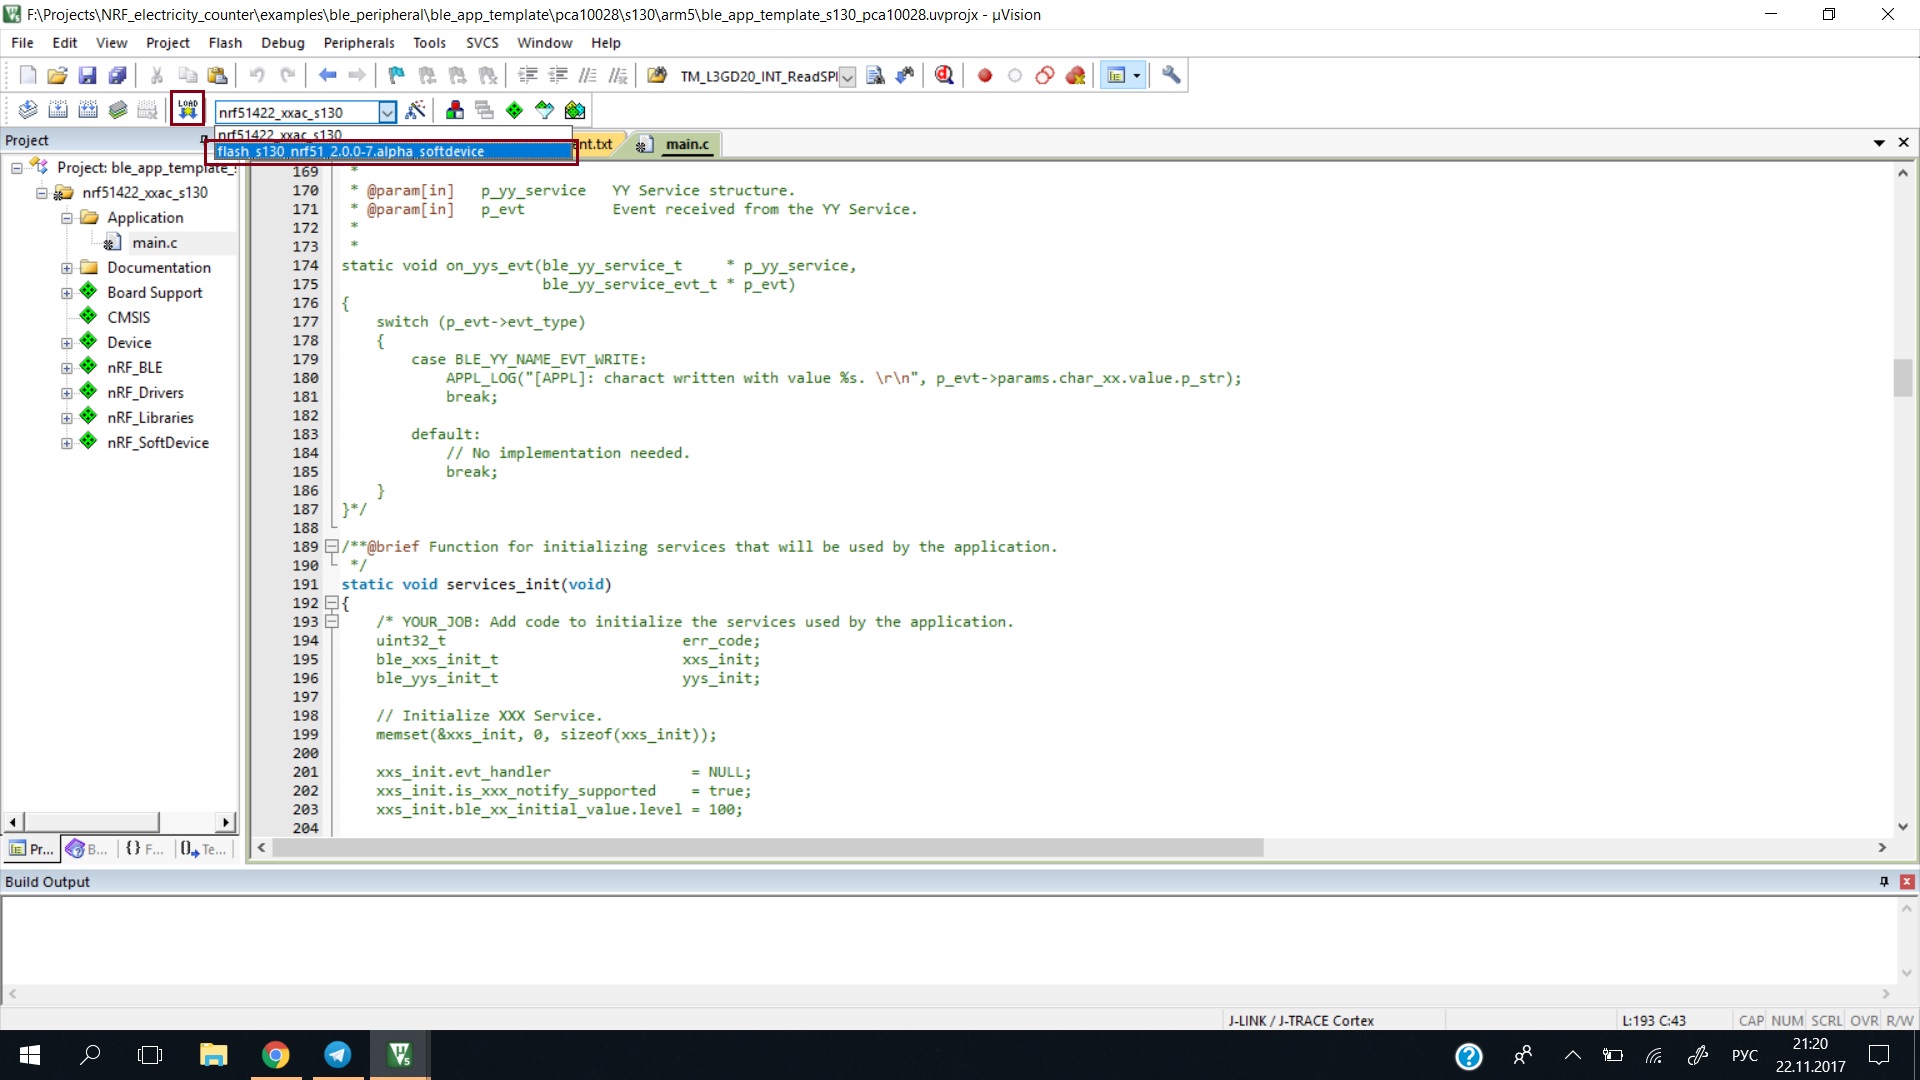
As it has already been mentioned more than once in other articles on the implementation of the BLE stack on various devices, the BLE stack is sewn into the bottom of the flash memory, after which the user application is loaded. Fortunately for the uninitiated in this aspect, in the template used, the addressing is already set, and all we need to do is in the Select Target section, select SoftDevice S130 and click download.
Now in the same way we will load the compiled user application.
5. Preliminary testing
At the moment, the downloaded application does not perform any useful functions for us, but it is able to send advertising packages with the ability to connect to the device. Detailed information can be fully obtained in the article that I mentioned earlier.
In order to connect to the received device, we need to download the nRF Connect for Mobile program on an Android smartphone. We launch, scan the air and find our device - Nordic_Template . We can connect, check whether everything is correct. In the future, using this program, we will be able to read and write the characteristics of the device, thereby interacting with it.
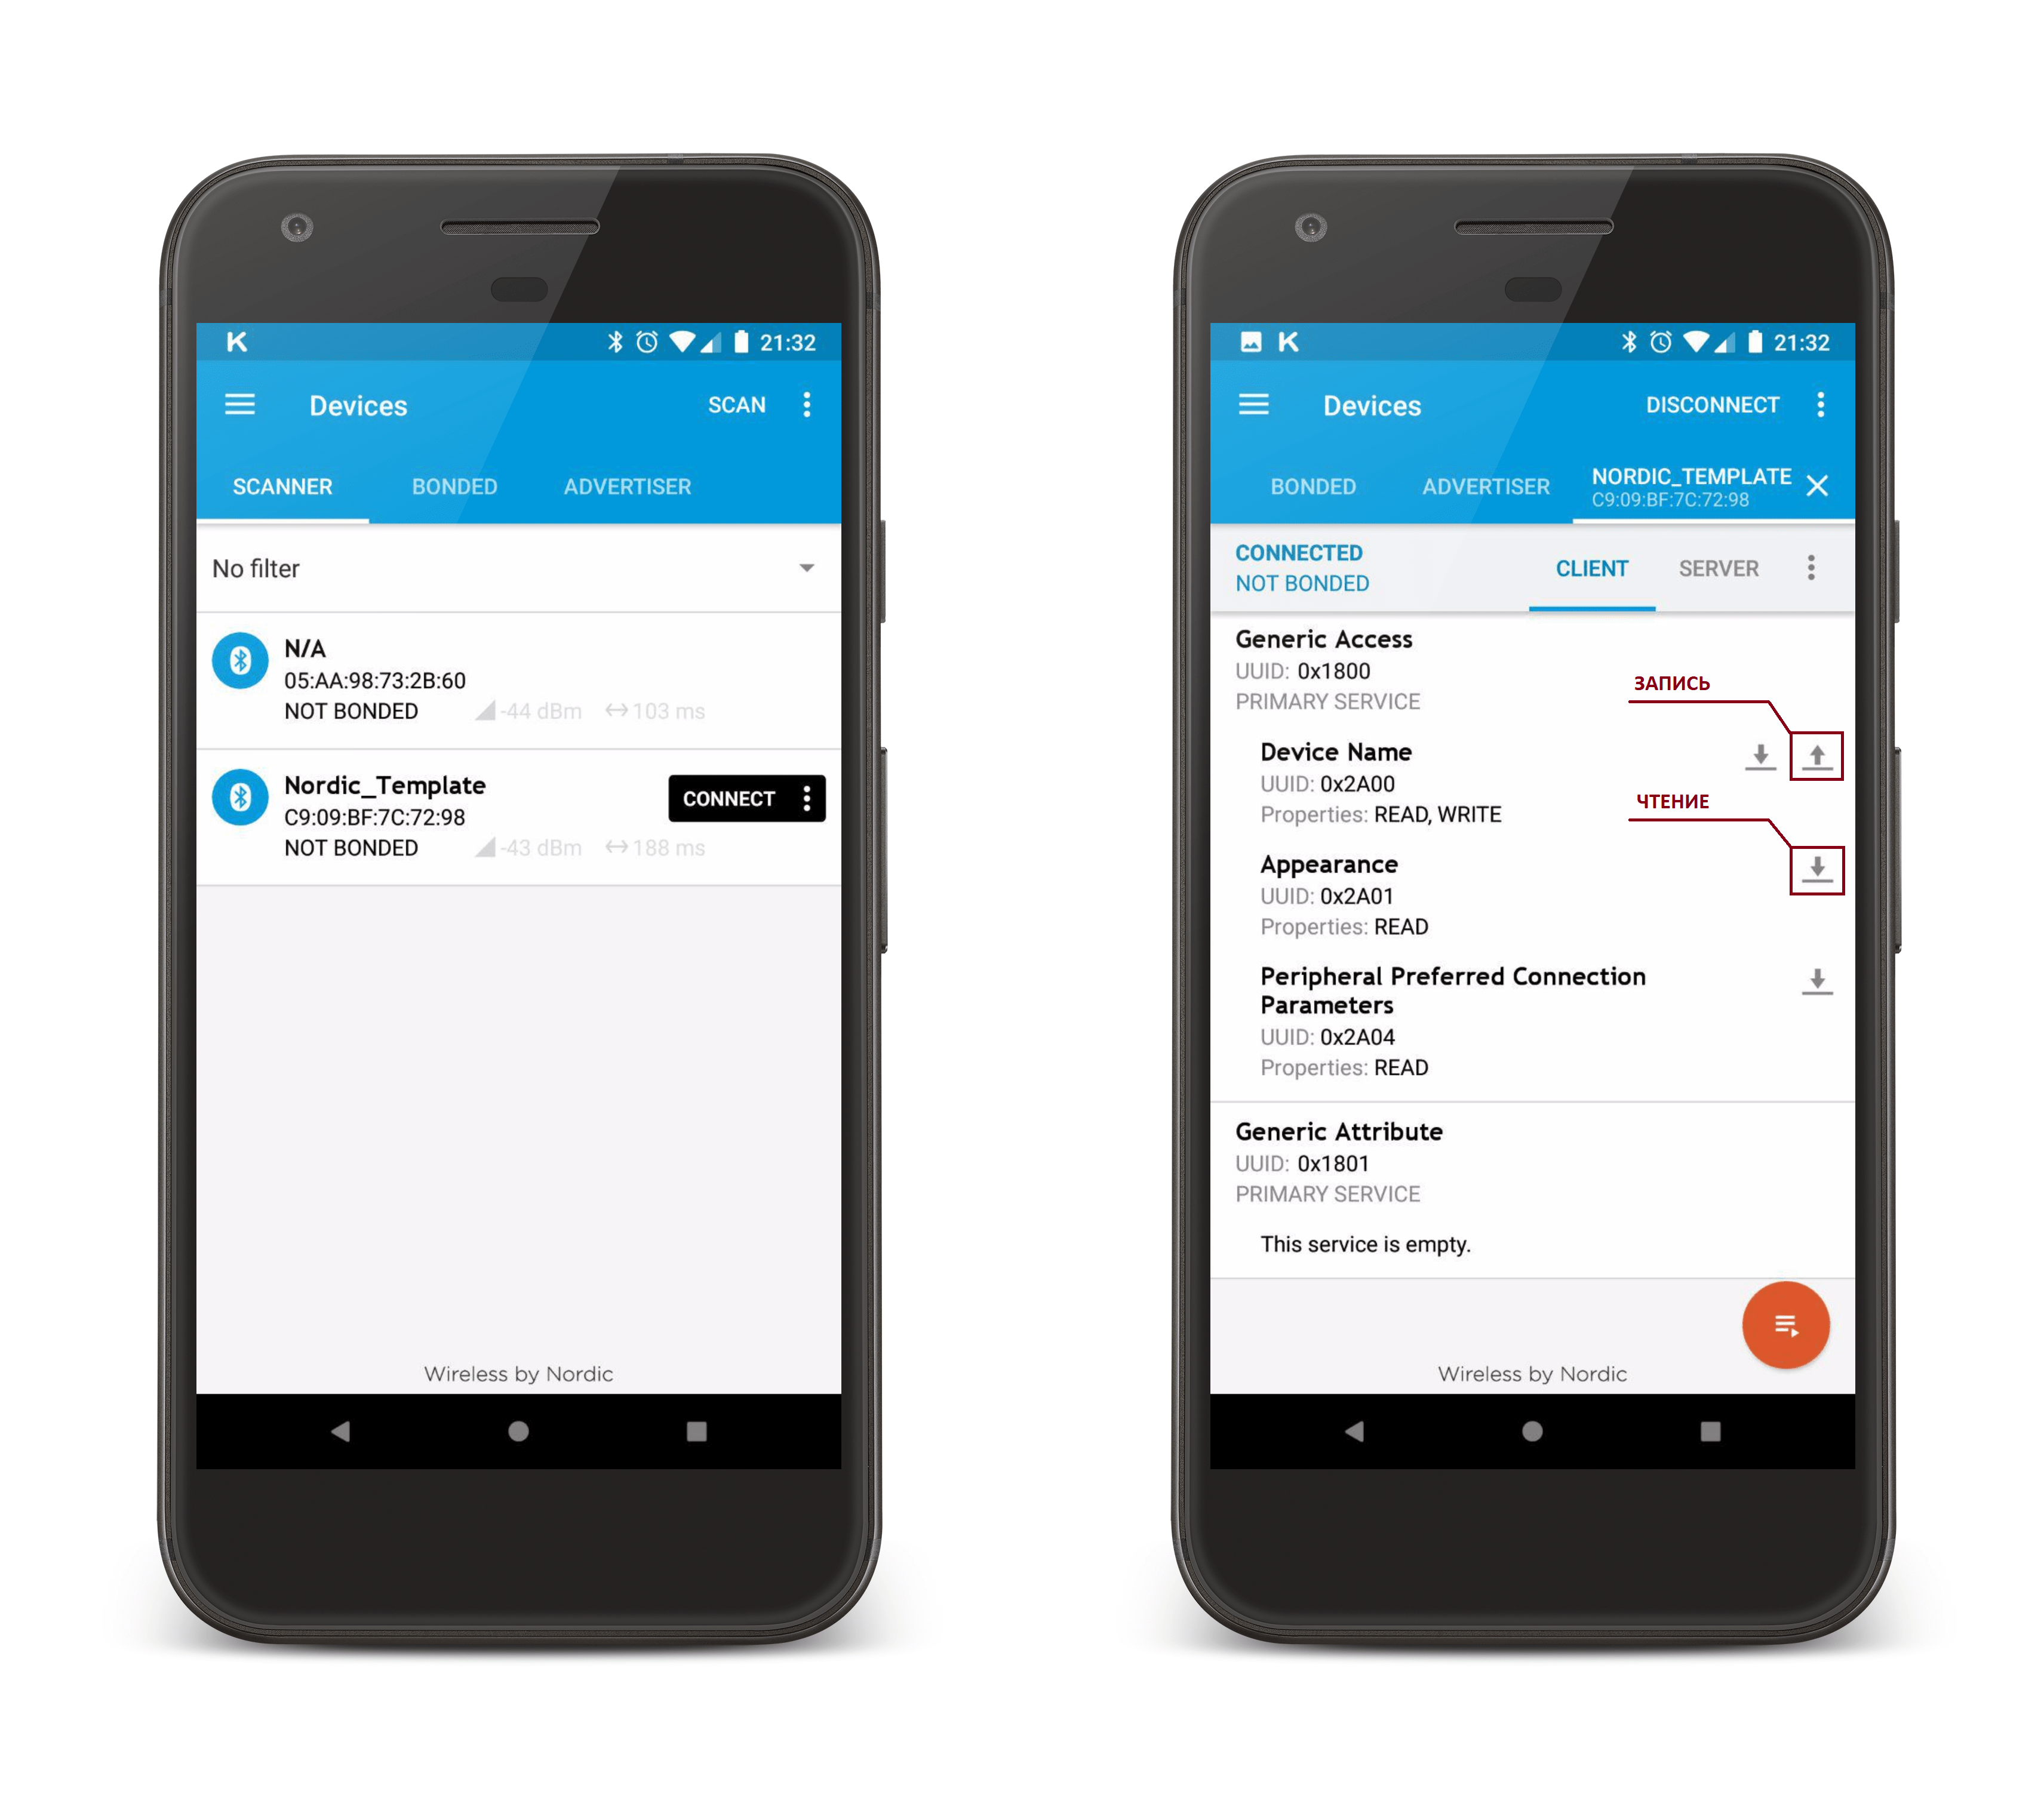
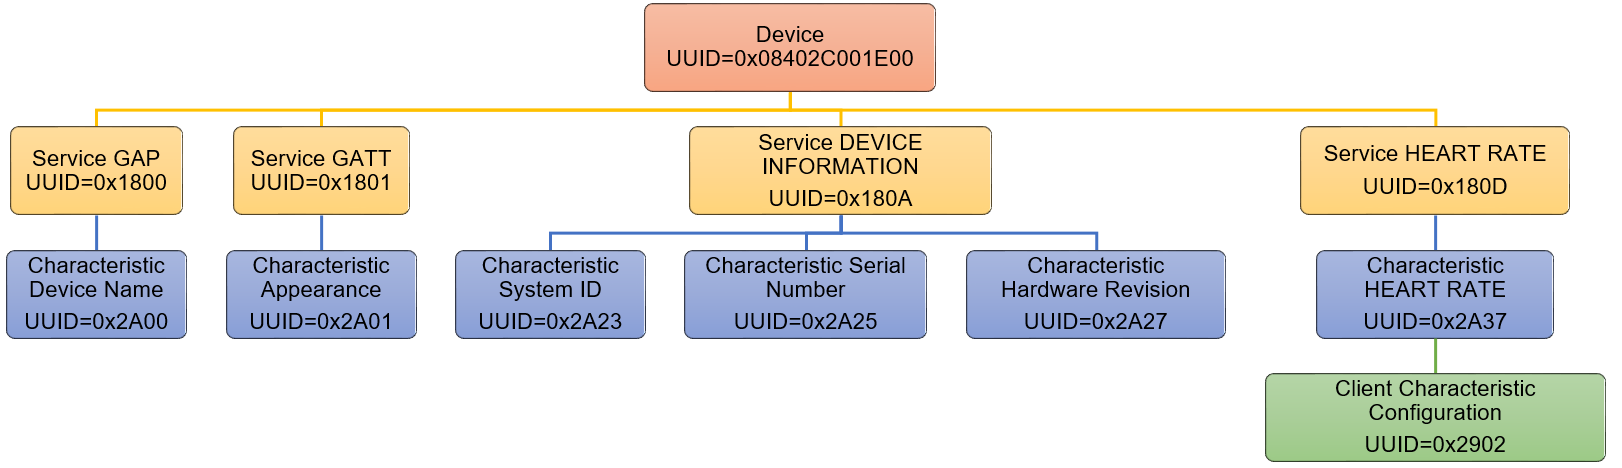
As mentioned earlier, at the moment the device does not carry any useful data in itself, with the exception of service parameters. Interaction with the device in BLE is provided through reading / writing characteristics. Characteristics are combined into services, they are then combined into profiles, but in general this is quite a serious topic for a separate article. However, it is still necessary to explain in simple words what kind of function in the first approximation carries the characteristic. Formally, this is a stack variable that has certain parameters (size, type, access type) that define interaction with it. For all characteristics, you can enable read, write, notification, etc. Through a characteristic that has permission to write, you can transfer any data to the device, and through a characteristic with read permission, you can get data.
So, for example, you can implement a request-response system . Imagine a device that has parameters (temperature, humidity, acceleration). We can create 3 different characteristics and read their values. Now imagine that we need to receive data for a certain period (for the last month, for example). In this case, we will create a characteristic with recording resolution and we will write the month number to it, and the device, in turn, will put the requested data into the characteristics.
But back to our task. In order to control the LED, you must create the appropriate service. The service will contain 2 features:
- characteristic to control the state of the LED (Write only) ;
- characteristic to determine the current status of the LED (Read only) .
Before you start writing your first service, you need to understand that each service and each characteristic it contains must have its own unique address (UUID) . Thanks to this address, devices (for example, a smartphone) can determine what needs to be done with specific data. It is worth noting that a number of profiles, services and characteristics are standard for BLE, have their 16-bit addresses registered in Bluetooth SIG and a predetermined set of functions performed. The smartphone, receiving data from the device on which one of these profiles is implemented, knows exactly the composition of the package and has all the necessary functions for the further implementation of the information received.
Only 128-bit addresses are available to us. We assign 3 UUID addresses, one for the service and two for the characteristics. To do this, we use a special generator designed to form random UUIDs. I advise you to select Time-based when generating, then UUIDs are generated sequentially with the same main part for all three addresses.
/* UUID ( UUID ) */ #define LED_BASE_UUID {0x66, 0x9A, 0x0C, 0x20, 0x00, 0x08, 0x1A, 0x8F, 0xE7, 0x11, 0x61, 0xBE, 0x00, 0x00, 0x00, 0x00} /* UUID ( UUID ) */ #define LED_SERVICE_UUID 0x1523 #define CONTROL_CHAR_UUID 0x1524 #define READ_CHAR_UUID 0x1525 /* UUID */ static ble_uuid_t m_adv_uuids[] = {{LED_SERVICE_UUID, BLE_UUID_TYPE_BLE}}; Now let's proceed directly to the creation of the service. In our template, fill in the services_init function:
services_init
uint16_t led_handles; // ( ) void services_init(void){ ble_uuid_t ble_uuid; /* 128 - UUID */ ble_uuid128_t base_uuid = LED_BASE_UUID; uint8_t uuid_type; ble_uuid.type = BLE_UUID_TYPE_VENDOR_BEGIN; ble_uuid.uuid = LED_SERVICE_UUID; sd_ble_uuid_vs_add(&base_uuid, &ble_uuid.type); sd_ble_gatts_service_add(BLE_GATTS_SRVC_TYPE_PRIMARY, &ble_uuid, &led_handles); } The next step is to implement a universal function for creating characteristics:
char_add
/* * UUID - * handles - ( ) * n_bytes - * iswrite, isnotf, isread - , , */ uint32_t char_add(uint16_t UUID, ble_gatts_char_handles_t * handles, uint8_t n_bytes, bool iswrite, bool isnotf, bool isread){ ble_gatts_char_md_t char_md; ble_gatts_attr_md_t cccd_md; ble_gatts_attr_t attr_char_value; ble_uuid_t char_uuid; ble_gatts_attr_md_t attr_md; memset(&cccd_md, 0, sizeof(cccd_md)); BLE_GAP_CONN_SEC_MODE_SET_OPEN(&cccd_md.read_perm); BLE_GAP_CONN_SEC_MODE_SET_OPEN(&cccd_md.write_perm); cccd_md.vloc = BLE_GATTS_VLOC_STACK; memset(&char_md, 0, sizeof(char_md)); char_md.char_props.notify = isnotf; // ; char_md.char_props.write = iswrite; // ; char_md.char_props.read = isread; // ; char_md.p_char_user_desc = NULL; char_md.p_char_pf = NULL; char_md.p_user_desc_md = NULL; char_md.p_cccd_md = &cccd_md; char_md.p_sccd_md = NULL; /* UUID - 128 - */ char_uuid.type = BLE_UUID_TYPE_VENDOR_BEGIN; char_uuid.uuid = UUID; memset(&attr_md, 0, sizeof(attr_md)); BLE_GAP_CONN_SEC_MODE_SET_OPEN(&attr_md.read_perm); BLE_GAP_CONN_SEC_MODE_SET_OPEN(&attr_md.write_perm); attr_md.vloc = BLE_GATTS_VLOC_STACK; attr_md.rd_auth = 0; attr_md.wr_auth = 0; attr_md.vlen = 0; attr_char_value.p_uuid = &char_uuid; attr_char_value.p_attr_md = &attr_md; attr_char_value.init_len = n_bytes; attr_char_value.init_offs = 0; attr_char_value.max_len = n_bytes; // ; attr_char_value.p_value = NULL; // ; /* */ sd_ble_gatts_characteristic_add(led_handles, &char_md, &attr_char_value, handles); return 0; } The functions of creating the service and features are ready Now let's estimate what else we need. And we need two things:
- write processing function in the characteristic (Write Only) ;
- the function of updating data in the characteristic (Read Only) .
Let's start with the recording processing function. The stack has one interrupt handler ble_evt_dispatch , which is called in case of any stack events. From this handler, all other user interrupt handlers are called that respond to an event if they have a defined response. In this case, we will not write a separate handler, we will write only a function that performs actions in accordance with the data obtained, and we will check the event of interest in one of the standard handlers.
on_ble_evt
static void on_ble_evt(ble_evt_t * p_ble_evt) { uint32_t err_code; /* */ ble_gatts_evt_write_t * p_evt_write = &p_ble_evt->evt.gatts_evt.params.write; switch (p_ble_evt->header.evt_id) { case BLE_GAP_EVT_CONNECTED: err_code = bsp_indication_set(BSP_INDICATE_CONNECTED); APP_ERROR_CHECK(err_code); m_conn_handle = p_ble_evt->evt.gap_evt.conn_handle; break; case BLE_GAP_EVT_DISCONNECTED: m_conn_handle = BLE_CONN_HANDLE_INVALID; break; /* */ case BLE_GATTS_EVT_WRITE: /* ( ) */ write_handler(p_evt_write->data); break; default: break; } } The function of setting the status of the LED will not be given, it is quite simple, especially in the attached project this will all be implemented.
We now turn to the function of updating data in the characteristic. Our smartphone itself does not know that the state of the LED has changed. And even in the case of a change in the variable responsible for the state of the LED on the device, reading the characteristic will still show the unchanged value. To change it, you must register this change in the BLE stack. Add another function (it is not universal, written for a specific characteristic, but is intuitive and easily rewritten for any needs):
data_update
uint32_t data_update(uint8_t *data, uint16_t value_handle) { uint32_t err_code; ble_gatts_value_t gatts_value; uint8_t update_buffer[1]; /* ( ) */ memcpy(update_buffer,data,(sizeof(update_buffer)/sizeof(uint8_t))); memset(&gatts_value, 0, sizeof(gatts_value)); /* */ gatts_value.len = sizeof(update_buffer)/sizeof(uint8_t); gatts_value.offset = 0; /* */ gatts_value.p_value = update_buffer; /* */ err_code = sd_ble_gatts_value_set(m_conn_handle, read_handles.value_handle, &gatts_value); return err_code; } It remains to be easy: to initialize the service and create characteristics in the main function:
main
/* ( ) */ ble_gatts_char_handles_t control_handles,read_handles; int main(void) { uint32_t err_code; bool erase_bonds; timers_init(); buttons_leds_init(&erase_bonds); ble_stack_init(); device_manager_init(erase_bonds); gap_params_init(); advertising_init(); /* */ services_init(); /* */ char_add(READ_CHAR_UUID,&read_handles,1,0,0,1); /* */ char_add(CONTROL_CHAR_UUID,&control_handles,1,1,0,0); conn_params_init(); /* */ err_code = ble_advertising_start(BLE_ADV_MODE_FAST); APP_ERROR_CHECK(err_code); for (;;) { power_manage(); } } 7. Final testing
Compile, upload and run nRF Connect for Mobile again. We see that we have a service and two characteristics. They are unknown to the smartphone, since such UUIDs are not listed in its bases, and he does not understand what to do about it. However, now we can safely control the LED by writing to the characteristic "1" or "0" , as well as read its current value. This example can be applied to almost any task, for example, taking parameters from sensors. In the future, you can write an application for Android, which will easily use your services for your purposes.

8. Conclusion
This article is designed to simplify the understanding of the data exchange process and allow beginners to take advantage of a ready-made, disassembled example, in order to further in practice to comprehend all the features of the BLE stack from Nordic Semiconductor. For the sake of simplicity, some features and nuances of implementation have been omitted, and there are quite a few of them in such devices. However, no article will help to understand without systematic entry into the topic through trial and error. All of the above will only allow you to start to make mistakes as quickly as possible. Good luck)
PS If the subject and manner of presentation are warmly received, then there is a chance to expand the selection of articles for the sake of modern trends, and in the near future to consider some of the nuances of the BLE stack, the implementation of popular peripherals (ADC, SPI, UART, I2C) using both libraries and in registers, as well as BLE application under android to complete the cycle.
X. Useful materials
Source: https://habr.com/ru/post/343166/
All Articles