The internal structure and optimization of the webpack bundle
Webpack has actually become the standard for building large JS applications. Almost everyone uses it. For the developer, the webpack looks like a magic black box: if you throw files and a small config into it, a bundle will automatically appear at the output.
To understand the secrets of this magic, we turned to an expert, a man who repeatedly climbed inside the webpack, Alexey Ivanov. He is ready to explain what the bundle looks like from the inside, how different settings affect it, what and why some of them can lead to, and also tell how to debug and optimize all this.
The material is based on the report by Aleksey Ivanov at the HolyJS 2017 conference, held in St. Petersburg on June 2-3.
In the company of Evil Martians, I am engaged in the service "eBay for business". eBay puts forward fairly stringent requirements, for example, on how much a site should weigh, the first page, how much it should load. In order not to go beyond the limits, we regularly look at the contents of our bundles: what goes there and what to do so that no strange person gets there.
')
To do this, we use various tools: webpack bundle analyzer, webpack runtime analyzer and others. It looks like this:

He is looking for your build. When you have finished collecting the bundle, it takes the result of the assembly, parses it and shows three beautiful mapy. And when you do it all the time, you start to notice oddities.
And here it goes like this: it seems you did everything according to the instructions, but something does not work. And the inspector says that some kind of garbage happened. What to do in such a situation is actually not very clear.
My first idea was to go on the Internet and look for new manuals, new instructions that would tell what is going wrong. But it turned out that there were thousands of reports about which webpack is good, and there was no information about what a webpack does with your code, how everything is arranged inside it and why it does so and not otherwise.
After that I had to conduct a series of experiments: run a webpack with an empty bundle, with one file and empty js, with one import, etc. And it helped me, I fixed all the problems. And then I thought that I, probably, was not the only one, and many faced such problems. And so I decided to share my experience.
Let's start with the CommonJS modules. CommonJS modules are such a thing when you write require in some files and require or export or module.exports in others.

About CommonJS modules, you need to remember the following: they appeared in the node, and when you use a webpack, you actually use not just CommonJS modules, but a piece that allows for compatibility with the node. In general, CommonJS is required:
The second obvious thing is that everyone probably knows it, but I’ll still tell you. What is rezolv ways? Here we have require (), inside it we write the way we say that we need to re-register. There are simple options when we write a dash or dash with dots. And it goes either to the current folder or to the root system, etc. There are no nuances, everything is simple.
Further, if you have not written the extension, it will first try to add the extension js. If not, it will try to find the folder where index.js is. If we are talking about node, then it looks for by default not only js, but also JSON, files with the node extension, and more. In the webpack, all this is not used, so you can forget about it for now. But this is what everyone knows.
The most interesting thing is what happens when we try to import the module. If we wrote a module, what does node and, accordingly, webpack do? It goes to the current node folder, searches for the node_modules folder, goes into it and searches for the folder with the name of the module. If she found her, then she takes her, and then everything is fine.
If she did not find her, she goes to the folder one level higher, after that - another level higher, and so on until it reaches the root of the file system. And here we have the first nuance, which can be well caught. It looks like this:

You put some kind of library from npm, and it says that it needs the lodash 1.0.0 dependency, and you use lodash 5.0.0 in your project. And so, if this happened, npm will create its node_modules folder and install its own version of lodash. If there are several such libraries, then each may contain a version of lodash that is not related to everyone else. If you use node, no problem, but if webpack, then all versions of lodash are loaded into the browser. These are the basic things that a webpack needs to do to work well.
The basic bundle device looks like this:

Here we have a file, and everything seems to be fine there, but there are nuances. The browser doesn’t know about require, neither about exports, nor about the module. He needs to talk about it somehow. The easiest way is to take the contents of the file, wrap it in a function in which all these things are passed in the parameters, and then at some point execute it. In fact, the webpack does something like this, but with a slight change.

First change: we change require to __webpack_require__. Why do you need it?
In fact, for two things. First, so that when you unload yourself with js in an unnatural way, bypassing the webpack, for example, via JSONP or something else, it does not break the build. Because if a function is created with the name require, then there may be all sorts of bad things, and so there is some protection against this.
Secondly, because of the way in the webpack to tag the functions that it is porting inside the bundle. Accordingly, we can do all sorts of optimizations.
I will show it again. Here we have written path:
Here we have in brackets 0:
Why is that? Browsers have no file system. Therefore, when webpack collects modules into one file, it actually puts them into an array. The number in parentheses is the default index in this array. This will affect us in the future. Why an array? Because in comparison with any objects with keys it is the most compact option and it will weigh the least.
That is, came webpack, wrapped all the modules in a function, put all the functions in an array of modules and added an anonymous function to the beginning that loads it all.

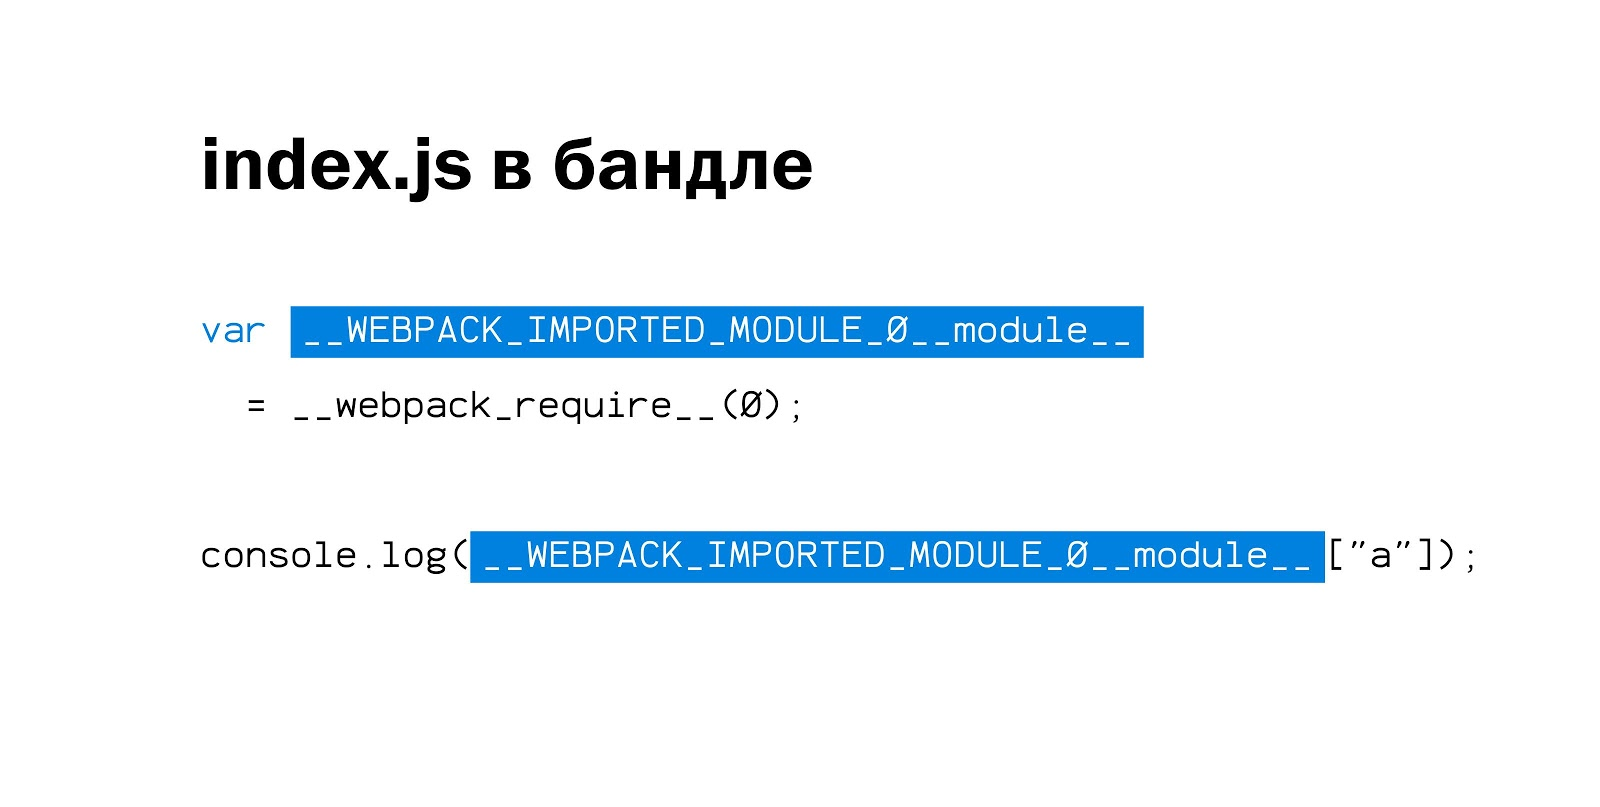
The first line that is important to us is installedModules. That is, when the webpack loads an array, it does not initialize what is in it, automatically - it continues to lie in the array with dead code.
At the moment when you recover the first file, the webpack creates an instance of this file, which somehow can continue to live, and everything is further stored in it and is more or less supported.
Next we have a function __ webpack_require __, which we will pass inside. And there is such a root place that calls your file, and you start building your root bandl. That is, we loaded everything into an array, called the function, declared the function __webpack_require__, and called the root file.
How exactly does __webpack_require__ work, what does it even do? Again, as I have already said, we are looking to see if we have a cache in the module. If not, go ahead, and if there is, return from it. Further, if not, we create a stub and add it to the array. The stub looks like this:

We have IDs (mostly numbers, but sometimes not) and the exports function. By default, it puts an empty object, so when we call this thing inside the webpack module, by default it will be an empty object there.
Next comes the following. We take our code and call what we had in the array, like this:

That is, we call not just a function, namely via call, so that exports also get into the first object. This is for backward compatibility with the node. The result is approximately the following:

From this point on, our module, which lives in installedModules, has no longer an exports object, but what we assigned and returned to it. Why is this interesting and important? Because, since we are doing everything in this way, we have one working instance of our module in the bundle, and we can use it as a closure.
That is, if we declare a variable in the module, it will be common to all instances. If we export to exports some method that allows, for example, to increment this variable inside the closure, then this variable will also be available inside. If you declare a library here and assign some plugins to it, the instance libraries with all the plugins will also be shared. Accordingly, with this piece you can share information with all modules and do other interesting things.
After we have all initialized, created an instance of the module, we return what is inside the exports, and calm down on this.
In fact, if we were talking about CommonJS and the simplest bundle, then we could end it, because in the simplest version of the webpack, it does nothing more. In practice, the webpack has become popular not because of the fact that he knows how to do it this way, but because of the fact that he knows how to do more complex things. For example, he can do this:

That is, when you specify in require not the full path of the file, but some regular one, the webpack will be able to collect it. At the same time, since he is not engaged in analyzing the code live, he cannot know what is actually being used, and just in case drags everything that can be there. So how does it all work? Webpack in this case will create a new module in the array, in which it will write the logic about the resolve paths.

Inside the module itself lives a map that describes all possible paths. That is, if you have 20 files, then he will put everything here and make 40 name choices, if you specify, for example, with js or without js. Next, it will make a function that will carry out the evolution of the expression passed into the function, and compare what is in the array. If she finds a match, she will return the body, if not, throw an error. In this place, too, there may be a problem. I think many have come across it.
The problem is as follows. We have a library of moment.js, which allows you to perform various operations with dates. When you use it through node, there is a small nuance. Inside the root file of moment.js there is a line of require ('./ locale /' + name). Accordingly, the webpack goes inside the locale folder, finds 118 locales there, loads them all into a bundle and creates a map of about 250 keys. Probably, this is not exactly what I would like to see.
For webpack, there is a ContextReplacementPlugin. He checks the first part of the mask. If the mask matches what is written in the first argument, instead of returning what it found in the file system, it returns what you passed to it with the second parameter.

We have a bundle, it's all good. It connects files, resolves paths, and so on. Sometimes we need to make sure that he does not live on the basis of the data that we have, but receive some information outside.
Suppose you have dev and production versions that have a different path, and you want the webpack to work with dev to work with one path and during production with another. Or there are different version numbers. Another use case that is used in many libraries is the task process.env.NODE_ENV. This variable is a kind of common template that says that these functions should not be used in development mode, and, for example, functions for debugging - in production mode.
The question arises, how do we transfer these variables? There is a DefinePlugin where you can declare these variables and, therefore, they will fall inside the bundle.

DefinePlugin takes the line to the left, in our case it is VERSION, then takes the line to the right, goes to the file, and the regular replaces the old line with the new one. As a result, the result looks like this:

JSON.stringify adds quotes. If there were no quotes, we would have just the number 1.0.1 and everything would be broken. What happened here? If, after replacing any string or number, the webpack can understand that this is an if condition, and it understands that the left side is compared with the right side and both are constants, then it replaces them with true or false. This happens so that UglifyPlugin can come in and tidy up.
The second interesting thing: as you can see, require has remained require. It has not been replaced by __webpack_require__. Accordingly, require does not hit the bundle and will not be in the build. If you want to disable some of the functionality, here is one way to do it. But, as elsewhere, there are nuances. The problem looks like this:

If you want to be fashionable and use, for example, babel, and it has destructuring, then you can write NODE_ENV. Unfortunately, it all breaks down. But why? This is how the code looks after the conversion:

That is, one variable refers to the second, which also something comes. And inside your condition will look like this: NODE_ENV! == "production".
In fact, if you roll out this code in production, everything will work as you would like. Because the variable comes false, and what is inside the if will not be executed. But since the webpack does not know what variables are and it does not do a complete analysis of the code and does not find out what it will be in this variable, it cannot understand that what is inside does not need to be loaded. In this situation, the module, which is inside and should not be loaded, will actually load.
Therefore, once again, if you use DefinePlugin, be sure to use string replacement, i.e. full line is replaced with the full line, no abbreviations.
Webpack tries to emulate a node, because most of the modules that are in the node_modules folder can be purely node. The standard variable in node is process. Therefore, when you do not specify process.env, and some of the libraries, which in the import, use process.env or simply process, the webpack thinks that this is a node module and adds a polyfil. As a result, not only did the code not decrease, so the polyfil was also added. That is, any variable that is by default inside node, if it is used in your file and is not replaced or declared, will be replaced with a polyfile when building a webpack.
Debugging Functions in Libraries
Redux
...
If you do not add a process for React, Redux, etc., there will be many polifilov.
What does Uglify do with all of our code?
UglifyPlugin
First, UglifyPlugin comes in and removes unnecessary spaces, hyphens, replaces long variable names with short ones, but does so within the function.

But if variables are declared outside the function, globally, other functions have access to them. So when we give up such a code as Uglify,


then all variables will remain. Now we come to the most interesting, to our true and false.

What's going on here? In some way, we have made a value inside the condition that has become a constant and is guaranteed not to change. When Uglify comes here and sees this, it will leave like this:

If a variable lives in a condition that is not static, Uglify will not be able to understand what is happening and will not delete anything.

Therefore, even if you declared a variable before a condition and indicated that it is false, and immediately after it comes an if, then Uglify will still not parse the code. All this code will eventually remain.


Nothing more global happens. The difference between import and export is about the following. First, the keys in import and export are necessarily immutable, i.e. we cannot assemble them from parts, they must always be constant. Secondly, import and export should live in the upper scope.
What is the joy of using import and export? It looks like this:
In theory, a webpack can determine exactly what is used in our application, and tag them accordingly. In practice, everything is somewhat more complicated.
One of the main features that is in the webpack 2 is an understanding of import and the ability to do Tree shaking. It would be great if everything worked, but there is a problem.

In fact, the fact that export is not used does not mean that the code will not be executed and it will not have side effects. If the code has side effects, there is a chance of breaking something.
Webpack is very concerned about backward compatibility. Therefore, he tries to make sure that no deletion breaks the builds. Therefore, he does the following:

What happens after the webpack reads this? First, the place it imports transforms into a CommonJS module.
It's more interesting here. What happens in the file from which export left? First, the export was removed before the word const. Secondly, for the constant that is exported, we manually wrote __webpack_exports__ with some kind of key. And everything seems to be good. When Uglify comes here and sees an unused constant 2, it deletes it.

But there are nuances.

If one of the exports used a variable that was previously imported from some import, then in this place the webpack and Uglify will not delete anything. More precisely, the const method will be deleted, and the import will remain and its contents will also be added to the bundle. Why? Firstly, because the webpack does not know whether it will be used or not, whether there are side effects or not, so he left it. Secondly, the module is used, so he left it too. After that Uglify came to us, saw the method and deleted it, and left the import, because it is actually a call from the array, there may be side effects and in fact Uglify does not know anything about it. Therefore, it will leave this variable, and it will live inside the array.
For example, we decided to use lodash-es, which is written with import and export. We import a method from it and hope that everything else will not fall, but in fact it will not work.

In the line where from, we have imported all the modules that are in lodash, and now they will all get into your bundle. Here from this problem not to leave. You need to use some kind of babel plugin that will replace lodash with specific methods, or manually write down everything you need up to the method.
And another very important thing: by default, if you use babel with default settings, then it actually transports all your beautiful imports and exports to the usual require. Therefore, if you have a babel with default settings, then you will not get any imports inside the webpack, but only the old require will be. Accordingly, if you want them to work, you need to replace transpiling in import and export in babel.
A chunk is a piece of code that can be loaded synchronously or asynchronously. In order to load a chunk, it is necessary to slightly correct the code that is engaged in initialization. It is edited something like this - the window [“webpackJsonp”] function is added.
Chunky
We have some file that is first loaded synchronously, you add it to the header. A function has been added to this file. All other files consist of a call to this function, to the input of which comes an object in which there is, for example, an id of a chunk, a list of modules, etc.

Further, after we have loaded all this, the webpack takes the loaded modules and simply adds the necessary indexes to the initial array. Nothing else happens, we continue to use the first array.
With synchronous chunks, everything is simple. We have two files: first we uploaded a file in which there is a load code, then after it we added another file in which we load the next piece of modules. Here it is necessary to understand: if we load it like this, then the order is important for us and, accordingly, we cannot add asynchronous loadings or carry out parallel loading, because the second function will be executed, will not find anything and will break everything.
Asynchronous chunks work the same way. There is only one nuance. We need to load them not at the time of loading the page, but as a separate request by adding a script tag to the header on the fly. In code, it looks like this:

We have an import function in which we prescribe what we want to import, and then it returns us promises. And when it is ready, it returns us an error or sends what we downloaded. In transpiled form, it looks like this:

We add a function __webpack_require __. E, which asynchronously loads other files. In it, one moment is important to us, which looks like this:
If we had chunks called numbers, then nothing terrible would have happened. We would give the numbers there, and everything would be fine. But in order to use the cache or it is more convenient to deal with it, we usually name them or add some tricky line to the url so that this url is unique. When the webpack needs to load this file, it needs to know the name.
Accordingly, all the names of all the chunks as objects are always stored inside the first file. And every time we change a chunk, its hash and name change - and this part of the code is also generated.
Actually, how are chunks created? The easiest way is using CommonChunkPlugin.

It works very simple. We add a plugin, telling him that “minChunks: 2” means that if a common plugin is used in two chunks, then let's create a separate chunk that will load synchronously, and the common part will be in it. But at the same time there are a couple of nuances.
The first caveat is when we wrote like this, and we have chunks that are created through import, it will not work with them, since these chunks are considered children, and they have a separate logic.

For example, you work with React and, so that you have not five copies, but one, you need to add children: true, then it will take out a common module from children.
The second caveat: when we have a code that takes everything in the node_modules folder and puts it in a separate chunk. What is the logic here? We rarely update modules, we have them in a separate file, and we want to cache them. We change our code often, we want to cache it separately, and it is necessary that only it is updated, and not all anew. So the most part will become like a constant and will not be loaded every time, and a smaller part will be updated.

This code allows us to do this. But with him there is one nuance. He does not work.
The example with node_modules does not work for the cache:
It does not work for two reasons. The first looks like this:

In the __webpack_require__ index is not always the first. There may be another, random index from the array. Accordingly, if you delete or add a file, the index of the first object may change. The code of the first chunk changes always and, accordingly, its hash changes, the sum and everything else.
The second problem: in order to load chunks asynchronously, a map of their names is necessary. Accordingly, if the contents of any chunk changes, then the map that is needed to load them also changes.

The first file where the webpack function lives, which loads all of this, is guaranteed to change always with every change of any file. What to do with it?
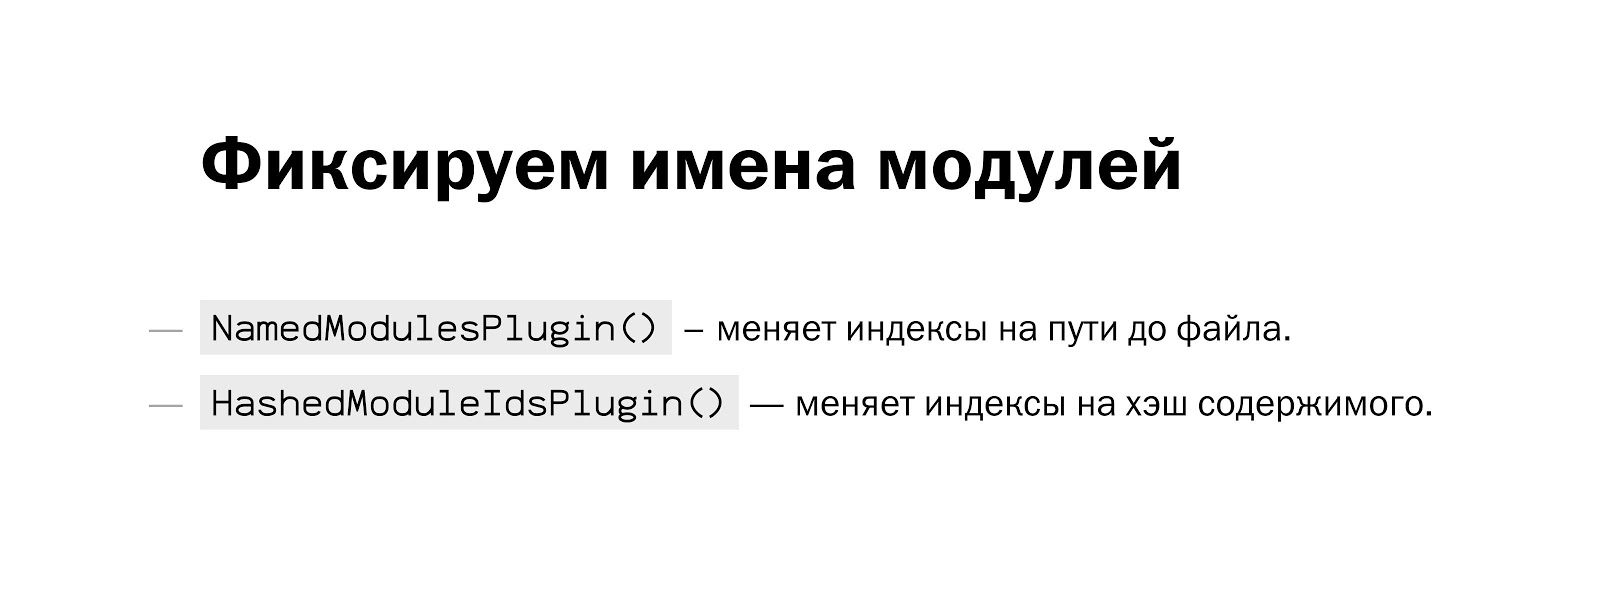
Two things need to be done. First, fix the file names. For this webpack has two built-in plugins. The first allows you to keep the names that you used earlier inside the webpack, but this is not very convenient for production, as the names become very long. The second allows you to change names to four-letter hashes.
Secondly, it is necessary that the part of the code that is responsible for loading new modules and chunks be taken out in a separate chunk. Accordingly, it can be done something like this:

Here “minChunks: Infinity” means that there will be only a download code and 0 of its chunks. Accordingly, you will get not two files, but three: the first with the download code, the second with node_modules, the third with your code. Of course, the code will be more, but caching will work.
This is how you can connect two plugins in a row:

There are two useful plugins for analyzing the bundle:
webpack-bundle-analyzer
Build a treemap bundle. It is convenient to check if you got into the bundle:
And the second, more convenient plugin:
webpack-runtime-analyzer
Shows the relationship between the files in the graph - who is referenced by whom, who is added to the assembly. Convenient to use to understand:
If you like JS just as we do, and with pleasure delve into all its interior, you may be interested in these reports at our December conference HolyJS 2017 Moscow :
To understand the secrets of this magic, we turned to an expert, a man who repeatedly climbed inside the webpack, Alexey Ivanov. He is ready to explain what the bundle looks like from the inside, how different settings affect it, what and why some of them can lead to, and also tell how to debug and optimize all this.
The material is based on the report by Aleksey Ivanov at the HolyJS 2017 conference, held in St. Petersburg on June 2-3.
In the company of Evil Martians, I am engaged in the service "eBay for business". eBay puts forward fairly stringent requirements, for example, on how much a site should weigh, the first page, how much it should load. In order not to go beyond the limits, we regularly look at the contents of our bundles: what goes there and what to do so that no strange person gets there.
')
To do this, we use various tools: webpack bundle analyzer, webpack runtime analyzer and others. It looks like this:
He is looking for your build. When you have finished collecting the bundle, it takes the result of the assembly, parses it and shows three beautiful mapy. And when you do it all the time, you start to notice oddities.
- React in a bundle weighs more than lib / react.js
- Multiple versions of lodash or underscore
- Moment.js loads 100+ locales
- Incomprehensible polyphiles
- Tree shaking does not work
- Changing cache for unchanged chunks
- And so on
And here it goes like this: it seems you did everything according to the instructions, but something does not work. And the inspector says that some kind of garbage happened. What to do in such a situation is actually not very clear.
My first idea was to go on the Internet and look for new manuals, new instructions that would tell what is going wrong. But it turned out that there were thousands of reports about which webpack is good, and there was no information about what a webpack does with your code, how everything is arranged inside it and why it does so and not otherwise.
After that I had to conduct a series of experiments: run a webpack with an empty bundle, with one file and empty js, with one import, etc. And it helped me, I fixed all the problems. And then I thought that I, probably, was not the only one, and many faced such problems. And so I decided to share my experience.
Content
- Commonjs
- Resolv file paths
- Bundle device from the inside
- Global constants and DefinePlugin
- UglifyJS dead code elimination
- ES6 modules and tree shaking
- Isolation of chunks and asynchronous loading
- Build Analysis
Let's start with the CommonJS modules. CommonJS modules are such a thing when you write require in some files and require or export or module.exports in others.
About CommonJS modules, you need to remember the following: they appeared in the node, and when you use a webpack, you actually use not just CommonJS modules, but a piece that allows for compatibility with the node. In general, CommonJS is required:
- JS-file with variables require, exports, module
- this equals exports
- exports defaults to {}
- In order to use npm-modules in the browser, we need to emulate this behavior in the browser.
The second obvious thing is that everyone probably knows it, but I’ll still tell you. What is rezolv ways? Here we have require (), inside it we write the way we say that we need to re-register. There are simple options when we write a dash or dash with dots. And it goes either to the current folder or to the root system, etc. There are no nuances, everything is simple.
Further, if you have not written the extension, it will first try to add the extension js. If not, it will try to find the folder where index.js is. If we are talking about node, then it looks for by default not only js, but also JSON, files with the node extension, and more. In the webpack, all this is not used, so you can forget about it for now. But this is what everyone knows.
The most interesting thing is what happens when we try to import the module. If we wrote a module, what does node and, accordingly, webpack do? It goes to the current node folder, searches for the node_modules folder, goes into it and searches for the folder with the name of the module. If she found her, then she takes her, and then everything is fine.
If she did not find her, she goes to the folder one level higher, after that - another level higher, and so on until it reaches the root of the file system. And here we have the first nuance, which can be well caught. It looks like this:
You put some kind of library from npm, and it says that it needs the lodash 1.0.0 dependency, and you use lodash 5.0.0 in your project. And so, if this happened, npm will create its node_modules folder and install its own version of lodash. If there are several such libraries, then each may contain a version of lodash that is not related to everyone else. If you use node, no problem, but if webpack, then all versions of lodash are loaded into the browser. These are the basic things that a webpack needs to do to work well.
Basic bundle device
The basic bundle device looks like this:
Here we have a file, and everything seems to be fine there, but there are nuances. The browser doesn’t know about require, neither about exports, nor about the module. He needs to talk about it somehow. The easiest way is to take the contents of the file, wrap it in a function in which all these things are passed in the parameters, and then at some point execute it. In fact, the webpack does something like this, but with a slight change.
First change: we change require to __webpack_require__. Why do you need it?
In fact, for two things. First, so that when you unload yourself with js in an unnatural way, bypassing the webpack, for example, via JSONP or something else, it does not break the build. Because if a function is created with the name require, then there may be all sorts of bad things, and so there is some protection against this.
Secondly, because of the way in the webpack to tag the functions that it is porting inside the bundle. Accordingly, we can do all sorts of optimizations.
I will show it again. Here we have written path:
Here we have in brackets 0:
Why is that? Browsers have no file system. Therefore, when webpack collects modules into one file, it actually puts them into an array. The number in parentheses is the default index in this array. This will affect us in the future. Why an array? Because in comparison with any objects with keys it is the most compact option and it will weigh the least.
That is, came webpack, wrapped all the modules in a function, put all the functions in an array of modules and added an anonymous function to the beginning that loads it all.
The first line that is important to us is installedModules. That is, when the webpack loads an array, it does not initialize what is in it, automatically - it continues to lie in the array with dead code.
At the moment when you recover the first file, the webpack creates an instance of this file, which somehow can continue to live, and everything is further stored in it and is more or less supported.
Next we have a function __ webpack_require __, which we will pass inside. And there is such a root place that calls your file, and you start building your root bandl. That is, we loaded everything into an array, called the function, declared the function __webpack_require__, and called the root file.
What makes __webpack_require__
- Searches for the initiated module in the cache.
- Creates a stub and adds it to the array.
- Executes module code with this equal to module.exports
- Returns module.exports
How exactly does __webpack_require__ work, what does it even do? Again, as I have already said, we are looking to see if we have a cache in the module. If not, go ahead, and if there is, return from it. Further, if not, we create a stub and add it to the array. The stub looks like this:
We have IDs (mostly numbers, but sometimes not) and the exports function. By default, it puts an empty object, so when we call this thing inside the webpack module, by default it will be an empty object there.
Next comes the following. We take our code and call what we had in the array, like this:
That is, we call not just a function, namely via call, so that exports also get into the first object. This is for backward compatibility with the node. The result is approximately the following:
From this point on, our module, which lives in installedModules, has no longer an exports object, but what we assigned and returned to it. Why is this interesting and important? Because, since we are doing everything in this way, we have one working instance of our module in the bundle, and we can use it as a closure.
That is, if we declare a variable in the module, it will be common to all instances. If we export to exports some method that allows, for example, to increment this variable inside the closure, then this variable will also be available inside. If you declare a library here and assign some plugins to it, the instance libraries with all the plugins will also be shared. Accordingly, with this piece you can share information with all modules and do other interesting things.
After we have all initialized, created an instance of the module, we return what is inside the exports, and calm down on this.
In fact, if we were talking about CommonJS and the simplest bundle, then we could end it, because in the simplest version of the webpack, it does nothing more. In practice, the webpack has become popular not because of the fact that he knows how to do it this way, but because of the fact that he knows how to do more complex things. For example, he can do this:
That is, when you specify in require not the full path of the file, but some regular one, the webpack will be able to collect it. At the same time, since he is not engaged in analyzing the code live, he cannot know what is actually being used, and just in case drags everything that can be there. So how does it all work? Webpack in this case will create a new module in the array, in which it will write the logic about the resolve paths.
Inside the module itself lives a map that describes all possible paths. That is, if you have 20 files, then he will put everything here and make 40 name choices, if you specify, for example, with js or without js. Next, it will make a function that will carry out the evolution of the expression passed into the function, and compare what is in the array. If she finds a match, she will return the body, if not, throw an error. In this place, too, there may be a problem. I think many have come across it.
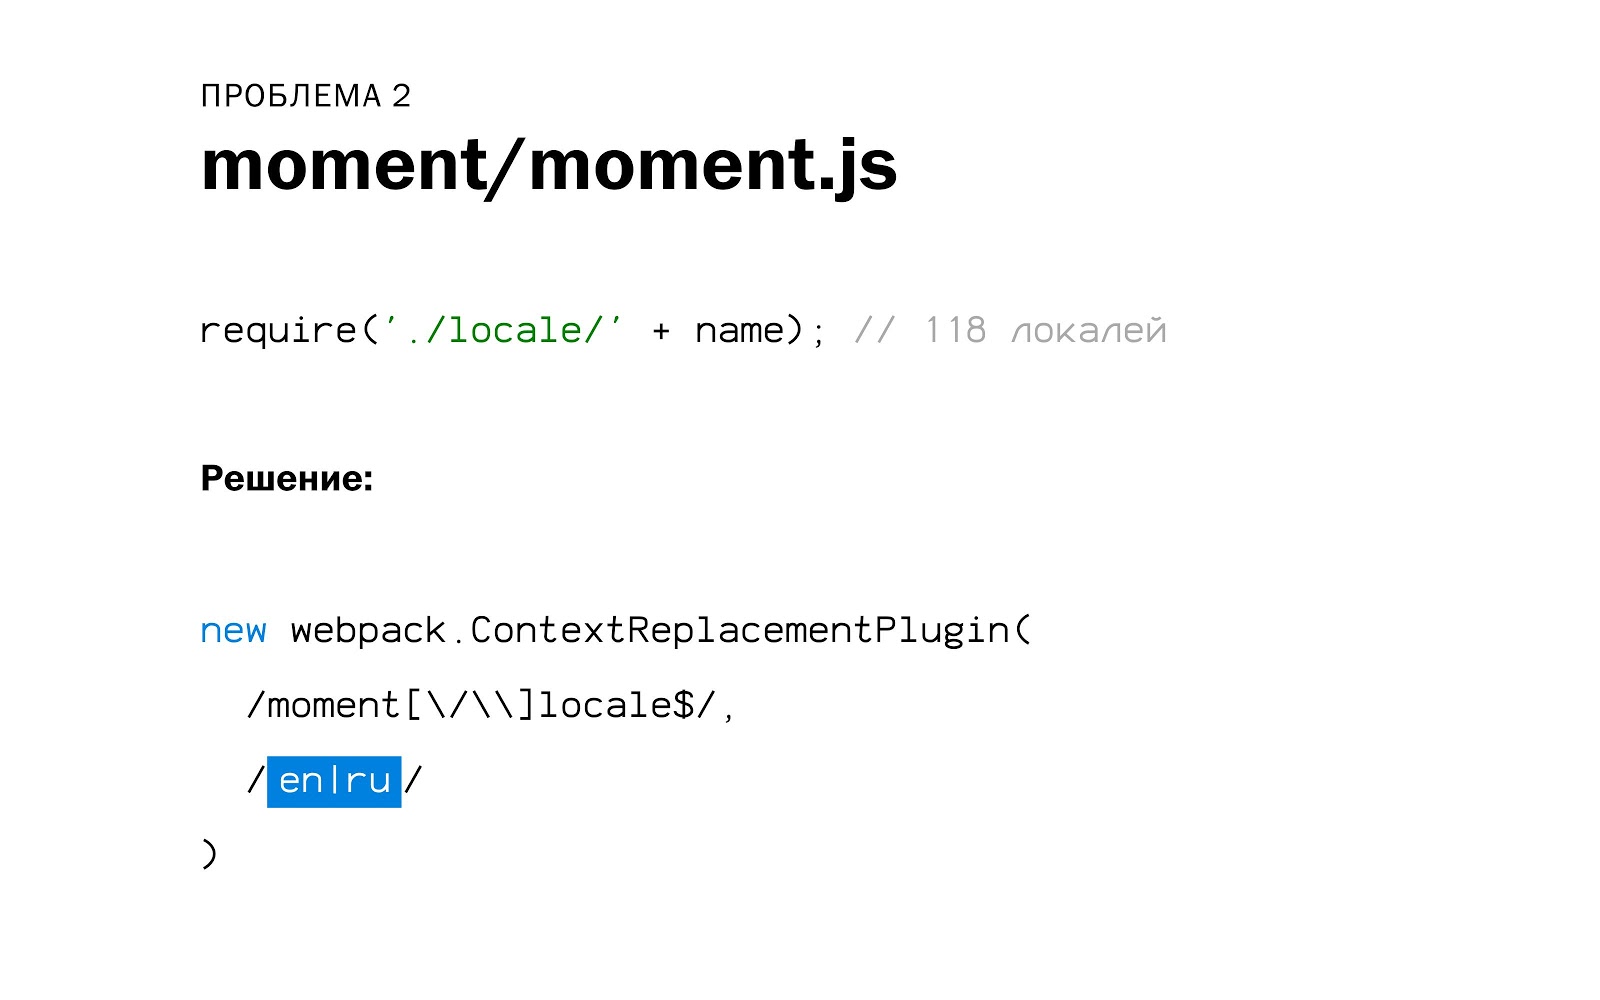
The problem is as follows. We have a library of moment.js, which allows you to perform various operations with dates. When you use it through node, there is a small nuance. Inside the root file of moment.js there is a line of require ('./ locale /' + name). Accordingly, the webpack goes inside the locale folder, finds 118 locales there, loads them all into a bundle and creates a map of about 250 keys. Probably, this is not exactly what I would like to see.
For webpack, there is a ContextReplacementPlugin. He checks the first part of the mask. If the mask matches what is written in the first argument, instead of returning what it found in the file system, it returns what you passed to it with the second parameter.
Global constants and DefinePlugin
We have a bundle, it's all good. It connects files, resolves paths, and so on. Sometimes we need to make sure that he does not live on the basis of the data that we have, but receive some information outside.
Suppose you have dev and production versions that have a different path, and you want the webpack to work with dev to work with one path and during production with another. Or there are different version numbers. Another use case that is used in many libraries is the task process.env.NODE_ENV. This variable is a kind of common template that says that these functions should not be used in development mode, and, for example, functions for debugging - in production mode.
The question arises, how do we transfer these variables? There is a DefinePlugin where you can declare these variables and, therefore, they will fall inside the bundle.
DefinePlugin takes the line to the left, in our case it is VERSION, then takes the line to the right, goes to the file, and the regular replaces the old line with the new one. As a result, the result looks like this:
JSON.stringify adds quotes. If there were no quotes, we would have just the number 1.0.1 and everything would be broken. What happened here? If, after replacing any string or number, the webpack can understand that this is an if condition, and it understands that the left side is compared with the right side and both are constants, then it replaces them with true or false. This happens so that UglifyPlugin can come in and tidy up.
The second interesting thing: as you can see, require has remained require. It has not been replaced by __webpack_require__. Accordingly, require does not hit the bundle and will not be in the build. If you want to disable some of the functionality, here is one way to do it. But, as elsewhere, there are nuances. The problem looks like this:
If you want to be fashionable and use, for example, babel, and it has destructuring, then you can write NODE_ENV. Unfortunately, it all breaks down. But why? This is how the code looks after the conversion:
That is, one variable refers to the second, which also something comes. And inside your condition will look like this: NODE_ENV! == "production".
In fact, if you roll out this code in production, everything will work as you would like. Because the variable comes false, and what is inside the if will not be executed. But since the webpack does not know what variables are and it does not do a complete analysis of the code and does not find out what it will be in this variable, it cannot understand that what is inside does not need to be loaded. In this situation, the module, which is inside and should not be loaded, will actually load.
Therefore, once again, if you use DefinePlugin, be sure to use string replacement, i.e. full line is replaced with the full line, no abbreviations.
What happens if process.env is replaced?
Webpack tries to emulate a node, because most of the modules that are in the node_modules folder can be purely node. The standard variable in node is process. Therefore, when you do not specify process.env, and some of the libraries, which in the import, use process.env or simply process, the webpack thinks that this is a node module and adds a polyfil. As a result, not only did the code not decrease, so the polyfil was also added. That is, any variable that is by default inside node, if it is used in your file and is not replaced or declared, will be replaced with a polyfile when building a webpack.
Debugging Functions in Libraries
Redux
...
If you do not add a process for React, Redux, etc., there will be many polifilov.
Code compression
What does Uglify do with all of our code?
UglifyPlugin
- Removes spaces
- Renames variables with short names
- Does dead code elimination
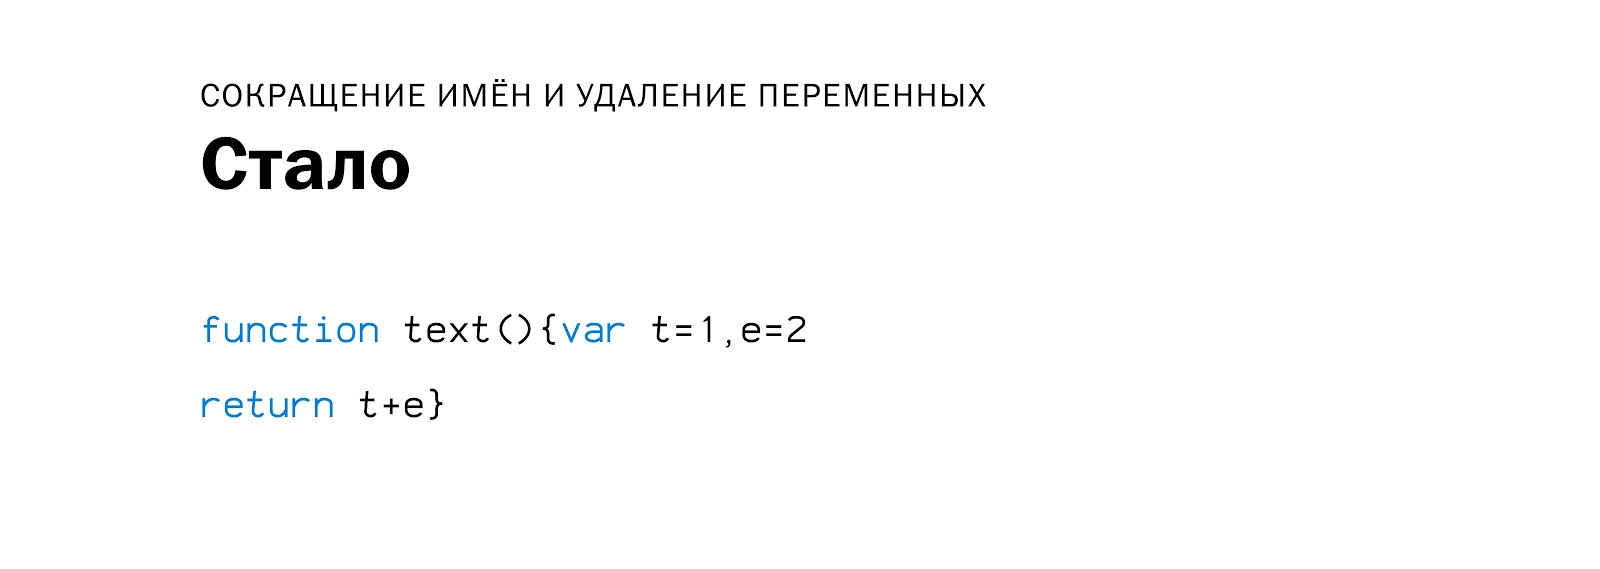
First, UglifyPlugin comes in and removes unnecessary spaces, hyphens, replaces long variable names with short ones, but does so within the function.
But if variables are declared outside the function, globally, other functions have access to them. So when we give up such a code as Uglify,
then all variables will remain. Now we come to the most interesting, to our true and false.
What's going on here? In some way, we have made a value inside the condition that has become a constant and is guaranteed not to change. When Uglify comes here and sees this, it will leave like this:
If a variable lives in a condition that is not static, Uglify will not be able to understand what is happening and will not delete anything.
Therefore, even if you declared a variable before a condition and indicated that it is false, and immediately after it comes an if, then Uglify will still not parse the code. All this code will eventually remain.
ES6 modules
Nothing more global happens. The difference between import and export is about the following. First, the keys in import and export are necessarily immutable, i.e. we cannot assemble them from parts, they must always be constant. Secondly, import and export should live in the upper scope.
What is the joy of using import and export? It looks like this:
Tree shaking
In theory, a webpack can determine exactly what is used in our application, and tag them accordingly. In practice, everything is somewhat more complicated.
One of the main features that is in the webpack 2 is an understanding of import and the ability to do Tree shaking. It would be great if everything worked, but there is a problem.
In fact, the fact that export is not used does not mean that the code will not be executed and it will not have side effects. If the code has side effects, there is a chance of breaking something.
Webpack is very concerned about backward compatibility. Therefore, he tries to make sure that no deletion breaks the builds. Therefore, he does the following:
What happens after the webpack reads this? First, the place it imports transforms into a CommonJS module.
It's more interesting here. What happens in the file from which export left? First, the export was removed before the word const. Secondly, for the constant that is exported, we manually wrote __webpack_exports__ with some kind of key. And everything seems to be good. When Uglify comes here and sees an unused constant 2, it deletes it.
But there are nuances.
If one of the exports used a variable that was previously imported from some import, then in this place the webpack and Uglify will not delete anything. More precisely, the const method will be deleted, and the import will remain and its contents will also be added to the bundle. Why? Firstly, because the webpack does not know whether it will be used or not, whether there are side effects or not, so he left it. Secondly, the module is used, so he left it too. After that Uglify came to us, saw the method and deleted it, and left the import, because it is actually a call from the array, there may be side effects and in fact Uglify does not know anything about it. Therefore, it will leave this variable, and it will live inside the array.
For example, we decided to use lodash-es, which is written with import and export. We import a method from it and hope that everything else will not fall, but in fact it will not work.
In the line where from, we have imported all the modules that are in lodash, and now they will all get into your bundle. Here from this problem not to leave. You need to use some kind of babel plugin that will replace lodash with specific methods, or manually write down everything you need up to the method.
And another very important thing: by default, if you use babel with default settings, then it actually transports all your beautiful imports and exports to the usual require. Therefore, if you have a babel with default settings, then you will not get any imports inside the webpack, but only the old require will be. Accordingly, if you want them to work, you need to replace transpiling in import and export in babel.
Chunky
A chunk is a piece of code that can be loaded synchronously or asynchronously. In order to load a chunk, it is necessary to slightly correct the code that is engaged in initialization. It is edited something like this - the window [“webpackJsonp”] function is added.
Chunky
- Synchronous and asynchronous
- The function window [“webpackJsonp”] is added to the first file
- In the following files, the webpackJsonp function is called with a list of modules and id modules to run
- All modules fall into a common array and are used from there.
We have some file that is first loaded synchronously, you add it to the header. A function has been added to this file. All other files consist of a call to this function, to the input of which comes an object in which there is, for example, an id of a chunk, a list of modules, etc.
Further, after we have loaded all this, the webpack takes the loaded modules and simply adds the necessary indexes to the initial array. Nothing else happens, we continue to use the first array.
With synchronous chunks, everything is simple. We have two files: first we uploaded a file in which there is a load code, then after it we added another file in which we load the next piece of modules. Here it is necessary to understand: if we load it like this, then the order is important for us and, accordingly, we cannot add asynchronous loadings or carry out parallel loading, because the second function will be executed, will not find anything and will break everything.
Asynchronous chunks work the same way. There is only one nuance. We need to load them not at the time of loading the page, but as a separate request by adding a script tag to the header on the fly. In code, it looks like this:
We have an import function in which we prescribe what we want to import, and then it returns us promises. And when it is ready, it returns us an error or sends what we downloaded. In transpiled form, it looks like this:
We add a function __webpack_require __. E, which asynchronously loads other files. In it, one moment is important to us, which looks like this:
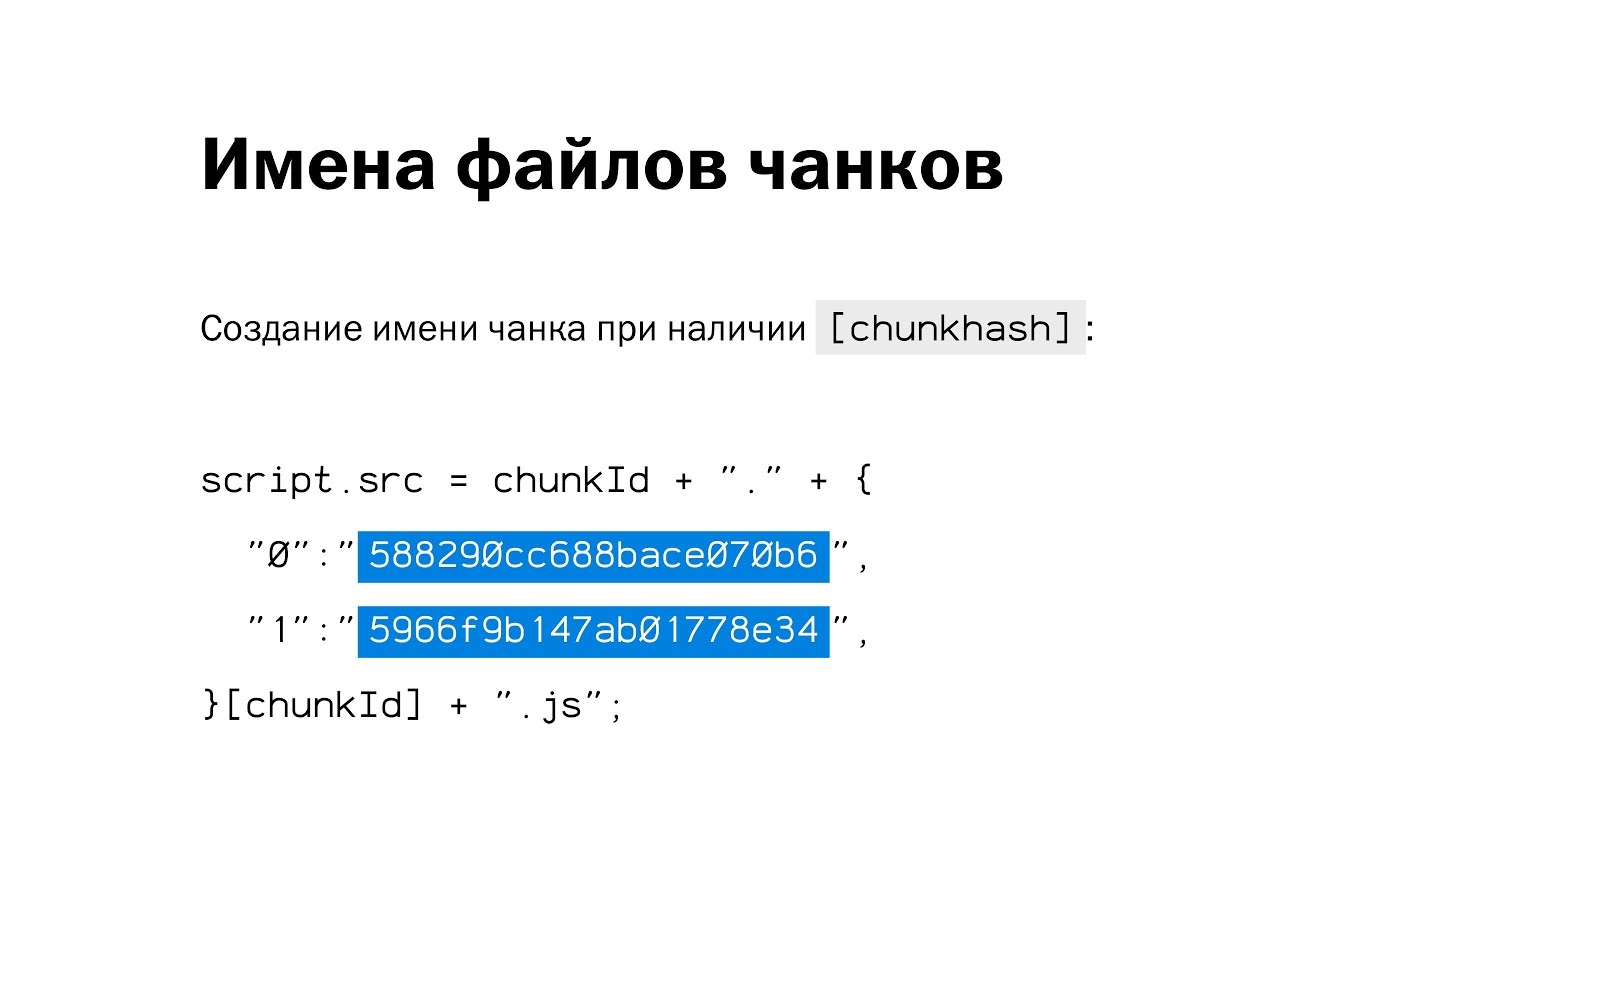
If we had chunks called numbers, then nothing terrible would have happened. We would give the numbers there, and everything would be fine. But in order to use the cache or it is more convenient to deal with it, we usually name them or add some tricky line to the url so that this url is unique. When the webpack needs to load this file, it needs to know the name.
Accordingly, all the names of all the chunks as objects are always stored inside the first file. And every time we change a chunk, its hash and name change - and this part of the code is also generated.
CoomonsChunkPlugin
Actually, how are chunks created? The easiest way is using CommonChunkPlugin.
It works very simple. We add a plugin, telling him that “minChunks: 2” means that if a common plugin is used in two chunks, then let's create a separate chunk that will load synchronously, and the common part will be in it. But at the same time there are a couple of nuances.
The first caveat is when we wrote like this, and we have chunks that are created through import, it will not work with them, since these chunks are considered children, and they have a separate logic.
For example, you work with React and, so that you have not five copies, but one, you need to add children: true, then it will take out a common module from children.
The second caveat: when we have a code that takes everything in the node_modules folder and puts it in a separate chunk. What is the logic here? We rarely update modules, we have them in a separate file, and we want to cache them. We change our code often, we want to cache it separately, and it is necessary that only it is updated, and not all anew. So the most part will become like a constant and will not be loaded every time, and a smaller part will be updated.
This code allows us to do this. But with him there is one nuance. He does not work.
Variable indices
The example with node_modules does not work for the cache:
- When adding files, indexes change
- The boot and initialization code lives in the first file:
- starting index changes
- links to chunks are changing
It does not work for two reasons. The first looks like this:
In the __webpack_require__ index is not always the first. There may be another, random index from the array. Accordingly, if you delete or add a file, the index of the first object may change. The code of the first chunk changes always and, accordingly, its hash changes, the sum and everything else.
The second problem: in order to load chunks asynchronously, a map of their names is necessary. Accordingly, if the contents of any chunk changes, then the map that is needed to load them also changes.
The first file where the webpack function lives, which loads all of this, is guaranteed to change always with every change of any file. What to do with it?
Two things need to be done. First, fix the file names. For this webpack has two built-in plugins. The first allows you to keep the names that you used earlier inside the webpack, but this is not very convenient for production, as the names become very long. The second allows you to change names to four-letter hashes.
Secondly, it is necessary that the part of the code that is responsible for loading new modules and chunks be taken out in a separate chunk. Accordingly, it can be done something like this:
Here “minChunks: Infinity” means that there will be only a download code and 0 of its chunks. Accordingly, you will get not two files, but three: the first with the download code, the second with node_modules, the third with your code. Of course, the code will be more, but caching will work.
This is how you can connect two plugins in a row:
Bundle analysis
There are two useful plugins for analyzing the bundle:
webpack-bundle-analyzer
Build a treemap bundle. It is convenient to check if you got into the bundle:
- Two versions of the same library
- Copies of the library in different chunks
- Libraries that were supposed to be cut by condition
- Unexpected dependencies on libraries
- Just big files
And the second, more convenient plugin:
webpack-runtime-analyzer
Shows the relationship between the files in the graph - who is referenced by whom, who is added to the assembly. Convenient to use to understand:
- Who exactly is using the file
- Who exactly connected the library
Total
- Make an empty bundle and look at the contents, there are 40 lines
- Do not be afraid to go to the source and watch what happened in the code
- After adding libraries, always launch a gang analyzer and see what it brought with it
- After adding chunks, check their contents.
If you like JS just as we do, and with pleasure delve into all its interior, you may be interested in these reports at our December conference HolyJS 2017 Moscow :
- Better, faster, stronger - getting more from the web platform (Martin Splitt, Archilogic)
- The Post JavaScript Apocalypse (Douglas Crockford)
- Testing serverless applications (Slobodan Stojanovic, Cloud Horizon)
Source: https://habr.com/ru/post/342842/
All Articles