Spring WebSocket. How it works?
Good day, dear habravchane. At my current place of work, it was decided to transfer the interaction with the web client to WebSocket. The server part is written in Java using the Spring framework. In this article, I wanted to share a feature of the Spring WebSocket device.
WebSocket provides two-way communication between the client and the server using a single TCP connection.
The protocol consists of two phases:
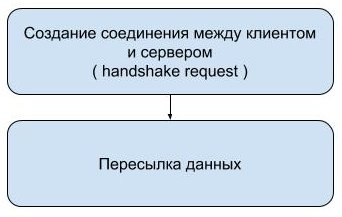
For a Handshake request, an HTTP GET request is used, which results in the connection being updated to WebSocket.
')
In this article, we will examine in detail the mechanism for establishing a connection between the client and the server, pumping the connection to the WebSocket and forwarding the message to the Spring application.
In the analysis we will use the Spring-WebSocket and Annotation based configuration.
So, first we need to declare an access point to which the client will contact to create a connection and send data.
To use WebSocket in the configuration class, we need to use the @EnableWebSocket annotation. From the description of this annotation should be the need to implement the interface WebSocketConfigurer our configuration class. The WebSocketConfigurer interface contains a single registerWebSocketHandlers method (WebSocketHandlerRegistry registry) . Using the WebSocketHandlerRegistry input parameter, we add handlers (WebSocketHandler) of incoming messages to a specific url.
Consider the work of the @EnableWebSocket annotation in more detail.
The main task of this annotation is to import the configuration class DelegatingWebSocketConfiguration, which with the help of @Autowired will receive instances of the WebSocketConfigurer interface (our configuration class). These WebSocketConfigurer instances are used in the parent WebSocketConfigurationSupport class to create the HandlerMapping bean.
Creating the HandlerMapping bean is necessary so that in the future DispatcherServlet can determine the handler for this url.

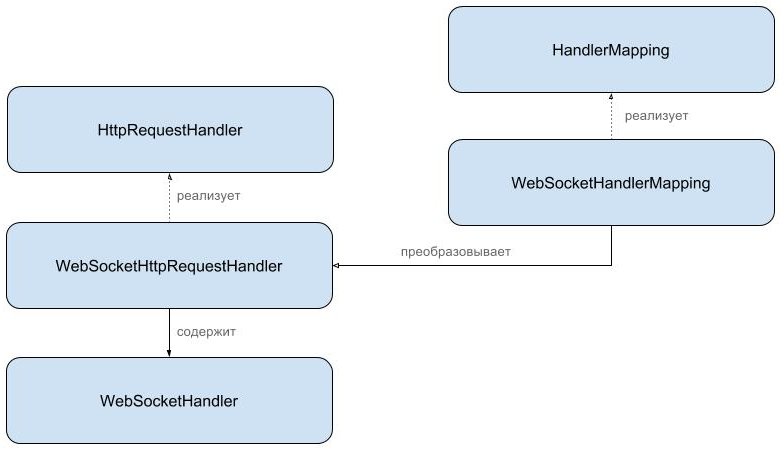
To convert a WebSocketHandler into a HandlerMapping instance, we need the WebSocketHttpRequestHandler and WebSocketHandlerMapping adapters.
Using WebSocketHttpRequestHandler, we will cast WebSocketHandler to HttpRequestHandler. And then using the url bundle, for which we are waiting for a request to open a WebSocket, and HttpRequestHandler create an instance of WebSocketHandlerMapping, which will be registered with the DispatcherServlet to process the HTTP request.
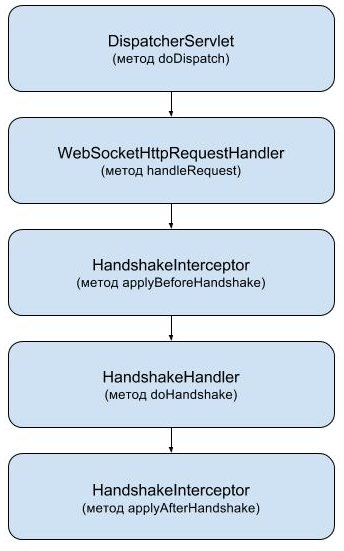
When a client sends a request to open a WebSocket connection, the request via DispatcherServlet comes to the handleRequest method (HttpServletRequest servletRequest, HttpServletResponse servletResponse) of our decorator WebSocketHttpRequestHandler.
This method calls Interceptors declared in the configuration class when setting WebSocketHandlers, and calling the doHandshake method, default or user instance of HandshakeHandler.
We will dwell on the work of the doHandshake method in a bit more detail. This is where all the magic of connection conversion to WebSockets happens. But first, let's look at the parameters of the user request and server response.
A typical example of a custom query is as follows:
Typical response from the server:
The HTTP 101 response code indicates a protocol switch, in our case, to a WebSocket.
Sec-WebSocket-Accept is a calculated value based on the transmitted Sec-WebSocket-Key and the constant "258EAFA5-E914-47DA-95CA-C5AB0DC85B11" —in fact, this is a confirmation from the server that it is ready to initiate a WebSocket connection.
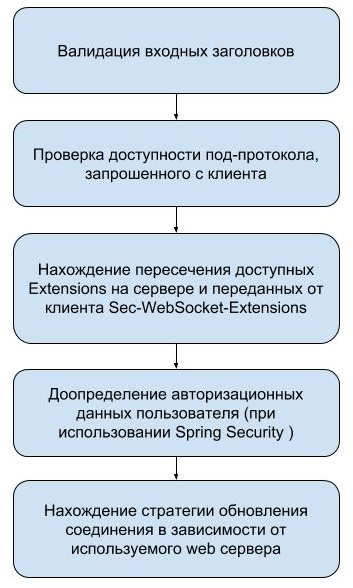
The work of the doHandshake method can be schematically presented as follows:
Connection update strategies are currently available.
The strategy update process consists of the following steps:
* An EndPoint instance is created by wrapping a WebSocketHandler in the StandardWebSocketHandlerAdapter, which is the EndPoint heir. To create a session, use StandardWebSocketSession.
** To update HttpServletRequest, use the standard method of this interface update, to which we pass the implementation of HttpUpgradeHandler,
in the case of working with Tomcat, this is a WsHttpUpgradeHandler. When the HttpUpgradeHandler instance is initialized, the EndPonit is created and registered in the WebSocketContainer.
After these settings, our implementation of WebSocketHandler is ready to accept incoming messages, and using WebSocketSession we were able to send messages to the client.
Thank you very much for your attention. In the following articles, we will consider the work of the fallback mechanism using SockJS and the capabilities of the STOMP sub-protocol.
Used sources:
→ The WebSocket Protocol
→ Spring WebSocket
WebSocket provides two-way communication between the client and the server using a single TCP connection.
The protocol consists of two phases:
For a Handshake request, an HTTP GET request is used, which results in the connection being updated to WebSocket.
')
In this article, we will examine in detail the mechanism for establishing a connection between the client and the server, pumping the connection to the WebSocket and forwarding the message to the Spring application.
In the analysis we will use the Spring-WebSocket and Annotation based configuration.
Creating a configuration class
So, first we need to declare an access point to which the client will contact to create a connection and send data.
To use WebSocket in the configuration class, we need to use the @EnableWebSocket annotation. From the description of this annotation should be the need to implement the interface WebSocketConfigurer our configuration class. The WebSocketConfigurer interface contains a single registerWebSocketHandlers method (WebSocketHandlerRegistry registry) . Using the WebSocketHandlerRegistry input parameter, we add handlers (WebSocketHandler) of incoming messages to a specific url.
Consider the work of the @EnableWebSocket annotation in more detail.
@Retention(RetentionPolicy.RUNTIME) @Target(ElementType.TYPE) @Documented @Import(DelegatingWebSocketConfiguration.class) public @interface EnableWebSocket { } The main task of this annotation is to import the configuration class DelegatingWebSocketConfiguration, which with the help of @Autowired will receive instances of the WebSocketConfigurer interface (our configuration class). These WebSocketConfigurer instances are used in the parent WebSocketConfigurationSupport class to create the HandlerMapping bean.
Creating the HandlerMapping bean is necessary so that in the future DispatcherServlet can determine the handler for this url.
To convert a WebSocketHandler into a HandlerMapping instance, we need the WebSocketHttpRequestHandler and WebSocketHandlerMapping adapters.
Using WebSocketHttpRequestHandler, we will cast WebSocketHandler to HttpRequestHandler. And then using the url bundle, for which we are waiting for a request to open a WebSocket, and HttpRequestHandler create an instance of WebSocketHandlerMapping, which will be registered with the DispatcherServlet to process the HTTP request.
When a client sends a request to open a WebSocket connection, the request via DispatcherServlet comes to the handleRequest method (HttpServletRequest servletRequest, HttpServletResponse servletResponse) of our decorator WebSocketHttpRequestHandler.
This method calls Interceptors declared in the configuration class when setting WebSocketHandlers, and calling the doHandshake method, default or user instance of HandshakeHandler.
Handshake Handling Request
We will dwell on the work of the doHandshake method in a bit more detail. This is where all the magic of connection conversion to WebSockets happens. But first, let's look at the parameters of the user request and server response.
A typical example of a custom query is as follows:
GET /chat HTTP/1.1 Host: server.example.com Upgrade: websocket Connection: Upgrade Sec-WebSocket-Key: dGhlIHNhbXBsZSBub25jZQ== Origin: http://example.com Sec-WebSocket-Protocol: chat, superchat Sec-WebSocket-Version: 13 Sec-WebSocket-Extensions: permessage-deflate; client_max_window_bits - Origin - contains the url from which the request is made. Used to verify valid addresses.
- Sec-WebSocket-Protocol defines a set of sub-protocols, for example, STOMP, which will be discussed in the following articles.
- Sec-WebSocket-Key is a random key that is generated by the browser: 16 bytes in Base64 encoding.
- Sec-WebSocket-Version - protocol version.
- Sec-WebSocket-Extensions - additional extensions, for example, permessage-deflate says that messages will be transmitted in a compressed form.
Typical response from the server:
HTTP/1.1 101 Switching Protocols Upgrade: websocket Connection: Upgrade Sec-WebSocket-Accept: s3pPLMBiTxaQ9kYGzzhZRbK+xOo= The HTTP 101 response code indicates a protocol switch, in our case, to a WebSocket.
Sec-WebSocket-Accept is a calculated value based on the transmitted Sec-WebSocket-Key and the constant "258EAFA5-E914-47DA-95CA-C5AB0DC85B11" —in fact, this is a confirmation from the server that it is ready to initiate a WebSocket connection.
The work of the doHandshake method can be schematically presented as follows:
Request Update Strategy to WebSocket
Connection update strategies are currently available.
- TomcatRequestUpgradeStrategy
- JettyRequestUpgradeStrategy
- UndertowRequestUpgradeStrategy
- GlassFishRequestUpgradeStrategy
- WebLogicRequestUpgradeStrategy
- WebSphereRequestUpgradeStrategy
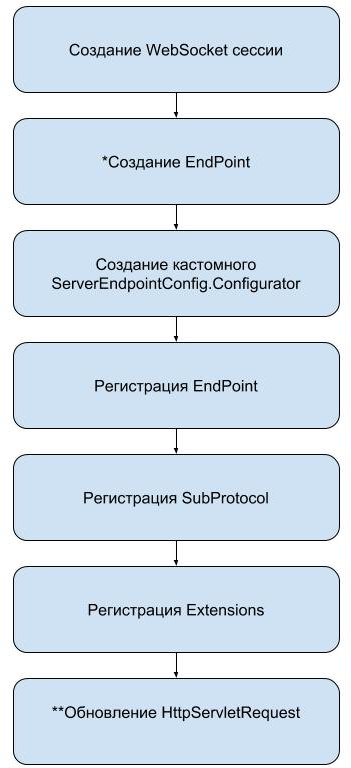
The strategy update process consists of the following steps:
* An EndPoint instance is created by wrapping a WebSocketHandler in the StandardWebSocketHandlerAdapter, which is the EndPoint heir. To create a session, use StandardWebSocketSession.
** To update HttpServletRequest, use the standard method of this interface update, to which we pass the implementation of HttpUpgradeHandler,
in the case of working with Tomcat, this is a WsHttpUpgradeHandler. When the HttpUpgradeHandler instance is initialized, the EndPonit is created and registered in the WebSocketContainer.
After these settings, our implementation of WebSocketHandler is ready to accept incoming messages, and using WebSocketSession we were able to send messages to the client.
Thank you very much for your attention. In the following articles, we will consider the work of the fallback mechanism using SockJS and the capabilities of the STOMP sub-protocol.
Used sources:
→ The WebSocket Protocol
→ Spring WebSocket
Source: https://habr.com/ru/post/342790/
All Articles