Chat bot understands human speech at Dialogflow
I want to share with you my experience with the Dialogflow service and tell you about some not very obvious things.

Dialogflow is a service that allows you to create chat bots for different platforms and languages on different devices .
The service can be used absolutely free of charge, so we don’t waste time and get down to work.
In this article I will tell you how to create a simple bot that will receive an order from your users in your store.
')
A bot should receive a request from the user consisting of three parameters: name, city and address. In this case, if the user previously mentioned one of these parameters - remember it within the context.
First you need to register and create a new agent:

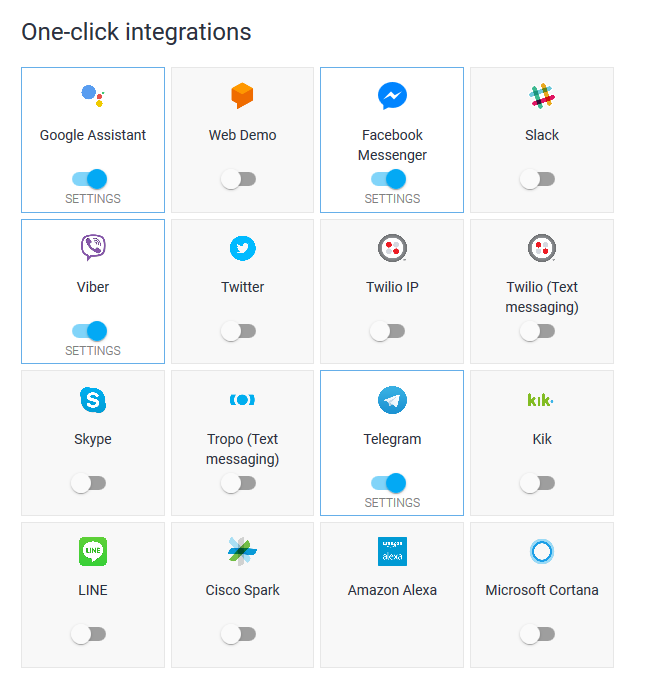
After creating the agent, go to the “Integrations” tab and connect the platforms we need.
At this stage, our bot is already running and can communicate with users. Now you need to teach him to correctly understand the phrase.
The destination is a handler for a specific request from the user.
Go to the tab "Intents". After creating the agent, there will be two standard assignments here:
Next, we implement the following: when a user greets a bot, he asks him for his name and address of residence in order to use it in the future.
Open the "Default Welcome Intent". There are several sections here:
Pay attention to the “Events” section: here you can see one service event “WELCOME”.
The assignment can be launched in two ways: as a reaction to the user's text or upon an event.
In our case, the Default Welcome Intent assignment does not respond to any text from the user, but to the WELCOME service event. For example, for Telegram this is the launch of a bot with the command / start. Read more about the events .
So, consider the “Response” section. Here are the messages that will be sent in response to the user. Each message can consist of several lines. Each line - a separate message options. For the answer one of these options will be selected. And the more of them, the less often your bot will repeat.
Add a message here asking them to tell about themselves.

Now create an appointment that will respond to the subsequent message.
On the “Intents” tab, move the cursor to “Default Welcome Intent” and click “Add follow-up intent”. In the drop-down list, we will offer several pre-installed options. We are not interested in them - choose "Custom"
Let's move on to the “User says” section and add several message options from the user.
Now you need to specify what data in these messages we need. To do this, select a piece of text and select the type of data in the drop-down menu. Dialogflow has a number of predefined types, in particular for names and addresses. But you can create your own. More details .

Now pay attention to the section "Action". Here are all the parameters that this assignment collects. The parameters with which we marked the text messages are automatically imported.
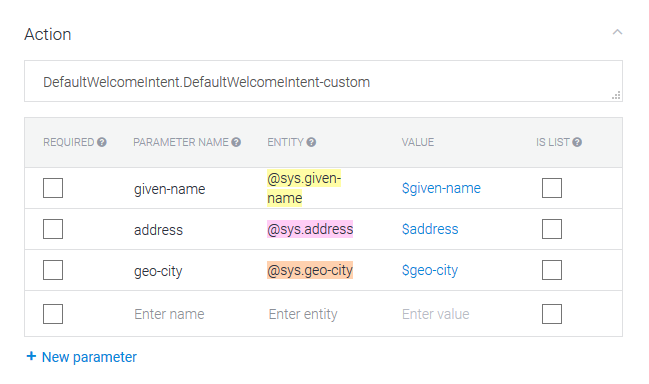
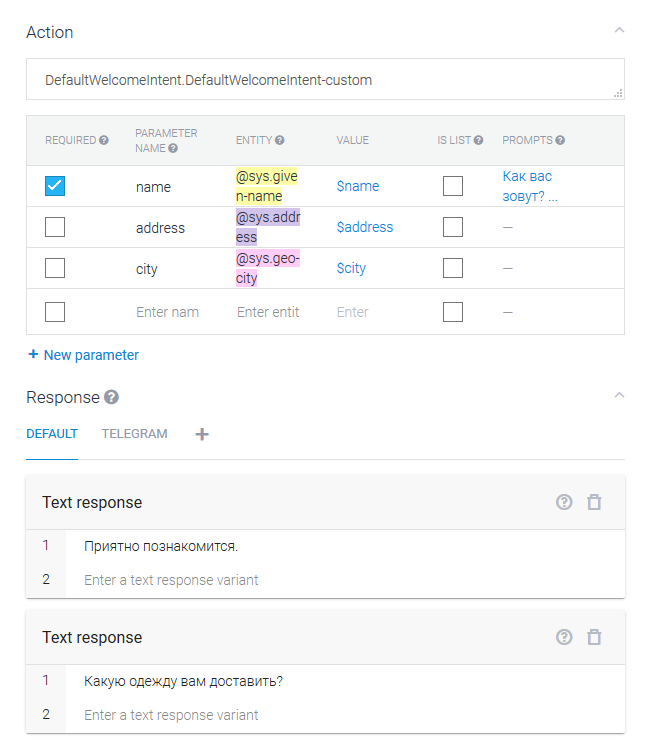
Denote the user name as a required parameter. Change the name of the parameter from “given-name” to “name” for more convenience. And in the column "Prompts" we will indicate the question "What is your name?". Now, since “name” is a required parameter, in case the message does not contain this parameter, one of the questions in “Prompts” will be sent to the user to get the name.
And finally, add the answer to the user in the section «Response».
Each assignment can work with the incoming context and create an outgoing context.
If the assignment has an incoming context, the assignment will be launched only if that context exists. If the destination has an outgoing context, it will be created and all collected data will be written to it.
Consider in order:
Default Welcome Intent - there is no incoming context. Therefore, the assignment may start for any request. The assignment creates a new empty context “DefaultWelcomeIntent-followup” (automatically added).
Default Welcome Intent - custom - has the incoming context "DefaultWelcomeIntent-followup" (added automatically). This assignment can start only when this context exists (when the user is welcomed). Outgoing context here is not yet.
Add the outgoing context for the “Default Welcome Intent - custom” with the name “UserData”. Now, when the user presents himself after the greeting, information about him will be recorded in the new “UserData” context.
Create a new “Order” destination with the outgoing “UserData” context. This assignment can be launched at any time, and it can change the “UserData” context.
In the text of the order we need the name, city and address.
Add phrases and mark them up. Duplicate all the parameters, but this time we will mark all as mandatory.

Our assignment can work both in case of absence of the “UserData” context, and in case of its presence. In the first case, the bot will ask the user for all the missing data. And in the second he should use already known.
For this:
Now, if a user has previously introduced himself (his name is stored in the context of UserData), then when placing an order, his name will be substituted automatically. If not, the bot will ask the user a name.
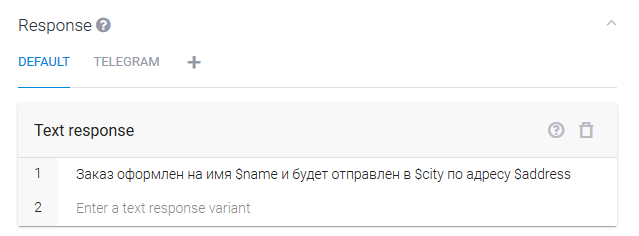
We add the answer with confirmation of the order. In the answer you can use your parameters. More details .
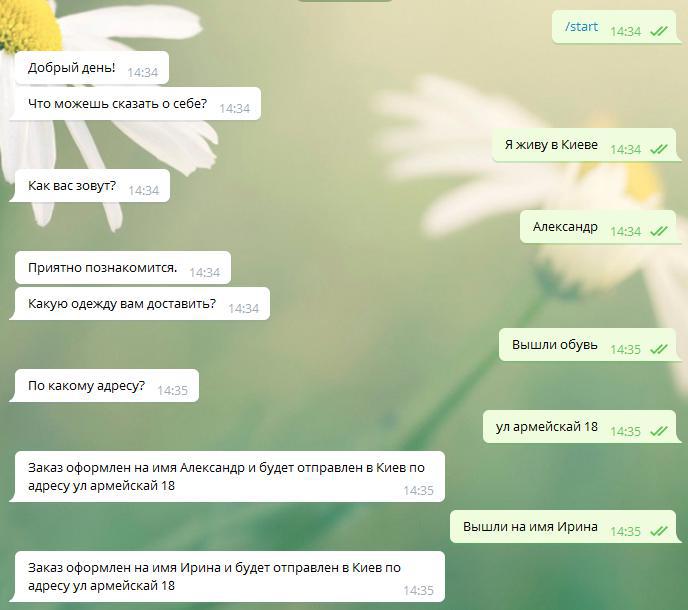
The result of the bot is shown in the screenshot below. You can talk to him yourself in Telegram: @sample_ShopBot or Web Demo
After a while, the context will be reset. After the first call, the bot will ask you for the name and shipping address. And re-establish the context.

Thus, Dialogflow takes on the collection of information about the user, the order and sends to your service only the finished result. It remains to configure sending WebHook to your server, which will respond and implement delivery. More details .
Web demo
Chat bot
Documentation
Dialogflow is a service that allows you to create chat bots for different platforms and languages on different devices .
The service can be used absolutely free of charge, so we don’t waste time and get down to work.
In this article I will tell you how to create a simple bot that will receive an order from your users in your store.
')
Step 0. Task
A bot should receive a request from the user consisting of three parameters: name, city and address. In this case, if the user previously mentioned one of these parameters - remember it within the context.
Step 1. Initial setup
First you need to register and create a new agent:
- The name of the agent can be any.
- Language, I chose Russian. But in the future you can add others.
- The time zone is important, since it will be used to identify phrases like “Today”, “3 days ago”
- Let's create a new Google project
- I will use the first version of the API
After creating the agent, go to the “Integrations” tab and connect the platforms we need.
At this stage, our bot is already running and can communicate with users. Now you need to teach him to correctly understand the phrase.
Step 2. Create appointments
The destination is a handler for a specific request from the user.
Go to the tab "Intents". After creating the agent, there will be two standard assignments here:
- Default Welcome Intent - launched to greet the user (send a return greeting)
- Default Fallback Intent - launched if none of the other appointments are appropriate. Send a message that the user did not understand (“This last phrase is not clear to me,” “Try, please express your thoughts differently,” etc.).
Next, we implement the following: when a user greets a bot, he asks him for his name and address of residence in order to use it in the future.
Add a user question to the greeting
Open the "Default Welcome Intent". There are several sections here:
- Contexts
- User says
- Events
- Action
- Response
Pay attention to the “Events” section: here you can see one service event “WELCOME”.
The assignment can be launched in two ways: as a reaction to the user's text or upon an event.
In our case, the Default Welcome Intent assignment does not respond to any text from the user, but to the WELCOME service event. For example, for Telegram this is the launch of a bot with the command / start. Read more about the events .
So, consider the “Response” section. Here are the messages that will be sent in response to the user. Each message can consist of several lines. Each line - a separate message options. For the answer one of these options will be selected. And the more of them, the less often your bot will repeat.
Add a message here asking them to tell about themselves.
Response to response
Now create an appointment that will respond to the subsequent message.
On the “Intents” tab, move the cursor to “Default Welcome Intent” and click “Add follow-up intent”. In the drop-down list, we will offer several pre-installed options. We are not interested in them - choose "Custom"
Let's move on to the “User says” section and add several message options from the user.
Now you need to specify what data in these messages we need. To do this, select a piece of text and select the type of data in the drop-down menu. Dialogflow has a number of predefined types, in particular for names and addresses. But you can create your own. More details .
Now pay attention to the section "Action". Here are all the parameters that this assignment collects. The parameters with which we marked the text messages are automatically imported.
Denote the user name as a required parameter. Change the name of the parameter from “given-name” to “name” for more convenience. And in the column "Prompts" we will indicate the question "What is your name?". Now, since “name” is a required parameter, in case the message does not contain this parameter, one of the questions in “Prompts” will be sent to the user to get the name.
And finally, add the answer to the user in the section «Response».
Work with context
Each assignment can work with the incoming context and create an outgoing context.
If the assignment has an incoming context, the assignment will be launched only if that context exists. If the destination has an outgoing context, it will be created and all collected data will be written to it.
Consider in order:
Default Welcome Intent - there is no incoming context. Therefore, the assignment may start for any request. The assignment creates a new empty context “DefaultWelcomeIntent-followup” (automatically added).
Default Welcome Intent - custom - has the incoming context "DefaultWelcomeIntent-followup" (added automatically). This assignment can start only when this context exists (when the user is welcomed). Outgoing context here is not yet.
Add the outgoing context for the “Default Welcome Intent - custom” with the name “UserData”. Now, when the user presents himself after the greeting, information about him will be recorded in the new “UserData” context.
Ordering by the user
Create a new “Order” destination with the outgoing “UserData” context. This assignment can be launched at any time, and it can change the “UserData” context.
In the text of the order we need the name, city and address.
Add phrases and mark them up. Duplicate all the parameters, but this time we will mark all as mandatory.
Using already known data
Our assignment can work both in case of absence of the “UserData” context, and in case of its presence. In the first case, the bot will ask the user for all the missing data. And in the second he should use already known.
For this:
- For the name parameter set the default value is # UserData.name
- For the address parameter set the default value is # UserData.address
- For the city parameter set the default value is # UserData.city
Now, if a user has previously introduced himself (his name is stored in the context of UserData), then when placing an order, his name will be substituted automatically. If not, the bot will ask the user a name.
We add the answer with confirmation of the order. In the answer you can use your parameters. More details .
Work result
The result of the bot is shown in the screenshot below. You can talk to him yourself in Telegram: @sample_ShopBot or Web Demo
After a while, the context will be reset. After the first call, the bot will ask you for the name and shipping address. And re-establish the context.
Conclusion
Thus, Dialogflow takes on the collection of information about the user, the order and sends to your service only the finished result. It remains to configure sending WebHook to your server, which will respond and implement delivery. More details .
Links
Web demo
Chat bot
Documentation
Source: https://habr.com/ru/post/342762/
All Articles