What happens in Kubernetes when starting the kubectl run? Part 1
Note trans. : This material, entitled the original as “What happens when ... Kubernetes edition!” And written by Jamie Hannaford of Rackspace, is an excellent illustration of the many Kubernetes mechanisms that are often hidden from our eyes, but very useful for better understanding the device of this Open Source -systems, operation algorithm and interrelations of its components. Since the whole article is quite voluminous, its translation is divided into two parts. The first is about the work of kubectl, kube-apiserver, etcd and initializers.
PS Some original references to the code in the master branches were replaced by commits that were last by the time they were translated, so that the line numbers to which the author refers were kept up for a long time.
')
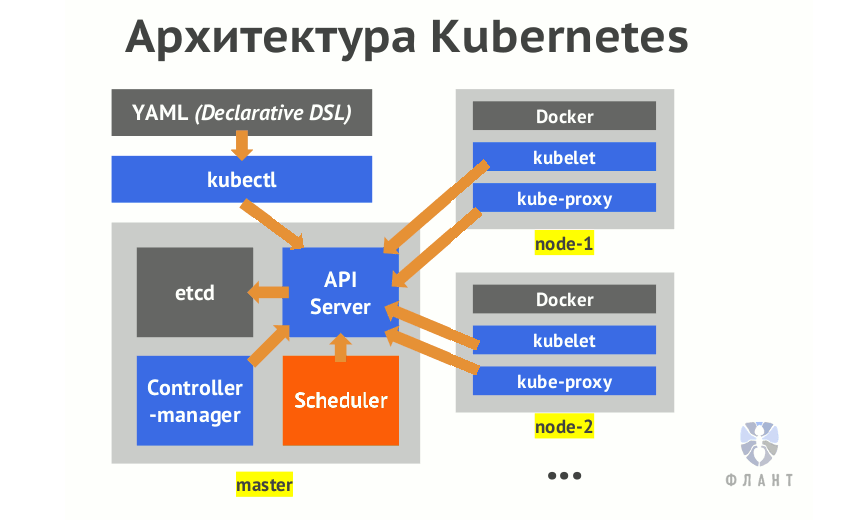
Imagine that I want to enclose nginx in a Kubernetes cluster. I'll enter something like this in the terminal:
... and press Enter. After a few seconds, I will see 3 hearths with nginx distributed across all work nodes. It works - as if by magic, and it's great! But what really happens under the hood?
One of the great features of Kubernetes is how this system serves the deployment of workloads to the infrastructure through user-friendly APIs. All complexity is hidden by simple abstraction. However, in order to fully understand the value that K8s brings, it is helpful to understand the inner kitchen. This article will guide you through the entire life cycle of a request from the client to the kubelet, if necessary referring to the source code to illustrate what is happening.
This is a living document. If you find something to improve or rewrite, changes are welcome! (This, of course, about the original English-language article in GitHub - approx. Transl.)
So, let's begin. We just clicked on Enter in the terminal. And now what?
First, kubectl will perform validation on the client side. He will make sure that non-working requests (for example, creating a resource that is not supported, or using an image with the wrong name ) will be quickly interrupted and not sent to kube-apiserver. This improves system performance by reducing unnecessary load.
After validation, kubectl starts building an HTTP request that will be sent to kube-apiserver. All attempts to access or change the status in the Kubernetes system pass through the API server, which in turn communicates with etcd. And kubectl is no exception. To compose an HTTP request, kubectl uses so-called generators ( generators ), an abstraction that implements serialization.
Not entirely obvious here may seem that in the
For example, resources that have
Having understood that we want to create Deployment, kubectl will use the
Before we continue, it is important to note that Kubernetes uses a versioned API that is classified into API groups (API groups) . The API group is designed to assign similar resources to one category in order to make it easier to interact with them. In addition, it is a good alternative to a single monolithic API. The Deployment API group is called
( Note : As we told in the announcement of Kubernetes 1.8 , the project is now working on creating a new Workload API group that will include Deployments and other APIs related to "workloads.")
In general, after kubectl has generated a runtime object, it begins to search for the corresponding API group and version, and then builds the client of the required version — it takes into account various REST semantics for the resource. This stage of detection is called “ version negotiation ” (version negotiation) , which includes scanning the contents
To improve performance, kubectl also caches the OpenAPI schema in the
The final step is to send an HTTP request. When it is made and a successful response is received, kubectl will display a successful message considering the preferred output format.
At the last step, we did not mention client authentication (it happens before sending an HTTP request) - we will consider it as well.
To successfully send a request, kubectl must be authenticated. User credentials are almost always stored in a
After parsing the file, the current context, the current cluster and the authentication information for the current user are determined. If the user specified special values via flags (such as
So, the request was sent, hooray! What's next? Kube-apiserver comes into play. As mentioned above, kube-apiserver is the main interface used by clients and system components to save and retrieve the status of a cluster. To perform this function, it is necessary to verify the requesting party, making sure that it corresponds to the one it claims to be. This process is called authentication.
How does apiserver authenticate requests? When the server is first started, it checks all user - supplied console flags and compiles a list of suitable authenticators. Consider an example: if passed to
If none of the authenticators succeeds, the request will fail and return an aggregated error. If the authentication is successful, the
Okay, the request has been sent, kube-apiserver successfully verified that we are who we are. What a relief! However, this is not all. We can be those who we imagine, but do we have rights to perform this operation? Identity and access rights are not the same thing. To continue, kube-apiserver must authorize us.
The way in which kube-apiserver performs authorization is very similar to authentication: from the flag values it collects a chain of authorizers (authorizers) that will be used for each incoming request. If all authorizers prohibit the request, it will end with the
Examples of authorizers that are part of the release of Kubernetes v1.8:
Look at the
Ok, we are authenticated and authorized by kube-apiserver. What is left? The kube-apiserver itself trusts us and allows us to continue, but other parts of the system in Kubernetes may have their own deeply held beliefs about what is allowed and what is not. This is where admission controllers get involved .
If the authorization answers the question of whether the user is eligible, the admission controllers check the request for compliance with a wider range of expectations and rules in the cluster. They are the last bastion of control before the object is passed to etcd, and are responsible for the remaining checks in the system, which are aimed at making sure that the action does not lead to unexpected or negative consequences.
The principle on which these controllers operate is similar to authenticators and authorizers, but has one difference: for admission controllers, a single failure in the chain of controllers is enough to interrupt this chain and recognize the request as unsuccessful.
The architecture of admission controllers is beautifully oriented towards promoting extensibility. Each controller is stored as a plugin in the
Typically, admission controllers are categorized by resource management, security, default settings, and reference consistency. Here are some examples of resource management controllers:
At this point, Kubernetes fully approved the incoming request and allowed to move on. The next step kube-apiserver deserializes the HTTP request, creates runtime objects from it (something like the reverse process of what the kubectl generators do) and saves them to the data store. Let's look at it in detail.
How does kube-apiserver know what to do when accepting our request? This is followed by a rather complicated sequence of steps that precede the processing of any requests. Let's see from the very beginning - when the binary file is first run:
At this point, the kube-apiserver knows which routes exist and has an internal mapping indicating which handlers and storage providers should be called when the request matches. Suppose we got our HTTP request:
Many steps! It's amazing to follow apiserver like that, because you understand how much work it actually does. So, summarizing: the Deployment resource now exists in etcd. But it’s not enough to just put it there - you still will not see it at this stage ...
When an object is stored in the data store, it is not fully visible to the apiserver and does not get into the scheduler until it has completed a set of initializers (intializers) . An initializer is a controller associated with a resource type and executing logic on a resource before it becomes available to the outside world. If the resource type does not have registered initializers, this step is skipped and resources are visible instantly.
As written in many blogs, this is a powerful feature that allows you to perform common bootstrap operations. Examples might be:
InitializerConfiguration objects allow you to determine which initializers should be run for certain types of resources. Imagine that we want to run our initializer every time a fire is created. Then we will do something like this:
After this config is created, a
Most observant readers may have noticed a potential problem. How can a controller from user space handle resources if kube-apiserver has not yet made them visible? For this, kube-apiserver has a special query parameter
The second part of the articlewill be published in the near future UPDATED: ... published on this link . It discusses the work of the Deployments and ReplicaSets controllers, informers, scheduler, kubelet.
Read also in our blog:
PS Some original references to the code in the master branches were replaced by commits that were last by the time they were translated, so that the line numbers to which the author refers were kept up for a long time.
')
Imagine that I want to enclose nginx in a Kubernetes cluster. I'll enter something like this in the terminal:
kubectl run --image=nginx --replicas=3 ... and press Enter. After a few seconds, I will see 3 hearths with nginx distributed across all work nodes. It works - as if by magic, and it's great! But what really happens under the hood?
One of the great features of Kubernetes is how this system serves the deployment of workloads to the infrastructure through user-friendly APIs. All complexity is hidden by simple abstraction. However, in order to fully understand the value that K8s brings, it is helpful to understand the inner kitchen. This article will guide you through the entire life cycle of a request from the client to the kubelet, if necessary referring to the source code to illustrate what is happening.
This is a living document. If you find something to improve or rewrite, changes are welcome! (This, of course, about the original English-language article in GitHub - approx. Transl.)
kubectl
Validation and Generators
So, let's begin. We just clicked on Enter in the terminal. And now what?
First, kubectl will perform validation on the client side. He will make sure that non-working requests (for example, creating a resource that is not supported, or using an image with the wrong name ) will be quickly interrupted and not sent to kube-apiserver. This improves system performance by reducing unnecessary load.
After validation, kubectl starts building an HTTP request that will be sent to kube-apiserver. All attempts to access or change the status in the Kubernetes system pass through the API server, which in turn communicates with etcd. And kubectl is no exception. To compose an HTTP request, kubectl uses so-called generators ( generators ), an abstraction that implements serialization.
Not entirely obvious here may seem that in the
kubectl run specifying a set of resource types is allowed, not only Deployments. For this to work, kubectl calculates the type of resource, unless the name of the generator has been specifically indicated through the --generator flag.For example, resources that have
--restart-policy=Always are treated as Deployments, and resources with --restart-policy=Never are treated as resources. Also, kubectl will find out what other actions need to be taken - for example, recording a command (for withdrawals or auditing) - and whether this command is a test run (by the presence of the --dry-run flag).Having understood that we want to create Deployment, kubectl will use the
DeploymentV1Beta1 generator to create a runtime object from the provided parameters. Runtime object is a generic term for a resource.API and version negotiation groups
Before we continue, it is important to note that Kubernetes uses a versioned API that is classified into API groups (API groups) . The API group is designed to assign similar resources to one category in order to make it easier to interact with them. In addition, it is a good alternative to a single monolithic API. The Deployment API group is called
apps and its latest version is v1beta2 . This is what you specify at the top of the Deployment definitions: apiVersion: apps/v1beta2 .( Note : As we told in the announcement of Kubernetes 1.8 , the project is now working on creating a new Workload API group that will include Deployments and other APIs related to "workloads.")
In general, after kubectl has generated a runtime object, it begins to search for the corresponding API group and version, and then builds the client of the required version — it takes into account various REST semantics for the resource. This stage of detection is called “ version negotiation ” (version negotiation) , which includes scanning the contents
/apis on a remote API to retrieve all possible API groups. Since kube-apiserver produces a structured document (in OpenAPI format) along this path ( /apis ), it is easy for clients to perform detection.To improve performance, kubectl also caches the OpenAPI schema in the
~/.kube/schema directory. If you want to see API detection in action, try deleting this directory and running the command with the maximum value for the -v flag. You will see all HTTP requests trying to find API versions. And a lot of them!The final step is to send an HTTP request. When it is made and a successful response is received, kubectl will display a successful message considering the preferred output format.
Client authentication
At the last step, we did not mention client authentication (it happens before sending an HTTP request) - we will consider it as well.
To successfully send a request, kubectl must be authenticated. User credentials are almost always stored in a
kubeconfig file stored on disk, but it can be in different places. To find it, kubectl does the following:- if the flag is
--kubeconfig---kubeconfig- uses it; - if the
$KUBECONFIGenvironment variable is$KUBECONFIG- uses it; - otherwise, it checks the expected home directory like
~/.kubeand uses the first found file.
After parsing the file, the current context, the current cluster and the authentication information for the current user are determined. If the user specified special values via flags (such as
--username ), priority is given to them and they overwrite the values specified in kubeconfig . When the information is received, kubectl sets the client configuration, making it relevant to the needs of the HTTP request:- x509 certificates are sent via
tls.TLSConfig(root CA is also included here); - client tokens are sent in the HTTP
Authorizationheader; - user and password are sent via basic HTTP authentication;
- The authentication process through OpenID is pre-performed by the user manually, as a result of which a token appears, which is sent similarly to the corresponding item above.
kube-apiserver
Authentication
So, the request was sent, hooray! What's next? Kube-apiserver comes into play. As mentioned above, kube-apiserver is the main interface used by clients and system components to save and retrieve the status of a cluster. To perform this function, it is necessary to verify the requesting party, making sure that it corresponds to the one it claims to be. This process is called authentication.
How does apiserver authenticate requests? When the server is first started, it checks all user - supplied console flags and compiles a list of suitable authenticators. Consider an example: if passed to
--client-ca-file , the authenticator x509 will be added; if --token-auth-file is specified - tokens authenticator will be added to the list. Each time a request is received, it is run through a chain of authenticators until one of them succeeds:- x509 handler verifies that the HTTP request is encrypted with the TLS key signed by the root certificate of the certification authority;
- the token handler verifies that the provided token (defined in the HTTP
Authorizationheader) exists in the file on the disk indicated by the--token-auth-filedirective; - The basicauth handler will similarly make sure that the credentials for basic authentication in an HTTP request match the local data.
If none of the authenticators succeeds, the request will fail and return an aggregated error. If the authentication is successful, the
Authorization header is removed from the request and the user information is added to its context. This gives access to the previously established user identity at subsequent stages (such as authorization and admission controllers).Authorization
Okay, the request has been sent, kube-apiserver successfully verified that we are who we are. What a relief! However, this is not all. We can be those who we imagine, but do we have rights to perform this operation? Identity and access rights are not the same thing. To continue, kube-apiserver must authorize us.
The way in which kube-apiserver performs authorization is very similar to authentication: from the flag values it collects a chain of authorizers (authorizers) that will be used for each incoming request. If all authorizers prohibit the request, it will end with the
Forbidden response and stop there. If at least one authorizer approves the request, it will go further.Examples of authorizers that are part of the release of Kubernetes v1.8:
- a webhook interacting with an HTTP (S) service outside of the K8s cluster;
- ABAC , which implements policies from a static file;
- RBAC , which implements RBAC (Role-based access control) roles added by the administrator as Kubernetes resources;
- Node , checking that the clients of cluster nodes — for example, kubelet — can access only resources located on themselves.
Look at the
Authorize method of each of them to see how they work.Access control
Ok, we are authenticated and authorized by kube-apiserver. What is left? The kube-apiserver itself trusts us and allows us to continue, but other parts of the system in Kubernetes may have their own deeply held beliefs about what is allowed and what is not. This is where admission controllers get involved .
If the authorization answers the question of whether the user is eligible, the admission controllers check the request for compliance with a wider range of expectations and rules in the cluster. They are the last bastion of control before the object is passed to etcd, and are responsible for the remaining checks in the system, which are aimed at making sure that the action does not lead to unexpected or negative consequences.
The principle on which these controllers operate is similar to authenticators and authorizers, but has one difference: for admission controllers, a single failure in the chain of controllers is enough to interrupt this chain and recognize the request as unsuccessful.
The architecture of admission controllers is beautifully oriented towards promoting extensibility. Each controller is stored as a plugin in the
plugin/pkg/admission directory and is created to meet the needs of a small interface. Each of them is compiled into the main binary file Kubernetes.Typically, admission controllers are categorized by resource management, security, default settings, and reference consistency. Here are some examples of resource management controllers:
InitialResourcessets default limits for container resources based on previous usage;LimitRangersets default values for requests and container limits, guarantees upper bounds for certain resources (512 MB of default memory, but no more than 2 GB);ResourceQuotacounts the number of objects (hearths, rc, load balancers of services) and total consumed resources (processor, memory, disk) in the namespace and prevents them from being exceeded.
etcd
At this point, Kubernetes fully approved the incoming request and allowed to move on. The next step kube-apiserver deserializes the HTTP request, creates runtime objects from it (something like the reverse process of what the kubectl generators do) and saves them to the data store. Let's look at it in detail.
How does kube-apiserver know what to do when accepting our request? This is followed by a rather complicated sequence of steps that precede the processing of any requests. Let's see from the very beginning - when the binary file is first run:
- When the kube-apiserver binary is launched, it creates a server chain that makes the Kubernetes apiserver aggregation possible. This is the basis for supporting many apiservers (which we should not worry about).
- When this happens, a generic apiserver is created, acting as the default implementation.
- The generated OpenAPI schema fills the apiserver configuration.
- Then, kube-apiserver passes sequentially through all the API groups defined in the schema, and sets up a storage provider for each of them, acting as a general (generic) abstraction of the storage. With it, kube-apiserver interacts when it accesses the state of a resource or changes it.
- For each API group, all versions of the group are sequentially searched and REST correspondences are established for each HTTP route. This allows kube-apiserver to match queries and delegate logic to the result found.
- In our particular case , a POST handler is registered , which is then delegated to the resource creation handler .
At this point, the kube-apiserver knows which routes exist and has an internal mapping indicating which handlers and storage providers should be called when the request matches. Suppose we got our HTTP request:
- If the chain of handlers can find a match between the request and the pattern (i.e., registered routes), then the required handler registered for this route will be called . Otherwise, a handler based on paths is called (the same happens when accessing
/apis). If there are no registered handlers for this path, the not found handler is called, which returns 404. - Luckily for us, there is a registered route called
createHandler. What is he doing? First of all, it decodes the HTTP request and performs basic validation, such as checking the provided JSON data with the expectations for the resource from the API of the required version. - There is an audit and final admission.
- The resource is stored in etcd by delegating to the storage provider. Usually, the key for etcd is represented as
<namespace>/<name>, but this is configurable. - Any errors on creation are intercepted and, finally, the storage provider makes a
getcall, checking that the object was actually created. Then it calls all the handlers assigned at the time after creation (post-create), and the decorators if additional finalization is required. - An HTTP request is created and sent back.
Many steps! It's amazing to follow apiserver like that, because you understand how much work it actually does. So, summarizing: the Deployment resource now exists in etcd. But it’s not enough to just put it there - you still will not see it at this stage ...
Initializers
When an object is stored in the data store, it is not fully visible to the apiserver and does not get into the scheduler until it has completed a set of initializers (intializers) . An initializer is a controller associated with a resource type and executing logic on a resource before it becomes available to the outside world. If the resource type does not have registered initializers, this step is skipped and resources are visible instantly.
As written in many blogs, this is a powerful feature that allows you to perform common bootstrap operations. Examples might be:
- Insert the proxy sidecar-container in the open port 80 or with a specific annotation (annotation) .
- Inserting a volume with test certificates in all the subs of a specific namespace.
- Prevent creation of a secret with a length of less than 20 characters (for example, for a password).
InitializerConfiguration objects allow you to determine which initializers should be run for certain types of resources. Imagine that we want to run our initializer every time a fire is created. Then we will do something like this:
apiVersion: admissionregistration.k8s.io/v1alpha1 kind: InitializerConfiguration metadata: name: custom-pod-initializer initializers: - name: podimage.example.com rules: - apiGroups: - "" apiVersions: - v1 resources: - pods After this config is created, a
custom-pod-initializer will be added to each waiting field ( metadata.initializers.pending ). The initializer controller will already be deployed and will begin to regularly scan the cluster for new scams. When the initializer detects the under with its (i.e. initializer) name in the waiting field, it will perform its actions. After completing the work, he will remove his name from the waiting list. Only initializers whose names are first on the list can manage resources. When all initializers have completed and the wait list is empty, the object will be considered initialized.Most observant readers may have noticed a potential problem. How can a controller from user space handle resources if kube-apiserver has not yet made them visible? For this, kube-apiserver has a special query parameter
?includeUninitialized , which allows to return all objects, including those that are not initialized.PS from translator
The second part of the article
Read also in our blog:
- “ What happens in Kubernetes when starting the kubectl run? Part 2 ";
- " Our experience with Kubernetes in small projects " (video of the report, which includes an introduction to the technical device Kubernetes);
- “ How does the Kubernetes scheduler actually work? ";
- " Infrastructure with Kubernetes as an affordable service ";
- " Kubernetes 1.8: a review of major innovations ."
Source: https://habr.com/ru/post/342658/
All Articles