Jest and Puppeteer: automation of testing web interfaces
This article was written by Italian programmer Valentino Gagliardi. He says that immediately after the release of Puppeteer, he was interested in automating the testing of web interfaces using this library and Jest. After that, he began to experiment.

Here we will talk about the basics of working with Puppeteer and Jest on the example of testing a web form. Also here will be considered the peculiarities of using Chromium with and without user interface, and some useful trivia regarding various aspects of testing web pages and organization of the working environment. Valentino believes that, although Puppeteer is a relatively new tool and its API may well undergo changes, it has a chance to take a worthy place in the arsenal of web developers.
I recently wrote interface tests and at this time came across a Kent S. Dodds post dedicated to improving test stability by using the
')
I came across Kent's material very much in time, since I then used something like this:
Here it should be noted that I mainly do server programming. And although I am not campaigning for the use of
So, our goal is to test the feedback form on this page , the work on which I do. Here is this form:
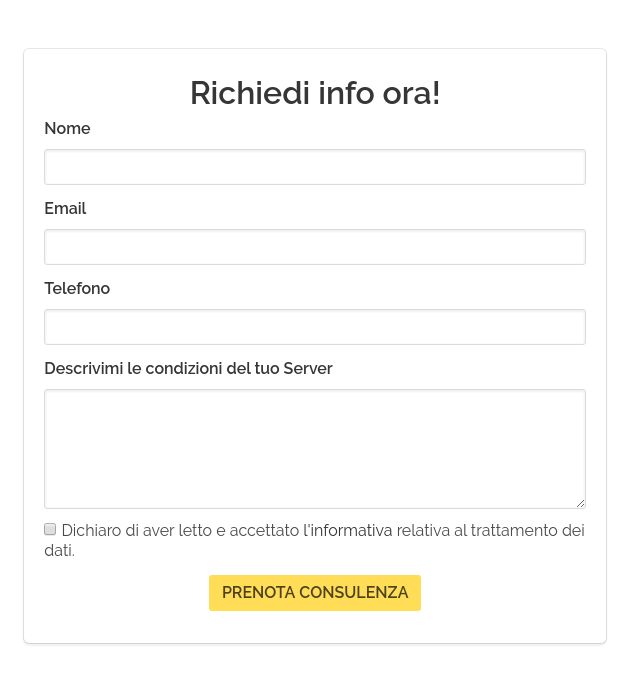
It includes the following elements:
During testing, you need to check the performance of the form, namely, to make sure that the site visitor can use it to send a request to the company.
For a start, let's take a closer look at the tools that we will use to automate testing.
Jest is a testing framework developed by Facebook. Jest provides a platform for automated testing, as well as a basic library that allows you to build statements (Expect).
Puppeteer is a library for Node.js, which allows you to control the Chromium browser without a user interface. The tool is quite new, so it's time to test it and think about whether it is needed in a specific project, and if needed - how to integrate it into an existing ecosystem.
Faker is a Node.js library that can generate random data. Among them are names, phone numbers, addresses. This is, by the way, something like Faker for PHP.
If you already have a project on which you want to experiment, you can install the necessary libraries with the following command:
The installation of Puppeteer will take some time, since, among other things, the Chromium browser is installed during the installation of the library.
Chromium is an open source web browser that is the foundation of Google Chrome. Chromium and Chrome have almost the same features, the main differences are in the features of licensing.
After everything necessary is installed, we will configure Jest in
In addition, in Jest, I prefer to use this design:
So here we need Babel for Jest:
After installing Babel, create a
This preliminary preparation is completed and we can begin to write tests.
Create a new directory in the project folder. You can call it
Now I propose to examine the test code in parts, starting with the import section. Below I give all this code in its entirety.
First import Faker and Puppeteer:
Now we will set the form URL. Perhaps you decide to test a version of the form that is under development and is available locally, instead of connecting to the work site:
Now, using Faker, create a fictitious user:
Next, we define some variables necessary for working with Puppeteer:
Now configure the behavior of the Puppeteer:
Here we use the Jest
It should be noted that we are not limited to the methods
Here I would like to make some comments about the above code snippet. Namely, notice that I launch the browser in windowed mode using the
The same applies to the
Now we write the test code:
Note the possibility of using the async / await construction with Jest . Here it is assumed that testing is conducted using one of the latest versions of Node.js.
Consider these tests. Here are the actions that a program-controlled browser performs:
Note that the Jasmine
If you test using a browser that is visible on the screen, and you do not set a timeout, the following error will occur:
If you perform testing by launching a browser without an interface, the timeout can be removed.
Now everything is ready and testing can be run with the following command:
After that, it remains only to observe the browser, which itself works with the page.
If anyone is interested, this on-screen video was recorded on Fedora using
However, this is not all.
Now that we’ve dealt with the form, you can test some more page elements.
Find out how things are with what is in the
And what about our navigation bar? She must be present on the page. Check with Jest and Puppeteer if this is the case:
You can also find out if a certain element contains the text that should be in it:
How about testing a page for search engine optimization? Check for example the presence of a canonical link :
By the same principles, you can create many other tests.
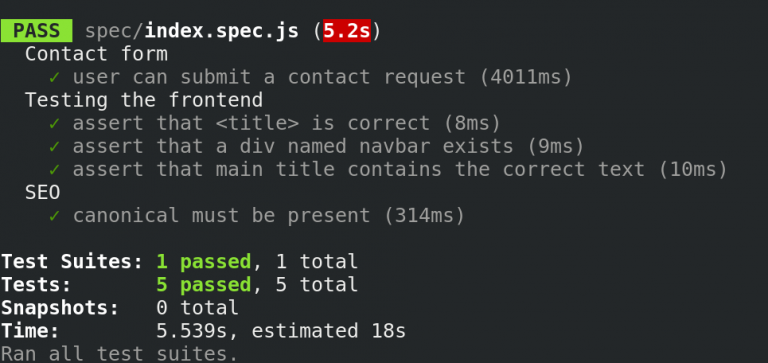
As a result, all my tests were successfully completed, which can be judged by the pleasant green messages.
We have already said that Puppeteer allows you to automate work with Chromium, run with or without a user interface. Recall the following code snippet:
In addition, you need to remember that when launching the browser with a graphical interface, you need to pass the Jasmine timeout parameter. Otherwise, testing will complete quickly and unexpectedly. The timeout is the second argument of the
With automated testing, it is not necessary to display the browser window, otherwise it will take forever to perform at least some serious test suite. However, it is sometimes useful to observe what exactly happens in the browser, controlled from the code. How to set up a convenient switch between tests using a browser with and without an interface?
You can solve this problem by creating an auxiliary function. We will do this and put it in the
Then you can access it from the file with the test code, first importing it, and then using it when launching the browser:
The same function is useful when setting the timeout:
After that, in order to start testing in a browser without an interface, just run the following command:
To run tests in visual mode, you will need to do the following:
It may not be quite convenient for you to work with the Puppeteer itself or its API. I understand you. And if the novelty of this project fills you with doubt about its practical applicability, you can take a look, for example, on Cypress . However, Puppeteer gives developers a truly unlimited opportunity. Now testing frameworks are being created based on this library. Of course, over time, the API Puppeteer may change, but I suppose that the basic things that we talked about here are not going anywhere. In addition, it should be noted that the Puppeteer goes well with Jest. Many also perform Puppeteer E2E testing .
Dear readers! How do you automate web interface testing?
Here we will talk about the basics of working with Puppeteer and Jest on the example of testing a web form. Also here will be considered the peculiarities of using Chromium with and without user interface, and some useful trivia regarding various aspects of testing web pages and organization of the working environment. Valentino believes that, although Puppeteer is a relatively new tool and its API may well undergo changes, it has a chance to take a worthy place in the arsenal of web developers.
About some features of the considered tests
I recently wrote interface tests and at this time came across a Kent S. Dodds post dedicated to improving test stability by using the
data-* attribute. This, in a nutshell, is custom attributes that can be set for almost any HTML element. They are especially useful when organizing data exchange with JavaScript-programs.')
I came across Kent's material very much in time, since I then used something like this:
await page.waitForSelector("#contact-form"); await page.click("#name"); await page.type("#name", user.name); Here it should be noted that I mainly do server programming. And although I am not campaigning for the use of
data-* in tests, I must admit that this is, after all, an excellent approach. This is especially useful in large applications, but for now, in our simple example, I will use the classic way of addressing elements.Testing the feedback form
So, our goal is to test the feedback form on this page , the work on which I do. Here is this form:
It includes the following elements:
- Name field.
- The field to enter the email address.
- Phone entry field.
- Area for entering arbitrary text.
- The checkbox, setting which, the user agrees with the data processing rules.
- Form submit button.
During testing, you need to check the performance of the form, namely, to make sure that the site visitor can use it to send a request to the company.
Project Setup
For a start, let's take a closer look at the tools that we will use to automate testing.
Jest is a testing framework developed by Facebook. Jest provides a platform for automated testing, as well as a basic library that allows you to build statements (Expect).
Puppeteer is a library for Node.js, which allows you to control the Chromium browser without a user interface. The tool is quite new, so it's time to test it and think about whether it is needed in a specific project, and if needed - how to integrate it into an existing ecosystem.
Faker is a Node.js library that can generate random data. Among them are names, phone numbers, addresses. This is, by the way, something like Faker for PHP.
If you already have a project on which you want to experiment, you can install the necessary libraries with the following command:
npm i jest puppeteer faker --save-dev The installation of Puppeteer will take some time, since, among other things, the Chromium browser is installed during the installation of the library.
Chromium is an open source web browser that is the foundation of Google Chrome. Chromium and Chrome have almost the same features, the main differences are in the features of licensing.
After everything necessary is installed, we will configure Jest in
package.json . The test command should point to the executable jest file: "scripts": { "test": "jest" } In addition, in Jest, I prefer to use this design:
import puppeteer from "puppeteer"; So here we need Babel for Jest:
npm i babel-core babel-jest babel-preset-env --save-dev After installing Babel, create a
.babelrc file in the project folder with the following contents: { "presets": ["env"] } This preliminary preparation is completed and we can begin to write tests.
We write tests
Create a new directory in the project folder. You can call it
test or spec . Then, in this directory, you need to create a file form.spec.jsNow I propose to examine the test code in parts, starting with the import section. Below I give all this code in its entirety.
First import Faker and Puppeteer:
import faker from "faker"; import puppeteer from "puppeteer"; Now we will set the form URL. Perhaps you decide to test a version of the form that is under development and is available locally, instead of connecting to the work site:
const APP = "https://www.change-this-to-your-website.com/contact-form.html" Now, using Faker, create a fictitious user:
const lead = { name: faker.name.firstName(), email: faker.internet.email(), phone: faker.phone.phoneNumber(), message: faker.random.words() }; Next, we define some variables necessary for working with Puppeteer:
let page; let browser; const width = 1920; const height = 1080; Now configure the behavior of the Puppeteer:
beforeAll(async () => { browser = await puppeteer.launch({ headless: false, slowMo: 80, args: [`--window-size=${width},${height}`] }); page = await browser.newPage(); await page.setViewport({ width, height }); }); afterAll(() => { browser.close(); }); Here we use the Jest
beforeAll and afterAll . We need the first one because we need to start a browser using Puppeteer before running the tests. After launching the browser, we can open a new page. When the tests are completed, the browser should be closed. This is done in the afterAll method using the browser.close() command.It should be noted that we are not limited to the methods
beforeAll and afterAll . To learn about other features of the Jest, take a look at the documentation for this library. In any case, it is recommended to use one instance of the browser to perform the entire test suite, rather than opening and closing the browser for each individual test.Here I would like to make some comments about the above code snippet. Namely, notice that I launch the browser in windowed mode using the
headless: false parameter. In this case, this is done in order to be able to record what is happening on the screen on video and show the testing process. Performing real tests using the tools described is usually not necessary to monitor what is happening. To start the browser without an interface, you can simply remove the parameters used when calling the launch() method.The same applies to the
setViewPort() command, which can also be removed. Or, even better, you can set up two different testing environments. One is used for visual debugging (it will be discussed below), the second is for working with a browser without a user interface.Now we write the test code:
describe("Contact form", () => { test("lead can submit a contact request", async () => { await page.waitForSelector("[data-test=contact-form]"); await page.click("input[name=name]"); await page.type("input[name=name]", lead.name); await page.click("input[name=email]"); await page.type("input[name=email]", lead.email); await page.click("input[name=tel]"); await page.type("input[name=tel]", lead.phone); await page.click("textarea[name=message]"); await page.type("textarea[name=message]", lead.message); await page.click("input[type=checkbox]"); await page.click("button[type=submit]"); await page.waitForSelector(".modal"); }, 16000); }); Note the possibility of using the async / await construction with Jest . Here it is assumed that testing is conducted using one of the latest versions of Node.js.
Consider these tests. Here are the actions that a program-controlled browser performs:
- Jump to the address specified in the APP constant.
- Waiting for the feedback form to appear.
- Clicking on the fields and filling them with data.
- Checkbox
- Submitting the form.
- Waiting for a modal window to appear.
Note that the Jasmine
test() function, as the second parameter, is timed out (16000). This allows you to observe exactly how the browser works with the page.If you test using a browser that is visible on the screen, and you do not set a timeout, the following error will occur:
Timeout - Async callback was not invoked within timeout specified by jasmine.DEFAULT_TIMEOUT_INTERVAL If you perform testing by launching a browser without an interface, the timeout can be removed.
Now everything is ready and testing can be run with the following command:
npm test After that, it remains only to observe the browser, which itself works with the page.
If anyone is interested, this on-screen video was recorded on Fedora using
recordmydesktop and the following command: recordmydesktop --width 1024 --height 768 -x 450 -y 130 --no-sound However, this is not all.
Testing other interface elements
Now that we’ve dealt with the form, you can test some more page elements.
Find out how things are with what is in the
<title></title> . As you know, there should be a meaningful title page: describe("Testing the frontend", () => { test("assert that <title> is correct", async () => { const title = await page.title(); expect(title).toBe( "Gestione Server Dedicati | Full Managed | Assistenza Sistemistica" ); }); // }); And what about our navigation bar? She must be present on the page. Check with Jest and Puppeteer if this is the case:
// test("assert that a div named navbar exists", async () => { const navbar = await page.$eval(".navbar", el => (el ? true : false)); expect(navbar).toBe(true); }); // You can also find out if a certain element contains the text that should be in it:
// test("assert that main title contains the correct text", async () => { const mainTitleText = await page.$eval("[data-test=main-title]", el => el.textContent); expect(mainTitleText).toEqual("GESTIONE SERVER, Full Managed"); }); // How about testing a page for search engine optimization? Check for example the presence of a canonical link :
describe("SEO", () => { test("canonical must be present", async () => { await page.goto(`${APP}`); const canonical = await page.$eval("link[rel=canonical]", el => el.href); expect(canonical).toEqual("https://www.servermanaged.it/"); }); }); By the same principles, you can create many other tests.
As a result, all my tests were successfully completed, which can be judged by the pleasant green messages.
Visual debugging
We have already said that Puppeteer allows you to automate work with Chromium, run with or without a user interface. Recall the following code snippet:
beforeAll(async () => { browser = await puppeteer.launch({ // headless: false, slowMo: 80, args: [`--window-size=1920,1080`] }); page = await browser.newPage(); /// }); In addition, you need to remember that when launching the browser with a graphical interface, you need to pass the Jasmine timeout parameter. Otherwise, testing will complete quickly and unexpectedly. The timeout is the second argument of the
test() method: describe("Contact form", () => { test( "lead can submit a contact request", async () => { ///// }, 16000 // <<< - Jasmine ); }); With automated testing, it is not necessary to display the browser window, otherwise it will take forever to perform at least some serious test suite. However, it is sometimes useful to observe what exactly happens in the browser, controlled from the code. How to set up a convenient switch between tests using a browser with and without an interface?
You can solve this problem by creating an auxiliary function. We will do this and put it in the
testingInit.js file: export const isDebugging = () => { let debugging_mode = { puppeteer: { headless: false, slowMo: 80, args: [`--window-size=1920,1080`] }, jasmine: 16000 }; return process.env.NODE_ENV === "debug" ? debugging_mode : false; }; Then you can access it from the file with the test code, first importing it, and then using it when launching the browser:
/// import { isDebugging } from "./testingInit.js"; /// beforeAll(async () => { browser = await puppeteer.launch(isDebugging().puppeteer)); // <<< page = await browser.newPage(); /// }); The same function is useful when setting the timeout:
describe("Contact form", () => { test( "lead can submit a contact request", async () => { ///// }, isDebugging().jasmine // <<< - Jasmine ); }); After that, in order to start testing in a browser without an interface, just run the following command:
npm test To run tests in visual mode, you will need to do the following:
NODE_ENV=debug npm test Results
It may not be quite convenient for you to work with the Puppeteer itself or its API. I understand you. And if the novelty of this project fills you with doubt about its practical applicability, you can take a look, for example, on Cypress . However, Puppeteer gives developers a truly unlimited opportunity. Now testing frameworks are being created based on this library. Of course, over time, the API Puppeteer may change, but I suppose that the basic things that we talked about here are not going anywhere. In addition, it should be noted that the Puppeteer goes well with Jest. Many also perform Puppeteer E2E testing .
Dear readers! How do you automate web interface testing?
Source: https://habr.com/ru/post/342578/
All Articles