Integration of physical bodies obtained in the Physics Body Editor into cocos2d-x-scene
Creating the game on the cocos2d-x engine, I needed a tool for creating physical bodies from arbitrary images. Initially, the search led me to the commercial tool PhysicsEditor, but looking at its price, I decided to find something cheaper. I had to spend quite a lot of time before I came across video tutorials that turned out to be useful for me.
This article will describe how to create physical bodies for images in the free, cross-platform Physics Body Editor and integrate them into the cocos2d-x scene.
For the lesson we need an image with a transparent background. If you do not have the right hand, you can use this.

')
Download the Physics Body Editor at this link .
Unpack it and double-click on physics-body-editor.jar. You must have Java software installed on your system, otherwise the editor will not start.
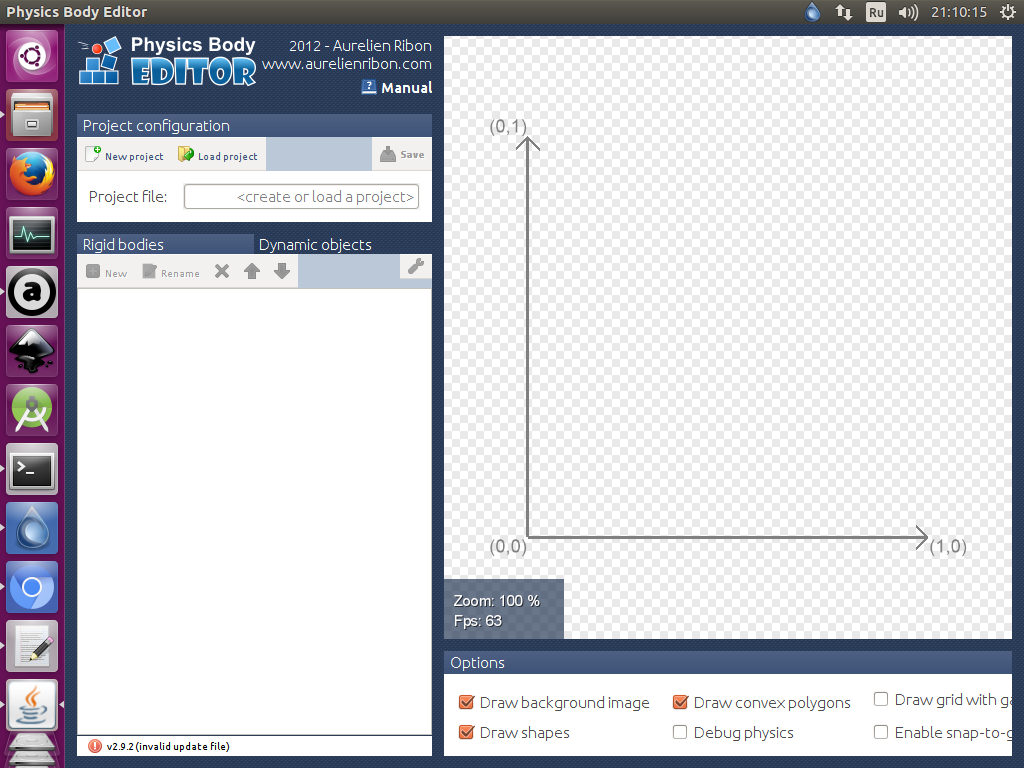
After running the Physics Body Editor, this window should appear.
Click New proect

At the top, select the folder where the file with the physical body will be stored. Below we write the name of this file. I called it pampkin.json. Click OK.

Now we click New

In the window that appears, enter the name of the created body, I put the name pampkin. Then click the button Create body from image.

Select the image file and click OK.
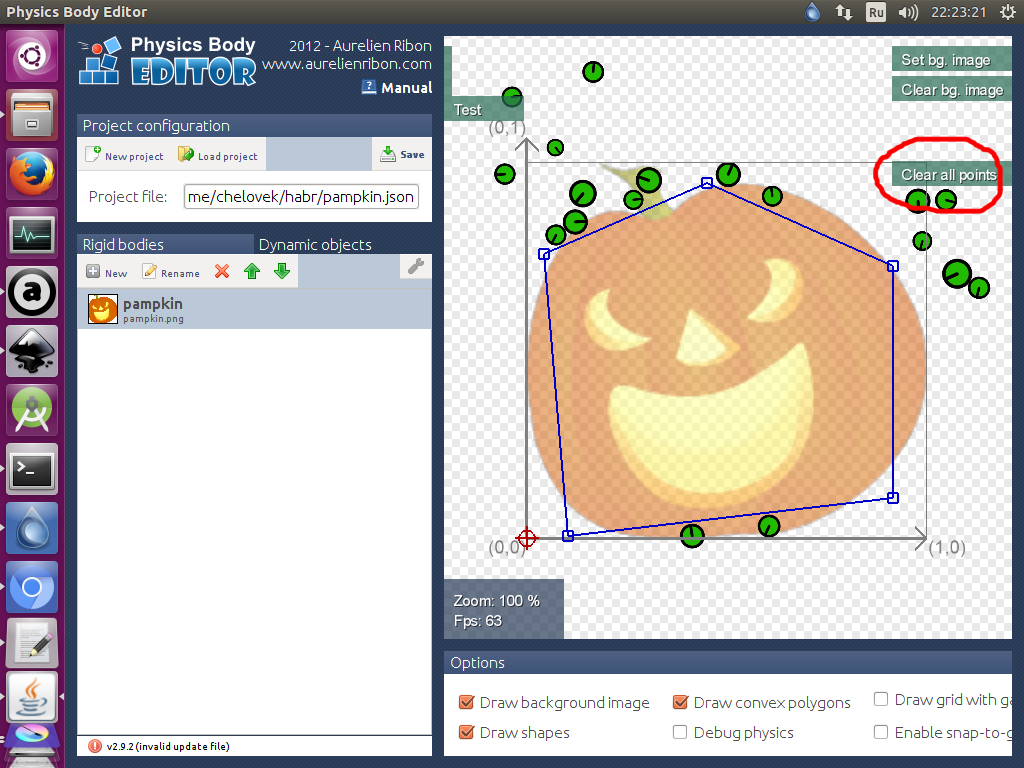
Our image appeared in the editor, as well as the scene menu. Let me explain what these menu flags mean.
With the Creation flag set, each click of the paint on the scene creates a point for our body until a closed loop is obtained. I created a contour of 5 points. If you click on the Creation flag, the scene mode will change to Edition.

In Edition mode, we can edit the created points. Just hover the mouse over the point, hold down the left mouse button and without releasing, drag the point to a position that you find more correct. In this mode, you can also delete selected points by clicking Remove points. Clicking the Edition flag, we will switch to Test body test mode.

In Test mode, holding the left mouse button and pointing the scope in the direction of our body, we can launch a ball into it that bounces off of it. Clicking on the Test flag, we will again get into Creation mode.

Our body turned out to be completely different. Therefore, we delete all points by clicking Clear all points.
Creating points by hand is not very convenient, since in the Physics Body Editor, this process can be automated. Click Auto-trace, in the appeared window we leave everything by default and click OK.

And we got such a body.

We edit, if something is not pleasant, we test, and we save by clicking Save.

The physical body for the image is ready.
Next we will work with cocos2d-x.
To begin, transfer the files with the physical body and the image into the folder with the Resources Resources.
Create a new project in cocos2d-x.
To download our json file that contains the physical body, we will need to download a special class. Download it and drop it into the Classes folder.
Next, open the CMakeLists.txt file and add the paths to the MyBodyParser.h and MyBodyParser.cpp files. It should look like this.
If you are compiling code for Androyd, then open the Android.mk file and add the path to the MyBodyParser class.
Open the HelloWorld.h file and remove such code from there.
Add MyBodyParser class
and such code inside the HelloWorld class.
Code requiring clarification will contain comments.
Open HelloWorld.cpp and remove the menuCloseCallback function we don't need (Ref * pSender).
Replace the code from the createScene () function with this.
Replacing the contents of the bool HelloWorld :: init () function with this.
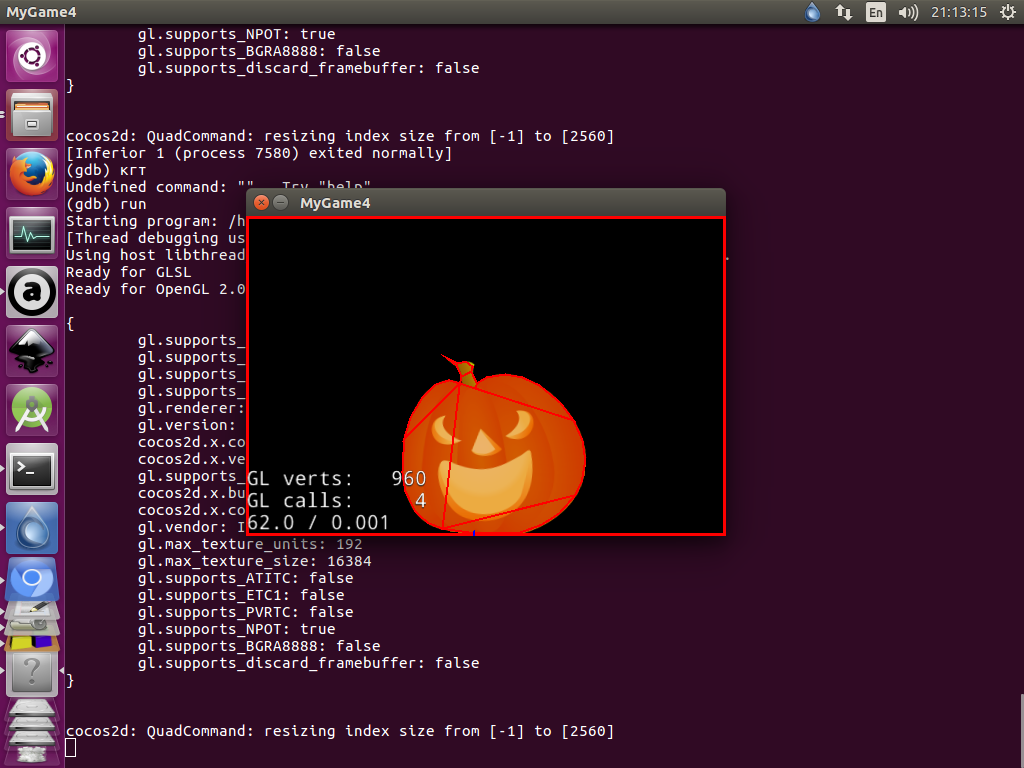
Compile, run and get this result.
Well, in order to more clearly see the work of physics, you can make our pumpkin rotate.
If you are too lazy to create a body in the editor and insert pieces of the code given above into your project, you can download ready-made folders with the Classes and Resources files at this link.
Just do not forget to add everything you need to makefile. I hope this publication will help beginners to quickly get used to physics in cocos2d-x.
This article will describe how to create physical bodies for images in the free, cross-platform Physics Body Editor and integrate them into the cocos2d-x scene.
For the lesson we need an image with a transparent background. If you do not have the right hand, you can use this.
')
Download the Physics Body Editor at this link .
Unpack it and double-click on physics-body-editor.jar. You must have Java software installed on your system, otherwise the editor will not start.
After running the Physics Body Editor, this window should appear.
Click New proect
At the top, select the folder where the file with the physical body will be stored. Below we write the name of this file. I called it pampkin.json. Click OK.
Now we click New
In the window that appears, enter the name of the created body, I put the name pampkin. Then click the button Create body from image.
Select the image file and click OK.
Our image appeared in the editor, as well as the scene menu. Let me explain what these menu flags mean.
With the Creation flag set, each click of the paint on the scene creates a point for our body until a closed loop is obtained. I created a contour of 5 points. If you click on the Creation flag, the scene mode will change to Edition.
In Edition mode, we can edit the created points. Just hover the mouse over the point, hold down the left mouse button and without releasing, drag the point to a position that you find more correct. In this mode, you can also delete selected points by clicking Remove points. Clicking the Edition flag, we will switch to Test body test mode.
In Test mode, holding the left mouse button and pointing the scope in the direction of our body, we can launch a ball into it that bounces off of it. Clicking on the Test flag, we will again get into Creation mode.
Our body turned out to be completely different. Therefore, we delete all points by clicking Clear all points.
Creating points by hand is not very convenient, since in the Physics Body Editor, this process can be automated. Click Auto-trace, in the appeared window we leave everything by default and click OK.
And we got such a body.
We edit, if something is not pleasant, we test, and we save by clicking Save.
The physical body for the image is ready.
Next we will work with cocos2d-x.
To begin, transfer the files with the physical body and the image into the folder with the Resources Resources.
Create a new project in cocos2d-x.
To download our json file that contains the physical body, we will need to download a special class. Download it and drop it into the Classes folder.
Next, open the CMakeLists.txt file and add the paths to the MyBodyParser.h and MyBodyParser.cpp files. It should look like this.
set(GAME_SRC Classes/AppDelegate.cpp Classes/HelloWorldScene.cpp Classes/MyBodyParser.cpp ${PLATFORM_SPECIFIC_SRC} ) set(GAME_HEADERS Classes/AppDelegate.h Classes/HelloWorldScene.h Classes/MyBodyParser.h ${PLATFORM_SPECIFIC_HEADERS} ) If you are compiling code for Androyd, then open the Android.mk file and add the path to the MyBodyParser class.
LOCAL_SRC_FILES := hellocpp/main.cpp \ ../../../Classes/AppDelegate.cpp \ ../../../Classes/MyBodyParser.cpp \ ../../../Classes/HelloWorld.cpp Open the HelloWorld.h file and remove such code from there.
// a selector callback void menuCloseCallback(cocos2d::Ref* pSender); Add MyBodyParser class
#include "MyBodyParser.h" and such code inside the HelloWorld class.
private: // cocos2d::PhysicsWorld *sceneWorld; void SetPhysicsWorld( cocos2d::PhysicsWorld *world ) { sceneWorld = world; }; Code requiring clarification will contain comments.
Open HelloWorld.cpp and remove the menuCloseCallback function we don't need (Ref * pSender).
Replace the code from the createScene () function with this.
Scene* HelloWorld::createScene() { // auto scene = Scene::createWithPhysics(); // DEBUGDRAW_ALL, scene->getPhysicsWorld()->setDebugDrawMask( PhysicsWorld::DEBUGDRAW_ALL ); // auto layer = HelloWorld::create(); // layer->SetPhysicsWorld( scene->getPhysicsWorld() ); // scene->addChild( layer ); return scene; } Replacing the contents of the bool HelloWorld :: init () function with this.
bool HelloWorld::init() { ////////////////////////////// // 1. super init first if ( !Scene::init() ) { return false; } // auto visibleSize = Director::getInstance()->getVisibleSize(); // visibleSize, , 3 auto edgeBody = PhysicsBody::createEdgeBox( visibleSize, PHYSICSBODY_MATERIAL_DEFAULT, 3 ); // , auto edgeNode = Node::create(); // edgeNode->setPosition( visibleSize.width / 2, visibleSize.height / 2 ); // edgeNode->setPhysicsBody( edgeBody ); // this->addChild( edgeNode ); // auto sprite = Sprite::create( "pampkin.png" ); // - json- if( MyBodyParser::getInstance()->parseJsonFile( "pampkin.json" ) ) { // . - ( ), - , . auto spriteBody = MyBodyParser::getInstance()->bodyFormJson( sprite, "pampkin", PhysicsMaterial( 1.0f, 0.0f, 1.0f ) ); if( spriteBody != nullptr ) { // sprite->setPhysicsBody( spriteBody ); } else { CCLOG( "Object.cpp spriteBody is nullptr" ); } } else { CCLOG( "JSON file not found" ); } // sprite->setPosition( Vec2( visibleSize.width / 2, visibleSize.height / 2 ) ); this->addChild( sprite ); return true; } Compile, run and get this result.
Well, in order to more clearly see the work of physics, you can make our pumpkin rotate.
sprite->getPhysicsBody()->setAngularVelocity( -10 ); If you are too lazy to create a body in the editor and insert pieces of the code given above into your project, you can download ready-made folders with the Classes and Resources files at this link.
Just do not forget to add everything you need to makefile. I hope this publication will help beginners to quickly get used to physics in cocos2d-x.
Source: https://habr.com/ru/post/342478/
All Articles